An iPad iOS 4 Split View and Popover Example (Xcode 4)
| Previous | Table of Contents | Next |
| Creating a Navigation based iOS 4 iPad Application using TableViews (Xcode 4) | Using the UIPickerView and UIDatePicker Components in iOS 4 iPad Applications (Xcode 4) |
Learn SwiftUI and take your iOS Development to the Next Level |
As demonstrated in the previous chapters, whilst it is possible to use the UITableView class as both an information display and application navigation tool, it is extremely inefficient in terms of the use of screen space when used on an iPad. In recognition of this fact, Apple introduced the Split View and Popover concepts for use when developing iPad applications.
The purpose of this chapter is to provide an overview of Split Views and Popovers followed by a tutorial that implements these concepts in a simple example iPad application.
An Overview of Split View and Popovers
When an iPad is in landscape mode, the UISplitViewController class divides the iPad screen into two side-by-side panels that implement a master-detail model. Within this model, the left hand panel is the master panel and presents a list of items to the user. The right hand panel is the detail panel and displays information relating to the currently selected item in the master panel.
A prime example of this concept in action can be seen in with the iPad Mail app which lists messages in the master panel and displays the content of the currently selected message in detail panel.
When an iPad is in portrait mode, the Split View Controller hides the master panel so that the detail panel is able to utilize the entire screen. In this instance, access to the master panel is provided using a Popover. A popover is a window that appears over the top of the current view and, in a split view situation, is typically accessed via a button placed in the toolbar of the detail view. When the device is rotated back to landscape orientation, the master and detail panels appear side by side once again and the popover access button is removed from view.
The UISplitterViewController is essentially a container to which two child view controllers are added to act as the master (also referred to as the root view controller) and detail views. The detail view controller is usually designated as a delegate to the splitter view controller in order to receive notifications relating to orientation changes, primarily so that the popover button may be hidden and displayed accordingly.
In the remainder of this chapter we will work through a tutorial that involves the creation of a simple iPad application that demonstrates the use of a split view and popover.
About the Example iPad Split View and Popover Project
The goal of this tutorial is to create an iPad application containing a split view user interface. The master panel will contain a table view listing a number of web sites. When a web site is selected from the list the detail panel will load the corresponding web site and display it using a UIWebView component. When rotated into portrait mode, a button will appear in the navigation bar of the detail view which, when selected, will display the master list in a popover.
Creating the Project
Begin by launching Xcode and creating a new iPad iOS application named splitView using the Split View-based Application template. By using this template we save a lot of extra coding effort in the implementation of the split view and popover behavior. Much of the code generated for us is standard boilerplate code that does not change from one split view implementation to another. In fact, much of this template can be copied even if you plan to hand code split view behavior in future applications.
Reviewing the Project
The Split View template has created a number of project files for us. The most significant of these are the files relating to the RootViewController and DetailViewController classes. These classes correspond to the master and detail views respectively.
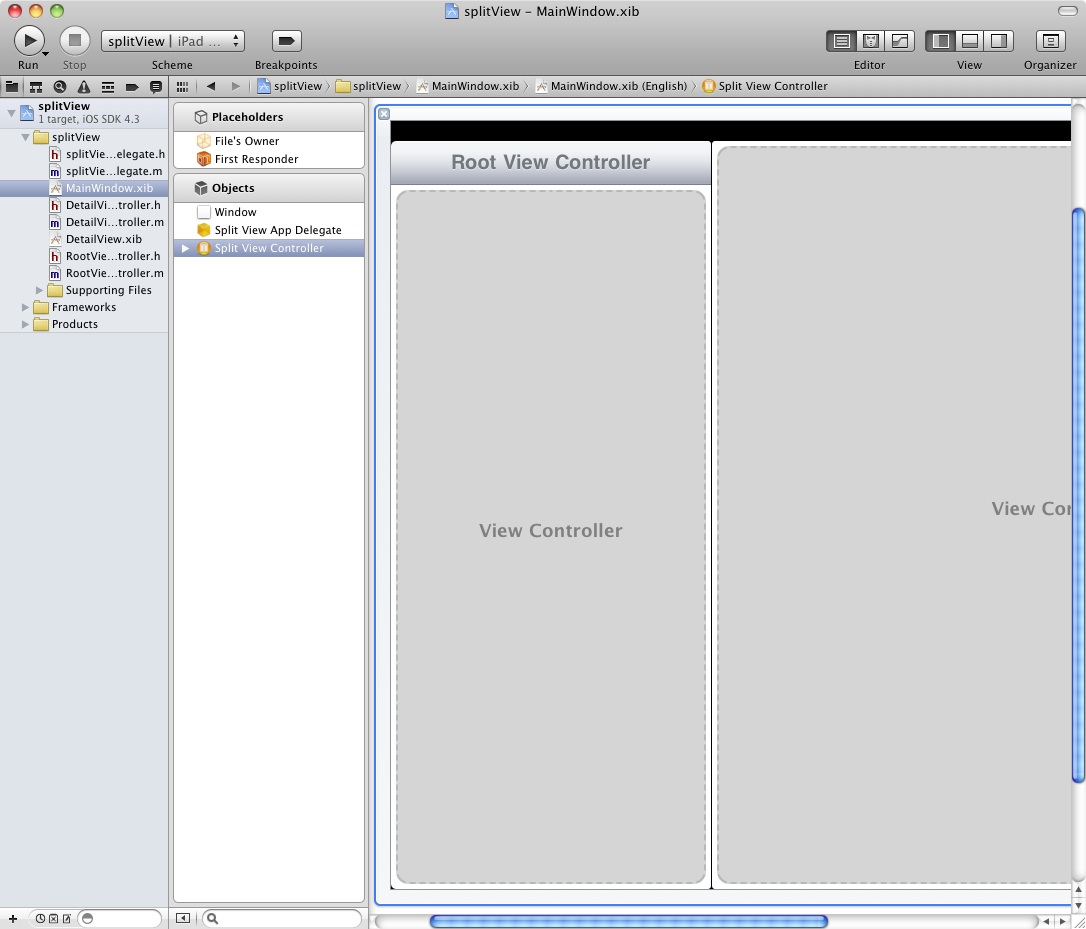
Xcode has also created a SplitViewController instance for us. To see this, select MainView.xib file from the project navigation panel to load the file into the Interface Builder environment. Next, click on the right hand pointing arrow at the bottom of the narrow panel containing the File’ Owner object so that it unfolds to display the more detailed view. Within the Objects sub-section, select the Split View Controller entry to display the split view in the design panel as illustrated in the following figure:
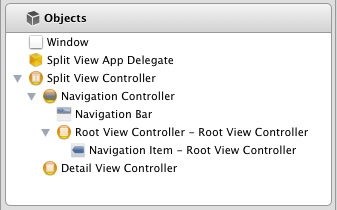
Within the Objects pane, click on the arrows to unfold the hierarchy of the Split View Controller and its children:
Selecting each item in the list will cause that object to be highlighted in the view panel. As each item is selected it will become evident that Root View Controller is assigned to the master panel and Detail View Controller is the detail panel. Finally, select the Split View Controller and display the Connections Inspector (View -> Utilities -> Connections Inspector) and note in the Outlets section that the Detail View Controller is designated as the spit view controller’s delegate.
Before proceeding, select the Navigation Item object located beneath the Root View Controller, display the Attribute Inspector (View -> Utilities -> Attribute Inspector) and change the Title property from “Root View Controller” to “Favorite Web Sites”.
Configuring Master View Items
The root view controller created for us by Xcode is actually an instance of the UITableView class. The next step, therefore, is to configure the table view to display the list of web sites. For this purpose we will need to configure two array objects to store the web site names and URL addresses. Select the RootViewController.h file and modify it as follows to declare these two arrays:
#import <UIKit/UIKit.h>
@class DetailViewController;

@interface RootViewController : UITableViewController {
    NSArray *sitesNames;
    NSArray *siteAddresses;
}
@property (nonatomic, retain) NSArray *siteNames;
@property (nonatomic, retain) NSArray *siteAddresses;
@property (nonatomic, retain) IBOutlet DetailViewController *detailViewController;
@end
Learn SwiftUI and take your iOS Development to the Next Level |
Having declared the arrays, modify the RootViewController.m file to add the @synthesize directive and to initialize the arrays in viewDidLoad method. Also be sure to add code to release memory allocated to these arrays when the application exits:
#import "RootViewController.h"
#import "DetailViewController.h"
@implementation RootViewController
@synthesize detailViewController;
@synthesize siteNames, siteAddresses;
- (void)viewDidLoad
{
    [super viewDidLoad];
    self.clearsSelectionOnViewWillAppear = NO;
    self.contentSizeForViewInPopover =
         CGSizeMake(320.0, 600.0);

    siteNames = [[NSArray alloc]
                 initWithObjects:@"Yahoo", @"Google",
                 @"Apple", @"eBookFrenzy", nil];

    siteAddresses = [[NSArray alloc]
                     initWithObjects:@"http://www.yahoo.com",
                     @"http:/www.google.com",
                     @"http://www.apple.com",
                     @"http://www.ebookfrenzy.com",
                     nil];

}
.
.
- (void)viewDidUnload
{
    // Relinquish ownership of anything that can be recreated in viewDidLoad or on demand.
    // For example: self.myOutlet = nil;
    self.siteNames = nil;
    self.siteAddresses = nil;
}

- (void)dealloc
{
    [siteAddresses release];
    [siteNames release];
    [detailViewController release];
    [super dealloc];
}
As outlined in the chapter entitled Creating a Simple iOS 4 iPad Table View Application there are a number of methods that must be implemented in order for the items to appear within the table view object. Fortunately, Xcode has already placed template methods for us to use in the RootViewController.m file. First, modify the numberOfRowsInSection method to notify the table view of the number of items to be displayed (in this case, equal to the number of items in our siteNames array):
- (NSInteger)tableView:(UITableView *)tableView
numberOfRowsInSection:(NSInteger)section
{
    return [siteNames count];

}
Next, modify the cellForRowAtIndexPath method to return the item to be displayed, using the row number as an index into the siteNames array:
- (UITableViewCell *)tableView:
(UITableView *)tableView
cellForRowAtIndexPath:(NSIndexPath *)indexPath
{
    static NSString *CellIdentifier = @"Cell";

    UITableViewCell *cell = [tableView
       dequeueReusableCellWithIdentifier:CellIdentifier];
    if (cell == nil) {
        cell = [[[UITableViewCell alloc]
          initWithStyle:UITableViewCellStyleDefault
          reuseIdentifier:CellIdentifier] autorelease];
    }

    // Configure the cell.
    cell.textLabel.text =
         [siteNames objectAtIndex:indexPath.row];
    return cell;
}
Click on the Run button located in the Xcode toolbar to test the current state of the application. Once the application loads into the iOS iPad simulator, rotate the device into landscape mode (Hardware -> Rotate Left):
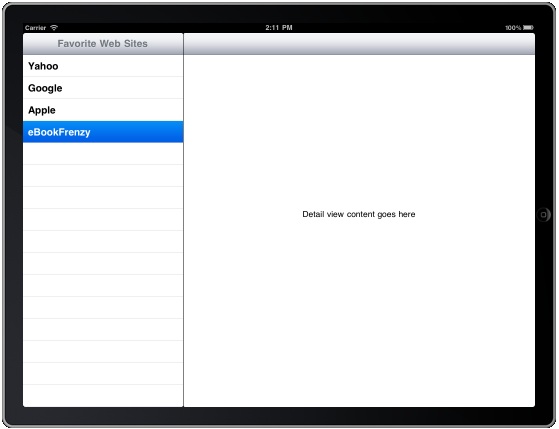
At this point the items in the master panel do nothing when selected and the detail panel still displays the place holder label provided by Xcode when the project was first created. The next step is to add the web view to the detail view controller.
Configuring the Detail View Controller
When a user selects a web site item from the master panel, the detail panel will load the selected web site into a web view object. The first step in configuring the detail panel is to declare an outlet for the web view object. Select the DetailViewController.h file and modify it as follows:
#import <UIKit/UIKit.h>

@interface DetailViewController : UIViewController <UIPopoverControllerDelegate,
UISplitViewControllerDelegate> {
    UIWebView *webView;
}
@property (nonatomic, retain) IBOutlet UIWebView *webView;
@property (nonatomic, retain) IBOutlet UIToolbar *toolbar;
@property (nonatomic, retain) id detailItem;
@property (nonatomic, retain) IBOutlet UILabel *detailDescriptionLabel;
@end
Note that the detailViewController.h file already declares an outlet to the toolbar object where the popover button is displayed when the split view is in portrait mode. Next, modify the DetailViewController.m file to add the @synthesize directive for the webView outlet:
#import "DetailViewController.h"
#import "RootViewController.h"

@interface DetailViewController ()
@property (nonatomic, retain) UIPopoverController *popoverController;
- (void)configureView;
@end
@implementation DetailViewController
@synthesize toolbar=_toolbar;
@synthesize detailItem=_detailItem;
@synthesize detailDescriptionLabel=_detailDescriptionLabel;
@synthesize popoverController=_myPopoverController;
@synthesize webView;
.
.
@end
Having declared the outlet for the web view the next step is to add the actual object to the view. Select the DetailView.xib file, highlight the placeholder label that reads “Detail view content goes here” and press the delete key. Drag and drop a UIWebView object from the object library (View -> Utilities -> Object Library) onto the view and resize it so that it fills the space beneath the Toolbar object.
Connect the webView outlet to the web view object by Ctrl-clicking on the File’s Owner icon and dragging to the web view object. Release the line and select the webView outlet from the resulting menu.
Connecting Master Selections to the Detail View
All that now remains is to configure the detail panel to update based on selections made in the master panel. When a user makes an item selection from the table view the didSelectRowAtIndexPath method in the root view controller is triggered. This template method needs to be modified to load the corresponding web site into the web view. Select the RootViewController.m file and locate and modify this method as follows:
- (void)tableView:(UITableView *)tableView didSelectRowAtIndexPath:(NSIndexPath *)indexPath
{
    NSString *urlString = [siteAddresses objectAtIndex:indexPath.row];
    detailViewController.webView.scalesPageToFit = YES;
    NSURL *url = [NSURL URLWithString:urlString];
    NSURLRequest *request = [NSURLRequest requestWithURL:url];
    [detailViewController.webView loadRequest:request];
}
All that method needs to do is identify the URL of the selected web site using the selected row as an index into the siteAddresses array. This is then used to construct an NSURL object that is loaded into the webView object of the detailViewController. Note that in order to make the web page scale to fit the detail view area the scalePagesToFit property of the UIWebView object is set to YES.
Popover Implementation
In actual fact the popover code was already implemented for us by Xcode when we selected the option to create a Split View application. That said, it is worth taking the time to look at this code, which consists of two delegate methods in the DetailViewController.m file. The first method is called when the device rotates to portrait orientation and reads as follows:
- (void)splitViewController:(UISplitViewController *)svc
 willHideViewController:(UIViewController *)aViewController
withBarButtonItem:(UIBarButtonItem *)barButtonItem
forPopoverController: (UIPopoverController *)pc
{
    barButtonItem.title = @"Events";
    NSMutableArray *items = [[self.toolbar items] mutableCopy];
    [items insertObject:barButtonItem atIndex:0];
    [self.toolbar setItems:items animated:YES];
    [items release];
    self.popoverController = pc;
}
This method configures the toolbar contained in the DetailView.xib file and referenced by the toolbar outlet declared in the DetailViewController.h file to display a button with the title “Events” and sets up the popover controller assignment. Before proceeding, modify the title line of code to display the “Favorite Web Sites” title:
barButtonItem.title = @"Favorite Web Sites";
The second method simply removes the button from the toolbar and de-assigns the popoverController reference:
- (void)splitViewController:(UISplitViewController *)svc
willShowViewController:(UIViewController *)aViewController
invalidatingBarButtonItem:(UIBarButtonItem *)barButtonItem
{
    NSMutableArray *items = [[self.toolbar items] mutableCopy];
    [items removeObjectAtIndex:0];
    [self.toolbar setItems:items animated:YES];
    [items release];
    self.popoverController = nil;
}
Testing the Application
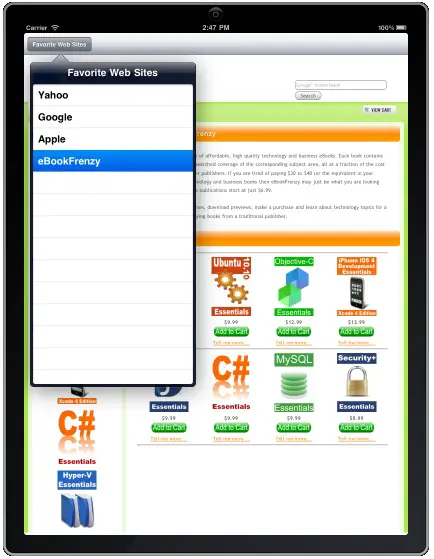
All that remains is to test the application so click on the Run button and wait for the application to load into the iOS iPad Simulator. In portrait mode only the detail panel should be visible. Tap the “Favorite Web Sites” button to display the popover and select a website from the list so that it loads into the detail view:
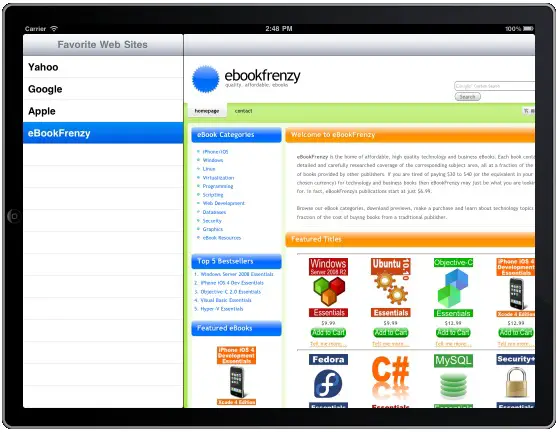
Select the Hardware -> Rotate Left menu option to switch the device into landscape mode and note that both the master and detail panels are now visible:
Learn SwiftUI and take your iOS Development to the Next Level |
| Previous | Table of Contents | Next |
| Creating a Navigation based iOS 4 iPad Application using TableViews (Xcode 4) | Using the UIPickerView and UIDatePicker Components in iOS 4 iPad Applications (Xcode 4) |


