Creating a Navigation based iOS 4 iPad Application using TableViews (Xcode 4)
| Previous | Table of Contents | Next |
| Creating a Simple iOS 4 iPad Table View Application (Xcode 4) | An iPad iOS 4 Split View and Popover Example (Xcode 4) |
Learn SwiftUI and take your iOS Development to the Next Level |
In the previous chapter (entitled Creating a Simple iOS 4 iPad Table View Application) we looked at the basics of the Table View object and worked through the creation of a simple example iPad application containing a single table view without any application navigation capabilities. Also discussed in the previous chapter was the fact that table view based navigation is primarily intended for use in iPhone applications and that it is more likely that a table view will be used within the context of a Split View and Popover based interface within iPad applications.
The above caveats aside the goal of this chapter is to provide an overview of how to use the table view to implement navigation within an iPad application. The reason for including this in an iPad development book is two-fold. Primarily this is provided because a good understanding of the table view is needed to be able to implement split view and popover based interfaces on the iPad (a topic covered in some detail in the chapter entitled An iPad iOS 4 Split View and Popover Example). The second reason for including this information is the fact that there may well be instances where pure table view navigation on the iPad might actually be the right solution for your application.
Navigation based applications present a hierarchical approach to displaying information to the user. Such applications typically take the form of a navigation bar (UINavigationBar) and a series of Table based views (UITableView). Selecting an item from the table list causes the view associated with that selection to be displayed. The navigation bar will display a title corresponding to the currently displayed view together with a button that returns the user to the previous view when selected. For an example of this concept in action, spend some time using the iPhone Mail or Settings applications.
When developing a navigation-based application the central component of the architecture is the navigation controller. In addition, each screen has a table view and a corresponding view controller. The navigation controller maintains a stack of these view controllers. When a new view is displayed it is pushed onto the navigation controller’s stack and becomes the currently active controller. When the user selects the button in the navigation bar to move back to the previous level, that view controller is popped off the stack and the view controller beneath it moved to the top becoming the currently active controller.
The view controller for the first table view that appears when the application is started is called the root view controller.
An Overview of the Example
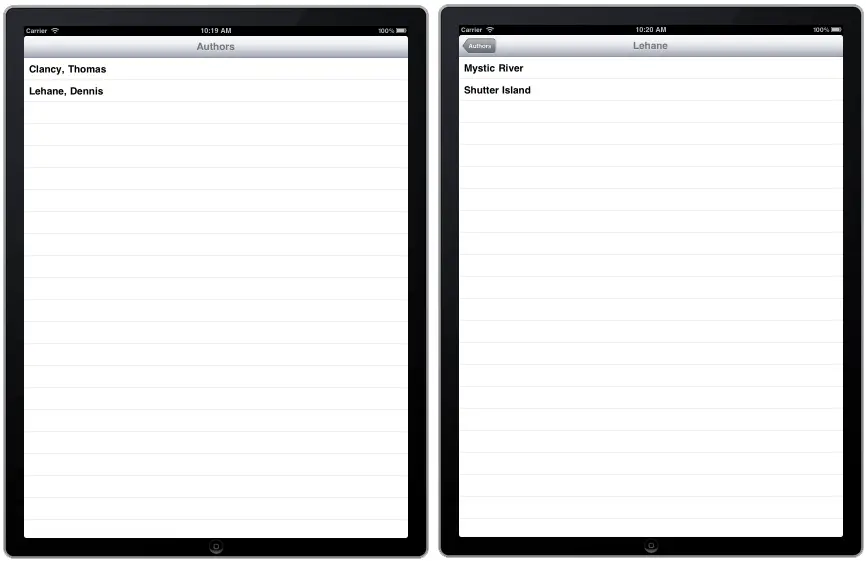
The goal of the example outlined in the remainder of this chapter is to design and implement an iOS iPad application that combines both navigation and table views. When completed, the application will display a table view that lists book authors. When an author is selected from the table, a second table view will be displayed listing the books written by that author. The navigation bar on the books view will contain a button to navigate back to the list of authors.
The following figure illustrates both of the table views from the completed application:
Since the objective of this chapter is to outline the steps involved in working with navigation and table views, rather than the handling of data, we will be implementing very simple code to create the authors and books data sources. In a real world situation it is more likely that such data would be pulled from a database, but in the interests of keeping this example as basic as possible we will be hard coding author names and book lists into simple array objects.
Setting up the Project
In order to implement our example application a new project will be needed, so start Xcode and click on the option to create a new project. Select the iOS Application option from the left hand panel and highlight the Navigation-based Application icon from the main panel. On the next screen name the product TableView, click Next and choose a suitable location for the files before creating the project.
The main Xcode window will appear populated with a number of different template files ready for us to begin to create our application.
By default, Xcode assumes that the application is going to be running on an iPhone. Since we are targeting the iPad it will be necessary to change the target device setting. In the project summary panel change the Devices setting located under iOS Application Target to iPad and confirm the transformation in the resulting panel.
Reviewing the Project Files
The selection of the Navigation-based iOS application template has given us a number of template files that will save us a considerable amount of time in the course of creating our application. The best way to get an overview of this is to select the MainWindow.xib file in the project navigator panel. Once the file has loaded, expand the panel to the right of the project navigator panel and unfold the entries under the Navigation Controller and Root View Controller objects:
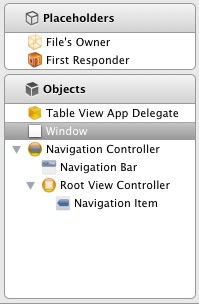
Xcode has created for us an application delegate and a navigation controller. The navigation controller contains a navigation bar and a root view controller for the home view of our application.
Though not visible in the above document window, the root view controller has associated with it an Interface Builder NIB file named RootViewController.xib (also automatically created for us by Xcode) that in turn contains a UITableView instance. To access this file, select the Navigation Controller item to display the design screen. This window will contain text that reads “Loaded from RootViewController”. Select the RootViewController.xib file in the project navigator panel to load the RootViewController.xib file into the editing panel where the table view will be visible.
Setting up the Data in the Root View Controller
The root view controller is going act as the data source and app delegate for the table view that displays the list of authors. As such, we need to add some code to set up this data and override some methods to implement the functionality for our application. Begin by editing the RootViewController.h interface file and add the declaration for an array to hold the names of the authors that are going to appear on the root table view:
@interface RootViewController : UITableViewController {
        NSArray *authorList;
}
@property (nonatomic, retain) NSArray *authorList;
@end
Edit RootViewController.m and add the line to synthesize access to the authorList array then edit the viewDidLoad method to implement the code to initialize the authorList array and set the title of the root table view to Authors:
#import "RootViewController.h"

@implementation RootViewController
@synthesize authorList;

- (void)viewDidLoad {
   [super viewDidLoad];
   self.authorList = [[NSArray alloc]
      initWithObjects:@"Clancy, Thomas",
      @"Lehane, Dennis", nil];
   self.title = @"Authors";
}
.
.
@end
Learn SwiftUI and take your iOS Development to the Next Level |
- (void)viewDidUnload {
    // Release anything that can be recreated in viewDidLoad or on demand.
    // e.g. self.myOutlet = nil;
    self.authorList = nil;
}
- (void)dealloc {
 [authorList release];
  [super dealloc];
}
Writing Code to Display the Data in the Table View
When a table view is displayed, it needs to know how many rows it is going to be required to display. It finds this information by making a call to the numberOfRowsInSection method. Our RootViewController.m file contains a pre-created template of this method, currently coded to return 0. In our example we want to return a value equivalent to the number of items in our authorList array, so we need to modify this method accordingly:
- (NSInteger)tableView:(UITableView *)tableView numberOfRowsInSection:(NSInteger)section {
    return [self.authorList count];
}
Having identified the number of items to be displayed, the table view then needs to get a UITableViewCell object containing the data to be displayed for each row. It achieves this by calling the cellForRowAtIndexPath method for each row, passing through the current row as an argument. When called, this method identifies the row being requested and constructs and returns a cell object. Implement the code to return a table cell for each row of the table view by modifying the template method as follows:
- (UITableViewCell *)tableView:(UITableView *)tableView cellForRowAtIndexPath:(NSIndexPath *)indexPath {

  static NSString *CellIdentifier = @"Cell";

  UITableViewCell *cell = [tableView
    dequeueReusableCellWithIdentifier:CellIdentifier];
  if (cell == nil) {
     cell = [[[UITableViewCell alloc]
       initWithStyle:UITableViewCellStyleDefault
     reuseIdentifier:CellIdentifier] autorelease];
  }
     // Configure the cell.
      cell.textLabel.text =
       [self.authorList objectAtIndex:
       [indexPath row]];
    return cell;
}
Note that Xcode has already written most of the code for us. In fact the only line we have to add is as follows:
cell.textLabel.text = [self.authorList objectAtIndex: [indexPath row]];
This line of code simply identifies the row that has been requested, uses it as the index into our array of authors and assigns it to the appropriate property of the cell object that was created for us in the preceding lines of the method.
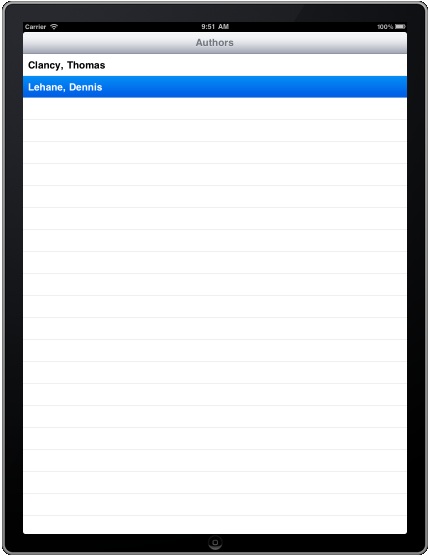
Now is a good time to make sure we haven’t made any errors in our coding, so build and run the application to make sure it all works so far. Assuming all is well, the application should appear in the simulator as follows:
When we select an author we want to navigate to another table view that provides a list of books written by that author. That table view will have its own NIB file containing the table view object and also its own view controller. The next steps, therefore, are to create these two files and configure them to meet our requirements.
Creating the Second View Controller
To create the view controller for the table view that will display the list of books written by the selected author, Ctrl-click on the TableView entry in the project navigator panel and select Add -> New File. On the template selection screen, select iOS Cocoa Touch Class followed by the UIViewController subclass icon and click Next. On the next screen, select UITableViewController from the Subclass of menu and make sure that the Targeted for iPad option is on. We will manually create the NIB file later so also leave the With XIB for user interface option unchecked.
Click on Next and save the class as BooksViewController.
Before we begin work on our second table view we need to make sure that the new class is declared within our root view controller class. To do so, edit the RootViewController.h file and add code to forward reference the BooksViewController class and add an outlet to the new view controller:
@class BooksViewController;

@interface RootViewController : UITableViewController {
        NSArray         *authorList;
        BooksViewController *booksController;
}
@property (nonatomic, retain) IBOutlet BooksViewController *booksController;
@property (nonatomic, retain) NSArray *authorList;
@end
Connecting the Second View Controller to the Root View Controller
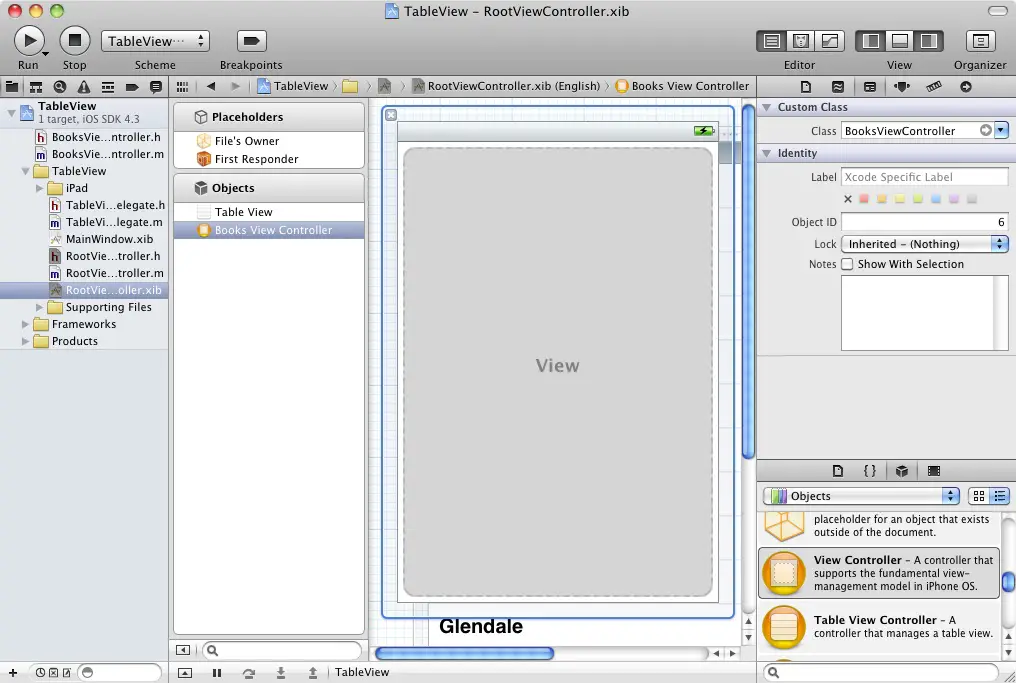
Select the RootViewController.xib file and drag a new View Controller (UIViewController) object from the Object library panel (View -> Utilities -> Object Library) to the Objects panel. Display the Identity Inspector (View -> Utilities -> Identity Inspector) and change the Class from UIViewController to BooksViewController:
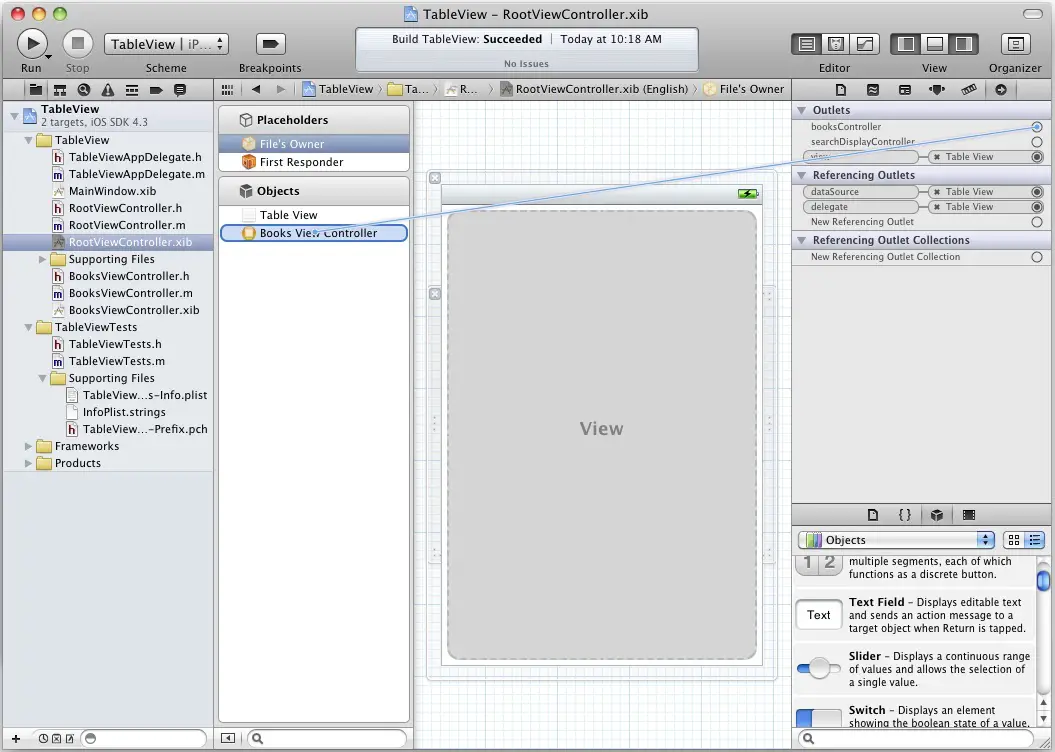
Select the File’s Owner entry listed under Placeholders and open the Connections Inspector (View -> Utilities -> Connections Inspector). Click in the circle located to the right of the booksController outlet and drag the blue line to the Books View Controller item in the Objects panel to make the connection to the outlet:
Creating the NIB File for the Second Table View
The next step is to create the NIB file for our second view controller. This will contain the instance of the table view that we will use to display the books that the selected author has written. In the main Xcode window, Ctrl-click on the TableView entry and select Add -> New File. In the New File dialog, select User Interface under the iOS list and select the View icon in the main panel. Click Next and make sure that the Device Family menu is set to iPad then click Next again. Save the file as BooksViewController.
Select BooksViewController.xib to load it into Interface Builder. At this point, the file currently contains a UIView object when we actually want it to contain a UITableView. In the Objects panel, select the View icon and press the Delete key on the keyboard to remove it from the design. From the Object library panel (View -> Utilities -> Object Library) drag a Table View object and drop it in place of the deleted View object. The design window will subsequently update to reflect the presence of the table view, populating it with some dummy data.
Select the File’s Owner icon, display the Identity Inspector (View -> Utilities -> Identity Inspector) and change the class to BooksViewController. With the File’s Owner item still selected, display the Connections Inspector (View -> Utilities -> Connections Inspector). Click on the circle to the right of the view outlet and drag to the Table View entry in the object panel. Select the Table View object and using the same technique, connect the dataSource and delegate outlets to File’s Owner.
Implementing the Functionality of the Second View Controller
Now that we have the view controller and nib file for the books table view created we now need to implement the functionality of this view controller. Since the BooksViewController class is acting as the dataSource for the table view we need to add some code to store the names of the books written by the respective authors.
Edit the BooksViewContoller.h interface file and make the following changes to declare an array to hold the book titles:
#import <UIKit/UIKit.h>

@interface BooksViewController : UITableViewController {
        NSArray *books;
}
@property (nonatomic, retain) NSArray *books;
@end
Next, edit BooksViewController.m and synthesize the accessors for the new array:
#import "BooksViewController.h"

@implementation BooksViewController
@synthesize books;
.
.
@end
It is also necessary to complete the coding for two template methods located in the BooksViewController.m file that provide information about how many sections the books table view contains (in this case one) and the number of rows in that section (in other words the number of books in our book array):
- (NSInteger)numberOfSectionsInTableView:(UITableView *)tableView {
    // Return the number of sections.
    return 1;
}
- (NSInteger)tableView:(UITableView *)tableView
numberOfRowsInSection:(NSInteger)section {
    // Return the number of rows in the section.
    return [books count];
}
The next task is to write some code to populate the array with book titles that correspond to the author that was selected by the user. One place to initialize the data is in the viewDidLoad method. This method gets called once when the view is first loaded and is not then called again unless the view had to be unloaded by the operating system in order free up memory and is then reloaded. This is ideal for situations where data needs to be initialized only once. In our case we are going to initialize the books array with different data depending on which author was selected. We therefore need to choose a method that gets called each time the view becomes visible. An ideal candidate for this purpose is the viewWillAppear method which gets called each time and just before the view is made visible to the user. Add this method as follows:
- (void)viewWillAppear:(BOOL)animated {
  if ([self.title isEqualToString:@"Lehane"]) {
         books = [[NSArray alloc ]
          initWithObjects:@"Mystic River",
          @"Shutter Island", nil];
  } else {
          books = [[NSArray alloc ]
           initWithObjects:@"The Hunt for Red October",
           @"Red Storm Rising", nil];
  }
  [super viewWillAppear:animated];
  [self.tableView reloadData];
}
In the above method we are using the title of the navigation bar to identify which author has been selected from the list (we will be implementing code to set the title in the root view controller later in the chapter). Based on this value we are initializing the array with the appropriate list of books. Finally, we make a call to the reloadData method of the table view to make sure that the new data is displayed (omitting this call will result in old data appearing).
Because we allocated memory to our books array in the previous method, we now need to make sure we free it up when the table view disappears or is unloaded by making changes to the following methods:
- (void)viewWillDisappear:(BOOL)animated {
   [books release];
   [super viewWillDisappear:animated];
}
- (void)viewDidUnload {
   // Release any retained subviews of the main view.
   // e.g. self.myOutlet = nil;
   self.books = nil;
}
Next we need to implement the code to provide cells for the table rows. These steps are much the same as those implemented for the root view controller earlier in the chapter:
- (UITableViewCell *)tableView:(UITableView *)tableView
cellForRowAtIndexPath:(NSIndexPath *)indexPath {

  static NSString *CellIdentifier = @"Cell";
  UITableViewCell *cell = [tableView
   dequeueReusableCellWithIdentifier:CellIdentifier];
  if (cell == nil) {
       cell = [[[UITableViewCell alloc]
        initWithStyle:UITableViewCellStyleDefault
        reuseIdentifier:CellIdentifier] autorelease];
  }
  // Configure the cell…
  cell.textLabel.text = [books objectAtIndex:
     [indexPath row]];
  return cell;
}
We also need to make sure we free up the memory we allocated to our array in the situation where the user exits the application while the view is displayed:
- (void)dealloc {
    [books release];
    [super dealloc];
}
As we mentioned previously, when a new view is displayed in a navigation based application, it is pushed onto the navigation controller’s stack. When the user navigates back to the previous view, the view controller must be popped off the stack:
- (void)tableView:(UITableView *)tableView didSelectRowAtIndexPath:(NSIndexPath *)indexPath {
  // Navigation logic may go here. Create and push another view controller.
  /*
  <#DetailViewController#> *detailViewController =
    [[<#DetailViewController#> alloc]
    initWithNibName:@"<#Nib name#>" bundle:nil];
   // ...
   // Pass the selected object to the new view controller.
  [self.navigationController
    pushViewController:detailViewController animated:YES];
  [detailViewController release];
   */
   [self.navigationController popViewControllerAnimated:YES];
}
Next we need to modify our root view controller so that the books table view is displayed when the user selects an author from the list. When a user selects an item from a Table View, the didSelectRowAtIndexPath method is called so we need to override this method in our view controller.
Edit the RootViewController.m file and begin by importing the BooksViewController.h interface header file for the books view controller and then synthesize access to the booksController class:
#import "RootViewController.h"
#import "BooksViewController.h"

@implementation RootViewController
@synthesize authorList;
@synthesize booksController;
Remaining within the RootViewController.m file, locate the template didSelectRowAtIndexPath method and modify it as follows:
- (void)tableView:(UITableView *)tableView
didSelectRowAtIndexPath:(NSIndexPath *)indexPath {

    /*
    <#DetailViewController#> *detailViewController =
       [[<#DetailViewController#> alloc]
       initWithNibName:@"<#Nib name#>"
       bundle:nil];
   // ...
   // Pass the selected object to the new view controller.
   [self.navigationController
      pushViewController:detailViewController
      animated:YES];
   [detailViewController release];
   */
   if (0 == indexPath.row)
   {
       self.booksController.title = @"Clancy";
   } else {
        self.booksController.title = @"Lehane";
   }
   [self.navigationController
      pushViewController:self.booksController
      animated:YES];
}
In this method we identify which row has been selected by the user and set the title property of the booksController object to reflect the corresponding author name. We then push the books view controller onto the navigation controller stack so that it becomes the currently active view controller, which in turn causes the books table view to become visible.
Finally, build and run the application in the iOS iPad Simulator. Selecting an author from the first table view should cause the second table view to appear listing the corresponding books for the selected author.
Learn SwiftUI and take your iOS Development to the Next Level |
| Previous | Table of Contents | Next |
| Creating a Simple iOS 4 iPad Table View Application (Xcode 4) | An iPad iOS 4 Split View and Popover Example (Xcode 4) |


