Creating a Simple iOS 4 iPad Table View Application (Xcode 4)
| Previous | Table of Contents | Next |
| Creating an iOS 4 iPad Multiview Application using the Tab Bar (Xcode 4) | Creating a Navigation based iOS 4 iPad Application using TableViews (Xcode 4) |
Learn SwiftUI and take your iOS Development to the Next Level |
The UITableView component was developed originally for the iPhone and provides the cornerstone of the navigation system for many iPhone applications. The original purpose of the table view was to provide a way to present information in a list format on the smaller iPhone screen whereby selecting an item from a table view causes a second view to appear containing more detailed information corresponding to the selected item. For example, both the iPhone Mail and Settings applications make extensive use of Table Views to present information to users in a list format and to enable users to drill down to more detailed information by selecting a particular list item.
In terms of the iPad, however, navigation is rarely handled in the same way as on the iPhone. The simple fact is that a table view that occupies an entire iPad display results in large amounts of wasted white space. Navigation of the type provided by the table view on the iPhone is typically implemented on the iPad using the Split View and Pop Over objects. The split view divides the screen into two panels consisting of master and detail panels. The master panel presents a range of items for the user to select. When a selection is made, the detail panel updates to present detailed information relating to that selection.
The reason for covering table views in an iPad development book is partly for the sake of completeness (you may, after all, have a valid reason for using a table view in a specific way), but primarily because the list of items in a split view master panel is typically presented using a table view. It is imperative, therefore, that you have an understanding of table views in order to be able to effectively use split views.
Whilst most implementations of table views involve the use of navigation, this chapter is intended to focus entirely on just the table view, including the creation of a very simple example. This will provide a good understanding of table views in general before moving on to a more complex navigation based example in Creating a Navigation based iOS 4 iPad Application using TableViews.
An Overview of the Table View
Table Views present the user with data in a list format and are represented by the UITableView class of the UIKit framework. The data is presented in rows, whereby the content of each row is implemented in the form of a UITableViewCell object. Each table cell can display a text label (textLabel), a subtitle (detailedTextLabel) and an image (imageView). More complex cells can be created by either adding subviews to the cell, or sub classing UITableViewCell and adding your own custom functionality.
The Table View Delegate and dataSource
Each table view in an application needs to have a delegate and a dataSource associated with it. The dataSource implements the UITableViewDataSource protocol, which basically consists of a number of methods that define title information, how many rows of data are to be displayed, how the data is divided into different sections and, most importantly, supplies the table view with the cell objects to be displayed. The delegate implements the UITableViewDelegate protocol and provides additional control over the appearance and functionality of the table view including detecting when a user touches a specific row, defining custom row heights and indentations and also implementation of row deletion and editing functions.
Table View Styles
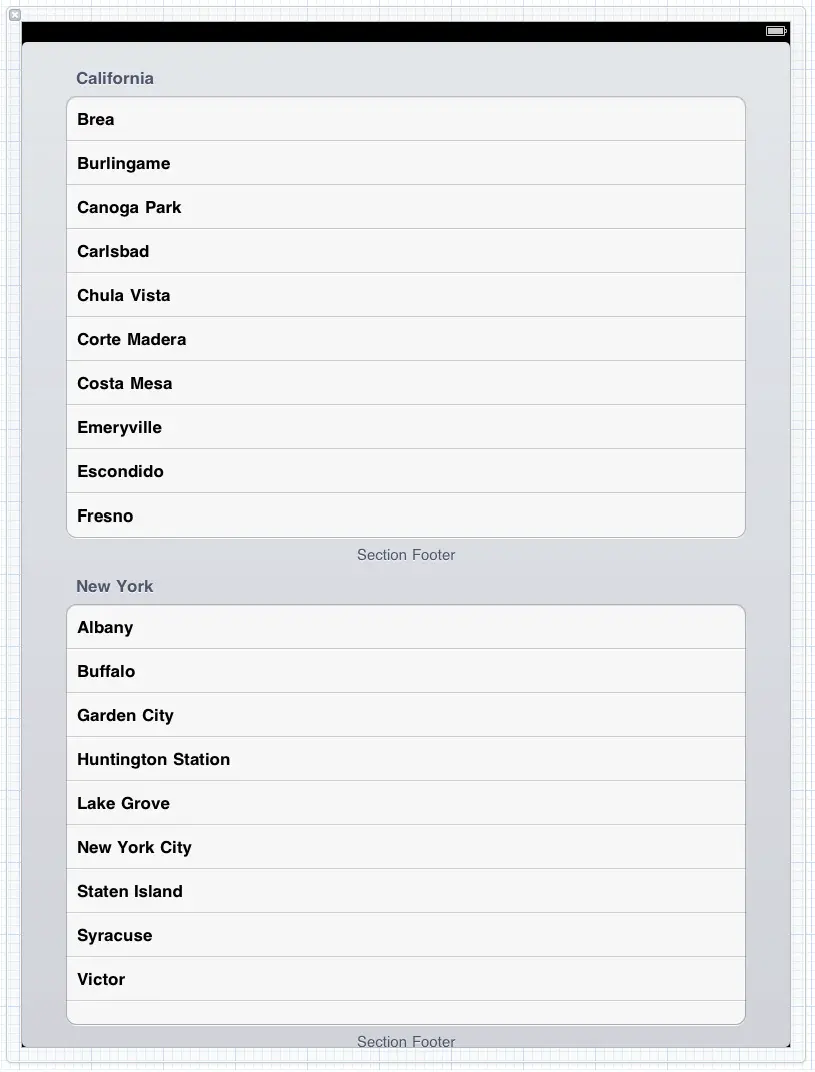
Table views can be configured to use either plain or grouped style. In the grouped style, the rows are grouped together in sections that are represented by rounded rectangles. For example, the following figure shows a table view configured to use the grouped style:
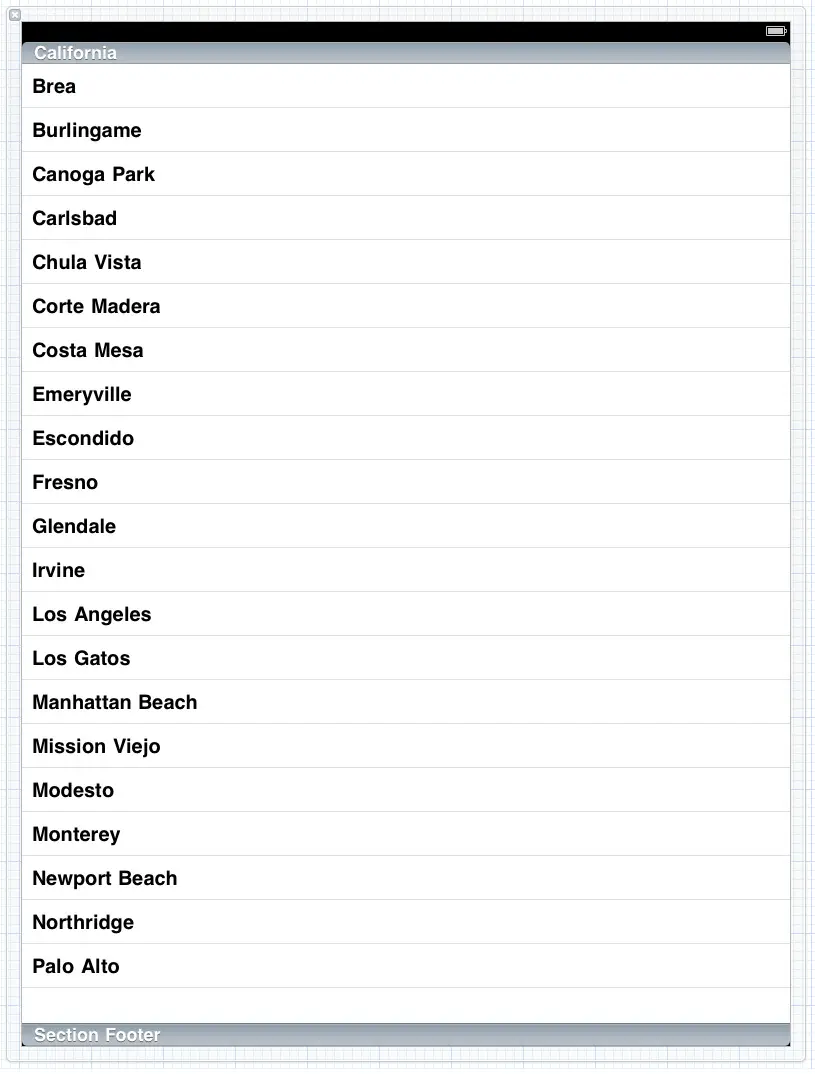
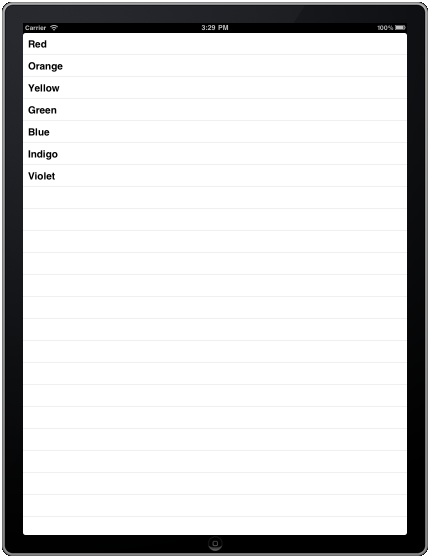
In the case of the plain style, the items are listed using the full width of the display, at which point we begin to see why a standalone table view is not common on the iPad due to the large amounts of white space:
Table Views using plain style can also be indexed, whereby rows are organized into groups according to specified criteria, such as alphabetical or numerical sorting.
Table View Cell Styles
In addition to the style of the Table View itself, different styles may also be specified for the individual table cells. The iOS 4 SDK currently supports four different cell styles:
- UITableViewCellStyleDefault – only the labelText in black and left aligned.
- UITableViewCellStyleSubtitle – labelText in black and left aligned with the detailLabeltext positioned beneath it in a smaller font using a gray foreground.
- UITableViewCellStyleValue1 – labelText in black left aligned and the smaller detailLabelText in blue, on the same line and right aligned.
- UITableViewCellStyleValue2 – labelText in blue on left side of cell, right aligned and detailedLabelText on right of cell, left aligned and black.
The style of a particular cell is specified when the cell object is created and will be covered in detail in a later section.
Setting up the Project
For the purposes of this chapter we will be creating a very simple iOS 4 iPad application that contains a single Table View. Begin by launching Xcode and selecting the option to Create a new Xcode Project. Select the View-based application, make sure that the Device Family selection is set to iPad and name the project TableExample.
Learn SwiftUI and take your iOS Development to the Next Level |
Adding the Table View Component
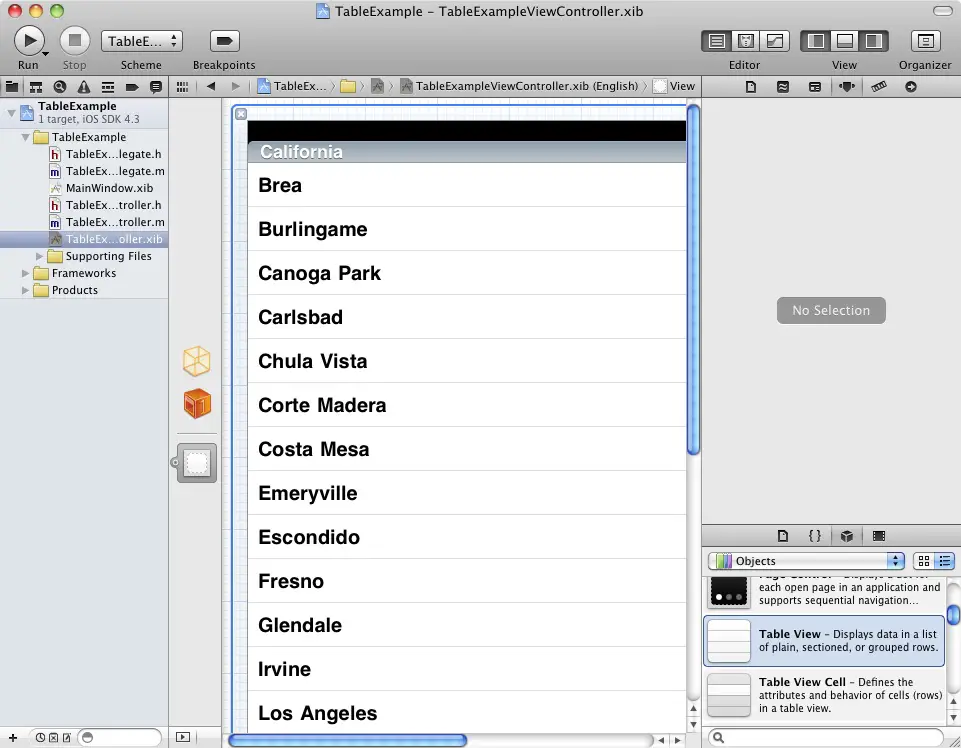
Not surprisingly, the application we are creating is going to require an instance of the Table View component. Select the TableExampleViewController.xib file from the project navigator panel to load it into Interface Builder tool. Display the Object library panel (View -> Utilities -> Object Library) and drag a Table View object onto the view in the editing panel:
Making the Delegate and dataSource Connections
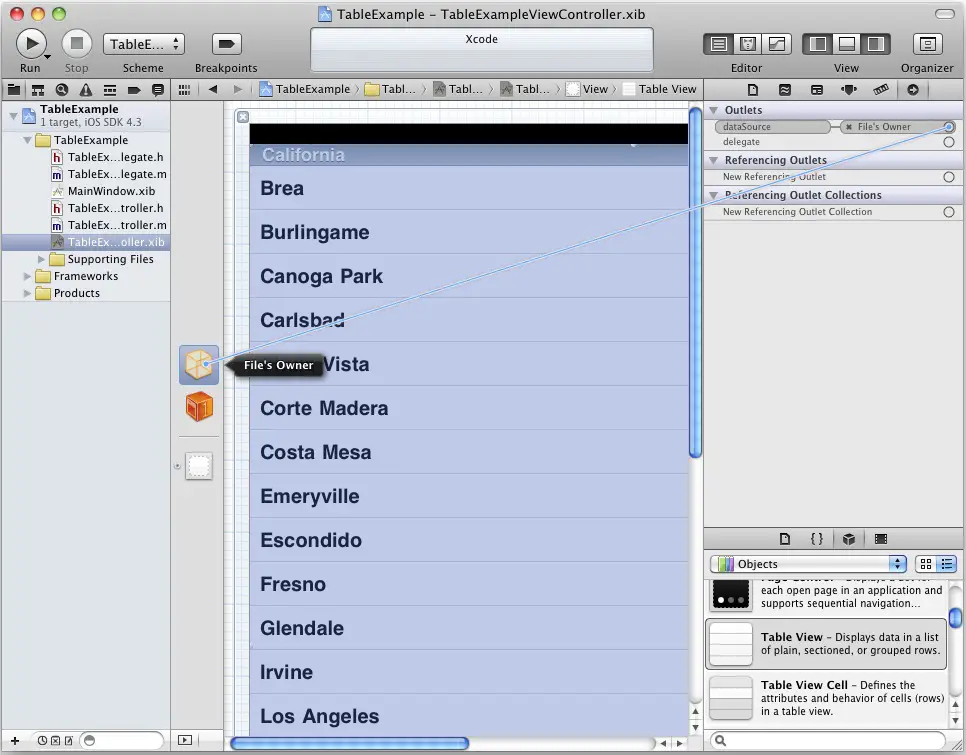
For the sake of simplicity, we are going to use our view controller class as both the dataSource and delegate for our application. This means that in our view controller we are going to need to implement the numberofRowsInSection and cellForRowAtIndexPath methods of the UITableViewDataSource protocol in the view controller. Before doing so, however, we need to connect the dataSource and delegate outlets of the Table View component to the view controller. To achieve this, make sure that the Table View component is selected in the Interface Builder panel and open the Connections Inspector (View -> Utilities -> Connections Inspector). In the Connections Inspector window, click in the small circle to the right of the dataSource outlet and drag the blue line to the File’s Owner icon:
Once the connection is established, repeat this task to connect the delegate outlet to the File’s Owner.
Implementing the dataSource
In order to bring our iPad table view application to life we need to implement two dataSource methods in our view controller. Before doing so, however, we need to create the data itself. In this example, we are going to create an NSArray object and initialize it with some strings. In the main Xcode project navigator panel, select the TableExampleViewController.h file and modify it in the editing pane to declare the array:
#import <UIKit/UIKit.h>

@interface TableExampleViewController : UIViewController
	<UITableViewDelegate, UITableViewDataSource>
{
        NSArray *colorNames;
}
@property (nonatomic, retain) NSArray *colorNames;
@end
Note the references to UITableViewDelegate and UITableViewDataSource in the above code. These are included to notify the Objective-C compiler that the class implements these two protocols. Consequently, if we fail to implement the mandatory methods required by these protocols the compiler will notify us with a warning. If this line is omitted from the class declaration the code will still compile, but we will not be warned if we have failed to implement any methods. The only indication we will get will be the application crashing at run time. For this reason, including these declarations is generally considered to be good programming practice.
Next, edit the TableExampleViewController.m class implementation file to synthesize access to the array:
#import "TableExampleViewController.h"

@implementation TableExampleViewController
@synthesize colorNames;
.
.
.
@end
Now that we have declared our array we need to initialize it with some data when the view is loaded. In order to achieve this we will override the viewDidLoad method. Scroll down the TableExampleViewController.m file until you find the template method, uncomment it by removing the /* and */ markers and modify the method as follows:
- (void)viewDidLoad {
    [super viewDidLoad];
    self.colorNames = [[NSArray alloc]
          initWithObjects:@"Red", @”Orange”,
	  @”Yellow”, @"Green",
          @"Blue", @"Indigo", @"Violet", nil];
}
Having allocated memory to our array and initialized it, the next task is to make sure the memory gets released when the array is no longer required. To do so it is necessary to add code to the viewDidUnload and dealloc methods:
- (void)viewDidUnload {
    // Release any retained subviews of the main view.
    // e.g. self.myOutlet = nil;
    self.colorNames = nil;
}
- (void)dealloc {
    [colorNames release];
    [super dealloc];
}
With our data constructed all we need to do now is implement the numberOfRowsInSection and cellForRowAtIndexPath methods in order to conform to the minimum requirements of the UITableViewDataSource protocol. We will begin by implementing the numberOfRowsInSection method which is called by the Table View to identify how many rows are to be displayed. Since our data is held in an array we can simply return the number of array elements to satisfy this requirement, so add the following method to your TableExampleViewController.m file:
// Customize the number of rows in the table view.
- (NSInteger)tableView:(UITableView *)tableView
numberOfRowsInSection:(NSInteger)section {
   return [self.colorNames count];
}
Next, the cellForRowAtIndexPath method needs to be implemented:
// Customize the appearance of table view cells.
- (UITableViewCell *)tableView:(UITableView *)tableView
cellForRowAtIndexPath:(NSIndexPath *)indexPath {

   static NSString *CellIdentifier = @"Cell";

    UITableViewCell *cell = [tableView
      dequeueReusableCellWithIdentifier:CellIdentifier];
    if (cell == nil) {
        cell = [[[UITableViewCell alloc]
           initWithStyle:UITableViewCellStyleDefault
           reuseIdentifier:CellIdentifier] autorelease];
    }

    // Configure the cell.
    cell.textLabel.text = [self.colorNames
       objectAtIndex: [indexPath row]];
    return cell;
}
In the above method everything, with the exception of the following line, is standard boilerplate code that you can reuse every time you need to implement this particular method:
cell.textLabel.text = [self.colorNames objectAtIndex: [indexPath row]];
The method begins by creating a cell identifier. Next, an attempt is made to reuse an existing cell that may have scrolled off the screen and is therefore available for use as the currently requested cell. If no previous cell is available for use then a new one is created using the UITableViewCellStyleDefault style. The cellForRowAtIndexPath method is passed as an argument an object of type NSIndexPath from which we are able to extract the row number for which the cell is being requested by the table view. This row number is used, in turn, to extract the corresponding element from our colorNames array and assign it to the textLabel property of the cell object.
Building and Running the Application
Once the code has been implemented for the application, build and run it by clicking on the Run button located in the toolbar of the Xcode main project window. Once compiled the application should run in the simulator and appear as illustrated in the following figure:
Adding Table View Images and Changing Cell Styles
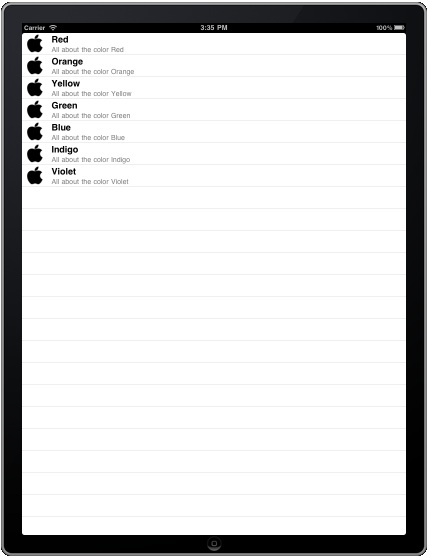
Now that we have created a simple table view example we can look at extending our code to change the cell style. In so doing we will make use of the image and detailed text properties of the cell object to add images and subtitles to each row of the view.
The first step is to add an image to the resources of our project. If you already have an image file that is suitable for this purpose feel free to use it in this example. Alternatively, we can pick up an image from the Mac OS X system on which Xcode is running (for example, a search for apple.png in a Finder window will provide a good example file). To add an image file to the application resources, locate the image file in a Finder window and then drag and drop it onto the Supporting Files item in the Xcode project navigator panel. In the resulting configuration window accept the default settings.
Now that the image is included in the project resources it is time to add some code to the cellForRowAtIndexPath method in the TableExampleViewCrontoller.m file. All we need to do in this file is add some code to create a UIImage object from the image file and assign it to the imageView property of the cell object. With these changes made, the method should read as follows:
// Customize the appearance of table view cells.
- (UITableViewCell *)tableView:(UITableView *)tableView
cellForRowAtIndexPath:(NSIndexPath *)indexPath
{
    static NSString *CellIdentifier = @"Cell";
    UITableViewCell *cell = [tableView
     dequeueReusableCellWithIdentifier:CellIdentifier];
    if (cell == nil) {
        cell = [[[UITableViewCell alloc]
            initWithStyle:UITableViewCellStyleSubtitle
            reuseIdentifier:CellIdentifier] autorelease];
    }
    // Configure the cell.
    UIImage *cellImage = [UIImage imageNamed:@"apple.png"];
    cell.imageView.image = cellImage;
    cell.textLabel.text = [self.colorNames
       objectAtIndex: [indexPath row]];
    return cell;
}
Next, we want to add a subtitle to the text of each cell. This is achieved by assigning a string to the cell object’s detailTextLabel text property. Note also that the code currently selects the UITableViewCellStyleDefault cell style which does not display the detailText. It will also be necessary, therefore to change the cell style to UITableViewCellStyleSubtitle . With all of these changes implemented, the method now reads as follows:
- (UITableViewCell *)tableView:(UITableView *)tableView
cellForRowAtIndexPath:(NSIndexPath *)indexPath
{
    static NSString *CellIdentifier = @"Cell";

    UITableViewCell *cell = [tableView
       dequeueReusableCellWithIdentifier:CellIdentifier];
    if (cell == nil) {
        cell = [[[UITableViewCell alloc]
           initWithStyle:UITableViewCellStyleSubtitle
           reuseIdentifier:CellIdentifier] autorelease];
    }

        // Configure the cell.
    UIImage *cellImage = [UIImage imageNamed:@"apple.png"];
    cell.imageView.image = cellImage;
    NSString *colorString = [self.colorNames
      objectAtIndex: [indexPath row]];

    cell.textLabel.text = colorString;
    NSString *subtitle = [NSString stringWithString:
      @"All about the color "];
    subtitle = [subtitle stringByAppendingString:colorString];
    cell.detailTextLabel.text = subtitle;
    return cell;
}
Once the changes have been made to the code, save the code file and build and run the application. When the iPad iOS Simulator starts up the table view should appear with images and subtitles as shown in the following figure:
Learn SwiftUI and take your iOS Development to the Next Level |
| Previous | Table of Contents | Next |
| Creating an iOS 4 iPad Multiview Application using the Tab Bar (Xcode 4) | Creating a Navigation based iOS 4 iPad Application using TableViews (Xcode 4) |


