Creating an iOS 4 iPad Multiview Application using the Tab Bar (Xcode 4)
| Previous | Table of Contents | Next |
| iOS 4 iPad Rotation, View Resizing and Layout Handling (Xcode 4) | Creating a Simple iOS 4 iPad Table View Application (Xcode 4) |
Learn SwiftUI and take your iOS Development to the Next Level |
So far in this book we have worked exclusively with iPad applications that present a single view to the user. In practice, it is more likely that an application will need to display a variety of different content depending on the actions of the user. This is typically achieved by creating multiple views (often referred to as content views) and then providing a mechanism for the user to switch from one view to another. One of the mechanisms for achieving this involves the use of either the UINavigationBar or UITabBar view components. In this chapter, therefore, we will look at implementing a multiview iPad application using a Tab Bar.
An Overview of the Tab Bar
The UITabBar is typically located at the bottom of the iPad screen and presents an array of tabs containing text and optional icons which may be selected by the user to display a different content view. Depending on the selection made from the tab bar, a different content view is displayed to the user.
Understanding View Controllers in a Multiview Application
In preceding chapters we have talked about the model-view-controller concept in relation to each view having its own view controller (for additional information on this read the chapter entitled An Overview of the iPad iOS 4 Application Development Architecture). In a multiview application, each content view will still have a view controller associated with it to handle user interaction and display updates. Multiview applications, however, require an additional controller.
Multiview applications need a visual control that will be used by the user to switch from one content view to another, and this usually takes the form of a tab or navigation bar. Both of these components are also views and as such need to have a view controller. In the context of a multiview application, this is known as the root controller and is responsible for controlling which content view is currently displayed to the user. As an app developer you are free to create your own root controller by subclassing from the UIViewController class, but in practice it usually makes more sense to use an instance of either the UIKit UITabBarController or UINavigationController classes.
Regardless of the origins of your chosen root controller, it is the first controller that is loaded by the application when it launches. Once loaded, it is responsible for displaying the first content view to the user and then switching the various content views in and out as required based on the user’s subsequent interaction with the user interface.
Since this chapter is dedicated to the creation of a tab bar based application we will be using an instance of the UITabBarController as our root controller.
Setting up the Tab Bar Example Application
The first step in creating our example application is to create a new Xcode project. To do so, launch Xcode and select the option to Create a new Xcode project. On the resulting template panel select the Window-based Application option. On the next screen name the product TabBar, making sure that Device Family is set to iPad and that the Use core data for storage option is turned off.
Configuring the App Delegate
The first new class we are going to add to our project is the root controller. Before we do so, however, we need to add an outlet to this controller within the app delegate class, and also add some code to the didFinishLaunchWithOptions method to add the view instance of the root controller as a subview of the application’s main window. In the project navigator panel, select the TabBarAppDelegate.h file and modify it as follows in the editing panel:
#import <UIKit/UIKit.h>

@interface TabBarAppDelegate : NSObject <UIApplicationDelegate> {
        UITabBarController *tabController;
}
@property (nonatomic, retain) IBOutlet UIWindow *window;
@property (nonatomic, retain) IBOutlet UITabBarController *tabController;
@end
Next, edit the TabBarAppDelegate.m implementation file and modify the code as follows (note the addition of the @synthesize directive for the tabController outlet):
#import "TabBarAppDelegate.h"

@implementation TabBarAppDelegate
@synthesize window=_window;
@synthesize tabController;

- (BOOL)application:(UIApplication *)application didFinishLaunchingWithOptions:(NSDictionary *)launchOptions
{
    // Override point for customization after application launch.
    [self.window addSubview:tabController.view];
    [self.window makeKeyAndVisible];
    return YES;
}
.
.
@end
Now that we have made the appropriate additions to the app delegate subclass we can add the root view controller to the project.
Creating the UITabBarController
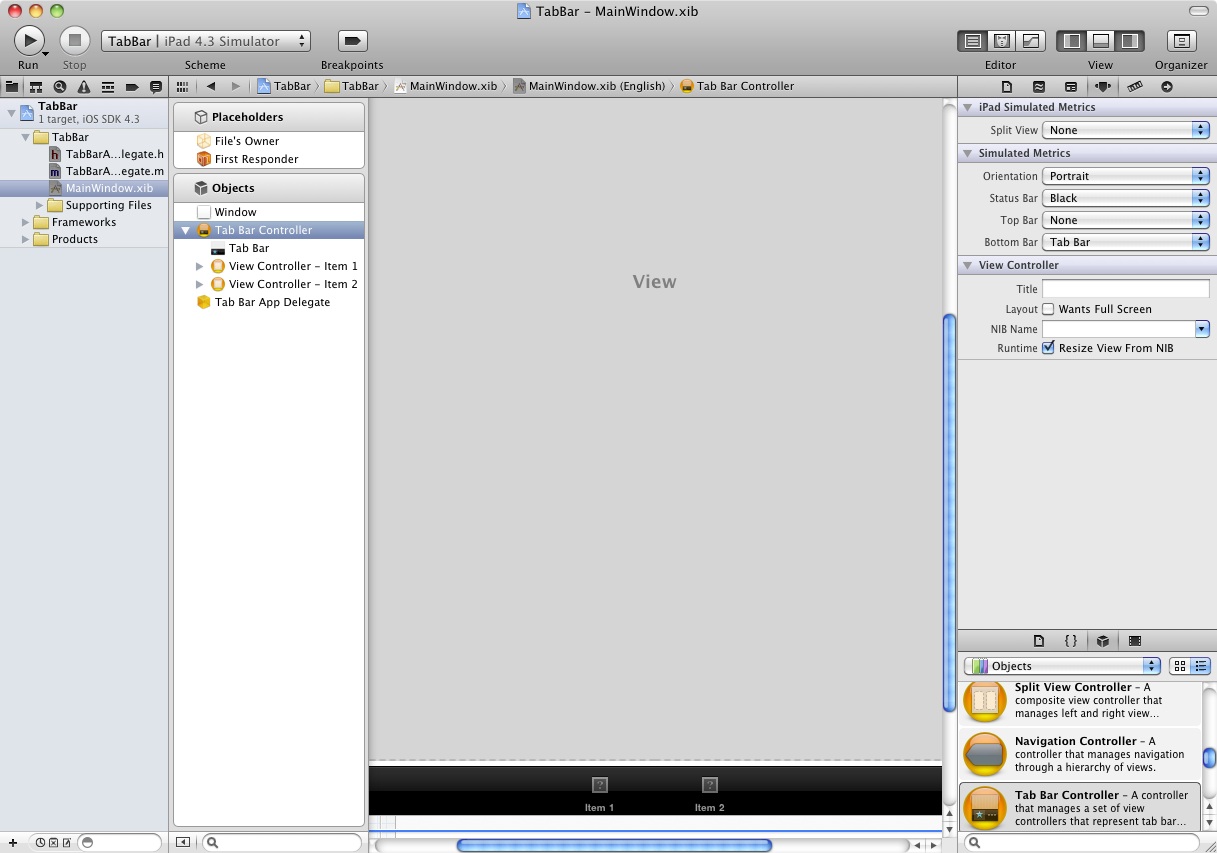
Because we are designing a tab bar based multiview iPad application it makes sense for us to use an instance of the UITabBarController class as the root controller. This is achieved from within the MainWindow.xib file, so select this file from the project navigator to load it into Interface Builder. Display the detailed view of the Placeholder and Objects panel by selecting the right facing arrow at the bottom of the narrow panel. Also click on the far right View button in the main Xcode toolbar to display the right hand panel. Once configured, the Xcode window should appear as illustrated in the following figure:
From within the Object library panel (View -> Utilities -> Object Library), click and drag a Tab Bar Controller object over to the narrow panel containing the Objects list panel and drop it into place beneath the Window icon. Once added, click the down arrow next to the new object to unfold the list of components:
As shown in the above figure, the Tab Bar Controller is now listed amongst the items in the MainWindow.xib file and the design panel now shows us a visual representation of our Tab Bar view. By default the Tab Bar is created with two tabs items. Additional tabs items may be added by dragging Tab Bar Items from the Object library (View -> Utilities -> Object Library) and dropping them onto the tab bar in the design panel.
Since we only plan to implement two content views in this example leave the number of view controllers unchanged.
Connecting the App Delegate Outlet to the Tab Bar Controller
Earlier in this chapter we created an outlet for the root view controller in the App Delegate. We must now connect it to the Tab Bar Controller instance we have created. From within the MainWindow.xib file hold down the Control key, click on the Tab Bar App Delegate icon and drag the resulting line to the Tab Bar Controller icon. From the resulting Outlets menu, select the tabController outlet.
Learn SwiftUI and take your iOS Development to the Next Level |
Creating the Content Views and View Controllers
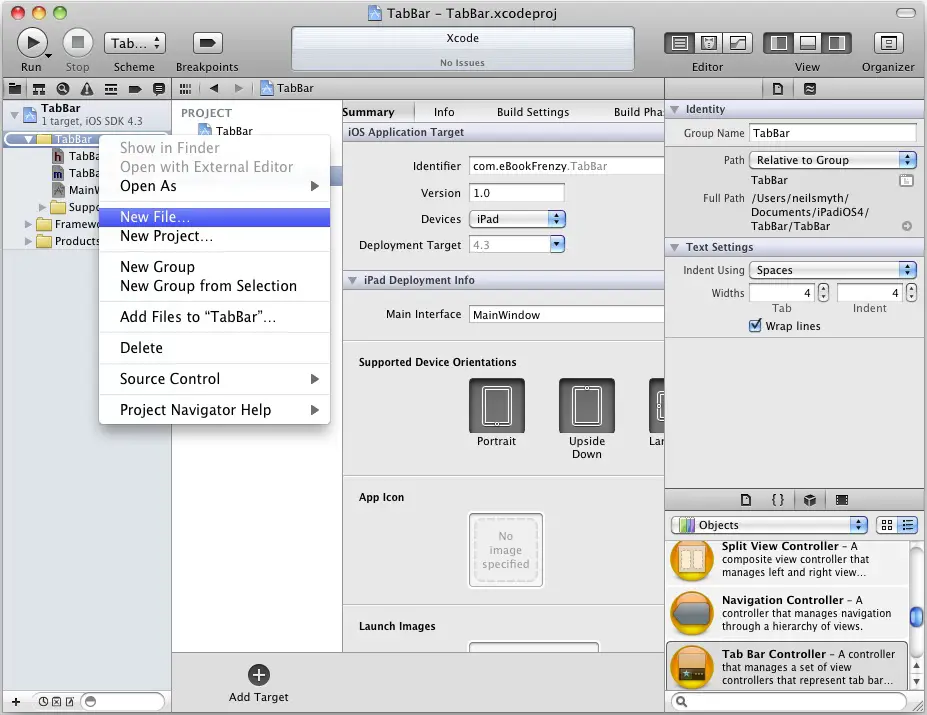
At this point, Xcode has created a minimal template for our application that contains a main window but no views or view controllers. The goal of this example is to provide two content views that the user can switch between using a tab bar. Each content view will need a view controller and a NIB file to contain the user interface. To create these, Ctrl-click over the TabBar folder entry in the project navigator panel on the left hand side of the main Xcode project window and select Add -> New File… as illustrated in the following figure:
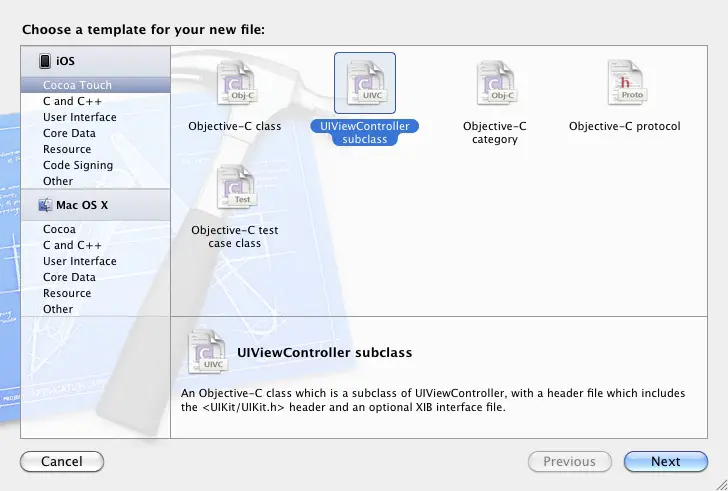
This will display the template selection panel as illustrated in the following figure:
In the left hand panel, verify that the iOS Cocoa Touch Class option is selected and that the current selection in the main panel is the UIViewController subclass icon and click Next. Since we also need an Interface Builder NIB file and are developing for the iPad, make sure that the With XIB for Interface Builder and Targeted for iPad options are selected before clicking on the Next button once again. On the following screen, specify ScreenOneViewController as the class name. Click Save to create the new view controller class files and corresponding Interface Builder file.
Repeat the above procedure to create the second content view and view controller, this time using the class name ScreenTwoViewController.
Associating Content Views with Tabs
15.9 Designing the Content Views
The final steps before trying out our application involve creating the user interfaces for our two content views. Select ScreenOneViewController.xib to load it into Interface Builder. Display the Attributes Inspector panel (View -> Utilities -> Attributes Inspector), select the view in the design panel and, if necessary, change the Orientation setting under Simulated Metrics to Portrait.
Within Interface Builder, drag a Label object from the Object library panel (View -> Utilities -> Object Library) and position it in the center of the View window. Open the Attributes Inspector (View -> Utilities -> Attributes Inspector) and change the font on the label object to a larger setting (for example 36 pt). Double click on the label text so that it becomes editable and change it so that it reads "Screen One". Select the view area and change the background color to red in the attributes inspector panel.
Select ScreenTwoViewController.xib and perform the same steps, this time setting the label text to "Screen Two" and the background color of the view to green.
Testing the Multiview Application
All that remains to do is to test that the application works. From within the main Xcode project window click on the Run toolbar button and wait for the code to compile and run within the iOS iPad Simulator. Once running, selecting tabs from the tab bar should cause the views to switch:
Learn SwiftUI and take your iOS Development to the Next Level |
| Previous | Table of Contents | Next |
| iOS 4 iPad Rotation, View Resizing and Layout Handling (Xcode 4) | Creating a Simple iOS 4 iPad Table View Application (Xcode 4) |


