Installing Fedora Linux on a Windows System (Dual booting)
| Previous | Table of Contents | Next |
| Create Your Own Fedora Distribution with Revisor | Allocating a Windows Disk Partition to Fedora Linux |
Take your Fedora Linux Skills to the Next Level |
Fedora Linux, just like most Linux distributions, will happily co-exist on a hard disk drive with just about any version of Windows. This is a concept known as dual-booting. Essentially, when you power up your PC you will be presented with a menu providing the option to boot either Fedora Linux or Windows. Obviously you can only run one operating system at a time, but it is worth noting that the files on the Windows partition of your disk drive will be available to you from Fedora Linux regardless of whether your Windows partition was formatted using NTFS, FAT16 or FAT32.
This installation method involves shrinking the size of the existing Windows partition to accommodate the installation of Fedora. Recent Fedora releases have provided the option to automatically shrink existing disk partitions during the installation process. It is also possible to pre-shrink an existing partition before starting the installation process. In this chapter both approaches will be covered in detail.
Downloading the Fedora Live CD
The first step in the installation process is to obtain the Fedora installation media in a format suitable for installing on a hard disk which already contains a Windows installation. The easiest way to achieve this is to boot the Fedora Live CD and perform the configuration and installation from the live session. Live CD support was introduced in Fedora Linux beginning with the release of Fedora 7. The latest Fedora Live CD images can be downloaded from the Fedora project web site:
The download image is approximately 650Mb in size so a broadband internet connection is recommended and sufficient disk space on the target system required.
The Live CD images are listed in the Fedora Desktop Live Media category and images are available for both 32 and 64-bit processor architectures. If you are unsure of the architecture of your computer hardware, check with the manufacturer for clarification. If you are still unsure, or wish to get started quickly it is worth knowing that the 32-bit version of Fedora will also run on 64-bit systems, though the same cannot be said of running the 64-bit version on a 32-bit computer.
There are two predominant desktop environments on Linux, namely KDE and GNOME. Given that the default desktop environment on Fedora is the GNOME desktop this will be the desktop covered in the remainder of this book. Once you have downloaded the appropriate image for your hardware and choice of desktop, burn the image onto a CDROM. Check the documentation for your preferred CD writing software for steps on how to write an ISO image file to a CD if you do not already know how to do this.
Beginning the Dual Boot Installation Process
Place the Fedora Live CD into the CD drive of your Windows system and reboot. If the system loads Windows again you will need to change the boot order in your system BIOS. To do this reboot again. Early in the boot process the BIOS will display a message indicating which key should be pressed to enter Setup. Press the key indicated so that the BIOS Setup menu appears. Navigate the menu system until you find the setting which indicates the boot order used by the BIOS. Change the order so that the drive containing the Fedora Linux Live CDROM is listed before the hard disk drive, then exit and save the settings. Reboot once more and you should find that Fedora loads from the CDROM.
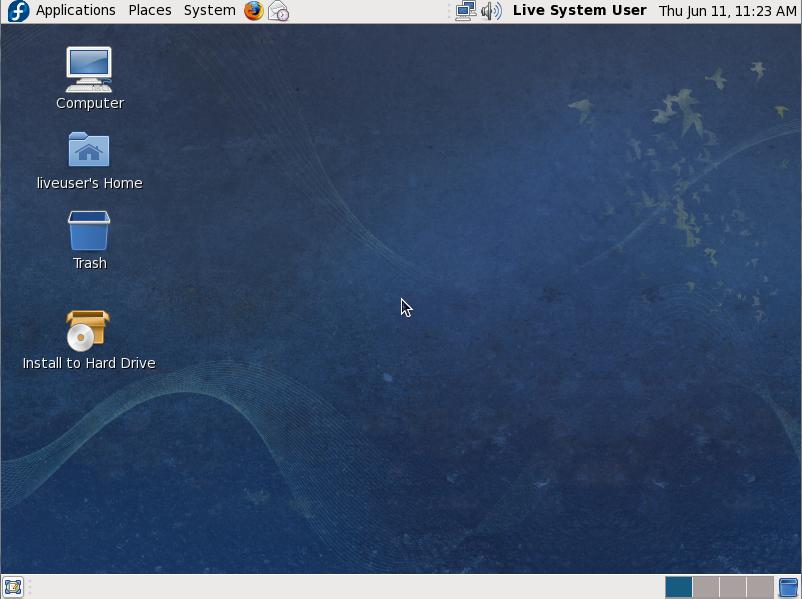
Once Fedora has loaded you will be presented with the Fedora login screen with the option to perform an automatic login pre-selected. If you take no action, Fedora will log you in after 60 seconds. If you prefer not to wait, click on the Login button to initiate the login sequence. Either way, Fedora will present you with the desktop screen similar to the one illustrated in the following figure:
To initiate the installation process, double click on the Install to Hard Drive icon located on the Fedora desktop. Once the installer has launched, make appropriate selections for keyboard layout, machine name, time zone and root password (the password that will be used when performing privileged administrative tasks on the system after installation). Once these settings have been configured, the drive partitioning screen will appear. At this point, the partition used by the incumbent Windows installation is ready to be resized to accommodate Fedora.
Resizing the Windows Partition
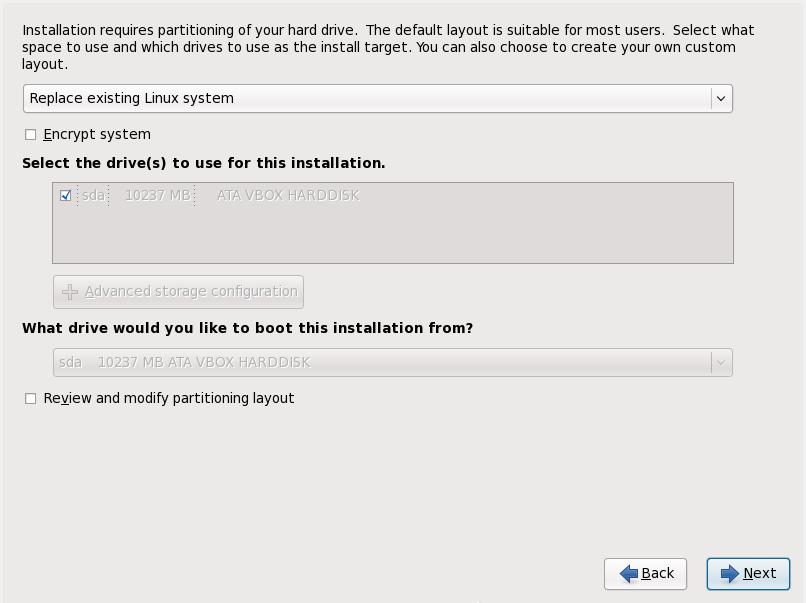
The installer screen responsible for configuring the basic partition layout of the target hard disk drive appears as illustrated in the following figure:
A number of options are provided for allocating space for the installation of Fedora:
- Use entire drive - The entire disk drive will be assigned to the Fedora operating system installation. Any pre-existing partitions, together with any existing operating systems and associated data files contained therein will be deleted to make room for Fedora. This option should only be used if you are absolutely sure you no longer need anything that is currently stored on that disk, or have already backed up all user files.
- Replace existing Linux System - If the drive was previously configured to support a Windows/Linux dual boot environment, this option may be selected to instruct the installer to delete the pre-existing Linux partition and replace it with Fedora. Once again, it is important to backup any user data that may still be needed.
- Shrink current system - Allows an existing partition to be reduced in size to make room on the drive for the Fedora installation. More details on this option are provided later in this chapter.
- Use free space - If the current partitions on the drive do not take up the entire disk space available, any unallocated space may be assigned to the Fedora installation using this option.
- Create custom layout - When selected, this option displays the disk partitioning tool allowing each partition on the disk to be manually configured. Unless you have experience with low level disk partitioning this option is not recommended.
Shrinking the Existing Windows Partition
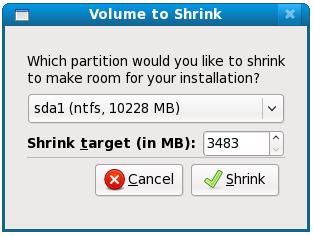
To create a dual boot environment, the existing Windows partition will need to be reduced in size to make room for Fedora to be installed on the hard disk drive. To achieve this, begin by selecting the Shrink current system option followed by the Next button. The installer will subsequently display the Volume to Shrink dialog as illustrated in the following figure:
Within this dialog, select the partition to shrink from the drop down menu, followed by the amount of space by which the partition is to be reduced in MB. Note that to allow sufficient room for the Fedora installation, a minimum of 5GB is recommended (equivalent to 5120MB). Once the partition and reduction amount have been entered, click on the Shrink button to initiate the partition modification. The installer will display a dialog seeking confirmation that you wish to proceed. Clicking the Write changes to disk button will commit the change. Once the resize process has completed, select the Use free space option and click Next to continue with the installation process.
The installer will format the unallocated space ready for the installation of Fedora and begin copying files to the partition.
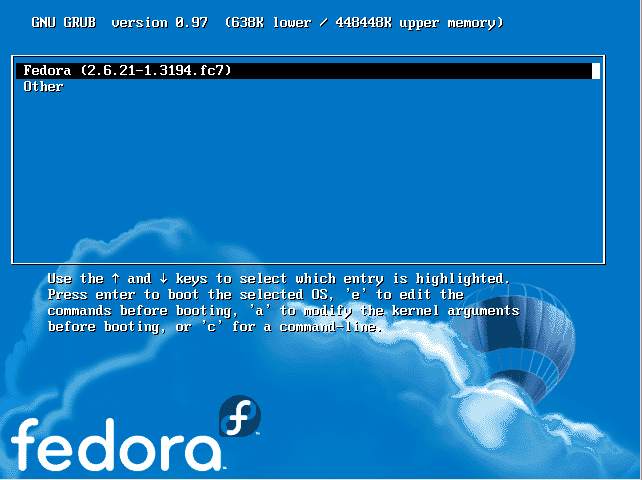
Once the installation completes, shutdown the Live CD Fedora session using the System->Shutdown menu option and eject the Fedora Live CD from the drive. Restart the system and note that a countdown message appears. Press any key at this point to enter the boot menu which will appear as follows:
This menu provides the option of booting either "Fedora" or "Other". In this instance, selecting "Other" will boot your original Windows installation. In the next section we will cover the steps to modify this menu to change the boot default and rename the "Other" menu option to something more descriptive.
Editing the Fedora Boot Menu
The boot menu configuration settings are stored in the /boot/grub/grub.conf file. This file may be edited in a terminal window (Applications->System Tools->Terminal) as follows:
su -
gedit /boot/grub/grub.conf
The contents of a typical grub.conf file is listed below:
# grub.conf generated by anaconda
#
# Note that you do not have to rerun grub after making changes to this file
# NOTICE:  You have a /boot partition.  This means that
#          all kernel and initrd paths are relative to /boot/, eg.
#          root (hd0,1)
#          kernel /vmlinuz-version ro root=/dev/VolGroup00/LogVol00
#          initrd /initrd-version.img
#boot=/dev/sda
default=0
timeout=5
splashimage=(hd0,1)/grub/splash.xpm.gz
hiddenmenu
title Fedora (2.6.21-1.3194.fc7)
        root (hd0,1)
        kernel /vmlinuz-2.6.21-1.3194.fc7 ro root=LABEL=/ rhgb quiet
        initrd /initrd-2.6.21-1.3194.fc7.img
title Other
        rootnoverify (hd0,0)
        chainloader +1
The above grub.conf file contains options to boot from two operating systems. The Fedora section of the configuration is as follows:
title Fedora (2.6.21-1.3194.fc7)
        root (hd0,1)
        kernel /vmlinuz-2.6.21-1.3194.fc7 ro root=LABEL=/ rhgb quiet
        initrd /initrd-2.6.21-1.3194.fc7.img
The Windows section of the configuration is:
title Other
        rootnoverify (hd0,0)
        chainloader +1
The default=0 line indicates that the first entry in the file is to be default operating systems (in other words, the operating system that will boot by default if the user does not intervene during the boot phase). The timeout=5 specifies the number of seconds the boot screen is displayed before the default operating system is automatically booted.
To configure the system to boot Windows by default simply change this line so that it reads as follows:
default=1
To increase the timeout before the default operating system boots, change the timeout value (in this case to 20 seconds):
timeout=20
The final task in our dual boot configuration process is to name the Windows boot option to something more descriptive than "Other". To achieve this, simply change the "Other" line as follows:
title Windows
Note that the title value can be anything you choose. Below is the entire grub.conf file with the above modifications made:
# grub.conf generated by anaconda
#
# Note that you do not have to rerun grub after making changes to this file
# NOTICE:  You have a /boot partition.  This means that
#          all kernel and initrd paths are relative to /boot/, eg.
#          root (hd0,1)
#          kernel /vmlinuz-version ro root=/dev/VolGroup00/LogVol00
#          initrd /initrd-version.img
#boot=/dev/sda
default=1
timeout=20
splashimage=(hd0,1)/grub/splash.xpm.gz
hiddenmenu
title Fedora (2.6.21-1.3194.fc7)
        root (hd0,1)
        kernel /vmlinuz-2.6.21-1.3194.fc7 ro root=LABEL=/ rhgb quiet
        initrd /initrd-2.6.21-1.3194.fc7.img
title Windows
        rootnoverify (hd0,0)
The next time the system is rebooted, the boot screen will wait 20 seconds before auto-booting. If no keys are pressed the system will now boot Windows by default, instead of Fedora Linux. If the user does intervene and display the boot menu, the Windows option is now titled "Windows" and not "Other".
Accessing the Windows Partition from Fedora Linux
When running Fedora Linux in a dual boot configuration it is possible to access files located on the Windows partition. This can be achieved using the file browser, or by manually mounting the partition from the command-line.
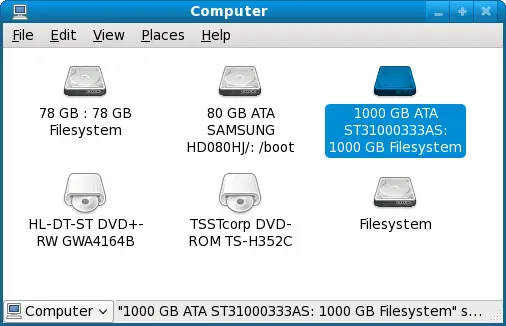
To access the Windows partition from the browser, select the Places->Computer desktop menu item. This will display a window similar to the one in the following figure containing a list of devices attached to the system:
Amongst the listed devices will be an icon for the hard disk drive containing the Windows partition. To mount this partition, double click on the disk drive and enter the root password if prompted to do so. A new window will subsequently appear listing contents of the top level directory of the Windows partition. It should now possible to navigate throughout the partition and access any files contained therein. In addition, a new shortcut will appear on the desktop containing a disk drive icon. Double clicking on this icon will provide access to the contents of the Windows partition.
Another option is to manually mount the Windows partition. The first step is to create a directory to use as the mount point. In this example we will create a directory called /windows from the terminal window (Applications->System Tools->Terminal):
su -
mkdir /windows
Next, we need to run the mount command (still as super user and assuming the Windows partition is /dev/sda1 and NTFS format - this may be different on your system):
mount /dev/sda1 /windows
Under some circumstances you may get a message that the Windows partition needs to be checked. If so, either reboot into Windows again, or force the mount:
mount /dev/sda1 /windows -o force
To automate the mount each time the system is booted, simply add the mount line to the /etc/fstab file:
/dev/sda1 /windows ntfs defaults 0 0
To unmount the Windows filesystem at any time:
umount /windows
Manually Partitioning the Disk for Windows/Fedora
Before moving on to the next chapter we will quickly look at the steps involved in manually resizing a Windows partition to make room for Fedora in advance of running the installer. The reason for including this information is that it can be helpful to understand what happens behind the scenes of the installer and also to provide an alternative mechanism should the installer fail to perform the resize operation.
Linux includes a powerful disk partitioning tool called GParted which will need to be installed before it can be used in the live system. To perform the installation, select the System->Administration->Add Remove Software menu option and wait for the application to start and populate the package list. Enter GParted into the text field, click Find and wait for the package to appear in the list. Click the check box next to the package name and initiate the installation.
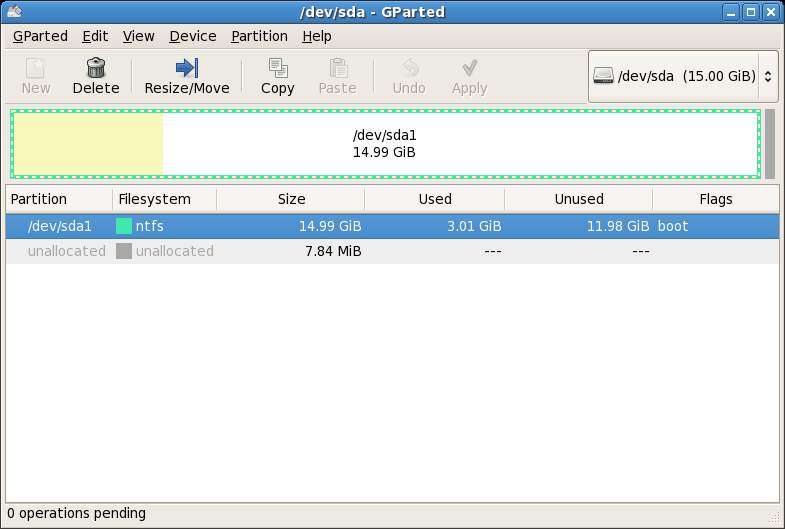
Once installed, to launch GParted click on the Applications desktop menu and from the System Tools sub-menu, select GParted. Once running, the GParted main screen will appear displaying a graphical representation of the disk partition layout:
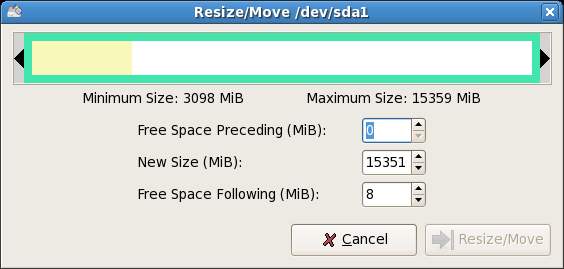
The above GParted session shows a Windows NTFS formatted partition which is taking up most of the available disk space. In order to make space for a Fedora Linux installation the next step is to resize the Windows NTFS partition. The objective is to reduce the size of the Windows partition from the current size of approximately 15GB to 8GB. This will create 7GB of unused space for the Fedora installation. Select the NTFS partition in the GParted window and click on the Resize/Move toolbar button to invoke the Resize/Move dialog:
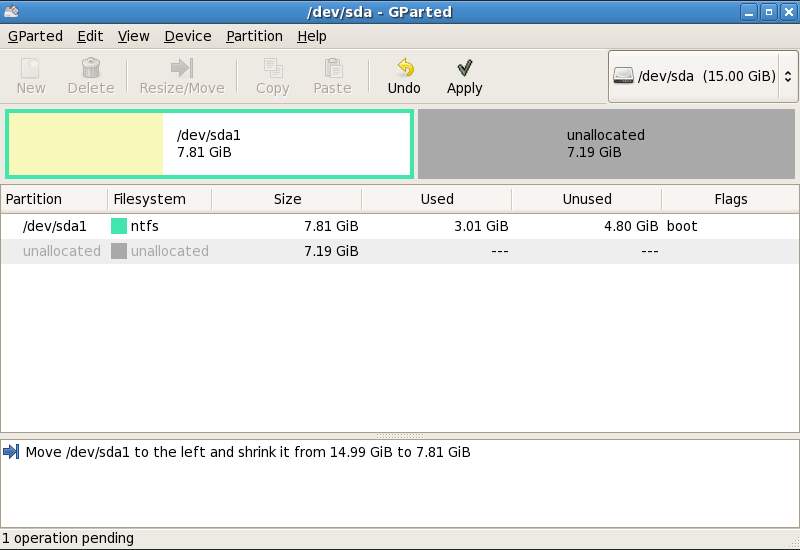
Change the New Size field to 8000 MiB and click on the Resize/Move button at the bottom of the dialog. The Resize action will then appear in the Pending panel at the bottom of the main GParted screen and the new space will be displayed in the graphical representation of the disk as Unallocated space:
To commit the resize click on the Apply button in the toolbar and confirm the resize in the subsequent warning dialog. The Apply pending operation dialog will appear and display the progress of the resize. Once the resize is completed successfully, close the dialog and exit GParted.
The disk is now partitioned with the existing Windows installation and unallocated space suitable for the installation of Fedora Linux. Launch the installer as previously outlined and select the Use free space option when prompted for partitioning information.
In the next chapter we will look at the steps necessary to remove a Windows partition from a dual boot configuration and assign that partition to Fedora Linux.
Take your Fedora Linux Skills to the Next Level |


