WatchOS 2 Page-based User Interfaces and Modal Interface Controllers
| Previous | Table of Contents | Next |
| Implementing watchOS 2 WatchKit Table Navigation | A watchOS 2 WatchKit Page-based Interface Tutorial |
| Purchase the full edition of this watchOS 2 App Development Essentials book in eBook ($12.99) or Print ($27.99) format watchOS 2 App Development Essentials Print and eBook (ePub/PDF/Kindle) editions contain 35 chapters. |
The WatchKit framework provides the infrastructure to create what Apple refers to as page-based interfaces within WatchKit Apps. A page-based interface consists of two or more WatchKit scenes through which the user is able to navigate by making left and right swiping motions on the Apple Watch screen.
Another form of transition between scenes involves the modal presentation of interface controller scenes within a WatchKit app. Since the modal interface controller is a useful mechanism for transitioning to an interface controller from a page-based scene, both topics will be covered in this chapter.
The Elements of a Page-based WatchKit Interface
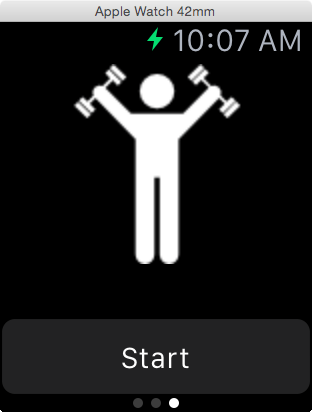
A page-based WatchKit interface provides a way to navigate through a sequence of scenes by making left and right swiping motions on the display. Each scene within the navigation sequence is represented by a dot along the bottom edge of the display with the dot representing the currently displayed scene highlighted. Figure 9-1, for example, shows a page-based interface containing three scenes in which the third scene is currently displayed:
Figure 9-1
When implementing page-based navigation, each scene will typically be assigned its own unique interface controller. As will be demonstrated in the next chapter, however, it also is possible to make use of context data to configure multiple scenes to use the same interface controller class.
Associating Page Scenes
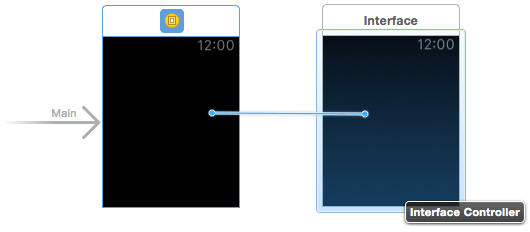
The scenes that are to be collected into a page-based navigation interface are connected together using next page segues within the WatchKit app storyboard file. Segues are transitions that have been configured between one scene and another within a storyboard and are typically implemented within the Interface Builder environment. Consider, for example, a storyboard containing two scenes. A segue between the two scenes can be created within Interface Builder by Ctrl-clicking on the first scene and dragging the resulting line to the second scene as shown in Figure 9-2.
Figure 9-2
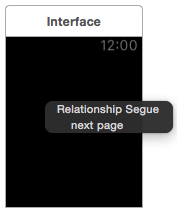
Upon releasing the line, a menu will appear providing a list of segue types available based on the context of the scene selections. Figure 9-3, for example, shows the segue menu providing the option to create a next page relationship segue between two scenes.
Figure 9-3
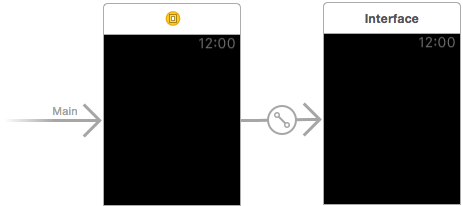
Once a segue has been established, it appears as a line and arrow between the two connected scenes (Figure 9-4). As with other items within a storyboard, a segue line can be selected and deleted. Certain types of segue may also be selected and given an identifier which, as will be shown later in the chapter, can be used to provide context during the transition from one scene to another.
Figure 9-4
| Purchase the full edition of this watchOS 2 App Development Essentials book in eBook ($12.99) or Print ($27.99) format watchOS 2 App Development Essentials Print and eBook (ePub/PDF/Kindle) editions contain 35 chapters. |
Managing Pages at Runtime
The interface controllers and ordering sequence for a paging interface may also be specified from within the application code via a call to the reloadRootControllersWithNames WKInterfaceController class method, passing through an array containing the identifiers of the interface controllers to be included in the page navigation together with a second array containing context data to be passed to each controller during scene transitions, for example:
WKInterfaceController.reloadRootControllersWithNames(
	["controllerOne", "controllerTwo"],
          contexts: [contextObj1, contextObj2])
It is also possible to make an interface controller the currently displayed controller within the page sequence via a call to the becomeCurrentPage method within an initialization method of the interface controller to be displayed.
Modal Presentation of Interface Controllers
Interface controller scenes can be displayed modally using either storyboard segues, or programmatically from within a WatchKit app extension. Modal interface controllers are typically used to display information to the user and result in the scene associated with the controller appearing to the user together with an option located in the top left hand corner to dismiss the scene and return to the previous controller.
Modal Presentation in Code
Modal interface controllers can be displayed individually, or as a paging group. A single interface controller can be presented in code via a call to the presentControllerWithName method, passing through as parameters the identifier name of the interface controller to be displayed and an optional object containing context data which will be passed to the modal interface controller via the awakeWithContext lifecycle method. For example, the following code fragment modally presents the interface controller with the identifier matching “controllerTwo”:
presentControllerWithName("controllerTwo", context: contextObj)
A set of interface controllers organized using page-based navigation may be presented modally from within code using the presentControllerWithNames method passing through arrays containing the controller identifiers and corresponding context objects:
presentControllerWithNames(["controllerOne", "controllerTwo"],
          contexts: [contextObj1, contextObj2])
By default, the dismissal option displayed in the modal scene will be labelled “Cancel”. This can be changed by setting the title property of the interface controller to the desired text.
Modal Presentation using Storyboard Segues
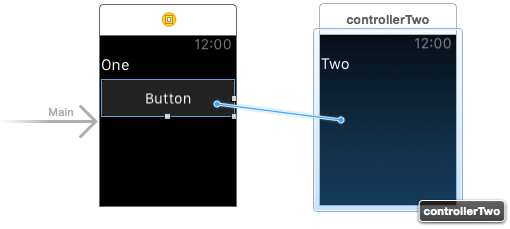
An alternative to writing code to present an interface controller modally involves the use of storyboard segues. All that is required to implement a modal segue is to Ctrl-click on the user interface object within the scene that is to trigger the modal transition and then drag the line to the scene that is to be presented. If a modal segue can be established, the destination scene will highlight as shown in Figure 9-5. If the scene does not highlight, a segue cannot be established. It is not possible, for example, to establish a segue from a Label object because labels, unlike Button objects, do not trigger an event when tapped by the user.
Figure 9-5
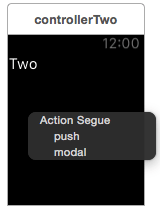
Upon release of the line, the segue menu will appear from which the modal option should be selected:
Figure 9-6
To modally present a collection of interface controllers grouped together using page-based navigation, simply connect the scenes together within the storyboard using next page segues as previously described.
Passing Context Data During a Modal Segue
The segue connection illustrated in Figure 9-5 above will cause the second interface controller to be presented modally when the button in the first interface controller is tapped by the user. If that is the only functionality that is required then no further steps are necessary when working with modal segues. If, on the other hand, context data needs to be passed during the segue transition then an additional step is needed.
When working with segues, the context data to be passed to the destination interface controllers can be specified by overriding either the contextForSegueWithIdentifier or contextsForSegueWithIdentifier method within the interface controller from which the segue is originating. The contextForSegueWithIdentifier method can be used to pass context data when presenting a single modal interface controller while the contextsForSegueWithIdentifier method is used when passing multiple context objects during the transition to a page-based set of interface controllers. In each case, the method will be called by the WatchKit framework during the scene transition and must return either a single context object, or in the case of the contextsForSegueWithIdentifier method, an array of context objects. The following code listing shows an example implementation of the method configured to return a string as the context object:
override func contextForSegueWithIdentifier(segueIdentifier: String)
	-> AnyObject? {
    return("MyContextString")
}
The context objects returned by these methods are passed to the corresponding destination interface controllers via the awakeWithContext lifecycle method.
Summary
Page-based navigation within WatchKit apps allows a sequence of interface controller scenes to be navigated by the user through left and right swiping motions performed on the display of the Apple Watch device. The interface controllers that comprise a page-based collection are grouped together within a storyboard file through the implementation of next page segues between each controller. Page-based interface controller groups may also be managed at runtime using the reloadRootControllersWithNames and becomeCurrentPage methods.
Interface controllers may be presented modally either by setting up a modal segue within a storyboard file, or from within code via method calls. The destination of a modal transition can take the form of either a single interface controller or a group of page-based controllers. Each modal controller displays an option for the user to return to the originating interface controller. Mechanisms are also provided for passing context data to the modal interface controller from the originating controller.
| Purchase the full edition of this watchOS 2 App Development Essentials book in eBook ($12.99) or Print ($27.99) format watchOS 2 App Development Essentials Print and eBook (ePub/PDF/Kindle) editions contain 35 chapters. |
| Previous | Table of Contents | Next |
| Implementing watchOS 2 WatchKit Table Navigation | A watchOS 2 WatchKit Page-based Interface Tutorial |
