Visual Basic and Forms
| Previous | Table of Contents | Next |
| A Simple Visual Basic Example | Designing Forms in Visual Studio |
| Purchase and download the fully updated Visual Basic 2010 edition of this eBook in PDF and ePub for only $9.99 |
The Windows Form is a vital component in the development of any Windows-based application. Forms essentially provide the windows that make up a Windows application. In fact, the terms window and form are often used interchangeably. Forms allow the Visual Basic developer to create windows and layout controls (such as buttons, labels etc) in those forms to provide the application's user interface.
In the next chapter (Designing Forms in Visual Basic) we will look at how to layout controls inside a form. Before we reach that stage, however, there are a surprising number of ways in which the form itself can be modified and configured. We will cover these options in detail in this chapter.
Creating a New Form
Throughout this chapter we will work with a form in a new project. Begin by starting Visual Studio and creating a new Windows Application project (see Creating a New Visual Basic Project for details of how to do this). Name the project VBforms.
Once the new project is created you will see a Form in Visual Studio ready for you to begin work.
Changing the Form Name
All objects in a Visual Basic application need a name so that they can be referenced in the code. When a new object is added to an application in Visual Studio it is assigned a default name which usually consists of the object type and a number. For example the first form object in an application is named Form1, the second Form2, and so on.
To change the name of a Form to something more meaningful, simply click in any area of the Form in Visual Studio and change the (Name) value in the Properties panel.
Changing the Form Title
Each form represents an application window. The text displayed in the title bar for each window should be changed to display something meaningful. This should either be the name of application, or a description of the form's function (for example Order Entry or Sales Report).
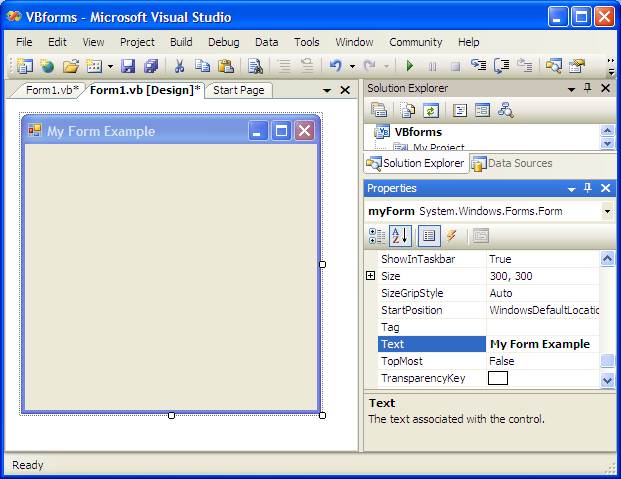
The value of the text to be displayed in the window title is defined by the form's Text property. To change the title of the form, therefore, select the Text value in the Properties panel and change it to a new value (for example, 'My Form Example'):
Changing the Form Background Color
<google>ADSDAQBOX_FLOW</google> The background of any form may be changed either by specifying a new color, or by using a background image. The background color is controlled by the BackColor property of the form. By default this property is set to Control. This specifies that the form should use a system defined default color. This color varies between different Windows versions, and changes when the user changes the overall color scheme of their Windows system.
To change the background color, select the form in Visual Studio and locate the BackColor property in the Properties panel. There are a number of ways to specify a color.
- Color by name - Simply type in a color name into the BackColor value field (for example Red, Yellow, Cyan etc).
- Color by RGB value - Colors may be specified by entering the hexadecimal RGB values (for example #FFFFFF for white, #000000 for black and so on). RGB values may also be specified using decimal values (for example 255,255,255 for white, 0,0,0 for black etc).
- Color from existing palette - Clicking on the down arrow in the BackColor value field will display a drop down menu. Lists are available for web safe colors, custom colors and system colors.
Once you have selected a new color the background color of your form will change to reflect the new setting.
Changing the Form Background Image
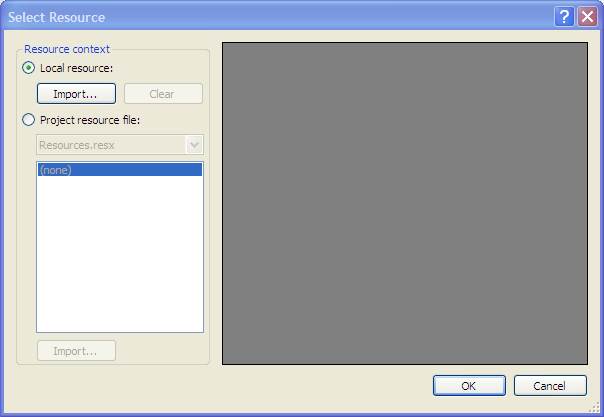
In addition to changing the background color of a form, it is also possible to specify a background image. This is specified using the form's BackgroundImage property in the Properties panel. When the BackgroundImage property is selected in the Property panel a button containing the label '...' appears. Click on this button to display the Select Resource window:
Click on the Local Resource option button and click on Import to browse for an image. If you don't have any images of your own readily available try looking in for the Sample Pictures folder in My Documents.
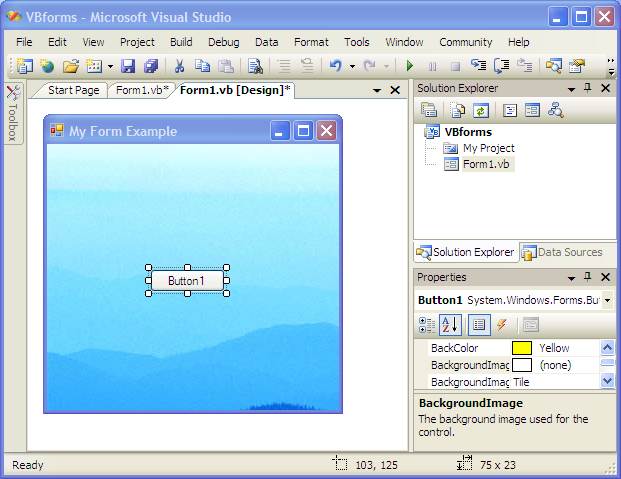
Once selected, the image will be applied to the form background and any controls added will appear on top of the image. The following figure shows a form with a background image and a Button control:
If the image used for the background is smaller than the form size, windows will use multiple copies of the image in a tile arrangement to ensure the entire available area is filled.
Configuring the Minimize, Maximize and Close Buttons
Each window in a Windows application has, by default, Minimize, Maximize and Close buttons in the top left hand corner of the title bar. In addition, clicking on the icon on the right hand side of the title bar drops down a control box containing the same options, plus options to resize the window.
These options make it easy for the user to perform tasks such as minimizing or maximizing a form. If, however, you do not want these controls to be available for a particular form they can be disabled from the Properties panel for the form in question. To disable the Maximize button set the MaximizeBox property to False. Similarly, disable the Minimize button by setting the MinimizeBox property to False. In each case the button will still be visible, but will be disabled so the user cannot click on it.
To remove all controls, including the Control Box and the Minimize, Maximize and Close buttons set the ControlBox property to False. When set, the only content in the form's toolbar will be the form title.
Setting Minimum and Maximum Form Sizes
The minimum and maximum sizes of a form can be specified. These limitations are controlled via the MinimumSize and MaximumSize properties respectively. Once set, assuming the form is sizable, the user will not be able to resize the form beyond the size boundaries you have defined using these properties.
Specifying the Position of a Form on the Display
The initial position of a form when it is first displayed in an application is controlled by the form's StartPosition property in conjunction with the Location property. The StartPosition property can be set to one of a number of different values:
- Manual - Sets the initial position of the form to the X and Y coordinates specified by the Location property.
- CenterScreen - Specifies that the form should be positioned in the center of the display.
- WindowsDefaultLocation - This is the default setting for this property and dictates that the form be positioned in the default Windows location for new windows (typically near the top left hand corner of the screen).
- CenterParent - If the form is a child of another form, this value specifies that the form should be positioned within the center of the parent form.
Changing the Form Border
By default a form can be resized by the user. Visual Studio allows both this behavior, and the appearance of the border to be controlled by manipulating the FormBorderStyle property. The border may be configured to allow, or disallow resizing of the form, with a variety of border styles (such as 3D).
To change the border, select the FormBorderStyle in the Properties panel of the form you wish to modify. Click on the down arrow in the value field to drop down a menu of items and select the setting of your choice. Feel free to experiment with the different settings, using the F5 key to build and run your application to try out each setting.
Stopping a Form from Appearing the Windows Taskbar
By default every form in an application is shown in the Windows desktop taskbar when it is created. Whilst this is acceptable for a small application consisting of one or two forms, it is unlikely that you would want every single form to appear in the taskbar.
To prevent a form from appearing the taskbar simply set the ShowInTaskbar property to False.
Creating a Transparent Form
The Opacity property can be used to control the degree of transparency of a form of control. The lower the opacity percentage the more transparent the form or control. To make a form transparent, select the form and change the Opacity percentage to 70% (if you select a percentage that is too low the form will be invisible when the application is run). Press F5 to build and run the application. The form will be partially transparent in that you can still see the form and its controls, but you can also see what is on the desktop behind the form.
| Purchase and download the fully updated Visual Basic 2010 edition of this eBook in PDF and ePub for only $9.99 |


