Setting up a Kindle Fire Android Development Environment
| Previous | Table of Contents | Next |
| An Overview and History of the Kindle Fire | Creating a Kindle Fire Android Virtual Device (AVD) |
<google>BUY_KINDLE_FIRE</google>
Before any work can begin on the development of an Android application for the Kindle Fire, the first step is to configure a computer system to act as the development platform. This involves a number of steps consisting of installing the Java Development Kit (JDK), the Eclipse Integrated Development Environment (IDE) and the appropriate Android Software Development Kit (SDK). In addition to these steps, it will also be necessary to install the Eclipse Android Development Tool (ADT) Plug-in.
This chapter will cover the steps necessary to install the requisite components for Kindle Fire development on Windows, Mac OS X and Linux based systems.
System Requirements
Kindle Fire application development may be performed on any of the following system types:
- Windows XP (32-bit)
- Windows Vista (32-bit or 64-bit)
- Windows 7 (32-bit or 64-bit)
- Windows 8
- Mac OS X 10.5.8 or later (Intel based systems only)
- Linux systems with version 2.7 or later of GNU C Library (glibc)
Installing the Java Development Kit (JDK)
Both the Eclipse IDE and Android SDK were developed using the Java programming language. Similarly, Android applications written for the Kindle Fire are also developed using Java. As a result, the Java Development Kit (JDK) is the first component that must be installed.
Kindle Fire development requires the installation of the Standard Edition of the Java Platform Development Kit version 6 or later. Java is provided in both development (JDK) and runtime (JRE) packages. For the purposes of Kindle Fire development, the JDK must be installed.
Windows JDK Installation
For Windows systems, the JDK may be obtained from Oracle Corporation’s website using the following URL:
http://www.oracle.com/technetwork/java/javase/downloads/index.html
Assuming that a suitable JDK is not already installed on your system, download the latest JDK package that matches the destination computer system. Note that although Oracle provides JDK packages for 32-bit (Windows x86) and 64-bit (Windows x64) systems, Amazon recommends use of the 32-bit download even when running a 64-bit version of Windows. Once downloaded, launch the installation executable and follow the on screen instructions to complete the installation process.
Mac OS X JDK Installation
The Java SE 6 environment or a more recent version should already be installed on the latest Mac OS X versions. To confirm the version that is installed, open a Terminal window and enter the following command:
java -version
Assuming that Java is currently installed, output similar to the following will appear in the terminal window:
java version "1.6.0_37"
Java(TM) SE Runtime Environment (build 1.6.0_37-b06-434-11M3909)
Java HotSpot(TM) 64-Bit Server VM (build 20.12-b01-434, mixed mode)
In the event that Java is not installed, issuing the “java” command in the terminal window should initiate the JDK installation process.
Linux JDK Installation
Firstly, if the chosen development system is running the 64-bit version of Ubuntu then it is essential that the 32-bit library support package be installed:
sudo apt-get install ia32-libs
As with Windows based JDK installation, it is possible to install the JDK on Linux by downloading the appropriate package from the Oracle web site, the URL for which is as follows:
http://www.oracle.com/technetwork/java/javase/downloads/index.html
Packages are provided by Oracle in RPM format (for installation on Red Hat Linux based systems such as Red Hat Enterprise Linux, Fedora and CentOS) and as a tar archive for other Linux distributions such as Ubuntu.
On Red Hat based Linux systems, download the .rpm JDK file from the Oracle web site and perform the installation using the rpm command in a terminal window. Assuming, for example, that the downloaded JDK file was named jdk-7u10-linux-x64.rpm, the commands to perform the installation would read as follows:
su
rpm –ihv jdk-7u10-linux-x64.rpm
To install using the compressed tar package (tar.gz) perform the following steps:
1. Create the directory into which the JDK is to be installed (for the purposes of this example we will assume /home/demo/java). 2. Download the appropriate tar.gz package from the Oracle web site into the directory. 3. Execute the following command (where <jdk-file> is replaced by the name of the downloaded JDK file): tar xvfz <jdk-file>.tar.gz 4. Remove the downloaded tar.gz file. 5. Add the path to the bin directory of the JDK installation to your $PATH variable. For example, assuming that the JDK ultimately installed into /home/demo/java/jdk1.7.0_10 the following would need to be added to your $PATH environment variable:
/home/demo/java/jdk1.7.0_10/bin
This can typically be achieved by adding a command to the .bashrc file in your home directory (specifics may differ depending on the particular Linux distribution in use). For example, change directory to your home directory, edit the .bashrc file contained therein and add the following line at the end of the file (modifying the path to match the location of the JDK on your system):
export PATH=/home/demo/java/jdk1.7.0_10/bin:$PATH
Having saved the change, future terminal sessions will include the JDK in the $PATH environment variable.
Downloading the Android Developer Tools (ADT) Bundle
Most of the work involved in developing applications for the Kindle Fire will be performed using the Eclipse Integrated Development Environment (IDE). If you are already using Eclipse to develop for other platforms, then the Android Developer Tools (ADT) plug-in can be integrated into your existing Eclipse installation (a topic covered later in this chapter). If, on the other hand, you are entirely new to Eclipse based development, the most convenient path to take is to install a package known as the ADT Bundle. This bundle includes many of the tools necessary to begin developing Android applications in a single download.
The ADT Bundle may be downloaded from the following web page:
https://developer.android.com/sdk/index.html
From this page, either click on the download button if it lists the correct platform (for example on a Windows based web browser the button will read “Download the SDK ADT Bundle for Windows”), or select the “Download for Other Platforms” option to manually select the appropriate package for your platform and operating system. On the subsequent screen, accept the terms and conditions, the target architecture of your computer system (32-bit or 64-bit) and click on the download button.
Installing the ADT Bundle
The ADT Bundle is downloaded as a compressed ZIP archive file which must be unpacked to complete the installation process. The exact steps to achieve this differ depending on the operating system.
Installation on Windows
Locate the downloaded ADT Bundle zip file in a Windows Explorer window, right-click on it and select the Extract All… menu option. In the resulting dialog, choose a suitable location into which to unzip the file before clicking on the Extract button. When choosing a suitable location, keep in mind that the extraction will create a sub-folder in the chosen location named either adt-bundle-windows-x86 or adt-bundle-windows-x86_64 containing the bundle packages.
Once the extraction is complete, navigate in Windows Explorer to the directory containing the ADT bundle, move into the eclipse sub-folder and double click on the eclipse executable to start the Eclipse IDE environment. For easier future access, right click on the eclipse executable and select Pin to Taskbar from the resulting menu.
It is possible that Windows will display a Security Warning dialog before Eclipse will launch stating that the publisher could not be verified. In the event that this warning appears, uncheck the “Always ask before opening this file” option before clicking the Run button. Once invoked, Eclipse will prompt for the location of the workspace. All projects will be stored by default into this folder. Browse for a suitable location, or choose the default offered by Eclipse and click on OK.
Installation on Mac OS X
On Mac OS X systems, open a terminal window, change directory to the location where Eclipse is to be installed and execute the following command:
unzip /<path to package>/<package name>.zip
For example, assuming a package file named adt-bundle-mac-x86_64.zip has been downloaded to /home/demo/Downloads, the following command would be needed to install Eclipse:
unzip /home/demo/Downloads/adt-bundle-mac-x86_64.zip
Note that the bundle will be installed into a sub-directory named adt-bundle-mac-x86_64. Assuming, therefore, that the above command was executed in /Users/demo, the software packages will be unpacked into /Users/demo/adt-bundle-mac-x86_64. Within this directory, the files comprising the Eclipse IDE are installed in a sub-directory named eclipse. Using the Finder tool, navigate to the eclipse sub-directory of the ADT bundle installation directory and double click on the eclipse executable to launch the application. For future easier access to the tool, simply drag the eclipse icon from the Finder window and drop it onto the dock.
Installation on Linux
On Linux systems, open a terminal window, change directory to the location where Eclipse is to be installed and execute the following command:
unzip /<path to package>/<package name>.zip
For example, assuming a package file named adt-bundle-linux-x86.zip has been downloaded to /home/demo/Downloads, the following command would be needed to install Eclipse:
unzip /home/demo/Downloads/adt-bundle-linux-x86.zip
Note that the bundle will be installed into a sub-directory named either adt-bundle-linux-x86 or adt-bundle-linux-x86_64 depending on whether the 32-bit or 64-bit edition was downloaded. Assuming, therefore, that the above command was executed in /home/demo, the software packages will be unpacked into /home/demo/adt-bundle-linux-x86. Within this directory, the files comprising the Eclipse IDE are installed in a sub-directory named eclipse.
To launch Eclipse, open a terminal window, change directory to the eclipse sub-directory of the ADT bundle installation directory and execute the following command:
./eclipse
Once invoked, Eclipse will prompt for the location of the workspace. All projects will be stored by default into this folder. Browse for a suitable location, or choose the default offered by Eclipse and click on OK.
Having verified that the Eclipse IDE is installed correctly, keep Eclipse running so that it can be used to install additional Android and Kindle specific SDK packages.
Installing the Correct Android and Kindle Fire SDK Packages
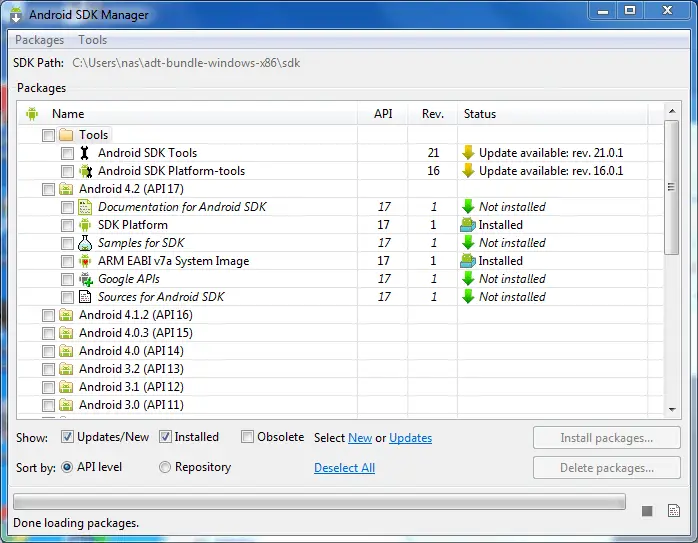
The steps performed so far have installed Java, the Eclipse IDE and the current set of default Android SDK packages. In order to develop applications for the Kindle Fire family of devices, particular versions of the Android SDK packages need to be installed along with some Kindle Fire specific SDK packages. This task can be performed using the Android SDK Manager, which may be launched from within the Eclipse tool by selecting the Window -> Android SDK Manager menu option. Once invoked, the SDK Manager tool will appear as illustrated in Figure 3-1:
Figure 3-1
Once the SDK Manager is running, return to the main Eclipse window and select the File -> Exit menu option to exit from the Eclipse environment. This will leave the Android SDK Manager running whilst ensuring that the Eclipse session does not conflict with the installation process.
Begin by checking that the SDK Path: setting at the top of the SDK Manager window matches the location into which the ADT Bundle package was unzipped. If it does not, relaunch Eclipse and select the Window -> Preferences option. In the Preferences dialog, select the Android option from the left hand panel and change the SDK Location setting so that it references the sdk sub-folder of the directory into which the ADT Bundle was unzipped before clicking on Apply followed by OK.
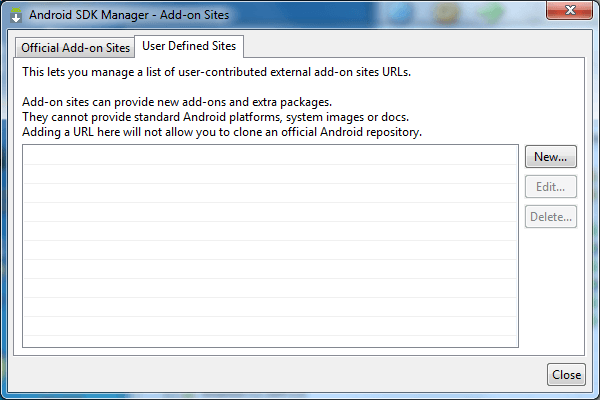
The ultimate goal at this point is to download and install the SDK packages needed for Kindle Fire development. Most of these will be downloaded from the standard Google repository servers. A few packages, however, will need to be downloaded direct from Amazon. In order to make this possible, a new Add-on Site needs to be added to the list of sites in the manager. To achieve this, select the Tools -> Manage Add-on Sites menu option. In the resulting window, select the User Defined Sites tab as illustrated in Figure 3-2:
Figure 3-2
Click on the New… button and enter the following URL into the resulting dialog:
http://kindle-sdk.s3.amazonaws.com/addon.xml
Click OK to close the dialog, make sure the URL is now listed under User Defined Sites and then click Close. The main SDK Manager window should now list Extras options to install the Kindle Fire Device Definitions and the Kindle Fire USB Driver packages. At the time of writing, Kindle Fire application development is performed using the Android 2.2.3 API Level 10 and Android 4.0.3 API level 15 SDKs. The current versions supported by the Kindle Fire device family can be identified by referring to the following web page:
https://developer.amazon.com/sdk/fire/setup.html
For the purposes of this tutorial, the assumption is made that Android 4.0.3 is still the current release for newer Kindle Fire models.
Within the Android SDK Manager, make sure that the check boxes next to the following packages are selected:
- Tools > Android SDK Tools: Rev. 21
- Tools > Android SDK Platform-tools: Rev. 16
- SDK Platform Android 4.0.3 API 15 > SDK Platform
- SDK Platform Android 4.0.3 API 15 > ARM EABI v7a System Image
- SDK Platform Android 4.0.3 API 15 > Kindle Fire (2nd Generation)
- SDK Platform Android 4.0.3 API 15 > Kindle Fire HD 7”
- SDK Platform Android 4.0.3 API 15 > Kindle Fire HD 8.9”
- SDK Platform Android 2.3.3 API 10 > SDK Platform
- SDK Platform Android 2.3.3 API 10 > Kindle Fire
- Extras > Kindle Fire USB Driver (Not applicable for Mac OS X or Linux.)
- Extras > Kindle Fire Device Definitions
- Extras > Android Support Library
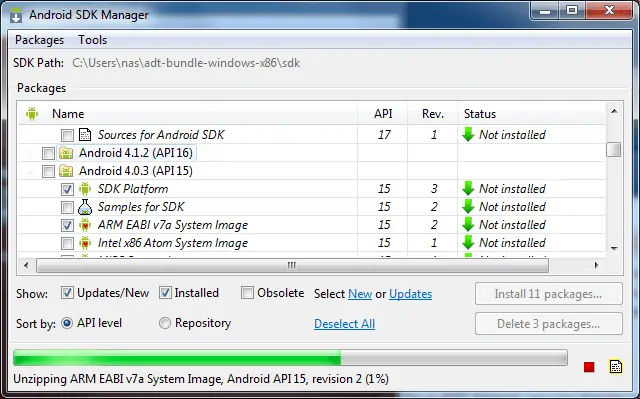
With the appropriate package selections made, click on the Install packages button to initiate the installation process. In the resulting dialog, accept the license agreements before clicking on the Install button. The SDK Manager will then begin to download and install the designated packages. As the installation proceeds, a progress bar will appear at the bottom of the manager window indicating the status of the installation as illustrated in Figure 3-3:
Figure 3-3
Once the installation is complete, review the package list and make sure that the selected packages are now listed as Installed in the Status column. If any are listed as Not installed (usually the Kindle Fire specific packages need to be installed separately from the generic Android packages), make sure they are selected and click on the Install packages… button again.
Making the Android SDK Tools Command-line Accessible
Most of the time, the underlying tools of the Android SDK will be accessed from within the Eclipse environment. That being said, however, there will also be instances where it will be useful to be able to invoke those tools from a command prompt or terminal window. In order for the operating system on which you are developing to be able to find these tools, it will be necessary to add them to the system’s PATH environment variable. Regardless of operating system, the PATH variable needs to be configured to include the following paths (where <path_to_adt_installation> represents the file system location into which the ADT bundle was installed):
<path_to_adt_installation>/sdk/tools
<path_to_adt_installation>/sdk/platform-tools
The steps to achieve this are operating system dependent:
Windows 7
1. Right click on Computer in the desktop start menu and select Properties from the resulting menu. 2. In the properties panel, select the Advanced System Settings link and, in the resulting dialog, click on the Environment Variables… button. 3. In the Environment Variables dialog, locate the Path variable in the System variables list, select it and click on Edit…. Locate the end of the current variable value string and append the path to the android platform tools to the end, using a semicolon to separate the path from the preceding values. For example, assuming the ADT bundle was installed into /Users/demo/adt-bundle-windows-x86_64, the following would be appended to the end of the current Path value:
;C:\Users\demo\adt-bundle-windows-x86_64\sdk\platform-tools;C:\Users\demo\adt-bundle-windows-x86_64\sdk\tools
4. Click on OK in each dialog box and close the system properties control panel. Once the above steps are complete, verify that the path is correctly set by opening a Command Prompt window (Start -> All Programs -> Accessories -> Command Prompt) and at the prompt enter:
echo %Path%
The returned path variable value should include the paths to the Android SDK platform tools folders. Verify that the platform-tools value is correct by attempting to run the adb tool as follows:
adb
The tool should output a list of command line options when executed.
Similarly, check the tools path setting by attempting to launch the Android SDK Manager: android
In the event that a message similar to following message appears for one or both of the commands, it is most likely that an incorrect path was appended to the Path environment variable:
'adb' is not recognized as an internal or external command,
operable program or batch file.
Windows 8
1. On the start screen, move the mouse to the bottom right hand corner of the screen and select Search from the resulting menu. In the search box, enter Control Panel. When the Control Panel icon appears in the results area, click on it to launch the tool on the desktop. 2. Within the Control Panel, use the Category menu to change the display to Large Icons. From the list of icons select, the one labeled System. 3. Follow the steps outlined for Windows 7 starting from step 2.
Adding the ADT Plugin to an Existing Eclipse Integration
The steps outlined so far in this chapter have assumed that the Eclipse IDE is not already installed on your system. In the event that you are already using Eclipse for Java based development, the appropriate Android development tools and SDKs can be added to this existing Eclipse installation. Eclipse editions with which the ADT Plugin is compatible are as follows:
- Eclipse IDE for Java Developers
- Eclipse Classic (versions 3.5.1 and higher)
- Eclipse IDE for Java EE Developers
- Eclipse for Mobile Developers
The ADT Plugin for Eclipse adds a range of Android specific features to what is otherwise a general-purpose Java edition of the Eclipse environment. To install this plugin, launch Eclipse and select the Help –> Install New Software… menu option. In the resulting window, click on the Add… button to display the Add Repository dialog. Enter “ADT Plugin” into the Name field and the following URL into the Location field:
https://dl-ssl.google.com/android/eclipse/
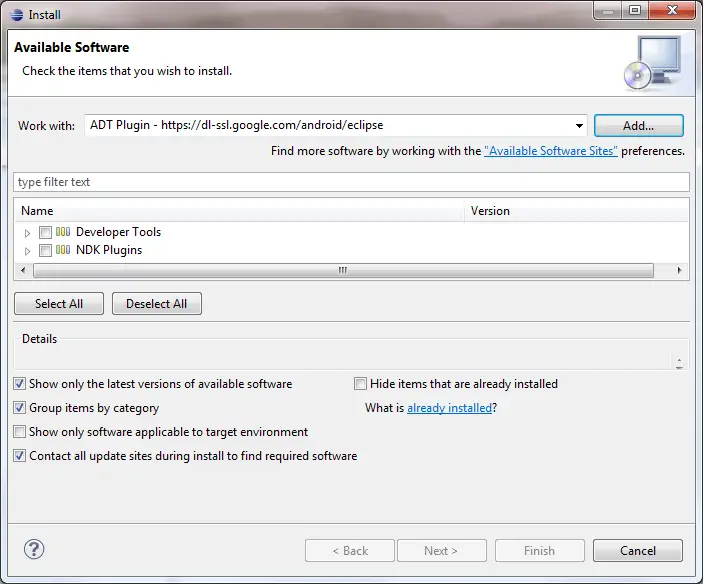
Click on the OK button and wait while Eclipse connects to the Android repository. Once the information has been downloaded, new items will be listed entitled Developer Tools and NDK Plugins as illustrated in Figure 3-4:
Figure 3-4
Select the checkbox next to the Developer Tools entry and click on the Next > button. After requirements and dependencies have been calculated by the installer, a more detailed list of the packages to be installed will appear. Once again click on the Next > button to proceed. On the subsequent licensing page, select the option to accept the terms of the agreements (assuming that you do, indeed, agree) and click on Finish to complete the installation. During the download and installation process, you may be prompted to confirm that you wish to install unsigned content. In the event that this happens, simply click on the option to proceed with the installation.
When the ADT Plugin installation is complete, a dialog will appear providing the option to restart Eclipse in order to complete the installation. Click on Yes and wait for the tool to exit and re-launch.
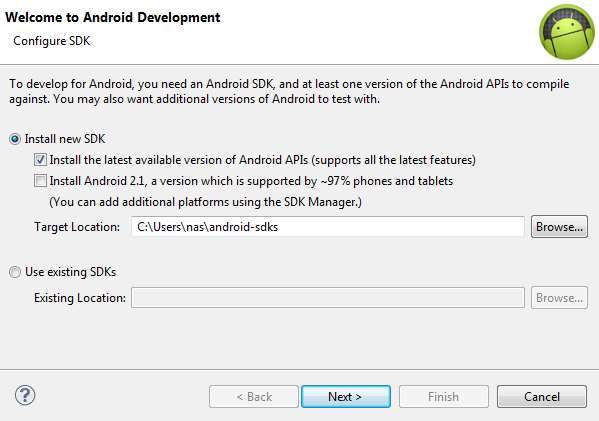
Upon restarting, the Welcome to Android Development dialog will appear as illustrated in Figure 3-5:
Figure 3-5
At this stage there is no existing SDK installed so the Use Existing SDKs choice is not a viable option. Unfortunately, the ADT Plugin does not provide the option at this point to install the SDKs of our choice so we will need to install the latest available SDK versions and then manually install the ones we actually need for Kindle Fire development. With this in mind, select the option to install the latest available version of the Android APIs. Make a note of the Target Location path and change it if you prefer the SDKs to be installed in a different location, then click Next. Choose whether to send usage information to Google, accept all the licensing terms and click on Install. The Android SDK Manager will now download and install the latest Android SDKs. Once this process is complete, follow the steps outlined in the earlier section entitled Installing the Correct Android and Kindle SDK Packages to install the appropriate Android and Amazon packages for Kindle development.
At this point, the Eclipse environment is ready to begin the development of Android applications for the Kindle Fire family of devices.
Mac OS X
A number of techniques may be employed to modify the $PATH environment variable on Mac OS X. Arguably the cleanest method is to add a new file in the /etc/paths.d directory containing the paths to be added to $PATH. Assuming an installation location of /Users/demo/adt-bundle-mac-x86_64, the path may be configured by creating a new file named android-sdk in the /etc/paths.d directory containing the following lines:
/Users/demo/adt-bundle-mac-x86_64/sdk/tools
/Users/demo/adt-bundle-mac-x86_64/sdk/platform-tools
Note that since this is a system directory it will be necessary to use the sudo command when creating the file. For example:
sudo vi /etc/paths.d/android-sdk
Adding the ADT Plugin to an Existing Eclipse Integration
The steps outlined so far in this chapter have assumed that the Eclipse IDE is not already installed on your system. In the event that you are already using Eclipse for Java based development, the appropriate Android development tools and SDKs can be added to this existing Eclipse installation. Eclipse editions with which the ADT Plugin is compatible are as follows:
- Eclipse IDE for Java Developers
- Eclipse Classic (versions 3.5.1 and higher)
- Eclipse IDE for Java EE Developers
- Eclipse for Mobile Developers
The ADT Plugin for Eclipse adds a range of Android specific features to what is otherwise a general-purpose Java edition of the Eclipse environment. To install this plugin, launch Eclipse and select the Help –> Install New Software… menu option. In the resulting window, click on the Add… button to display the Add Repository dialog. Enter “ADT Plugin” into the Name field and the following URL into the Location field:
https://dl-ssl.google.com/android/eclipse/
Click on the OK button and wait while Eclipse connects to the Android repository. Once the information has been downloaded, new items will be listed entitled Developer Tools and NDK Plugins as illustrated in Figure 3-4:
Figure 3-4
Select the checkbox next to the Developer Tools entry and click on the Next > button. After requirements and dependencies have been calculated by the installer, a more detailed list of the packages to be installed will appear. Once again click on the Next > button to proceed. On the subsequent licensing page, select the option to accept the terms of the agreements (assuming that you do, indeed, agree) and click on Finish to complete the installation. During the download and installation process, you may be prompted to confirm that you wish to install unsigned content. In the event that this happens, simply click on the option to proceed with the installation.
When the ADT Plugin installation is complete, a dialog will appear providing the option to restart Eclipse in order to complete the installation. Click on Yes and wait for the tool to exit and re-launch.
Upon restarting, the Welcome to Android Development dialog will appear as illustrated in Figure 3-5:
Figure 3-5
At this stage there is no existing SDK installed so the Use Existing SDKs choice is not a viable option. Unfortunately, the ADT Plugin does not provide the option at this point to install the SDKs of our choice so we will need to install the latest available SDK versions and then manually install the ones we actually need for Kindle Fire development. With this in mind, select the option to install the latest available version of the Android APIs. Make a note of the Target Location path and change it if you prefer the SDKs to be installed in a different location, then click Next. Choose whether to send usage information to Google, accept all the licensing terms and click on Install. The Android SDK Manager will now download and install the latest Android SDKs. Once this process is complete, follow the steps outlined in the earlier section entitled Installing the Correct Android and Kindle SDK Packages to install the appropriate Android and Amazon packages for Kindle development.
At this point, the Eclipse environment is ready to begin the development of Android applications for the Kindle Fire family of devices.
Summary
Prior to beginning the development of Android based applications for the Kindle Fire, the first step is to set up a suitable development environment. This consists of the Java Development Kit (JDK), Android and Kindle Fire SDKs, Eclipse IDE and the Android ADT Plugin for Eclipse. In this chapter, we have covered the steps necessary to install these packages on Windows, Mac OS X and Linux.
<google>BUY_KINDLE_FIRE</google>
| Previous | Table of Contents | Next |
| An Overview and History of the Kindle Fire | Creating a Kindle Fire Android Virtual Device (AVD) |
