Creating and Managing Simple and Spanned Volumes on Windows Server 2008 R2
| Previous | Table of Contents | Next |
| Extending and Shrinking Windows Server 2008 R2 Partitions and Volumes | Creating and Managing Windows Server 2008 R2 Striped (RAID 0) Volumes |
<google>BUY_WINSERV_2008R2</google>
So far in this book we have worked with basic disks. Simple and spanned volumes in Windows Server 2008 R2 take advantage of a concept known as dynamic disks. In this chapter of Windows Server 2008 R2 Essentials the topic of using dynamic disk support to create both simple and spanned volumes on Windows Server 2008 R2 system will be covered in detail.
An Overview of Dynamic Disks
As covered in the preceding chapters, basic disks allow partitions to be created on a physical disk which are subsequently formatted with a particular file system and then used to store data. Whilst the partitions on a basic disk can be increased in size this can be achieved only within the confines of the space available on the physical disk on which they reside.
Dynamic disks bring significantly more flexibility into the creation and management of volumes both in terms of space management, performance and redundancy. There are five types of dynamic volume which can be created through the use of dynamic disks:
- Simple Volume - The equivalent of a partition on a basic disk. A simple volume must reside on a single disk and cannot be extended beyond the space available on that disk.
- Spanned Volume - A spanned volume can span multiple physical disk drives or be comprised of multiple, non-contiguous volumes on a single disk drive. Spanned volumes avoid many of the limitations inherent in simple volumes.
- Striped Volume - Also referred to as RAID 0, disk striping involves splitting data into multiple parts and writing each part to a different disk drive (a process which is reversed when the data is read back). The disks involved in this process are referred to as a stripe set. The key purpose of striping is to increase disk performance since it removes the bottleneck of writing all data to a single disk controller.
- Mirrored Volume - Also referred to as RAID 1, disk mirroring involves writing the same data to two drives such that if one drive fails an exact copy of the data is available on the second disk. The primary purpose of disk mirroring is data redundancy and disaster recovery.
- RAID 5 Volume - RAID 5 is a variation of volume striping. With RAID 5 striping is used in conjunction with parity error checking such that the data can continue to be used in the event that one of the drives fails. The parity information can also be used to restore data in the event of a failure using a technique known as regeneration. RAID 5 requires 3 or more disks and is designed to provide fault tolerance.
Converting Basic Disks to Dynamic Disks with Disk Management
Windows Server 2008 R2 allows basic disks to be converted to dynamic disks using the Disk Management interface or via the command prompt using the diskpart tool. Before covering the steps to perform such a conversion there are a number of rules which need to be observed.
In the first instance, MBR disks must have at least 1MB of free space at the end of the disk where the dynamic disk database will be stored. Both Disk Management and diskpart allocate this space automatically so this will only be a problem if the disk was partitioned using a third party tool or an older version of Windows.
GPT disks can only be converted if they have contiguous, Windows compatible partitions. It is not, for example, possible to convert a basic GPT disk containing one or more Linux partitions to a dynamic disk. In addition, dynamic disks cannot be used as operating system boot disks.
Finally, basic disks with sector sizes in excess of 512 bytes cannot be converted to dynamic disks.
Assuming that the above requirements are met, the first step is to open the Disk Management interface. This can be achieved by running compmgmt.msc in command prompt window or Run dialog and selecting Storage -> Disk Management.
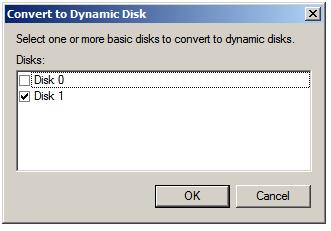
To perform the conversion simply right click on the icon for the drive in question and select Convert to Dynamic Disk... from the popup menu. This will invoke the Convert to Dynamic Disk dialog shown below:
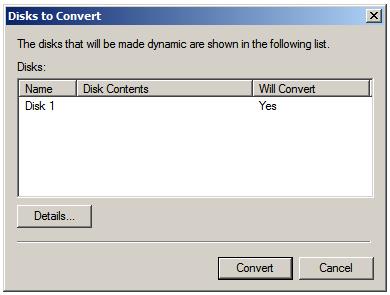
As shown in the above figure all drives eligible for conversion are listed. Select the disk to be converted and click on OK. In the resulting dialog a list of drives scheduled for conversion is displayed. To view the volumes on a drive, select the drive in the list and click on details:
Click on Convert to initiate the conversion process. Once completed, the drive will appear as a dynamic drive in the Disk Management interface.
Converting Basic Disks to Dynamic Disks from the Command Line
Basic disks can also be converted to dynamic disks at the command prompt using the diskpart tool. To invoke this tool, type diskpart either at the command prompt or in a Run window. Once started a DISKPART> prompt will be displayed. As mentioned in previous chapters, if you are logged in as a user without administrative privileges it will be necessary to run the command prompt with elevated privileges in order to make any changes to the disk layout. To do so, right click the command prompt icon in the Start menu and select Run as administrator from the resulting menu.
The first step is to identify the disks on the system. This information is obtained using the list disk command:
DISKPART> list disk
  Disk ###  Status      Size     Free     Dyn  Gpt
  --------  ----------  -------  -------  ---  ---
  Disk 0    Online        30 GB      0 B
  Disk 1    Online        10 GB      0 B
For the purposes of this tutorial we will be working on disk 1. To select the required disk use the select disk command:
DISKPART> select disk 1
Disk 1 is now the selected disk.
With the disk selected the conversion can be performed simply by using the convert command:
DISKPART> convert dynamic
DiskPart successfully converted the selected disk to dynamic format.
Creating a New Spanned Volume using Disk Management
<google>WIN28BOX</google> A new spanned volume can easily be created using the Disk Management interface. For the purposes of this chapter we will be creating a spanned volume which spans two physical disk drives. In this example we will work with a system containing three disk drives. Disk 0 is the system drive containing the Windows Server 2008 R2 operating system. Disks 1 and 2 are both initialized using the MBR partition style, have been converted to dynamic disks but have yet to have any volumes created on them. The objective of this tutorial is to create a spanned volume which uses the entire capacity of disks 1 and 2.
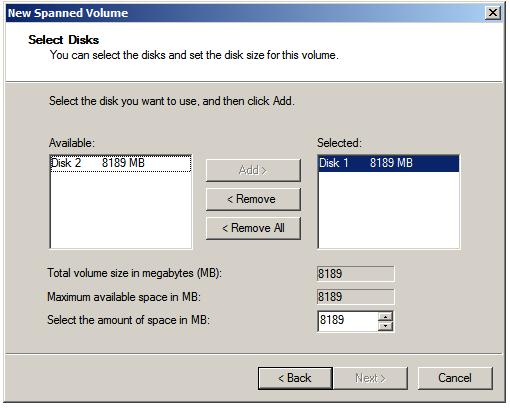
Assuming that the Disk Management snap-in is currently running, right click on the first disk drive and select New Spanned Volume... from the popup menu. This will invoke the New Spanned Volume Wizard. Click Next on the welcome screen to proceed to the disk selection screen as illustrated in the following figure:
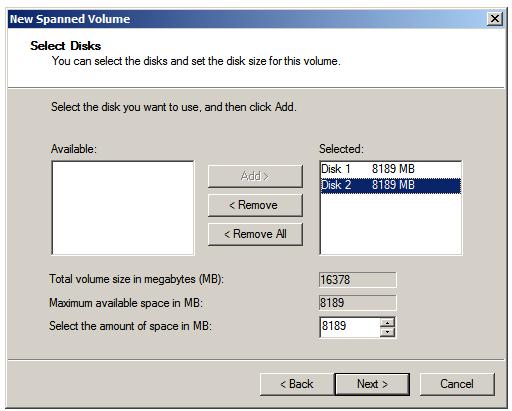
This screen provides the option to select disk drives from which the spanned volume is to be constructed. By default, only the drive on which the new volume is being created is listed. Consequently, the Maximum available space value reflects only the space available on the current disk. In this example, however, the volume is going to span both disks 1 and 2. To enable this we need to select disk 2 from the left hand list of available disks and click on Add> to add it to the selected disks. Having done so the amount of space from each drive may be selected up to the maximum combined space from both disks:
With the desired total volume size configured by selecting each drive and selecting the amount of space to be allocated the Next button may be pressed to move the drive letter or mount point allocation screen. Select either a suitable drive letter or mount point and click on Next to proceed. Finally, select the file system format and disk compression options and once again click Next to proceed to the summary screen. To initiate the creation of the volume, click on Finish. After a short delay the Disk Management graphical view will show the volume being formatted on both drives. When completed the spanned volume is ready for use.
Creating a New Spanned Volume from the Command Prompt
In addition to using the Disk Management interface, Windows Server 2008 allows spanned volumes to be created from the command prompt using the diskpart tool. Invoke this tool by typing diskpart at a command prompt or in a Run dialog box. The tool will start and display a DISKPART> prompt.
The first step is to identify the disks on the system. This information is obtained using the list disk command:
DISKPART> list disk
  Disk ###  Status      Size     Free     Dyn  Gpt
  --------  ----------  -------  -------  ---  ---
  Disk 0    Online        30 GB      0 B
  Disk 1    Online         8 GB  8189 MB
  Disk 2    Online         8 GB  8189 MB
For the purposes of this tutorial we will be creating a volume on disk 1 and then extending it such that it spans both disk 1 and disk 2. To select the required disk use the select disk command:
DISKPART> select disk 1
Disk 1 is now the selected disk.
With disk 1 selected the next step is to create a volume on the disk. This is achieved using the create volume command. Initially the volume is going to be a simple volume. We will later extend the volume onto disk 2 thereby creating a spanned volume:
DISKPART> create volume simple disk=1
DiskPart successfully created the volume.
Note that the size of the volume could have been specified in the above command with the size= directive. By not including a size the command will default to using all available space on the disk.
Having created the volume on the first disk, the next step is to select the volume and extend it onto disk 2. To obtain a list of volumes the list volume command is used:
DISKPART> list volume
  Volume ###  Ltr  Label        Fs     Type        Size     Status     Info
  ----------  ---  -----------  -----  ----------  -------  ---------  ------
  Volume 0                      RAW    Simple      8189 MB  Healthy
  Volume 1     D                       DVD-ROM         0 B  No Media
  Volume 2     C                NTFS   Partition     30 GB  Healthy    System
Clearly, Volume 2 is the system volume and volume 1 is the DVD drive so volume 0 must be the new raw (unformatted) volume just created. Since this is the volume we are going to convert into a spanned volume we need to select it using the select volume command:
DISKPART> select volume 0
Volume 0 is the selected volume.
With the appropriate disk and volume selected the next task is to extend the volume so that it encompasses the space on both disks. To decide on the amount by which the partition can be extended, the extend command be used in a number of different ways. For example, a partition may be extended by a specified number of MB by using the size= option. Alternatively the size option may be omitted such that the entire available space is used. Also, the number of the disk onto which the volume is to be extended must also be provided, in this case disk 2:
DISKPART> extend disk=2
DiskPart successfully extended the volume.
Having extended the volume across two disks the list volume command may be used to verify the new configuration:
DISKPART> list volume
  Volume ###  Ltr  Label        Fs     Type        Size     Status     Info
  ----------  ---  -----------  -----  ----------  -------  ---------  --------
* Volume 0                      RAW    Spanned       16 GB  Healthy
  Volume 1     D                       DVD-ROM         0 B  No Media
  Volume 2     C                NTFS   Partition     30 GB  Healthy    System
As shown above the volume is now 16GB in size which is equivalent to the combined available space on disks 1 and 2. The volume is also listed being Spanned. Next, the new spanned volume needs to be formatted for use:
DISKPART> format fs=ntfs label="My Spanned Vol"
  100 percent completed
DiskPart successfully formatted the volume.
Once formatted, the last task is to assign either a drive letter or mount point to the volume by which it will be accessed:
To assign a drive letter:
DISKPART> assign letter=E:
DiskPart successfully assigned the drive letter or mount point.
To assign a mount point:
DISKPART> assign mount=\bigvol
DiskPart successfully assigned the drive letter or mount point.
Once assigned a drive letter or mount point, the new spanned volume is ready for use.
<google>BUY_WINSERV_2008R2_BOTTOM</google>


