A watchOS 2 WatchKit Picker Tutorial
| Previous | Table of Contents | Next |
| An Introduction to the watchOS 2 WatchKit WKInterfacePicker Object | A WatchKit WKInterfacePicker Coordinated Animation Example |
| Purchase the full edition of this watchOS 2 App Development Essentials book in eBook ($12.99) or Print ($27.99) format watchOS 2 App Development Essentials Print and eBook (ePub/PDF/Kindle) editions contain 35 chapters. |
As outlined in the chapter entitled An Introduction to the watchOS 2 WatchKit WKInterfacePicker Object, the WKInterfacePicker object can be configured to use a variety of different styles. Having covered the basics of the WKInterfacePicker object in the preceding chapter, this chapter will work through the creation of a project that makes use of the picker object using the List style within a WatchKit app.
The project created in this chapter will consist of color names through which the user is able to scroll using the Digital Crown. As the user scrolls, a Label object will update to display the current item in the list.
Creating the Picker Project
Start Xcode and create a new iOS project. On the template screen choose the Application option located under watchOS in the left hand panel and select iOS App with WatchKit App. Click Next, set the product name to PickerListApp, enter your organization identifier and make sure that the Devices menu is set to Universal. Before clicking Next, change the Language menu to Swift and switch off all of the Include options. On the final screen, choose a location in which to store the project files and click on Create to proceed to the main Xcode project window.
Designing the WatchKit App Scene
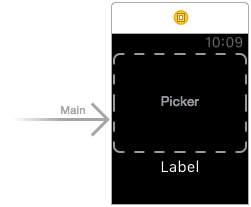
Locate and select the Interface.storyboard file listed under PickerListApp WatchKit App in the Project Navigator panel. Once loaded into Interface Builder, drag and drop a Picker object from the Object Library panel onto the main storyboard scene. Next, drag a Label object and position it immediately beneath the Picker object as illustrated in Figure 26 1. Once the Label has been added, use the Attributes Inspector panel to set the Alignment and Horizontal Position properties to Center.
Figure 26-1
Display the Assistant Editor panel and create outlet connections from the Picker and Label objects named myPicker and itemLabel respectively.
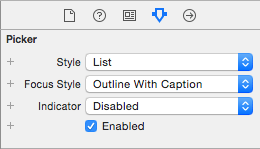
Finally, select the Picker object in the scene and, in the Attributes Inspector panel, set the Style property to List and the Focus Style to Outline with Caption as shown in Figure 26-2:
Figure 26-2
Implementing the Picker List Items
Each picker item will need to have a caption and a title property. The values for these items will be stored in an array of string pairs within the interface controller class. Select the InterfaceController.swift file and add this array as follows:
import WatchKit
import Foundation

class InterfaceController: WKInterfaceController {

    @IBOutlet var myPicker: WKInterfacePicker!
    @IBOutlet var itemLabel: WKInterfaceLabel!

    var itemList: [(String, String)] = [
        ("Item 1", "Red"),
        ("Item 2", "Green"),
        ("Item 3", "Blue"),
        ("Item 4", "Yellow"),
        ("Item 5", "Indigo"),
        ("Item 6", "Violet") ]

    override func awakeWithContext(context: AnyObject?) {
        super.awakeWithContext(context)

        // Configure interface objects here.
    }
.
.
.
}
The code to populate the picker object with the items now needs to be added to the awakeWithContext method as follows:
override func awakeWithContext(context: AnyObject?) {
    super.awakeWithContext(context)

    let pickerItems: [WKPickerItem] = itemList.map {
        let pickerItem = WKPickerItem()
        pickerItem.caption = $0.0
        pickerItem.title = $0.1
        return pickerItem
    }
    myPicker.setItems(pickerItems)
}
The code added to the method works through the items in the array and creates a WKPickerItem object for each one assigning the string values in each array element to the picker item caption and title properties. After each WKPickerItem object has been created and initialized it is added to the array of picker items. Once the array is complete it is passed through to the myPicker object via the setItems method.
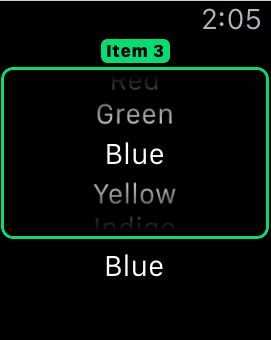
Compile and run the PickerListApp WatchKit App target and, once running, scroll through the list items using the Digital Crown or, in the case of the Watch Simulator, the mouse scroll wheel:
Figure 26-3
Note that the picker has a green outline as configured and that the caption changes along with the item as the list scrolls.
Implementing the Action Method
In order to be able to update the Label object with the current selection in the picker list, an action outlet needs to be added to the project. With the Assistant Editor panel displayed, establish an action connection from the picker object to a method named pickerChanged. Once the action method has been established, modify the code so that it reads as follows:
@IBAction func pickerChanged(value: Int) {
    itemLabel.setText(itemList[value].1)
}
The single line of code added to this method takes the value argument passed to the method and uses it as an index into the array of picker items. The color name is then extracted from the array element and set as the text on the Label object in the scene.
Testing the App
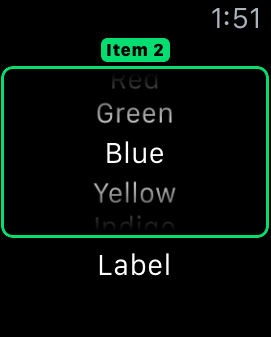
Compile and run the WatchKit app once more and, using either the Digital Crown on a physical Apple Watch device, or the scroll wheel if using the Simulator, verify that the Label object updates as the current item in the picker object changes as illustrated in Figure 26-4:
Figure 26-4
Summary
The WKInterfacePicker object in List style mode allows a list of items to be displayed through which the user is able to scroll using the Digital Crown. As the user scrolls through the items in the list, an action method (if configured) is called and passed the index value of the current list item selection. This chapter has worked through the creation of a project designed to outline the steps in implementing this behavior.
| Purchase the full edition of this watchOS 2 App Development Essentials book in eBook ($12.99) or Print ($27.99) format watchOS 2 App Development Essentials Print and eBook (ePub/PDF/Kindle) editions contain 35 chapters. |
| Previous | Table of Contents | Next |
| An Introduction to the watchOS 2 WatchKit WKInterfacePicker Object | A WatchKit WKInterfacePicker Coordinated Animation Example |
