Difference between revisions of "A Guide to Multitasking in iOS 9"
m (Text replacement - "<!-- Ezoic - BottomOfPage - bottom_of_page --> <div id="ezoic-pub-ad-placeholder-114"></div> <!-- End Ezoic - BottomOfPage - bottom_of_page -->" to "<htmlet>ezoicbottom</htmlet>") |
m (Text replacement - "<htmlet>ezoicbottom</htmlet>" to "") |
||
| Line 220: | Line 220: | ||
| − | + | ||
<hr> | <hr> | ||
<table border="0" cellspacing="0"> | <table border="0" cellspacing="0"> | ||
Revision as of 18:05, 11 May 2016
| Previous | Table of Contents | Next |
| An iOS 9 Split View Master-Detail Example | An iOS 9 Multitasking Example |
Learn SwiftUI and take your iOS Development to the Next Level |
With the introduction of iOS 9 it is now possible for users to display and interact with two apps side by side on the iPad screen, a concept referred to as multitasking. Although inclusion of support for multitasking within an iOS iPad app is optional, enabling support where appropriate is recommended to provide the user with the best possible experience when using the app.
This chapter will provide an introduction to multitasking in terms of what it means to the user and the steps that can be taken to effectively adopt and support multitasking within a iOS 9 iPad app. Once these areas have been covered, the next chapter (An iOS 9 Multitasking Example) will create an example project designed to support multitasking.
Before reading this chapter, it is important to understand that multitasking support makes extensive use of both the Size Classes and Auto Layout features of iOS, topics which were covered in the An Introduction to Auto Layout in iOS 9 and Using Size Classes to Design Adaptable Universal iOS 9 User Interfaces chapters of this book.
Using iPad Multitasking
Before implementing multitasking support for an iOS 9 iPad app it is first important to understand multitasking from the perspective of the user. Traditionally, when an app was launched from the iPad screen it would fill the entire display and continue to do so until placed into the background by the user. With the introduction of iOS 9, two apps are now able to share the iPad display.
Multitasking is initiated by making a dragging motion on the device screen while an app is running, starting at the right-hand edge of the screen (regardless of whether the device is in portrait or landscape orientation) in a perpendicular direction away from the edge of the device. The app that is currently running at the time that multitasking is used is referred to as the primary app.
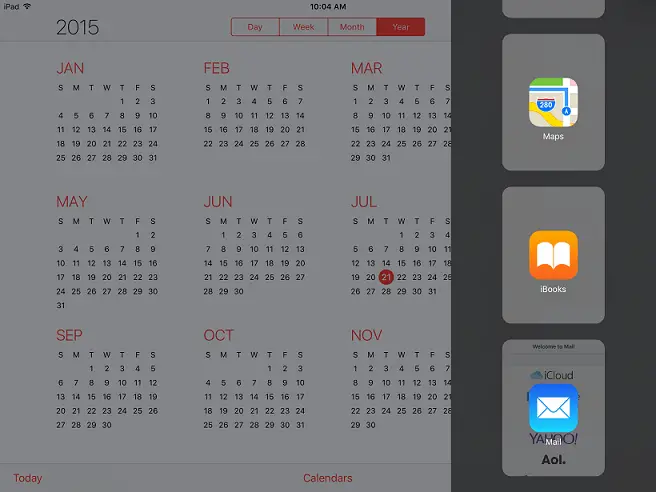
If no multitasked app was previously running, a scrollable list of apps on the device which support multitasking will appear in an overlay at the left-hand edge of the screen. Figure 34-1, for example, shows the list of available apps in the overlay panel beside the Calendar app:
Figure 34-1
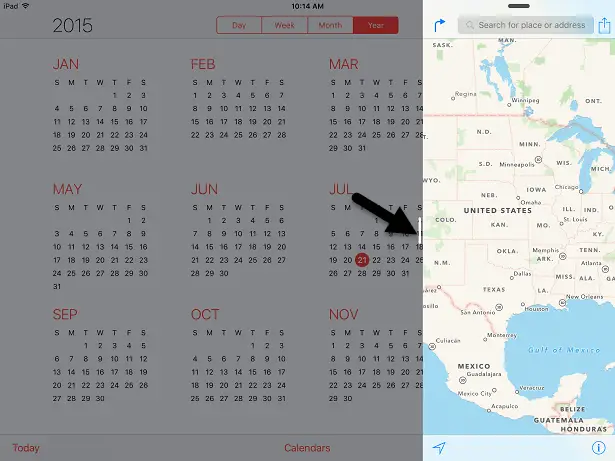
Selecting an app from the list loads that app into the overlay panel. This app is referred to as the secondary app and is overlaid over the top of the right edge of the primary app. In Figure 34 2, for example, the Calendar app is the primary app and the Map app in the overlay is the secondary app. This multitasking configuration is referred to as Slide Over.
Figure 34-2
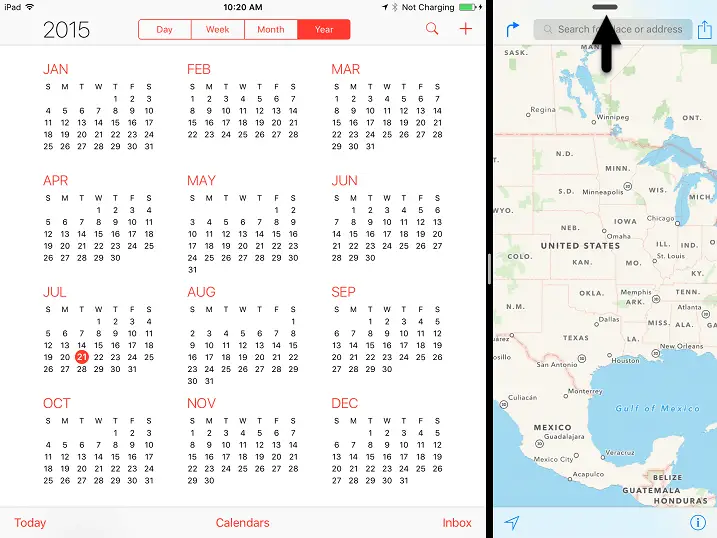
The small white bar located just outside the left hand edge of the secondary app Slide Over panel (as indicated by the arrow in Figure 34-2) is a button which, when tapped, will cause the primary app window to resize so that it is no longer overlaid by the secondary app as shown in Figure 34 3. This multitasking configuration is known as Split View.
Figure 34-3
Dragging down on the black button (indicated by the arrow in Figure 34 3) will hide the secondary app and redisplay the list of available multitasking apps.
Once the display is in Split View mode, tapping the narrow white button between the two panels will toggle between Split View and Slide Over mode. Touching and dragging the button allows the position of the division between the primary and secondary apps to be adjusted. Dragging partially to the left will cause the two apps to share the screen width equally while dragging all the way to the right will remove the secondary app from the screen leaving the primary app to fill the entire display. Dragging all the way to the left will cause the secondary app to fill the entire screen, thereby making it the primary app.
Picture-In-Picture Multitasking
In addition to Split View and Slide Over modes, multitasking also supports the presentation of a moveable and resizable video playback window over the top of the primary app window. This is a topic which will be covered in the chapter entitled An iOS 9 Multitasking Picture in Picture Tutorial.
iPad Devices with Multitasking Support
It is important to be aware that not all iPad models support all forms of multitasking. In fact, at the time of writing only the iPad Air 2 (and any subsequent models) support Slide Over, Split View and Picture in Picture multitasking.
The iPad Mini 2 and 3 models and the original iPad Air support both Slide Over and Picture in Picture but not Split View multitasking. Earlier iPad models do not support multitasking of any type.
Multitasking and Size Classes
Clearly, a key part of supporting multitasking involves making sure that the storyboard scenes within an app are able to adapt to a variety of different window sizes. In actual fact, each of the different window sizes an app is likely to encounter in a multitasking mode corresponds to one of the existing size classes as outlined in the chapter entitled Using Size Classes to Design Adaptable Universal iOS User Interfaces. As outlined in that chapter, the height and width available to an app is classed as being either compact or regular. An app running in portrait mode on an iPhone 6s, for example, would use the compact width and regular height size class whilst the same app running in portrait orientation would use regular width and compact height size class.
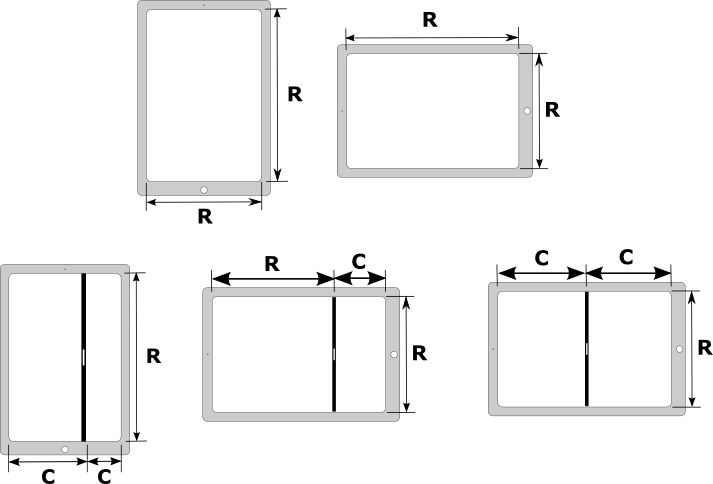
When running in a multitasking environment the primary and secondary apps will pass through a range of compact and regular widths depending on the prevailing multitasking configuration. The diagrams in Figure 34-4 illustrate the way in which the different multitasking modes translate to equivalent regular and compact size classes.
Figure 34-4
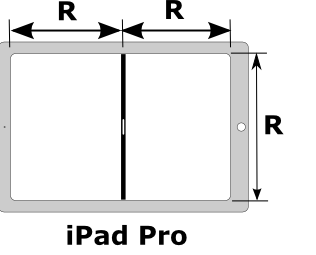
The above rules change slightly when the app is running in Split View mode on an iPad Pro. Due to the larger screen size of the iPad Pro, both apps are presented in Split View mode using the regular width as illustrated in Figure 34-5:
Figure 34-5
Implementing multitasking support within an iOS app is essentially a matter of designing layouts that adapt appropriately to the different size classes outlined in the above diagram.
Multitasking and the Master-Detail Split View
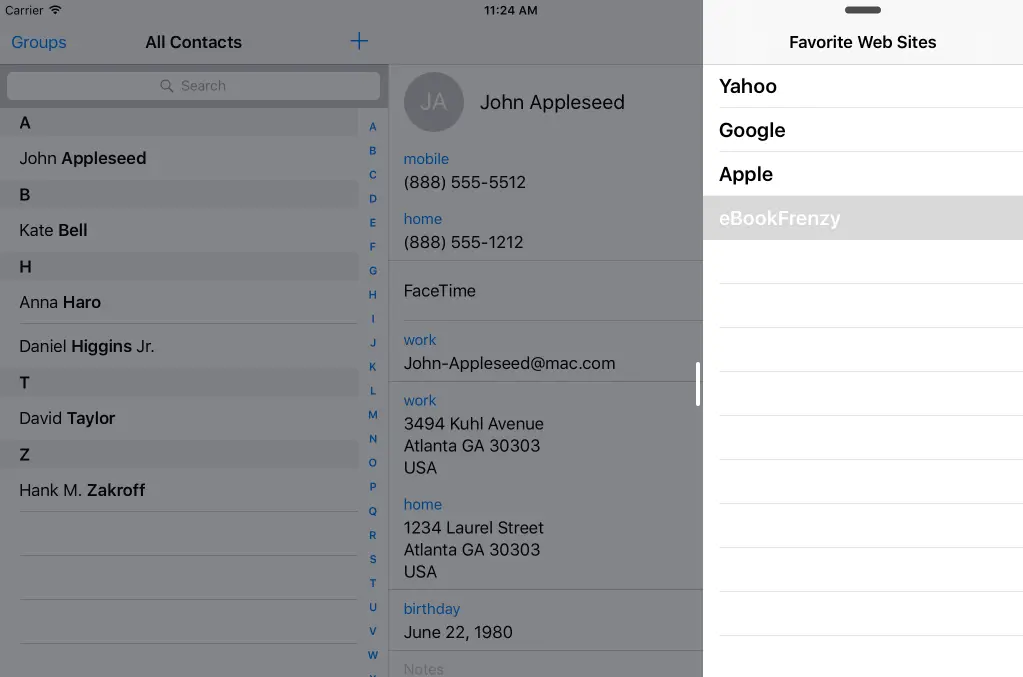
The previous chapter introduced the master-detail split view interface. In this configuration both a master panel and a detail panel are displayed at the same time whereby selecting an item from the master panel influences what is displayed in the detail panel. While this “split view” approach should not be confused with the multitasking Split View mode, it is useful to know that a master-detail user interface will automatically work within multitasking. Consider, for the purpose of an example, the SplitView app created in the previous chapter. When selected as a secondary app, the master panel will appear within the Slide Over panel as shown in Figure 34-6:
Learn SwiftUI and take your iOS Development to the Next Level |
Figure 34-6
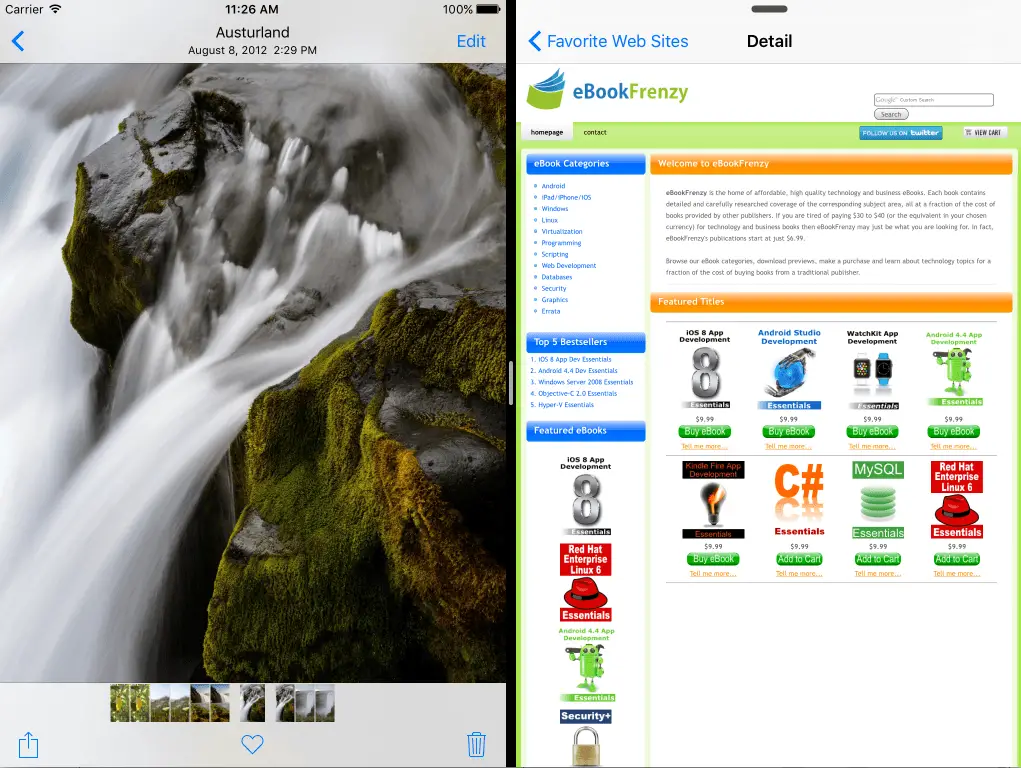
When an item is selected from the master panel, the detail panel is then displayed in place of the master panel together with a toolbar button to return to the master panel. This same behavior applies in Split View mode as shown in Figure 34-7 where the detail panel is displayed in Split View mode alongside the Photos app:
Figure 34-7
Handling Multitasking in Code
Much can be achieved in terms of using Auto Layout and Size Classes to adapt to the size changes associated with multitasking. There will, however, inevitably be instances where some code needs to be executed when a scene transitions from one size class to another (for example when an app transitions from Slide Over to Split View). Fortunately, UIKit will call three delegate methods on the container instance (typically a view controller) of the current scene during the transition to notify it of the transition where code can be added to perform app specific tasks at different points in the transition. These delegate methods are outlined below in the order in which they are called during the transition:
willTransitionToTraitCollection(_:withTransitionCoordinator:)
This method is called immediately before the traits for the currently displayed view controller view are to change. A trait is represented by the UITraitCollection class, instances of which contain a collection of values consisting of size class settings, the display density of the screen and the user interface idiom (which is simply a value indicating whether the device on which the app is running is an iPhone or iPad).
When called, this method is passed a UITraitCollection object containing the new trait collection from which information can be accessed and used to decide how to respond to the transition. The following code, for example, checks that the app is running on an iPad before identifying whether the horizontal size class is transitioning to a regular or compact size class:
override func willTransitionToTraitCollection(newCollection: UITraitCollection, withTransitionCoordinator coordinator: UIViewControllerTransitionCoordinator) {

    super.willTransitionToTraitCollection(newCollection,
		withTransitionCoordinator: coordinator)

    if newCollection.userInterfaceIdiom == .Pad {

        if newCollection.horizontalSizeClass == .Regular {

               // Transitioning to Regular Width Size Class

        } else if newCollection.horizontalSizeClass == .Compact {

		// Transitioning to Compact Width Size Class

        }
    }
}
The second argument passed through to the method is a UIViewControllerTransitionCoordinator object. This is the coordinator object that is handling the transition and can be used to add additional animations to those being performed by UIKit during the transition.
viewWillTransitionToSize(_:withTransitionCoordinator:)
This method is also called before the size change is implemented and is passed a CGSize value and a coordinator object. The size object can be used to obtain the new height and width to which the view is transitioning. The following sample code simply outputs the new height and width values to the console:
override func viewWillTransitionToSize(size: CGSize,
	withTransitionCoordinator coordinator:
		UIViewControllerTransitionCoordinator) {

    super.viewWillTransitionToSize(size,
        withTransitionCoordinator: coordinator)

    print("Height = \(size.height), Width = \(size.width)")
}
traitCollectionDidChange(_:)
This method is called once the transition from one trait collection to another is complete and is passed the UITraitCollection object for the previous trait. In the following example implementation, the method simply checks to find out whether the previous horizontal size class was regular or compact:
override func traitCollectionDidChange(previousTraitCollection:
		UITraitCollection?) {

    super.traitCollectionDidChange(previousTraitCollection)

    if previousTraitCollection?.horizontalSizeClass == .Regular {
        // The previous horizontal size class was regular
    }

    if previousTraitCollection?.horizontalSizeClass == .Compact {
        // The previous horizontal size class was compact
    }
}
Lifecycle Method Calls
In addition to the transition delegate methods outlined above, a number of lifecycle methods are called on the application delegate of the app during a multitasking transition. When the user moves the divider the applicationWillResignActive method is called at the point that the divider position changes. When the user slides the divider all the way to the edge of the screen so that the app is no longer visible, the applicationDidEnterBackground delegate method is called.
These method calls are of particular significance when taking into consideration what is taking place behind the scenes when the divider is moved by the user. As the divider is moving, the system repeatedly resizes the app off screen and takes snapshots at various sizes as the slider moves. These snapshots are used to make the sliding transition appear to take place smoothly. The applicationWillResignActive method may need to be used to preserve the state of the user interface so that when the user releases the divider the same data and navigation position within the user interface is presented as before the slider change.
Enabling Multitasking Support
All new Xcode 7 projects are configured to support multitasking by default. Multitasking support may be retroactively applied to an existing Xcode project using the following steps:
1. Select the project target at the top of the Project Navigator panel and choose the Build Settings tab in the main panel.
2. Within the Build Settings screen locate the Base SDK option and set it to Latest iOS.
Figure 34-8
3. With the project target still selected in the Project Navigator panel, change the selected tab in the main panel to General and enable all of the orientations in the Device Orientation section:
Figure 34-9
4. If the launch screen is currently in the form of an image file, replace it with a LaunchScreen.storyboard file.
Opting Out of Multitasking
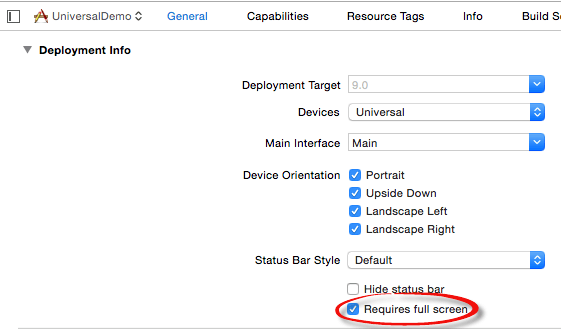
To disable multitasking support for an app, simply add the UIRequiresFullScreen key to the project’s Info.plist file with the value set to true. This can be set manually within the Info.plist file itself, or within the Deployment Info section of the General settings panel for the project target:
Figure 34-10
Summary
Multitasking provides the user with the ability to display and interact with two apps concurrently when running on recent models of iPad device. Multitasking apps are categorized as primary and secondary and can be displayed in either Slide Over or Split View configurations. Multitasking also supports a “Picture in Picture” option whereby video playback is displayed in a floating, resizable window over the top of the existing app.
Supporting multitasking within an iOS app primarily involves designing the user interface such that it supports both regular and compact size classes. A range of delegate methods also allow view controllers to receive notification of size changes and to respond accordingly.
Projects created in Xcode 7 are configured to support multitasking by default. Multitasking support may be added to existing projects by following a few simple steps. It is also possible to opt out of multitasking with a change to the project Info.plist file.
Learn SwiftUI and take your iOS Development to the Next Level |
| Previous | Table of Contents | Next |
| An iOS 9 Split View Master-Detail Example | An iOS 9 Multitasking Example |


