Testing Apps on iOS 7 Devices with Xcode 5
| Previous | Table of Contents | Next |
| Creating a Simple iOS 7 App | Creating an Interactive iOS 7 App |
Learn SwiftUI and take your iOS Development to the Next Level |
In the chapter entitled Creating a Simple iOS 7 App we were able to run an application in the iOS Simulator environment bundled with the iOS 7 SDK. Whilst this is fine for most cases, in practice there are a number of areas that cannot be comprehensively tested in the simulator. For example, no matter how hard you shake your computer (not something we actually recommend) or where in the world you move it to, neither the accelerometer nor GPS features will provide real world results within the simulator (though the simulator does have the option to perform a basic virtual shake gesture and to simulate location data). If we really want to test an iOS application thoroughly in the real world, therefore, we need to install the app onto a physical iOS device.
Many new features have been added Xcode 5 to make the task of the developer easier. One of these features makes it considerably easier to obtain the signing certificates and provisioning profiles that are necessary to perform testing of applications on physical iOS devices.
The previous edition of this book, which was based on Xcode 4, dedicated no less than 11 pages to the process of obtaining a developer certificate, App ID and provisioning profile to test an application on a physical iOS device. Much of this work is now performed automatically by Xcode resulting in a much simpler path to testing applications on iOS devices.
Configuring Xcode with Apple IDs
The first step in setting up a fully configured development environment involves entering the Apple ID associated with your Apple Developer Program membership.
To enter this information, start Xcode and select the Xcode -> Preferences… menu option. From within the preferences window, select the Accounts tab as illustrated in Figure 6-1:
Figure 6-1
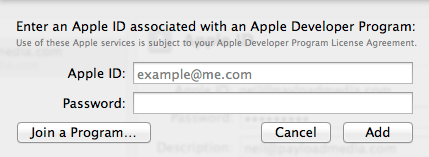
To add an Apple ID, click on the + button in the lower left hand corner and select Add Apple ID… from the drop down menu. When prompted to do so (Figure 6-2), either enter the Apple ID and password associated with your Apple Developer Program membership, or click on the Join a Program… button if you are not yet a member.
Figure 6-2
Repeat these steps to add additional Apple IDs if you are associated with more than one development team. Once the information has been entered, the accounts will be listed in the preferences window.
Generating Signing Identities
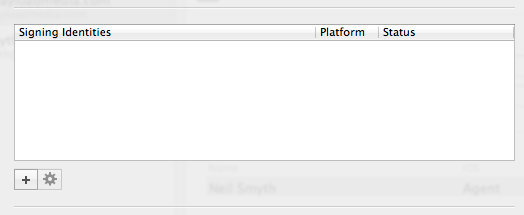
Before an application can be run on a physical iOS device for testing purposes it must first be signed with a developer signing identity. When the application is finished and ready to be placed on sale in the App Store it must first be signed with a distribution signing identity. Signing identities are comprised of a certificate and a private key. Signing identities can be generated from within the Xcode account preferences panel. Begin by selecting the Apple ID for which the identities are to be generated before clicking on the View Details… button located in the lower right hand corner of the window. This will display a list of signing identities and any provisioning profiles associated with those identities. If no valid signing identities are listed (as is the cased in Figure 6-3), the next step is to generate them.
Figure 6-3
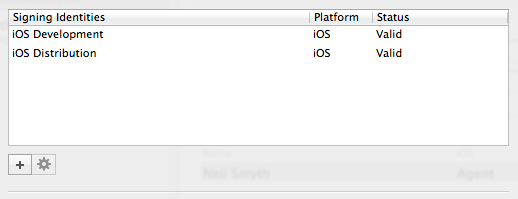
Begin by clicking on the + button and selecting the iOS Development option from the resulting menu. Xcode will then contact the Apple Developer member Center portal and request and download a developer signing identity. Repeat these steps, this time selecting iOS Distribution from the menu to create and download a distribution signing identity. Once completed, the two identities should now be listed as shown in Figure 6 4:
Figure 6-4
Learn SwiftUI and take your iOS Development to the Next Level |
https://developer.apple.com/membercenter
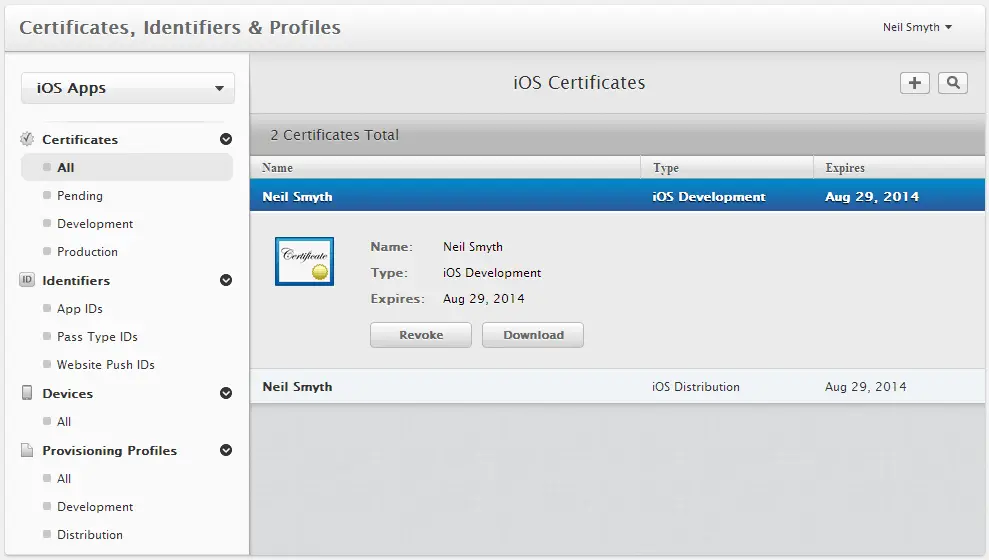
Within the member center, click on the Certificates, Identifiers and Profiles option and choose Certificates from the list of options under the iOS Apps category. On the resulting page, the certificates for both signing identifies should be listed. Clicking on certificate will display details such as the expiration date as outlined in Figure 6 5:
Figure 6-5
As can be seen in the left hand panel of Figure 6-5, the member center also provides options to manually create App IDs and Provisioning Profiles. With Xcode 5, however, these are typically created automatically.
Adding a Device to the Developer Portal
Having generated signing identities the next step is to register the iOS devices to be used for testing with the iOS member center. Note that Apple restricts developers to 100 provisioned devices within the membership year.
A new device may be added to the list of supported test devices from within the Xcode Organizer window. To add a device to the portal from within the Organizer, simply connect the device to the development system, open the Organizer window in Xcode using the Window -> Organizer menu option, select the attached device from the left hand panel and click on either the Add to Portal or Use for Development button. The Organizer will connect to the developer portal and register the device for testing purposes.
Running an Application on a Registered Device
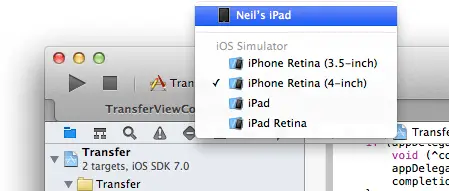
With a registered device connected to the development system, and an application ready for testing, refer to the device menu located in the Xcode toolbar. There is a reasonable chance that this will have defaulted to one of the iOS Simulator configurations (in the case of Figure 6-6, this is the iPhone Retina 4-inch simulator configuration).
Figure 6-6
Switch to the physical device by selecting this menu and changing it to the device name as shown in Figure 6-7:
Figure 6-7
Xcode will request a provisioning profile that matches the App ID of the application and includes permission to run on the specified device, build the application using the developer signing identity before installing the application and provisioning profile on the device. Finally the application will be launched on the device.
Summary
Without question, the iOS Simulator included with the iOS 7 SDK is an invaluable tool for testing applications during the development process. There are, however, a number of situations where it is necessary to test an application on a physical iOS device. In this chapter we have covered the steps involved in provisioning applications for installation and testing on iPhone and iPad devices.
Learn SwiftUI and take your iOS Development to the Next Level |
| Previous | Table of Contents | Next |
| Creating a Simple iOS 7 App | Creating an Interactive iOS 7 App |


