Signing and Preparing an Android Application for Release
| Previous | Table of Contents | Next |
| Handling Different Android Devices and Displays | Integrating Google Play In-app Billing into an Android Application – A Tutorial |
Once the development work on an Android application is complete and it has been tested on wide range of Android devices, the next step is to prepare the application for submission to the Google Play App Store. Before submission can take place, however, the application must be packaged for release and signed with a private key. This chapter will work through the steps involved in obtaining a private key and preparing the application package for release, all of which can be performed using a convenient Eclipse based wizard.
The Release Preparation Process
Up until this point in the book we have been building application projects in a mode suitable for testing and debugging. Building an application package for release to customers via the Google Play store, on the other hand, requires that some additional steps be taken. The first requirement is that the application be compiled in release mode instead of debug mode. Secondly, the application must be signed with a private key that uniquely identifies you as the application’s developer. Finally, the application package must be aligned. This is simply a process by which some data files in the application package are formatted with a certain byte alignment to improve performance.
Whilst each of these tasks can be performed outside of the Eclipse ADT environment, the tasks can more easily be performed using the Export Wizard as outlined in the remainder of this chapter. Note that Eclipse assumes that the JDK tools are in the PATH environment of your system as outlined in Setting up an Android Development Environment.
Accessing the Export Wizard
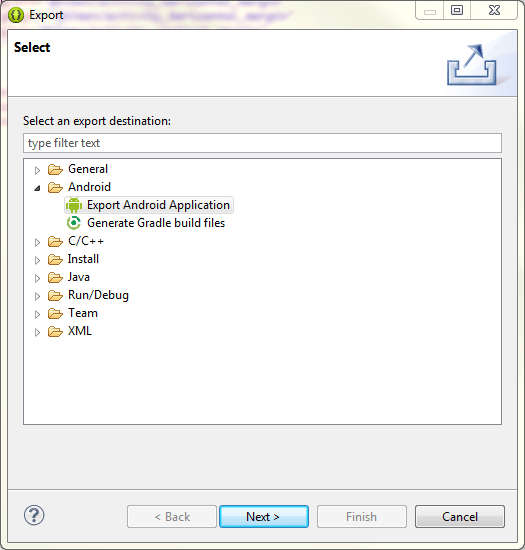
To gain access to the Export Wizard, launch the Eclipse environment and select the project to be released from the Package Explorer panel. Once selected, select the File -> Export menu option to display the Export dialog. From within the list of options choose Android -> Export Android Application as illustrated in Figure 44-1:
Figure 44-1
Click Next to proceed to the Project Checks screen where the project will be scanned to ensure that there are no potential problems that might prevent the application from being exported. In the event that no errors are found, click Next once again to proceed to the Keystore selection screen.
Creating a Keystore File
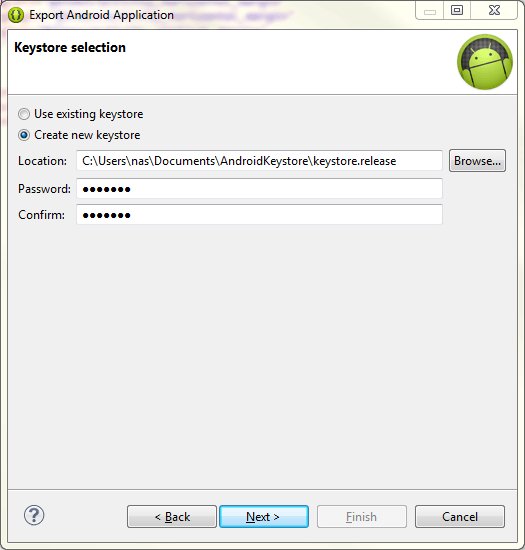
The Keystore selection screen (Figure 44 2) provides the option either to use an existing keystore file, or to generate a new file. If you already have a keystore file simply click on the Browse button to locate and load the file. If you have yet to create a file, however, select the Create new keystore menu option and enter a file system path and file name location into which the keystore file should be saved.
Figure 44-2
Next, enter a strong password with which to protect the keystore file into both the Password and Confirm fields before clicking on Next.
Generating a Private Key
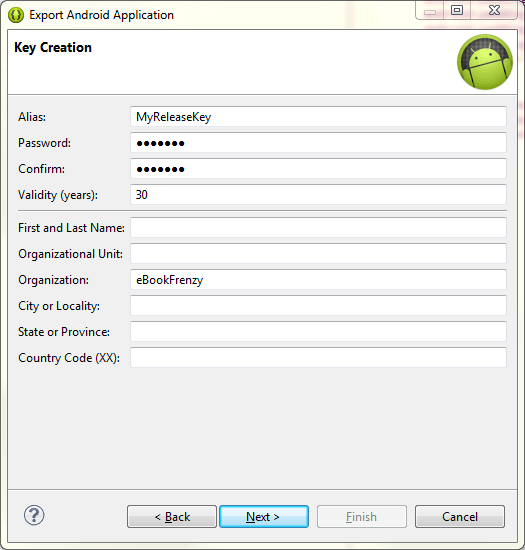
The next step is to generate a new private key which will be used to sign the application package. At this point, the Key Creation screen (Figure 44-3) of the Export Wizard should be displayed. Within this screen, enter the following information:
- An alias by which the key will be referenced. This can be any sequence of characters, through only the first 8 are used by the system.
- A suitably strong password to protect the key.
- The number of years for which the key is to be valid (Google recommends a duration in excess of 27 years).
In addition, information must be provided for at least one of the remaining fields (for example your first and last name or organization name).
Figure 44-3
Once the information has been entered, click on the Next button to proceed with the package creation.
Creating the Application APK File
The next task to be performed is to instruct Eclipse to build the application APK package file in release mode and then sign it with the newly created private key. At this point the Destination and key/certificate checks screen should be displayed. Using the Browse…button, navigate to a suitable folder into which the application APK file should be created. Once a path and file name have been specified, click on Finish to generate the APK and sign it with your private key.
During this process, output similar to that outlined below will appear within the Console panel:
[2013-06-13 10:34:39 - ReleaseTest] New keystore C:\Users\nas\Documents\AndroidReleaseAPK\ReleaseTest.apk has been created.
[2013-06-13 10:34:39 - ReleaseTest] Certificate fingerprints:
[2013-06-13 10:34:39 - ReleaseTest]   MD5 : FA:65:D9:F4:CA:17:DD:24:C2:16:FB:D4:77:22:AB:46
[2013-06-13 10:34:39 - ReleaseTest]   SHA1: D1:E1:33:43:99:FF:CF:DF:65:71:AA:EE:22:A7:DA:CF:E9:61:45:13
On completion of the generation process, the keystore file and APK file will have been generated into the designated locations of the file system. At this point the application is ready to be submitted to the Google Play store.
The private key generated as part of this process should be used when signing and releasing future application and, as such, should be kept in a safe place and securely backed up.
The final step in the process of bringing an Android application to market involves submitting it to the Google Play Developer Console. Once submitted, the application will be available for download from the Google Play App Store.
Register for a Google Play Developer Console Account
The first step in the application submission process is to create a Google Play Developer Console account. To do so, navigate to https://play.google.com/apps/publish/signup/ and follow the instructions to complete the registration process. Note that there is a one-time $25 fee to register. Once an application goes on sale, Google will keep 30% of all revenues associated with the application.
Once the account has been created, the next step is to gather together information about the application. In order to bring your application to market, the following information will be required:
- Title – The title of the application.
- Description – Up to 4000 words describing the application.
- Screenshots – Up to 8 screenshots of your application running (a minimum of two is required). Google recommends submitted screenshots of the application running on a 7” or 10” tablet.
- Language – The language of the application (the default is US English).
- Promotional Text – The text that will be used when your application appears in special promotional features within the Google Play environment.
- Application Type – Whether your application is considered to be a game or an application.
- Category – The category that best describes your application (for example finance, health and fitness, education, sports etc).
- Locations – The geographical locations into which you wish to your application to be made available for purchase.
- Contact Information – Methods by which users may contact you for support relating to the application. Options include web, email and phone.
Having collected the above information and prepared the application package file for release, simply follow the steps in the Google Play Developer Console to submit the application for sale.
Summary
Before an application can be submitted to the Google Play store, it must first be built in release mode, signed with a private certificate and the resulting APK package file subjected to a process referred to as alignment. As outlined in this chapter, all of these steps can be performed with relative ease through the use of the Eclipse Export Wizard.
| Previous | Table of Contents | Next |
| Handling Different Android Devices and Displays | Integrating Google Play In-app Billing into an Android Application – A Tutorial |


