Handling User Input in a watchOS 2 WatchKit App
| Previous | Table of Contents | Next |
| A watchOS 2 WatchKit Page-based Interface Tutorial | An Introduction to Watch Connectivity in watchOS 2 |
| Purchase the full edition of this watchOS 2 App Development Essentials book in eBook ($12.99) or Print ($27.99) format watchOS 2 App Development Essentials Print and eBook (ePub/PDF/Kindle) editions contain 35 chapters. |
Unlike the iPhone, the Apple Watch display is too small to accommodate a virtual keyboard to allow the user to input text into an app. This does not, however, mean that it is not possible to accept user input. In fact, the WatchKit framework provides a mechanism for user input in the form of selections from a list of phrases, voice dictation and emoji image selection.
This chapter will provide an overview of how to accept user input from within a WatchKit app before providing a brief tutorial.
Getting User Input
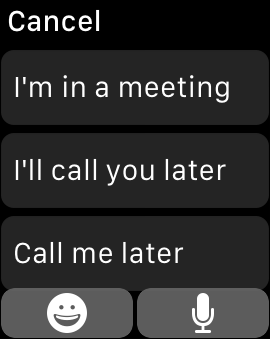
The WatchKit framework supports three types of user input in the form of phrase selection, voice dictation and emoji image selection. All three forms of input are available via a single modal scene, an example of which is illustrated in Figure 11-1:
Figure 11-1
This screen is referred to as the text input controller and can be configured with a list of phrases to be displayed, to enable or disable support for emoji selection, or to go directly to dictation input.
Displaying the Text Input Controller
The text input controller screen is displayed via a call to the presentTextInputControllerWithSuggestions method of the currently active interface controller instance. The method accepts as parameters an array of phrase suggestion strings and an input mode value indicating what forms of input are to be accepted. The method also requires a completion handler block to be called when the input session is completed. This completion block is passed an array containing the results of the input.
The following code, for example, invokes the text input controller with emoji support and a range of phrase suggestions. The completion handler block simply outputs the input string from the reply array to the console:
let phrases = ["I'm in a meeting", "I'll call you later", "Call me later"]

presentTextInputControllerWithSuggestions(phrases,
			allowedInputMode: .AllowEmoji,
			completion: { (result) -> Void in

    if let choice = result {
            print(choice[0])
    }
})
The above code used the .AllowEmoji option (or more precisely the WKTextInputMode.AllowEmoji option) to include static emoji images as selection options. The three input mode options supported by WatchKit are as follows:
- WKTextInputMode.Plain – Allows the user to generate input from the phrase selection list and dictation only. The emoji button is absent from the text input controller screen in this mode.
- WKTextInputMode.AllowEmoji - Allows the user to generate input using the phrase list, dictation and non-animated emoji images.
- WKTextInputMode.AllowAnimatedEmoji - Allows the user to generate input using the phrase list, dictation and both animated and non-animated emoji images.
The text input controller screen will automatically dismiss when the user has made an input selection or tapped the Cancel button. The controller may also be dismissed from within the code of the interface controller via a call to the dismissTextInputController method. When the text input controller is dismissed in this way, the code within the completion handler block is not executed.
When testing text input, it is important to note that emoji and dictation modes are not available from within the simulator environment.
Detecting if Input is a String or NSData Object
If the input is in the form of text or a non-animated emoji, the input will be returned in the form of a Unicode string contained within a String object. If the user selects an animated emoji, however, the image will be returned in the form of an NSData object. The following code can be used to identify whether the returned result is a String or NSData object:
| Purchase the full edition of this watchOS 2 App Development Essentials book in eBook ($12.99) or Print ($27.99) format watchOS 2 App Development Essentials Print and eBook (ePub/PDF/Kindle) editions contain 35 chapters. |
if let choice = result {
    if choice[0] is String {
        // Result is a String object
        // Handle as a text string
    }

    if choice[0] is NSData {
        // Result is an NSData object
        // Handle as an image
    }
}
Direct Dictation Input
In many situations, input will be needed only through the use of dictation. To move directly to dictation based input, call the presentTextInputControllerWithSuggestions method without any suggested phrases and with the input mode set to .Plain. For example:
presentTextInputControllerWithSuggestions(nil,
		allowedInputMode: .Plain,
		completion: { (result) -> Void in

    }
})
Creating the User Input Example Project
Start Xcode and create a new iOS project. On the template screen choose the Application option located under watchOS in the left hand panel and select iOS App with WatchKit App. Click Next, set the product name to TextInputApp, enter your organization identifier and make sure that the Devices menu is set to Universal. Before clicking Next, change the Language menu to Swift and verify that all of the Include options are switched off. On the final screen, choose a location in which to store the project files and click on Create to proceed to the main Xcode project window.
Designing the WatchKit App Main Scene
Locate and select the Interface.storyboard file so that it loads into Interface Builder. Drag and drop a Button object from the Object Library panel, double-click on it and change the text so that it reads “Get Input”.
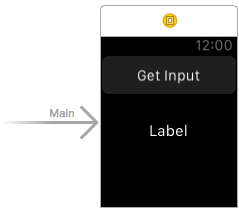
Add a Label object to the scene and set both the Horizontal and Vertical alignment properties in the Attributes Inspector panel to Center so that the scene layout matches that of Figure 11 2. Also, increase the Lines property to 4 so that multiple lines of text input can be displayed if necessary:
Figure 11-2
Display the Assistant Editor, Ctrl-click on the Label object in the storyboard scene and drag the resulting line to a position immediately beneath the class declaration line in the Assistant Editor panel. On releasing the line, establish an outlet named labelObject in the connection panel.
Repeat these steps on the Button object, this time establishing an action connection to a method named getUserInput.
Getting the User Input
The code to get input from the user now needs to be implemented within the getUserInput action method. For the purposes of this example, input will be accepted in the form of dictation, non-animated emoji and via phrase list selection. Once obtained, the user input will be displayed on the Label object within the main scene. Locate and select the InterfaceController.swift file for the WatchKit app extension in the Project Navigator panel and modify the getUserInput method so that it reads as follows:
@IBAction func getUserInput() {
    let phrases = ["I'm in a meeting", "I'll call you later", "Call me later"]

    presentTextInputControllerWithSuggestions(phrases,
                allowedInputMode: .AllowEmoji,
                completion: { (result) -> Void in

        if let choice = result {
            self.labelObject.setText(choice[0] as? String)
        }
    })
}
Testing the Application
Compile and run the WatchKit app on a physical Apple Watch device, tap on the Get Input button and use dictation to enter some text. On tapping the Done button the dictated text will appear on the Label object in the main scene of the app. Repeat these steps to test the phrase selection and emoji forms of input.
Summary
WatchKit provides support for user input via phrase selection, dictation and emoji images. Input is initiated using the presentTextInputControllerWithSuggestions method of the currently active interface controller instance. This chapter has covered the basics of user input in WatchKit and worked through the creation of an example WatchKit app project.
| Purchase the full edition of this watchOS 2 App Development Essentials book in eBook ($12.99) or Print ($27.99) format watchOS 2 App Development Essentials Print and eBook (ePub/PDF/Kindle) editions contain 35 chapters. |
| Previous | Table of Contents | Next |
| A watchOS 2 WatchKit Page-based Interface Tutorial | An Introduction to Watch Connectivity in watchOS 2 |


