An iOS 10 CloudKit Subscription Example
| Previous | Table of Contents | Next |
| An iOS 10 CloudKit Example | An iOS CloudKit Sharing Example |
Learn SwiftUI and take your iOS Development to the Next Level |
In the previous chapter, entitled An iOS 10 CloudKit Example, an example application was created that demonstrated the use of the iOS 10 CloudKit Framework to save, query, update and delete cloud database records. In this chapter, the CloudKitDemo application created in the previous chapter will be extended so that users of the application receive push notifications when a new record is added to the application’s private database by other instances of the app.
Push Notifications and CloudKit Subscriptions
A push notification occurs when a remote server associated with an app installed on an iOS device sends a notification of importance to the user. On receipt of the notification the user will be notified either via an alert on the lock screen, or by an alert panel appearing at the top of the screen accompanied by an optional sound. Generally, selecting the notification alert will launch the associated app in a context that is relevant to the nature of the notification. When enabled, a red badge will also appear in the corner of the application’s launch icon containing a number representing the amount of outstanding notifications received for the application since it was last launched.
Consider, for example, a news based application that is configured to receive push notifications from a remote server when a breaking news headline is available. Once the push notification is received, brief details of the news item will be displayed to the user and, in the event that the user selected the notification alert, the news app will launch and display the news article corresponding to the notification.
CloudKit subscriptions use the iOS push notifications infrastructure to enable users to receive notifications when changes occur to the data stored in a cloud database. Specifically, CloudKit subscriptions can be used to notify the user when CloudKit based records of a specific record type are created, updated or deleted. As with other push notifications, the user can select the notification and launch the corresponding application. Making the application appear in the appropriate context (for example with a newly created record loaded), however, requires some work. The remainder of this chapter will outline the steps to implement this behavior.
Configuring the Project for Remote Notifications
Figure 50-1
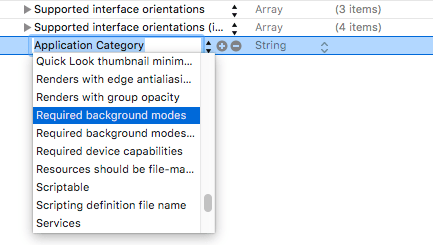
Once the key has been added, click on the right-facing arrow to the left of the key to unfold the values. In the value field for Item 0, enter remote-notification.
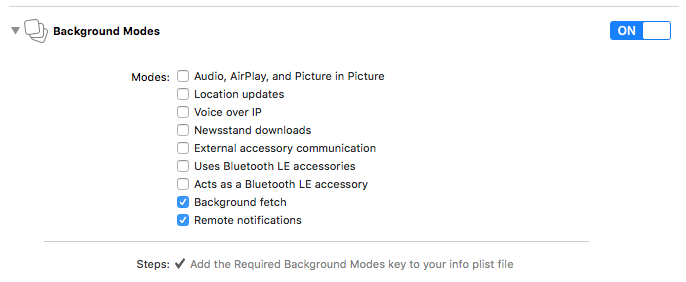
Next, Select the CloudKitDemo target located at the top of the project navigator panel, select the Capabilities tab in the main panel and scroll down to the Background Modes section. Enable the background modes option if it is not already switched on and enable both the Background Fetch and Remote Notifications options as shown in Figure 50-2:
Figure 50-2
Registering an App to Receive Push Notifications
By default, applications installed on a user’s device will not be allowed to receive push notifications until the user specifically grants permission. An application seeks this permission by registering for remote notifications. The first time this registration request occurs the user will be prompted to grant permission. Once permission has been granted, the application will be able to receive remote notifications until the user changes the notifications setting for the application in the Settings app.
To register for remote notifications for the CloudKitDemo project, locate and select the AppDelegate.swift file in the project navigator panel and modify the didFinishLaunchingWithOptions method to add the appropriate registration code. Now is also an opportune time to import the CloudKit and UserNotifications Frameworks into the class:
import UIKit
import CloudKit
import UserNotifications

@UIApplicationMain
class AppDelegate: UIResponder, UIApplicationDelegate {

    var window: UIWindow?

    func application(_ application: UIApplication, didFinishLaunchingWithOptions launchOptions: [UIApplicationLaunchOptionsKey: Any]?) -> Bool {

        UNUserNotificationCenter.current().requestAuthorization(options:
            [[.alert, .sound, .badge]],
                completionHandler: { (granted, error) in
                    // Handle Error
            })
        application.registerForRemoteNotifications()

        return true
    }
.
.
}
The code in the method configures the notification settings such that the system will display an alert to the user when an notification is received, display a badge on the application’s launch icon and also, if configured, play a sound to get the user’s attention. Although sound is enabled for this example, only the alert and badge settings will be used.
Having made these code changes, run the application and, when prompted, allow the application to receive notifications.
Configuring a CloudKit Subscription
A CloudKit subscription is configured using an instance of the CKQuerySubscription class. When the CKQuerySubscription instance is created it is passed the record type, a predicate and an option indicating whether the notifications are to be triggered when records of the specified type are created, deleted or updated. The predicate allows additional rules to be declared which the subscription must meet before the notification can be triggered. For example, a user might only be interested in notifications when records are added for houses on a particular street.
An instance of the CKNotification class is also assigned to the CKQuerySubscription object and is used to define the information that is to be delivered to the application with the notification such as the message to be displayed in the notification alert, a sound to be played and whether or not a badge should be displayed on the application’s launch icon.
Once the CKQuerySubscription is fully configured, it is committed to the cloud database using the save method of the cloud database object. For the purposes of this example, the code to implement the subscription should be implemented in the viewDidLoad method located in the ViewController.swift file:
override func viewDidLoad() {
    super.viewDidLoad()
    privateDatabase = container().privateCloudDatabase
    recordZone = CKRecordZone(zoneName: "HouseZone")

    privateDatabase?.save(recordZone!,
		completionHandler: {(recordzone, error) in
        if (error != nil) {
            self.notifyUser("Record Zone Error", message: "Failed to create custom record zone.")
        } else {
            print("Saved record zone")
        }
    })

    let predicate = NSPredicate(format: "TRUEPREDICATE")

    let subscription = CKQuerySubscription(recordType: "Houses",
                          predicate: predicate,
                          options: .firesOnRecordCreation)

    let notificationInfo = CKNotificationInfo()

    notificationInfo.alertBody = "A new House was added"
    notificationInfo.shouldBadge = true

    subscription.notificationInfo = notificationInfo

    privateDatabase?.save(subscription,
              completionHandler: ({returnRecord, error in
        if let err = error {
            print("subscription failed %@",
                        err.localizedDescription)
        } else {
            DispatchQueue.main.async() {
                self.notifyUser("Success",
                    message: "Subscription set up successfully")
            }
        }
    }))
}
Note that the NSPredicate object was created using “TRUEPREDICATE”. This is a special value that configures the predicate to always return a true value and is the equivalent of indicating that all records of the specified type match the predicate.
The .firesOnRecordCreation option indicates that the user is to be notified whenever a new record of type “Houses” is added to the database. Other options available are .firesOnRecordUpdate, .firesOnRecordDelete and .firesOnce. The .firesOnce option causes the subscription to be deleted from the server after it has fired for the first time.
Compile and run the application on a device or simulator, then log into the iCloud Dashboard. Display the settings for the CloudKitDemo application and select the Subscription Types entry in the left-hand navigation panel. If the subscription was successfully configured it should be listed as shown in Figure 50-3:
Figure 50-3
Handling Remote Notifications
When the user selects a notification alert on an iOS device, the CloudKitDemo application will be launched by the operating system. At the point that the user selects the notification, the application will currently be in one of three possible states – foreground, background or not currently running.
If the application is in the background when the alert is selected, it is simply brought to the foreground. If it was not currently running, the application is launched by the operating system and brought to the foreground. When the application is already in foreground or background state when a CloudKit notification alert is selected, the didReceiveRemoteNotification method of the application delegate class is called and passed as an argument an NSDictionary instance containing a CKNotification object which contains, among other information, the ID of the cloud database record that triggered the notification.
If the application was not already in the foreground or background when the alert is selected, the didReceiveRemoteNotification method is not called. Instead, information about the database change is passed as an argument to the didFinishLaunchingWithOptions method of the application delegate.
Implementing the didReceiveRemoteNotification Method
The didReceiveRemoteNotification method will be called when the user selects an alert and the CloudKitDemo application is either already in the foreground or currently in the background. The method will need to be implemented in the AppDelegate.swift file so locate this file in the project navigator panel and modify it to add this method:
func application(_ application: UIApplication, didReceiveRemoteNotification userInfo: [AnyHashable : Any], fetchCompletionHandler completionHandler: @escaping (UIBackgroundFetchResult) -> Void) {

    let viewController: ViewController =
       self.window?.rootViewController as! ViewController

    let notification: CKNotification =
        CKNotification(fromRemoteNotificationDictionary:
            userInfo as! [String : NSObject])

    if (notification.notificationType ==
                CKNotificationType.query) {

        let queryNotification =
            notification as! CKQueryNotification

        let recordID = queryNotification.recordID

        viewController.fetchRecord(recordID!)
    }
}
The method begins by obtaining a reference to the root view controller of the application. The code then extracts the CKNotification object from the NSDictionary that was passed to the method by the operating system. The notificationType property of the CKNotification object is then checked to make sure it matches CKNotificationType.query (which indicates that the notification was triggered as a result of a subscription).
The record ID is then obtained and passed to the fetchRecord method on the view controller. The next step is to implement the fetchRecord method.
Fetching a Record From a Cloud Database
Records can be fetched by record ID from a cloud database using the fetch(withRecordID:) method of the cloud database object. Within the ViewController.swift file, implement the fetchRecord method as follows:
func fetchRecord(_ recordID: CKRecordID) -> Void
{
    privateDatabase?.fetch(withRecordID: recordID,
                     completionHandler: ({record, error in
        if let err = error {
            DispatchQueue.main.async() {
                self.notifyUser("Fetch Error", message:
                   err.localizedDescription)
            }
        } else {
            DispatchQueue.main.async() {
                self.currentRecord = record
                self.addressField.text =
                   record!.object(forKey: "address") as? String
                self.commentsField.text =
                   record!.object(forKey: "comment") as? String
                let photo =
                   record!.object(forKey: "photo") as! CKAsset

                let image = UIImage(contentsOfFile:
                   photo.fileURL.path)
                self.imageView.image = image
                self.photoURL = self.saveImageToFile(image!)
            }
        }
    }))
}
The code obtains a reference to the private cloud database (keep in mind that this code will be executed before the viewDidLoad method where this has previously been obtained) and then fetches the record from the cloud database based on the record ID passed through as a parameter. If the fetch operation is successful, the data and photo are extracted from the record and displayed to the user. Since the fetched record is also now the current record, it is stored in the currentRecord variable.
Completing the didFinishLaunchingWithOptions Method
As previously outlined, the didReceiveRemoteNotification method is only called when the user selected an alert notification and the application is already running either in the foreground or background. When the application was not already running, the didFinishLaunchingWithOptions method is called and passed information about the notification. In this scenario, it will be the responsibility of this method to ensure that the newly added record is displayed to the user when the application loads. Within the AppDelegate.swift file, locate the didFinishLaunchingWithOptions method and modify it as follows:
func application(application: UIApplication!, didFinishLaunchingWithOptions launchOptions: NSDictionary!) -> Bool {

    let settings = UIUserNotificationSettings(forTypes:
        .Alert | .Badge | .Sound, categories: nil)

    application.registerUserNotificationSettings(settings)
    application.registerForRemoteNotifications()

    if let options: NSDictionary = launchOptions as NSDictionary? {
        let remoteNotification =
		options[UIApplicationLaunchOptionsKey.remoteNotification]


        if let notification = remoteNotification {

            self.application(application, didReceiveRemoteNotification:
			notification as! [AnyHashable : Any],
			 fetchCompletionHandler:  { (result) in
            })

        }
    }
    return true
}
The added source code begins by verifying that data has been passed to the method via the launchOptions parameter. The remote notification key is then used to obtain the NSDictionary object containing the notification data. If the key returns a value, it is passed to the didReceiveRemoteNotification method so that the record can be fetched and displayed to the user.
Testing the Application
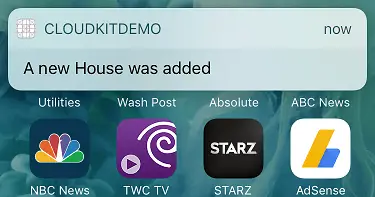
Install and run the application on two devices or simulators (or a mixture thereof) remembering to log into iCloud on both instances with the same Apple ID via the iCloud screen of the Settings app. From one instance of the application add a new record to the database. When the notification alert appears on the other device or simulator (Figure 50-4), select it to launch the CloudKitDemo application which should, after a short delay, load and display the newly added record.
Figure 50-4
Repeat these steps both when the application on the second device is in the background and not currently running. In each case the behavior should be the same.
Summary
The iOS Push Notification system is used to notify users of events relating to applications installed on a device. This infrastructure has been integrated into CloudKit allowing applications to notify users about changes to the data stored on iCloud using CloudKit.
Learn SwiftUI and take your iOS Development to the Next Level |
| Previous | Table of Contents | Next |
| An iOS 10 CloudKit Example | An iOS CloudKit Sharing Example |


