A WatchKit Table Tutorial
| Previous | Table of Contents | Next |
| An Overview of WatchKit Tables | A WatchKit Table Navigation Tutorial |
| Purchase the fully updated watchOS 2/Swift 2 edition of this book in eBook ($12.99) or Print ($27.99) format watchOS 2 App Development Essentials Print and eBook (ePub/PDF/Kindle) editions contain 35 chapters. |
The previous chapter provided an overview of tables within WatchKit apps. Now that these basics have been covered, this chapter will provide a tutorial that implements a table-based user interface within a WatchKit app using the techniques outlined in the previous chapter.
About the Table Example
The WatchKit app created in this chapter will take the form of an extension to a hypothetical iOS-based physical fitness application. The main WatchKit app storyboard will use a table to provide a list of the different steps in a workout routine with each table row containing an image and a label.
Although no interactive features will be added to the app in this chapter, the example will be extended in the next chapter (A WatchKit Table Navigation Tutorial) so that selecting a row in the table navigates to a second scene providing more detail on the selected workout step.
Creating the Table Project
Start Xcode and create a new iOS project. On the template screen choose the Application option located under iOS in the left hand panel and select Single View Application. Click Next, set the product name to TableDemoApp, enter your company identifier and make sure that the Devices menu is set to Universal. Before clicking Next, change the Language menu to Swift. On the final screen, choose a location in which to store the project files and click on Create to proceed to the main Xcode project window.
Adding the WatchKit App Target
For the purposes of this example we will assume that the iOS app has already been implemented. The next step, therefore, is to add the WatchKit app target to the project. Within Xcode, select the File -> New -> Target… menu option. In the target template dialog, select the Apple Watch option listed beneath the iOS heading. In the main panel, select the WatchKit App icon and click on Next. On the subsequent screen turn off the Include Glance Scene and Include Notification Scene options before clicking on the Finish button.
As soon as the extension target has been created, a new panel will appear requesting permission to activate the new scheme for the extension target. Activate this scheme now by clicking on the Activate button in the request panel.
Adding the Table to the Scene
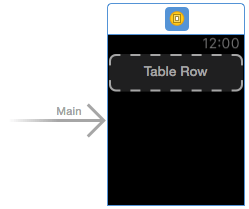
Navigate to and select the storyboard file for the WatchKit app (TableDemoApp WatchKit App -> Interface.storyboard) so that it appears in the Interface Builder tool. Within the Object Library panel, locate the Table object and drag and drop it onto the scene layout so that it appears as shown in Figure 711:
Figure 7-1
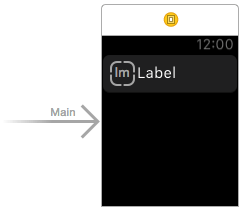
Drag an Image object from the Object Library panel and drop it onto the table row in the storyboard scene so that it is positioned on the left hand side of the row. Repeat this step, this time selecting a Label object and positioning it to the right of the Image object. Select the label and, using the Attributes Inspector panel, set the Vertical position menu to Center.
Select the Image object and make the following changes within the Attributes Inspector panel:
1. Set the Mode menu to Aspect Fit so that images are not distorted when displayed. 2. In the Position section of the panel change the Vertical menu to Center so that the image is in alignment with the label object. 3. Within the Size section of the panel set both the Height and Width attributes to be Fixed at 25 points.
On completion of these steps, the layout of the scene should resemble that of Figure 7-2:
Figure 7-2
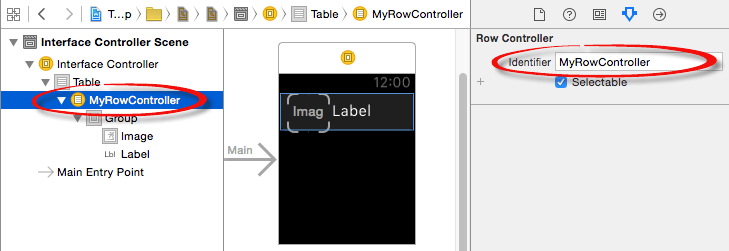
Display the Document Outline panel, select the Table Row Controller object from the hierarchy, display the Attributes Inspector panel and enter “MyRowController” into the Identifier field (Figure 7-3):
Figure 7-3
Creating the Row Controller Class
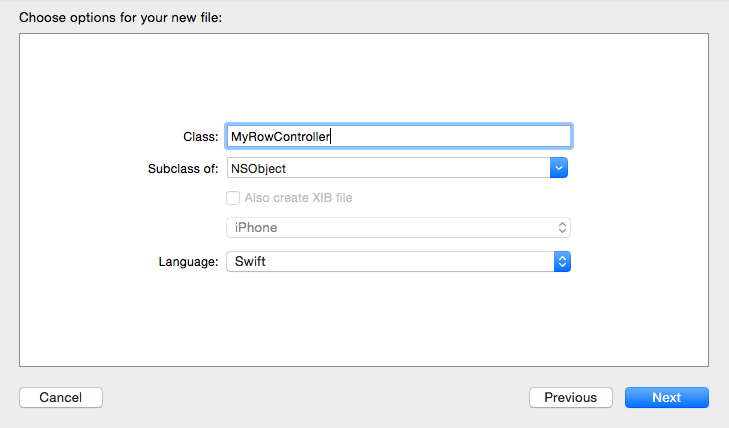
As discussed in the chapter entitled An Overview of WatchKit Tables, each row controller in the table must have associated with it a row controller class within the app extension. The next step, therefore, is to add this class. Locate the TableDemoApp WatchKit Extension entry with in the Project Navigator panel and Ctrl-click on it to display the context menu. From this menu, select the New File… menu option and, in the template selection panel, click on the Source entry listed under iOS in the left hand panel and Cocoa Touch Class from the main panel. Click Next to proceed to the next screen, enter MyRowController into the Class field and select NSObject from the Subclass of: menu as outlined in Figure 7-4:
Figure 7-4
Click Next followed by Create to generate the source file for the class into the WatchKit app extension folder.
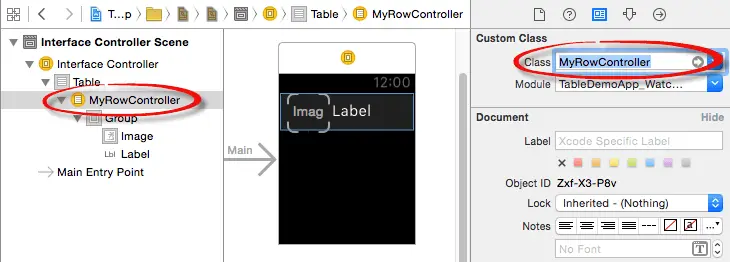
Before connecting outlets from the storyboard scene to the new row controller class, the row controller needs to be configured as a subclass of MyRowController. With the Interface.storyboard file selected and the Document Outline visible select the row controller object and display the Identity Inspector panel (View -> Utilities -> Show Identity Inspector). Within the Identity Inspector panel, use the Class drop down menu to select the MyRowController class as shown in Figure 7-5:
Figure 7-5
Establishing the Outlets
With the row controller class created, it is now time to establish the outlets for the image and label objects containing the row controller in the storyboard scene. Select the Interface.storyboard file so that it loads into Interface Builder, select the image object and display the Assistant Editor panel using the button displaying interlocking rings in the Xcode toolbar:
Figure 7-6
Once the Assistant Editor has appeared, verify that it has loaded the MyRowController.swift file. In the event that it has not loaded the correct file, use the toolbar along the top of the editor panel to select the correct file. The small instance of the Assistant Editor icon in this toolbar can be used to switch to Manual mode allowing the file to be selected from a pull-right menu containing all the source files in the project. From this menu, select Manual -> TableDemoApp -> TableDemoApp Watchkit Extension -> MyRowController.swift.
Figure 7-7
With the MyRowController.swift file displayed in the Assistant Editor panel, Ctrl-click on the image object in the storyboard scene and drag the resulting line to a location beneath the class declaration line in the Assistant Editor panel. Release the line and establish an outlet connection named myImage.
Repeat the above step to establish an outlet from the label object named myLabel. Remaining within the Assistant Editor, edit the content of the file to import the WatchKit framework instead of UIKit. On completion of these steps, the MyRowController.swift file should read as follows:
import WatchKit

class MyRowController: NSObject {

    @IBOutlet weak var myImage: WKInterfaceImage!
    @IBOutlet weak var myLabel: WKInterfaceLabel!
}
With these steps completed, the next step is to create some data to be displayed and to add initialization code to the interface controller to display the rows at runtime.
Connecting the Table Outlet
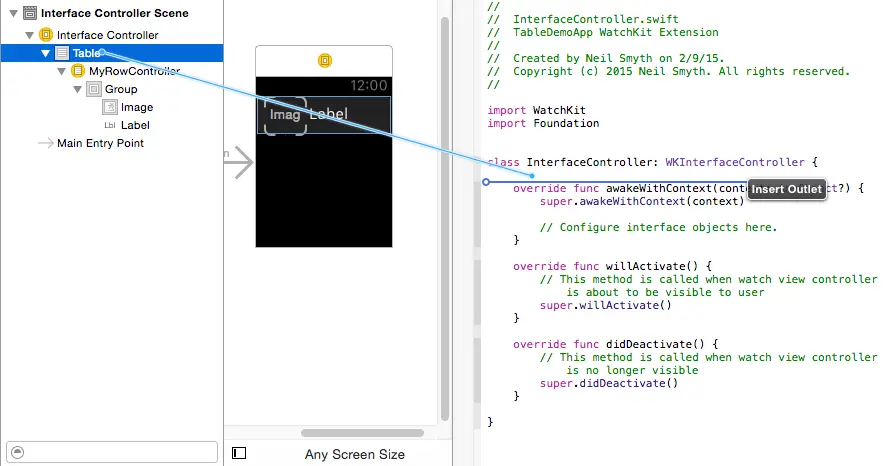
In the course of initializing the table it will be necessary to access the table instance from within the interface controller class which will, in turn, require the establishment of an outlet. With the Interface.storyboard file selected and the Document Outline panel displayed, open the Assistant Editor panel and make sure that it is displaying the content of the InterfaceController.swift file. Ctrl-click on the Table entry in the Document Outline panel and drag the resulting line to a position immediately beneath the class declaration line in the Assistant Editor panel:
Figure 7-8
Release the line and establish an outlet named myTable in the resulting connection dialog.
Creating the Data
Clearly the rows within the table consist of an image and a label. The next step is to add some data to the project to serve as content for these two objects. This will take the form of two arrays declared within the interface controller class consisting of the names of the image files to be displayed on the Image object and strings to display on the Label object. Select the InterfaceController.swift file and edit it to add these two arrays as follows:
import WatchKit
import Foundation


class InterfaceController: WKInterfaceController {

    @IBOutlet weak var myTable: WKInterfaceTable!

    let stringData = ["Warm-up", "Cardio", "Weightlifting", "Core", "Bike", "Cooldown"]

    let imageData = ["walking", "treadmill", "weights", "core", "bikeriding", "cooldown"]
.
.
}
Next, a method needs to be added to the class to initialize the table with the content of the data arrays. Remaining within the InterfaceController.swift file, implement this method as follows:
func loadTable() {

    myTable.setNumberOfRows(stringData.count,
		withRowType: "MyRowController")

    for (index, labelText) in enumerate(stringData) {
        let row = myTable.rowControllerAtIndex(index)
		as! MyRowController
        row.myLabel.setText(labelText)
        row.myImage.setImage(UIImage(named: imageData[index]))
    }
}
| Purchase the fully updated watchOS 2/Swift 2 edition of this book in eBook ($12.99) or Print ($27.99) format watchOS 2 App Development Essentials Print and eBook (ePub/PDF/Kindle) editions contain 35 chapters. |
The init lifecycle method now needs to be overridden and implemented to call the new loadTable method when the scene loads within the WatchKit app. Add this method to the InterfaceController.swift file so that it reads as follows:
override init() {
    super.init()
    loadTable()
}
Adding the Image Files to the Project
The final task before testing the app is to add the image files referenced in the imageData array. These are contained within the following ZIP file:
http://www.ebookfrenzy.com/watchkit/fitness_icons.zip
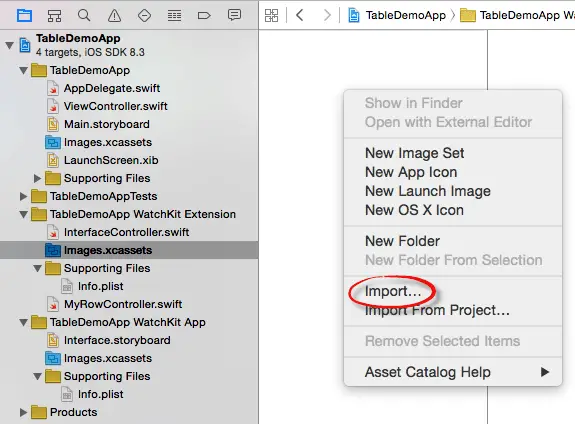
Within the code Project Navigator panel, select the Images.xcassets entry listed under the TableDemoApp WatchKit App Extension folder so that the asset catalog panel appears. Ctrl-click in the left hand panel of the asset catalog and select the Import… option from the resulting menu:
Figure 7-9
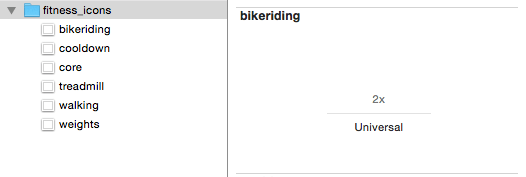
In the file import selection panel, navigate to and select the fitness_icons folder before clicking on the Open button. The images will be imported into the asset catalog as an image set named fitness_icons as shown in Figure 7-10:
Figure 7-10
Testing the WatchKit App
Select the current scheme in the toolbar and use the drop down menu (Figure 7 11) to select the TableDemoApp WatchKit App -> iPhone 6 option:
Figure 7-11
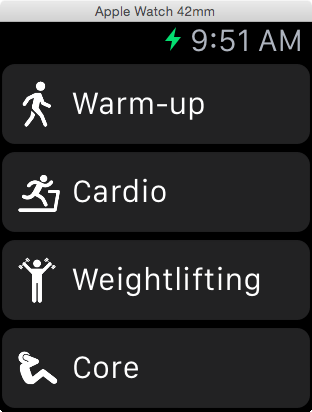
With the correct build scheme and run target selected, click on the run button to launch the app on the simulator where it should appear as illustrated in Figure 7-12:
Figure 7-12
Assuming that the app runs as expected, note that it is possible to scroll through the rows but that selecting a row has no effect beyond some shadowing indicating that the row was selected. This functionality will be added in the chapter entitled A WatchKit Table Navigation Tutorial.
Adding a Title Row to the Table
The project will now be extended to demonstrate the steps involved in displaying multiple row controller types within a WatchKit app table. For the purposes of this project this will involve the addition of a title row to the top of the table.
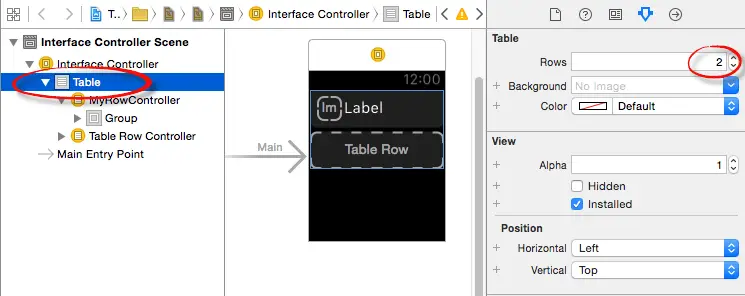
The first step is to add another row controller to the table. Begin by selecting the Interface.storyboard file and displaying the Document Outline panel. Within the Document Outline panel, select the Table entry, display the Attributes Inspector and set the Rows property to 2 as outlined in Figure 7-13:
Figure 7-13
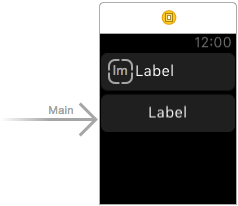
Drag a Label from the Object Library panel and drop it onto the new table row within the storyboard scene. With the new label selected, display the Attributes Inspector panel and set both the Horizontal and Vertical Position attributes to Center. On completion of these steps the scene should match that shown in Figure 7-14:
Figure 7-14
In the Document Outline panel, select the new Table Row Controller entry and enter MyTitleRowController into the Identifier field in the Attributes Inspector panel. Since this is a title row and is not intended to be selectable by the user, turn off the Selectable attribute.
As with the first row controller, this new controller will need a corresponding row controller class within the app extension. Locate and Ctrl-click on the TableDemoApp WatchKit Extension entry and select the New File… option from the menu. Repeat the steps performed earlier in this chapter to add a new Cocoa Touch Class named MyTitleRowController subclassed from NSObject. Edit the MyTitleRowController.swift file and modify the import directive so that the file imports the Watchkit framework instead of UIKit:
import UIKit
import WatchKit

class MyTitleRowController: NSObject {

}
Connecting the Outlet and Initializing the Second Table Row
Load the Interface.storyboard file into Interface Builder, display the Document Outline and Identity Inspector panels. From the Class menu in the Identity Inspector, select the newly created MyTitleRowController class. Display the Assistant Editor and make sure that it is displaying the content of the MyTitleRowController.swift file. Following the usual steps, establish an outlet for the label in the second row named titleLabel.
Finally, edit the InterfaceController.swift file and re-write the loadTable method so that it reads as follows:
func loadTable() {

    myTable.setRowTypes(["MyTitleRowController",
        "MyRowController",
        "MyRowController",
        "MyRowController",
        "MyRowController",
        "MyRowController",
        "MyRowController"])

    let titleRow = myTable.rowControllerAtIndex(0)
		as! MyTitleRowController

    titleRow.titleLabel.setText("Workout Plan")

    for index in 0..<stringData.count {
        let row = myTable.rowControllerAtIndex(index+1)
			as! MyRowController
        row.myLabel.setText(stringData[index])
        row.myImage.setImage(UIImage(named: imageData[index]))
    }
}
This time, the method is calling the setRowTypes method of the table and passing through an array containing the identifier of the title row and six instances of the MyRowController row type. This will ensure that the first row is the title row.
Next, the code obtains a reference to the title row at index position 0 in the table’s internal array and sets a string value on the text property that reads “Workout Plan”. Finally, the method iterates through the remaining rows configuring the properties of the Image and Label objects accordingly.
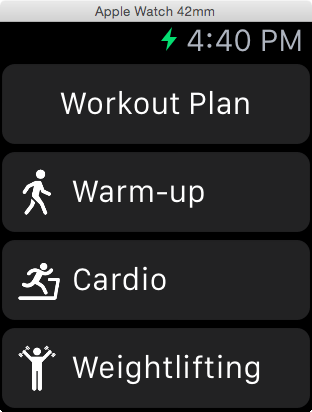
Compile and run the app once again, noting that the title row now appears at the top of the table:
Figure 7-15
Summary
This chapter has worked through the creation of a project designed to demonstrate the steps involved in creating a table-based scene within a WatchKit app. Topics covered included the creation of a table scene, implementation of the supporting classes in the app extension and the process of supporting multiple row controller types within a single table.
| Purchase the fully updated watchOS 2/Swift 2 edition of this book in eBook ($12.99) or Print ($27.99) format watchOS 2 App Development Essentials Print and eBook (ePub/PDF/Kindle) editions contain 35 chapters. |
| Previous | Table of Contents | Next |
| An Overview of WatchKit Tables | A WatchKit Table Navigation Tutorial |
