A Firebase App Indexing Tutorial
| Previous | Table of Contents | Next |
| Implementing Firebase App Indexing | Firebase Performance Monitoring |
The previous chapters have covered a considerable amount of information relating to App Indexing. As is often the case, the best way to gain familiarity with the concepts of an area of this level of complexity is to put the information to practical use and to see it in action. With these goals in mind, this chapter will create an example Android app which makes use of many of the features offered by Firebase App Indexing.
About the Example App
In this chapter app indexing support will be added to an existing project. The project, named AppIndexing, is a basic app designed to allow users to find out information about landmarks in London. The app uses a SQLite database accessed through a standard Android content provider class. The app is provided with an existing database containing a set of records for some popular tourist attractions in London. In addition to the existing database entries, the app also lets the user add and delete personal landmark descriptions.
In its current form, the app allows records to be searched and new records to be added and deleted. The app also makes use of deep links to allow landmark descriptions to be loaded and viewed within the app via URL link clicks.
The goal of this chapter is to enhance the app to add support for app indexing including public and personal content indexing and user action logging.
The Database Schema
The data for the example app is contained within a file named landmarks.db located in the app -> assets –> databases folder of the project hierarchy. The database contains a single table named locations, the structure of which is outlined in Table 50‑1:
| Column | Type | Description |
|---|---|---|
| _id | String | The primary index, this column contains string values that uniquely identify the landmarks in the database. |
| Title | String | The name of the landmark (e.g. London Bridge). |
| description | String | A description of the landmark. |
| personal | Boolean | Indicates whether the record is personal or public. This value is set to true for all records added by the user. Existing records provided with the database are set to false. |
Table 50‑1
Loading and Running the Project
The project is contained within the AppIndexing folder of the sample source code download archive located at the following URL:
http://www.ebookfrenzy.com/web/firebase_android
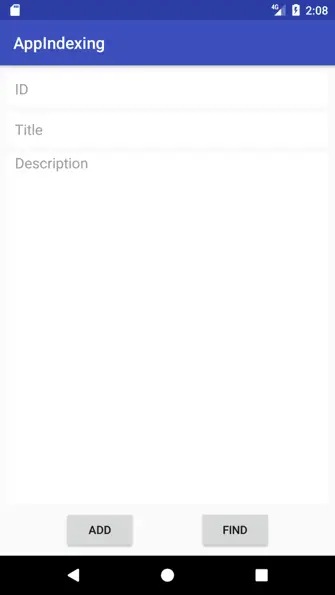
Having located the folder, open it within Android Studio and run the app on an device or emulator. Once the app is launched, the screen illustrated in Figure 50‑1 below will appear:
Figure 50‑1
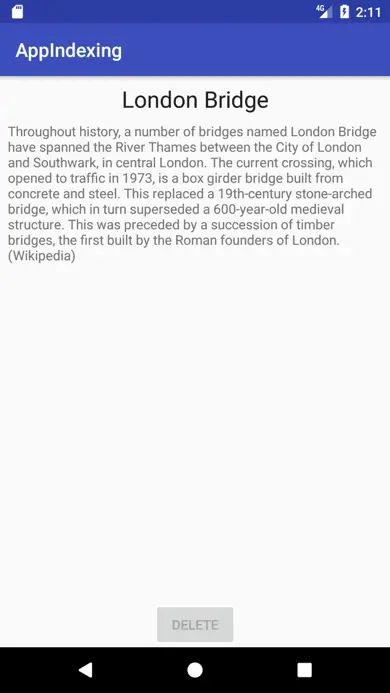
As currently implemented, landmarks are located using the ID for the location. The default database configuration currently contains two records referenced by the IDs “londonbridge” and “toweroflondon”. Test the search feature by entering the ID for London Bridge into the ID field and clicking the Find button. When a matching record is found, a second activity (named LandmarkActivity) is launched and passed information about the record to be displayed. This information takes the form of a deep link URL which is then used by LandmarkActivity to extract the record from the database and display it to the user using the screen shown in Figure 50‑2. The first time the second activity is launched, Android may ask you to select which app to use to handle the intent. If so, select the AppIndexing option followed by the Always button.
Figure 50‑2
Finally, verify that deep links work by opening a terminal or command-prompt window and executing the following adb command:
adb shell am start -a android.intent.action.VIEW -d
  "http://example.com/landmarks/toweroflondon" com.ebookfrenzy.appindexing
After the command has executed, the app should display information about the Tower of London.
Adding Firebase App Indexing Support
Using the Firebase assistant panel, locate the App Indexing entry and take the necessary steps to connect the project to Firebase and to add the App Indexing libraries.
Logging User Actions
When a user performs a search or views information about a landmark using a deep link, that action needs to be recorded so that it appears as an auto-completion option when performing a search within the Google app on the device. When logging these actions, it will be important to differentiate between personal and public database records to ensure that only public actions are uploaded to Google.
Landmark information is displayed by the displayLandmark() method located in the LandmarkActivity.java file. This method is passed a Landmark object containing the information extracted from the database. From this information we can identify whether a public or personal record is being viewed and log the action accordingly. Edit the LandmarkActivity.java file and add two new methods to perform the logging:
import com.google.firebase.appindexing.Action;
import com.google.firebase.appindexing.FirebaseUserActions;
import com.google.firebase.appindexing.builders.Actions;

private void logPublicAction() {
    Action action = Actions.newView(landmark.getTitle(),
			landmark.getLandmarkURL());
    FirebaseUserActions.getInstance().end(action);
}
.
.
.
private void logPersonalAction() {
    Action action = new Action.Builder(Action.Builder.VIEW_ACTION)
            .setObject(landmark.getTitle(),landmark.getLandmarkURL())
            .setMetadata(new Action.Metadata.Builder().setUpload(false))
            .build();

    FirebaseUserActions.getInstance().end(action);
}
Next, locate the displayLandmark() method and modify it to call the appropriate logging method depending on whether the landmark is public or personal:
private void displayLandmark(String landmarkId) {
    MyDBHandler dbHandler = new MyDBHandler(this, null, null, 1);

    landmark =
            dbHandler.findLandmark(landmarkId);

    if (landmark != null) {

        if (landmark.getPersonal() == 0) {
            logPublicAction();
            deleteButton.setEnabled(false);
        } else {
            logPersonalAction();
            deleteButton.setEnabled(true);
        }

        titleText.setText(landmark.getTitle());
        descriptionText.setText(landmark.getDescription());
    } else {
        titleText.setText("No Match Found");
    }
}
Adding Content Indexing
Now that actions are being logged, the next step is to begin indexing both public and personal content. The code to perform the content indexing will be implemented in a method named indexLandmark() which now needs to be added to the LandmarkActivity.java file:
.
.
import android.support.annotation.NonNull;
import com.google.android.gms.tasks.OnFailureListener;
import com.google.android.gms.tasks.OnSuccessListener;
import com.google.android.gms.tasks.Task;
import com.google.firebase.appindexing.FirebaseAppIndex;
import com.google.firebase.appindexing.Indexable;
.
.
private void indexLandmark() {

    Indexable indexableLandmark = new Indexable.Builder()
            .setName(landmark.getTitle())
            .setUrl(landmark.getLandmarkURL())
            .setDescription(landmark.getDescription())
            .build();

    Task<Void> task =
	FirebaseAppIndex.getInstance().update(indexableLandmark);

    task.addOnSuccessListener(new OnSuccessListener<Void>() {
        @Override
        public void onSuccess(Void aVoid) {
            Log.d(TAG, "App Indexing added "
		+ landmark.getTitle() + " to " +
                    "index");
        }
    });

    task.addOnFailureListener(new OnFailureListener() {
        @Override
        public void onFailure(@NonNull Exception exception) {
            Log.e(TAG, "App Indexing failed to add " +
			landmark.getTitle() + " to index. " +
                    "" + exception.getMessage());
        }
    });
}
The method builds an Indexable object containing the landmark title, URL and description before passing it through to the update() method of the FirebaseAppIndex instance as a background task. Success and failure listeners are then added to the task to report on the status of the update once the task completes.
The objective is to index the content when the user views it within the app. To ensure that this happens, a call to the indexLandmark() method will be added to the activity’s onStart() method:
@Override
protected void onStart() {
    super.onStart();

    if (landmark != null) {
        indexLandmark();
    }
}
Testing Content Indexing
With content indexing added to the app, compile and run the app on a device or emulator and enter “londonbridge” into the ID field before clicking on the Find button. When the Landmark activity loads with the London Bridge information, check the logcat output to verify that the content was successfully indexed.
Display the device home screen and swipe right to display the Google screen (Figure 50‑3).
Figure 50‑3
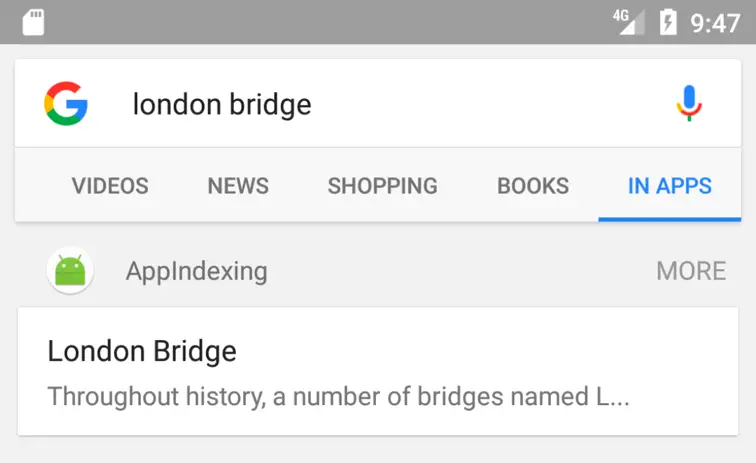
Enter London Bridge into the search bar and initiate the search. When the search results screen appears, scroll sideways through the list of search categories and select the In Apps option (the option may be displayed as Tablet or Phone if testing is being performed on a physical device). The results should now include the London Bridge content from the AppIndexing app:
Figure 50‑4
Selecting the London Bridge entry from the search results should launch the app and load the London Bridge content into the Landmark activity view.
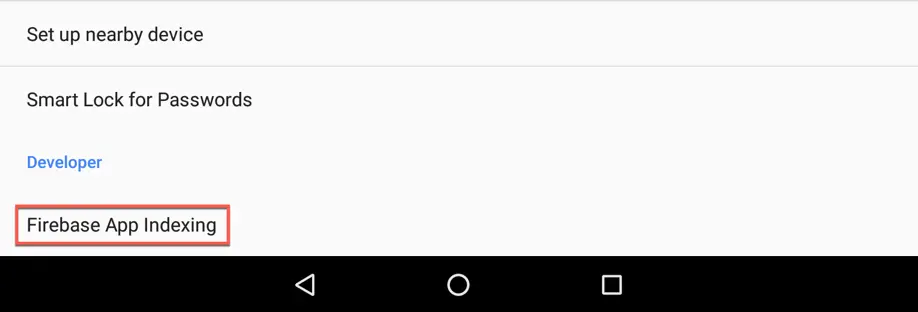
If the app is running on a physical device, the index information can be reviewed within the Settings app. After opening Settings, select the Google entry, scroll down to the Developer section and click on the Firebase App Indexing option:
Figure 50‑5
Within the list of applications, select the AppIndexing entry to display index information captured for the app:
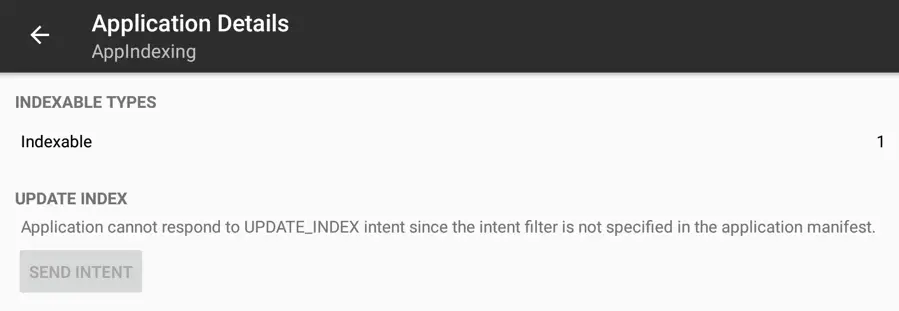
Figure 50‑6
Note that the screen includes a Send Intent button. This is provided to force the app to update the index entries for personal content. This button is currently disabled because index updating support has not yet been added to the project. This feature will be implemented later in the chapter.
The above figure shows that one Indexable item has been stored for the app. Selecting this entry will display the index list including the title and URL:
Figure 50‑7
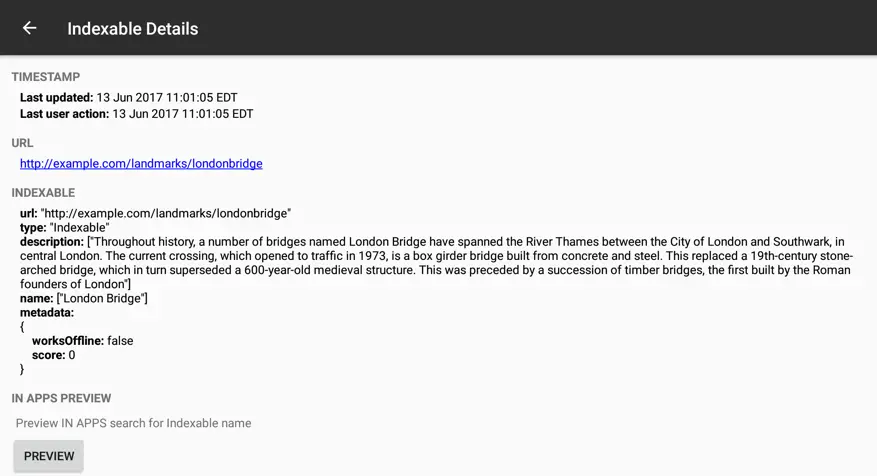
Selecting the London Bridge item will display all of the data that has been included for that index entry:
Figure 50‑8
Clicking the Preview button in the Indexable Details screen will launch the AppIndexing app and load the London Bridge content within the Landmark Activity.
Indexing User Added Content
The final task is to make sure that any new personal content added by the user is indexed at regular intervals. New landmarks are added to the database using the main activity screen. As currently configured, a newly added landmark will not be indexed until the user views the details in the Landmark activity. One possible solution to this problem might be to add code to index each new landmark as it is added. Another option, and the one that will be used in this instance, is to add an App Indexing Service to the app. This intent service is called when the app is installed or updated, each time it is launched and intermitantly over time.
The purpose of the service is to identify the personal content within the app and to add it to the on-device index. To add an app indexing service to the project, locate and right-click on the package name (com.ebookfrenzy.appindexing) within the Android Studio project tool window and select the New -> Service -> Service (IntentService) menu option. In the resulting dialog, name the class AppIndexingService, turn off the option to include helper start methods and click on the Finish button.
Edit the AppIndexingService.java file, delete the current content and implement the class as follows:
package com.ebookfrenzy.appindexing;

import android.app.IntentService;
import android.content.Intent;
import android.support.annotation.NonNull;
import android.util.Log;

import com.google.android.gms.tasks.OnFailureListener;
import com.google.android.gms.tasks.OnSuccessListener;
import com.google.android.gms.tasks.Task;
import com.google.firebase.appindexing.FirebaseAppIndex;
import com.google.firebase.appindexing.Indexable;
import com.google.firebase.appindexing.builders.Indexables;

import java.util.ArrayList;
import java.util.List;
public class AppIndexingService extends IntentService {

    public static final String TAG = "AppIndexingService";

    public AppIndexingService() {
        super("AppIndexingService");
    }

    @Override
    protected void onHandleIntent(Intent intent) {

    }

}
The first method that needs to be added to the class will be used to return an array of personal landmark records contained within the database. Remaining within the AppIndexingService.java file, add this method as follows:
private List<Landmark> getPersonalLandmarks() {

    ArrayList<Landmark> landmarks = new ArrayList();

    MyDBHandler dbHandler = new MyDBHandler(this, null, null, 1);

    landmarks = dbHandler.findAllLandmarks();

    for (Landmark landmark : landmarks) {
        if (landmark.getPersonal() == 1) {
            landmarks.add(landmark);
        }
    }
    return landmarks;
}
The code calls a method on a MyDBHandler instance that returns all of the landmarks in the database. The code then iterates through all of the landmarks, adding only those with the personal flag set to the array list. Once all the landmarks have been checked, the array list is returned.
Each time the intent service is launched, the method named onHandleIntent() will be called. The following code now needs to be added to this method to call the getPersonalLandmarks() method and add each landmark to the index:
@Override
protected void onHandleIntent(Intent intent) {

    ArrayList<Indexable> indexableLandmarks = new ArrayList<>();

    for (Landmark landmark : getPersonalLandmarks()) {

        if (landmark != null) {

            Indexable personalLandmark = Indexables.digitalDocumentBuilder()
                    .setName(landmark.getTitle())
                    .setText(landmark.getDescription())
                    .setUrl(landmark.getLandmarkURL())
                    .build();

            Task<Void> task =
		FirebaseAppIndex.getInstance().update(personalLandmark);

            task.addOnSuccessListener(new OnSuccessListener<Void>() {
                @Override
                public void onSuccess(Void aVoid) {
                    Log.d(TAG, "AppIndexService: Successfully added landmark");

                }
            });

            task.addOnFailureListener(new OnFailureListener() {
                @Override
                public void onFailure(@NonNull Exception exception) {
                    Log.e(TAG, "AppIndexService: Failed to add landmark " +
                            "" + exception.getMessage());
                }
            });

        }
    }
}
The intent will be called at regular intervals by Google Play services. In order for this to happen, the intent needs an UPDATE_INDEX intent filter and app indexing permission. Edit the AndroidManifest.xml file, locate the .AppIndexingService element and modify it so that it matches the entry below:
<service android:name=".AppIndexingService"
    android:exported="true"
    android:permission="com.google.android.gms.permission.APPINDEXING">
    <intent-filter>
      <action android:name="com.google.firebase.appindexing.UPDATE_INDEX" />
    </intent-filter>
</service>
Testing Index Updates
Compile and run the app (ideally on a physical Android device) and add a new landmark to the database. Before viewing the landmark, open the Google app and perform a search for the newly added landmark. The In Apps screen of the search results should indicate that the content has not yet been indexed.
Using the App Indexing screen of the Settings app, select the AppIndexing app and click on the Send Intent button shown in Figure 50‑8 above. This will launch the AppIndexingService intent causing the new landmark to be indexed. Remaining within the Settings app, navigate to the index details for new index entry and click on the Preview button.
This should launch the Google app and show the new content in the In App search results.
Deleting Index Entries
The final task is to make sure that when a personal landmark is deleted, the corresponding index entry is also removed. When a personal landmark is displayed in the Landmark activity screen, the Delete button is enabled allowing the record to be removed from the database. The code to perform this task is contained in the deleteLandmark() method located in the LandmarkActivity.java file. Edit this file, locate the method and modify it to remove the index entry for the landmark:
public void deleteLandmark(View view) {

    MyDBHandler dbHandler = new MyDBHandler(this, null, null, 1);

    if (landmark != null) {
        dbHandler.deleteLandmark(landmark.getID());
        titleText.setText("");
        descriptionText.setText("");
        deleteButton.setEnabled(false);
        FirebaseAppIndex.getInstance().remove(landmark.getLandmarkURL());
    }
}
Run the app one last time, find the personal landmark added in the previous section and delete it from the database. Using either the Google app or App Indexing Settings screens, verify that the landmark is no longer indexed.
Summary
The objective of this chapter has been to demonstrate in practical terms the indexing of personal content and logging of user actions using Firebase App Indexing within an Android app. This included the implementation of an app indexing service and use of the Android Settings app to test app indexing functionality.
| Previous | Table of Contents | Next |
| Implementing Firebase App Indexing | Firebase Performance Monitoring |
