Difference between revisions of "Configuring the Fedora Desktop Panels"
(→Adding Items to a GNOME Destop Panel) |
(→Adding Items to a GNOME Destop Panel) |
||
| Line 66: | Line 66: | ||
== Adding Items to a GNOME Destop Panel == | == Adding Items to a GNOME Destop Panel == | ||
| − | When Fedora Linux is first installed, a number of items are added by default to the | + | When Fedora Linux is first installed, a number of items are added by default to the two panels. Additional items, however, may easily be added to any panel. There are a couple of ways to add items to the panel. |
| + | |||
| + | If there is application you frequently launch from the ''Applications'' menu there is a quick way to add a launch icon to the panel. Simply open the ''Applications'' menu and navigate to the menu option for the desired application. Rather than clicking on this menu item with the left mouse button as you normally would, click instead with the right mouse button and select the ''Add this launcher to panel'' option. An icon representing the application will subsequently appear on the panel which, when clicked, will launch the corresponding application. | ||
| + | |||
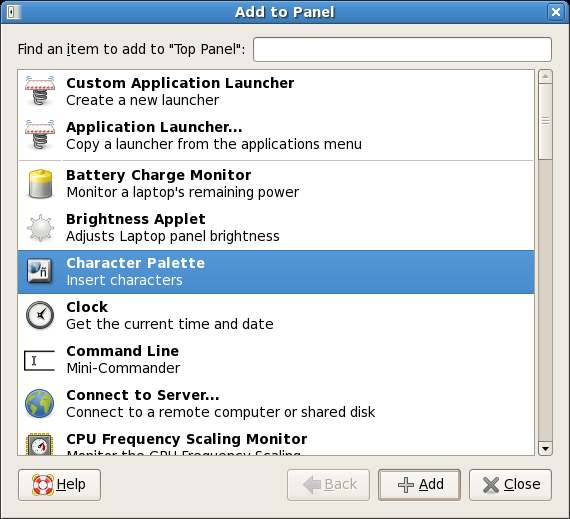
| + | To add items to a panel simply click with the right mouse button over the panel to be configured and select the ''Add to Panel'' menu option from the resulting popup menu. The ''Add to Panel'' dialog will then appear as follows: | ||
Revision as of 16:59, 17 December 2007
The Fedora Desktop Panels are probably the most useful aspect of the entire desktop, and as with just about every other aspect of the GNOME desktop, these panels are accompanied by extensive configuration options.
What are Desktop Panels
On a newly installed Fedora system there are two panels configured by default. These appear at the top and bottom of the desktop. The top panel contains the main desktop menus and a number of status areas with information such as the system date and time. The bottom panel contains the trash can, access to the various virtual workspaces and also has a button representing each application currently running in the current workspace.
The top panel:
The bottom panel:
These panels can be configured in a wide variety of ways including:
- Adding additional panels
- Moving the panels to new different locations
- Adding mini applications (such as stock ticker or weather applet)
- Size, background, visibility and transparency
In the remainder of this chapter we will look at each of these customization options in detail.
Changing the Position of a Panel
A panel can be placed in one of four different locations on the desktop: the top, bottom, far left or far right of the desktop. There are two ways to change the position of a Fedora GNOME Desktop panel. By far the easiest method is to simply click with the left hand mouse button on the panel you wish to relocate and grag it to the new location.
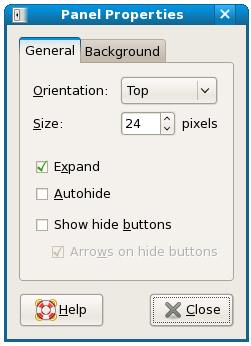
Alternatively, the location of the panel can be adjusted using the Properties dialog of the panel. This dialog is accessed by clicking with the right hand mouse button on any blank area of the panel and selecting Properties from the popup menu:
From the above dialog, change the Orientation setting to the desired value to position the panel as required.
Adding and Deleting Desktop Panels
New panels may be added to the desktop by right clicking on any existing panel and selecting New Panel from the resulting menu. The new panel will be place in an orientation where no panel currently exists. If you already have panels on all four sides of your desktop, the new panel will be placed next to a pre-existing panel. It is possible to fill your entire desktop with panels if you wish, though obviously this is not recommended.
An existing panel may be removed from the desktop by right clicking on the panel and selecting Delete This Panel from the popup menu.
Changing the Appearance of a Desktop Panel
A number of configuration options are available for changing the appearance of a desktop panel. These are all made using the panel properties dialog (accessed by right clicking on the panel to be changed and selecting Properties from the popup menu).
The Size property controls the height (when the panel is in a horizontal orientation) or width (when in vertical orientation). It is not possible to reduce the size to the extent where items will no long be visible (typically around 23 pixels).
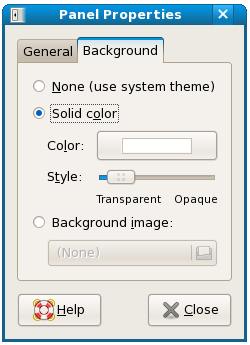
A different color or even an image may be specified for the panel background. These settings are available from the Background page of the panel properties dialog:
The level of transparency can be specified by adjusting the Style slider.
The panel may be further configured so that it remains hidden until the mouse point moves to the side of the desktop where the panel is located. To activate this feature, select the Autohide option on the main panel properties page.
Finally, if you do not wish to have the panel occupy the full width or height of the desktop, unset the Expand option. The panel will then only be as wide or as tall as it needs to be to accommodate the items it is configured to display.
Adding Items to a GNOME Destop Panel
When Fedora Linux is first installed, a number of items are added by default to the two panels. Additional items, however, may easily be added to any panel. There are a couple of ways to add items to the panel.
If there is application you frequently launch from the Applications menu there is a quick way to add a launch icon to the panel. Simply open the Applications menu and navigate to the menu option for the desired application. Rather than clicking on this menu item with the left mouse button as you normally would, click instead with the right mouse button and select the Add this launcher to panel option. An icon representing the application will subsequently appear on the panel which, when clicked, will launch the corresponding application.
To add items to a panel simply click with the right mouse button over the panel to be configured and select the Add to Panel menu option from the resulting popup menu. The Add to Panel dialog will then appear as follows:
To add an item to the panel, simply scroll through the list provided, select the required item and press the Add button. The following panel shows an example Fedora desktop panel with the system monitor and weather items added:
To edit the properties or preferences for a panel item, move the mouse pointer over the item in the panel and click the right mouse button. Select either Properties or Preferences from the menu and the appropriate dialog will appear. For example, the Preferences panel for the Weather item allows various settings to be changed, such as the location and units for displaying temperature (Celsius or Fahrenheit). The system monitor can similarly be configured to also display metrics such as system load, memory and network graphs.
To delete an item from a panel right click with the mouse on the item and select Remove from Panel.
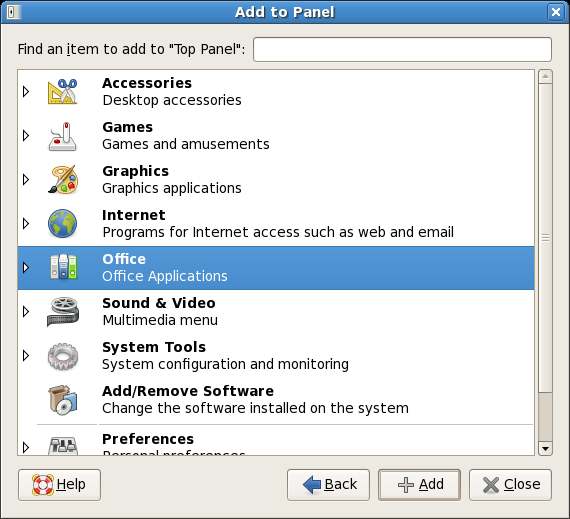
in addition, if you find there is an application you frequently launch from the desktop Applications or System menus, these may also be added to a panel. To do so, launch the Add to Panel dialog as outlined above and click on the Application Launcher. The resulting dialog will list each menu item and all sub-menu items. If, for example, you wanted to be able to launch the OpenOffice Word Processor from the panel simply click on the arrow next to Office in the Add to Panel dialog to unfold the list of Office applications. Select OpenOffice.org Word Processor and click on the Add button:
To move an item to a different location in a panel right click with the mouse of the item and select Move. Then use the mouse to drag and drop the item to a new location. Alternatively, click with either the middle mouse button, or the left and right mouse buttons and drag and drop the panel item to the new location.
To add a binary or application not currently available from the desktop menus simply select the Custom Application Launcher and specify the path to the application and provide a name. Click on the No icon button to select an icon to represent the item on the panel.
Changing the Number of Fedora Desktop Workspaces
The Fedora GNOME desktop supports multiple desktop workspaces (these are essentially individual screens which the user can switch between to avoid having to have all applications cluttered onto one screen). Switching between workspaces is achieved by clicking on the workspaces in the bottom desktop panel. The image below shows the panel from a desktop with four workspaces:
By default, Fedora configures four workspaces. To increase the number of available workspaces, right click with the mouse on the workspace control (as shown above) in the panel and select Preferences. Simply increase the Number of workspaces value to the desired number. The name of each workspace may be changed by double clicking on the default name in the list (Desk 1, Desk 2 etc) and typing in a new name.


