Configuring Fedora Linux Wireless Networking
Over recent years it has become increasingly common for computers to be connected to local area networks and the internet via wireless connections. This has spread from the home and the coffee shop into the enterprise, especially with the advent of increased wireless security and faster standards such as wireless N. Configuring wireless network access on many Linux distributions is still a somewhat complex proposition. Fedora Linux, however, makes this task extremely easy.
Installing the Wireless Card
If you are installing a wireless card into system which is already running Fedora Linux, the first step is to install the new hardware device. If the device is an internal card, shut the machine down and install the card. If the device is a laptop PC card or a USB wireless adaptor this can be installed without the necessity to shut down the system.
Once the wireless device is installed, Fedora should automatically detect it.
Checking for a Wireless Connection
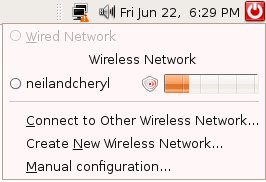
If you are on an open wireless network (i.e it does not use any form of encryption) then it is possible that Ubuntu will automatically locate the network and connect to it. This is because Ubuntu is configured by default with roaming mode enabled. In roaming mode the networking system searches the airwaves for wireless networks it can connect to. If it finds either an open network, or one for which it has the encryption key it will automatically connect. A status indicator in the top right hand corner of the desktop indicates whether or not a network connection is active. The indicator icon shows two computer monitors. If the icon shows a red warning triangle with a white exclamation mark (as below) then there is currently no active connection.
Clicking with the left-hand mouse button on the network connection status icon will cause a drop down menu to appear:
In the above example Ubuntu has located a wireless network called neilandcheryl and shows moderately low signal strength. The small shield icon next to the network name indicates that this is an encrypted network. It is also possible from this drop down menu to connect to other wireless networks, configure a network connection manually or create a new wireless network.
Configuring a Wireless Network Connection
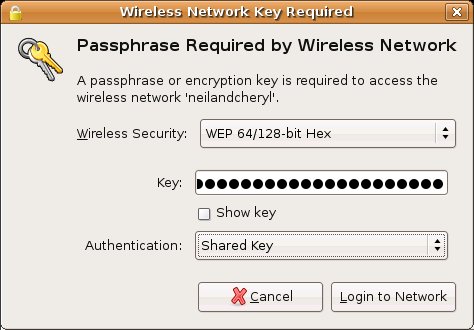
If the above drop down menu lists a wireless network for which you have an encryption key or passphrase simply click on the network name to invoke the Wireless Network Key Required dialog:
Select the key type (Passphrase, WEP Hex or WEP ASCII) and the authentication type (Shared key). Having made appropriate selections enter the key or passphrase you configured when you set up your wireless base station and click on the Login to Network button. After a short wait the network connection should be activated. If the connection fails go back and check that you entered the correct settings for the encryption key or passphrase or try using the Network Settings Dialog described below.
Using the Ubuntu Linux Network Settings Dialog
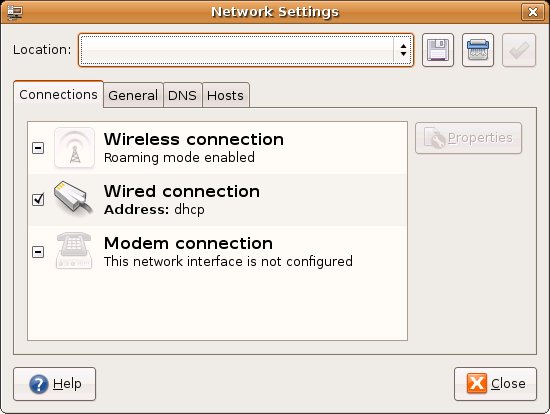
A more advanced network configuration tool is accessible by selecting the System menu at the top of the desktop, choosing Administration and the clicking on Network. The Network Settings dialog lists wired, wireless and modem connections. If no Wireless Connection is shown in the list, check that you have a wireless adaptor card installed into your system. Assuming you have a wireless adaptor installed your Network Settings dialog should appear as follows:
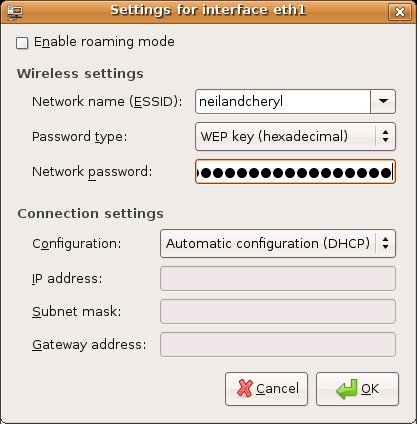
To configure a wireless network connection, select the Wireless connection entry from the Network Settings list and click on the Properties button. The following dialog will then appear:
If the Enable roaming mode toggle is set, uncheck it to gain access to the configuration fields below.
Select the appropriate Network name (ESSID) from the drop down list. If no networks are listed it may be that you are not in range of a wireless network. After choosing a wireless network, select the password type and enter the authentication key required for access to the chosen wireless network.
If your wireless base station is configured to provide IP addresses using DHCP (the most common configuration) then leave this setting unchanged. In the unlikely event that you are required to manually enter network configuration information change this setting to Static IP address and enter your IP address, subnet mask and gateway address. If you are unsure as to what these values are check with your network administrator.
All being well your Ubuntu Linux system should now be connected to your wireless network.


