Understanding Visual Basic Events
In the days before graphical environments such as Microsoft windows, applications were developed using a procedural approach. This meant that the path a user would take through an application was dictated by the programmer at the point the application was developed. For example. the application might display a menu listing several options, and prompt the user to select an option. Depending on the user's selection, the application might display a data input screen in which data would need to be entered in the order in which the fields were displayed on the screen. Once the data was entered the user would then be able to press a key to save the data and return to the menu screen again.
The world of the graphical user interface is very different from the old days. Today a user is presented with windows containing multiple controls such as buttons, text fields, toggles and sliders. The mouse allows the user to interact with any of the visible controls in any order they choose. The programmer can, therefore, no longer dictate the path a user will take through an application. A new way of handling the interaction between a user and an application was needed. This approach is known as event handling.
Instead of a procedural approach to programming, applications are now event driven. In essence, the developer defines what the user interface is to look like, and then defines subroutines which will be called when particular events are triggered. For example, the Visual Basic programmer might create a Form containing a number of Buttons. For each Button, the programmer will define the Visual Basic code to be executed when a Click event is triggered on each button. When the application runs, an event loop sits in the background and waits for an event to be triggered in the application. Once an event is triggered (such as button click or a a keystroke in a text field) the event loop looks at the object from which the event was triggered to see if an event handler has been defined by the developer for that particular event type. If a handler has been defined, that subroutine is executed and the event loop continues to loop waiting for the next event to be triggered.
Visual Event Triggers
There are a number of ways events can be triggered:
- User Interaction - One of the most common ways for events to be triggered is through user interaction with controls in a Form. Each control has a number of events which can be triggered. For example, a text field can trigger an event when a user types a character or when a user moves the mouse over the control.
- Object Event Triggering - Objects can trigger their own events. For example, the Timer object can be configured to trigger its own Timer event after a specified amount of time has elapsed.
- Operating System - The Windows operating system can trigger events which can be handled by the application. For example, Windows will trigger an event when part of a window is obscured by another window. In this situatio,n Visual Basic receives an event when the previously obscured window area is re-exposed so that it knows to repaint the area.
- Programmatically triggered events - The event of any object may be triggered by the programmer from within the Visual Basic code. For example, a program may need to simulate the event triggered by a user clicking on a button.
Wiring Up Events in Visual Studio
In this section we will look at the steps involved in configuring events on controls in a Form. Create a new Windows Application project in Visual Studio called VBevents (see Creating a New Visual Basic Project for details on how to do this).
In this example we are going to create a Form containing a TextBox, a Label and a Button. We are then going to set up event handlers such that any text typed into the TextBox will appear in the Label control. We will also wire up an event handler on the Button to close the application when the button is pressed.
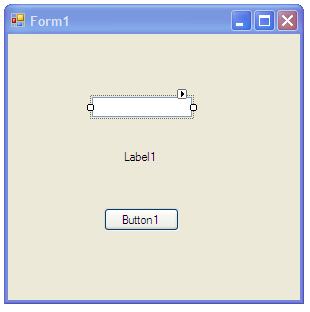
The first step is to design the Form. Using the Toolbox (see Designing Forms in Visual Basic for an overview of designing forms) add a TextBox, Label and Button to the Form so that form appears as follows:
Select each control in turn and using the Properties panel change the Name of the controls to myButton, myLabel and textInput respectively. The Form design is now complete and we can now begin to connect the events to event handlers.
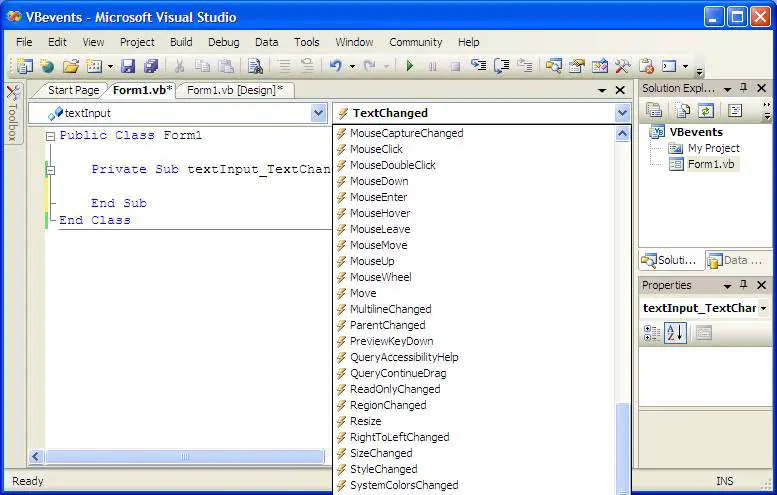
We will begin by defining an event procedure for the TextBox. To access the textInput control event procedures simply double click on the TextBox control in the Form. Visual Studio will subsequently display the event procedures for the textInput control. By default Visual Studio picks the most common event, the TextChanged event, and creates a stub of the subroutine to be called when that event is triggered by the user.
In our example we want every keystroke performed by the user in the TextBox to be displayed by the Label control. In this case the TextChanged event is exactly the event we want. If, however, we had wanted to write the procedure for a different event on the TextBox we could simply click on the right-hand drop down menu above the code area to view and and select from a list of events available on this type of control:
With the TextChanged event still selected it is time to write the Visual Basic code that will be executed when the event is triggered. To do so, we will need to set the Text property of the myLabel control to equal the Text property of the textInput control. The properties of objects are accessed using what is called dot notation. For example the Text property of myLabel is accessed in Visual basic code as follows:
myLabel.Text
To modify the event procedure, therefore, the code this this event needs to be modified as follows:
Private Sub textInput_TextChanged(ByVal sender As System.Object, ByVal e As System.EventArgs) Handles textInput.TextChanged

            myLabel.Text = textInput.Text

    End Sub
Visual Studio, of course, makes life easy for us when accessing peroperties of objects. At the point that you type the '.' after myLabel a drop down list of properties available with this type of object is displayed from which to choose. Either select the Text property from the list, or continue to type the word Text. Repeat this for the textInput property:
The implementation of the TextChanged event handler for our inputText control is now complete. Now we need to implement the event procedure for the Button. The drop down menu to the left of the event type menu contains a list of all the objects in our application and may be used to switch to editing the event procedures for an object other than the currently selected TextBox control. Use this menu to select the myButton control. Once again Visual Studio selects the most likely event, in this case 'Click which, in this case is the event we wish to handle. Modify the event procedure to call Close() as follows:
Private Sub myButton_Click(ByVal sender As Object, ByVal e As System.EventArgs) Handles myButton.Click
        Close()
    End Sub
Now, when the button is pressed the application will exit.
Finally build the application by selecting the Debug->Start Debugging menu option, or click on the Debug button in the toolbar (the button displaying the green Play triangle). The application should compile and run. When you type text into the TextBox the characters should also appear in the label:
Clicking the Button should close the application as specified in the Click() event procedure.


