Signing and Preparing an Android App for Release
| Previous | Table of Contents | |
| Handling Different Android Devices and Displays in Kotlin |
Once the development work on an Android application is complete and it has been tested on a wide range of Android devices, the next step is to prepare the application for submission to the Google Play App Store. Before submission can take place, however, the application must be packaged for release and signed with a private key. This chapter will work through the steps involved in obtaining a private key and preparing the application package for release.
The Release Preparation Process
Up until this point in the book, we have been building application projects in a mode suitable for testing and debugging. Building an application package for release to customers via the Google Play store, on the other hand, requires that some additional steps be taken. The first requirement is that the application be compiled in release mode instead of debug mode. Secondly, the application must be signed with a private key that uniquely identifies you as the application’s developer. Finally, the application package must be aligned. This is simply a process by which some data files in the application package are formatted with a certain byte alignment to improve performance.
While each of these tasks can be performed outside of the Android Studio environment, the procedures can more easily be performed using the Android Studio build mechanism as outlined in the remainder of this chapter.
Register for a Google Play Developer Console Account
The first step in the application submission process is to create a Google Play Developer Console account. To do so, navigate to https://play.google.com/apps/publish/signup/ and follow the instructions to complete the registration process. Note that there is a one-time $25 fee to register. Once an application goes on sale, Google will keep 30% of all revenues associated with the application.
Once the account has been created, the next step is to gather together information about the application. In order to bring your application to market, the following information will be required:
- Title – The title of the application.
- Short Description - Up to 80 words describing the application.
- Full Description – Up to 4000 words describing the application.
- Screenshots – Up to 8 screenshots of your application running (a minimum of two is required). Google recommends submitting screenshots of the application running on a 7” or 10” tablet.
- Language – The language of the application (the default is US English).
- Promotional Text – The text that will be used when your application appears in special promotional features within the Google Play environment.
- Application Type – Whether your application is considered to be a game or an application.
- Category – The category that best describes your application (for example finance, health and fitness, education, sports, etc.).
- Locations – The geographical locations into which you wish your application to be made available for purchase.
- Contact Details – Methods by which users may contact you for support relating to the application. Options include web, email and phone.
- Pricing & Distribution – Information about the price of the application and the geographical locations where it is to be marketed and sold.
Having collected the above information, click on the Create Application button within the Google Play Console to begin the creation process.
Configuring the App in the Console
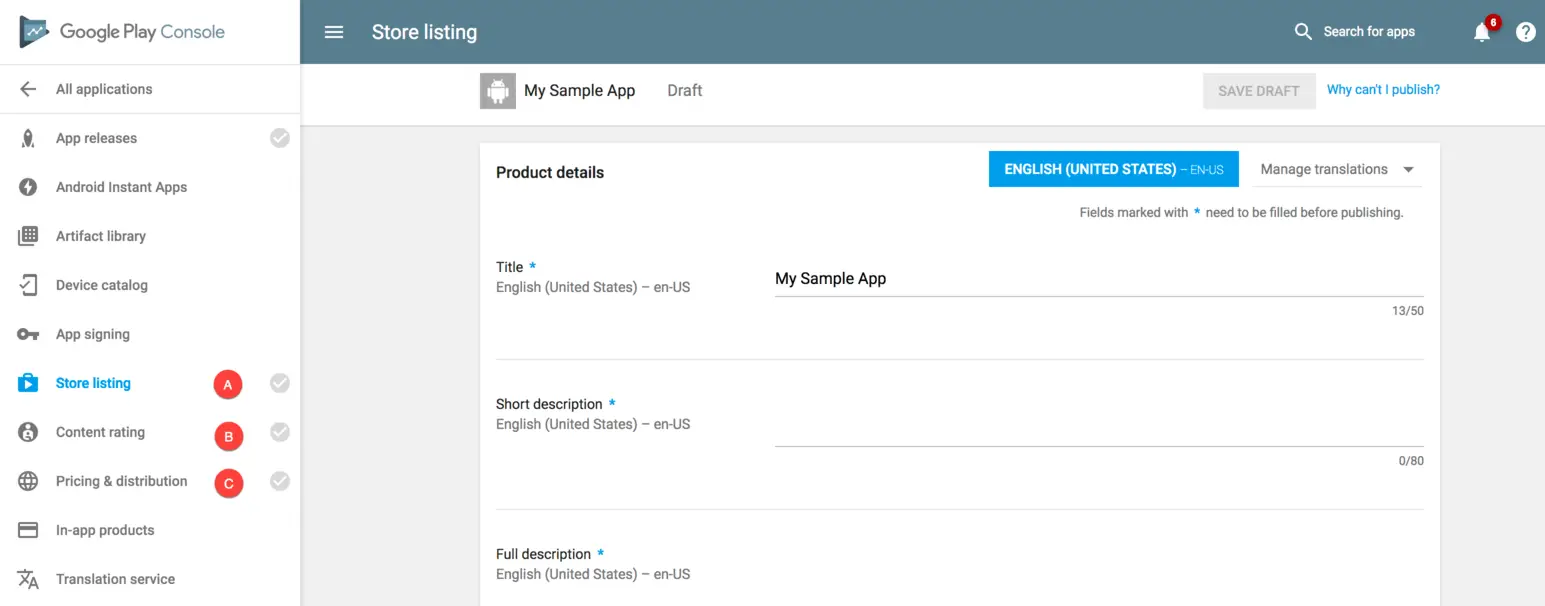
When the Create Application button is first clicked, the Store listing screen will appear as shown in Figure 87-1 below. The screen may also be accessed by selecting the Store listing option (marked A) in the navigation panel. Once all of the requirements have been met for the Store listing screen, both the Content rating (B) and Pricing & distribution (C) screens must also be completed:
Once the app entry has been fully configured, the next step is to upload a release APK for the app.
Enabling Google Play App Signing
Up until recently, release APKs were signed with a release app signing key from within Android Studio and then uploaded to the Google Play console. While this option is still available, the recommended way to upload APK files is to now use a process referred to as Google Play App Signing. For a newly created app, this involves opting in to Google Play App Signing and then generating an upload key that is used to sign the release APK file within Android Studio. When the release APK file generated by Android Studio is uploaded, the Google Play console removes the upload key and then signs the file with an app signing key that is stored securely within the Google Play servers. For existing apps, some additional steps are required to enable Google Play Signing and will be covered at the end of this chapter.
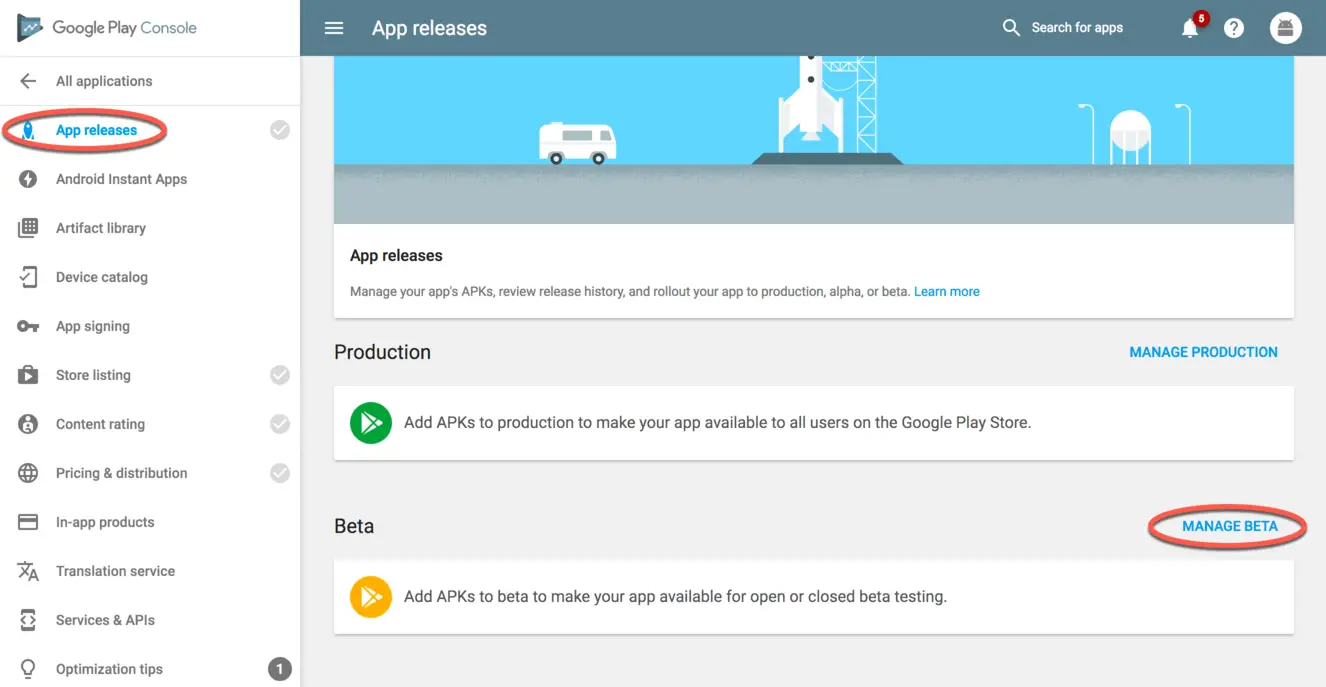
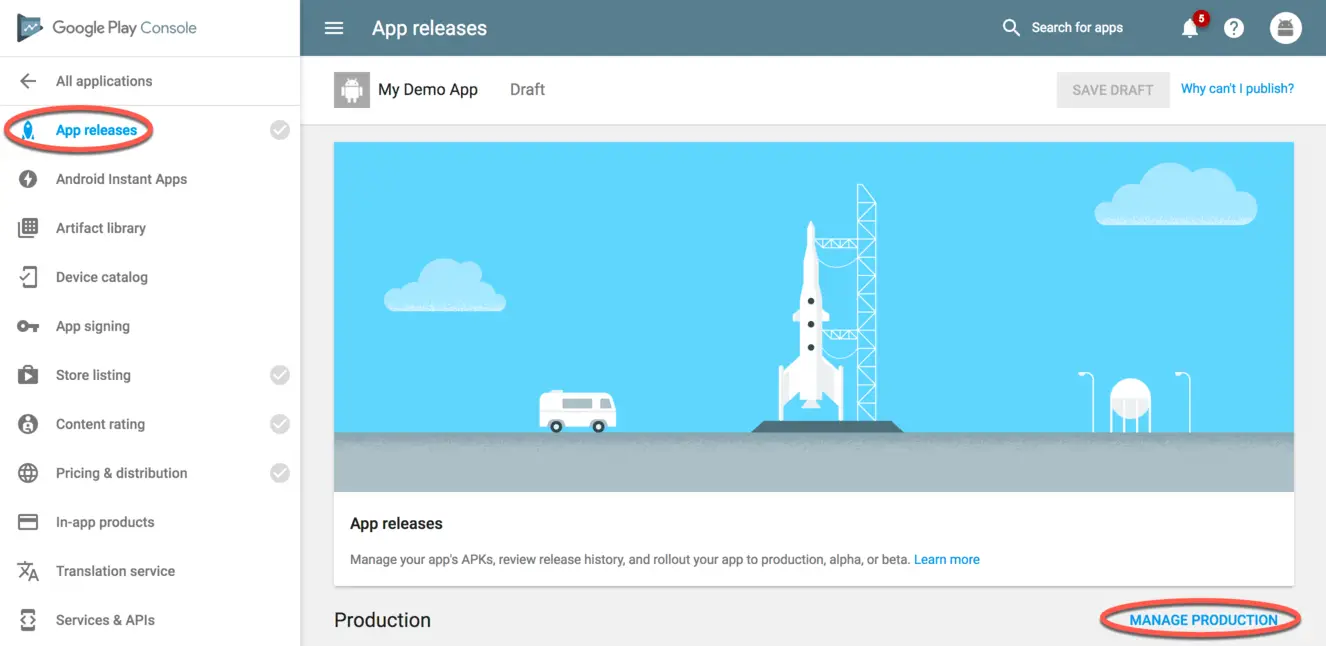
Within the Google Play console, select the newly added app entry from the dashboard and select the App releases option from the left-hand navigation panel. On the App releases screen, select either the Alpha, Beta or Production management button to upload an APK file for testing or production release (depending on where you are in the app development process):
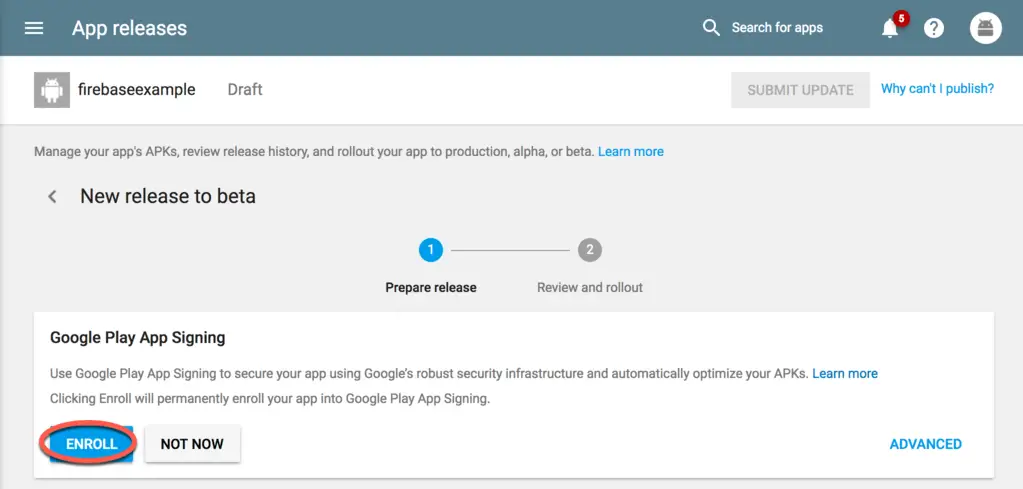
On the subsequent screen, click on the Create Release button to display the settings screen shown in Figure 87-3:
To enroll the app in Google Play App Signing, click on the Enroll button highlighted in the above figure. This will generate an app signing certificate for the app which will be secured within the Google Play servers.
The next step is to generate the upload key from within Android Studio. This is performed as part of the process of generating a signed release APK file for the app and begins with switching the project from debug to release build mode.
Changing the Build Variant
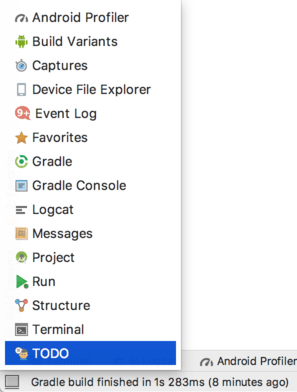
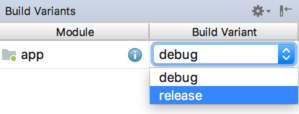
The first step in the process of generating a signed application APK file involves changing the build variant for the project from debug to release. This is achieved using the Build Variants tool window which can be accessed from the tool window quick access menu (located in the bottom left-hand corner of the Android Studio main window as shown in Figure 87-4).
Once the Build Variants tool window is displayed, change the Build Variant settings for all the modules listed from debug to release:
The project is now configured to build in release mode. The next step is to configure signing key information for use when generating the signed application package.
Enabling ProGuard
When generating an application package, the option is available to use ProGuard during the package creation process. ProGuard performs a series of optimization and verification tasks that result in smaller and more efficient byte code. In order to use ProGuard, it is necessary to enable this feature within the Project Structure settings prior to generating the APK file.
The steps to enable ProGuard are as follows:
1. Display the Project Structure dialog (File -> Project Structure).
2. Select the “app” module in the far left panel.
3. Select the “Build Types” tab in the main panel and the “release” entry from the middle panel.
4. Change the “Minify Enabled” option from “false” to “true” and click on OK.
Follow the steps to create a keystore file and build the release APK file.
With the project configured for release building, the next step is to create a keystore file containing the upload key.
Creating a Keystore File
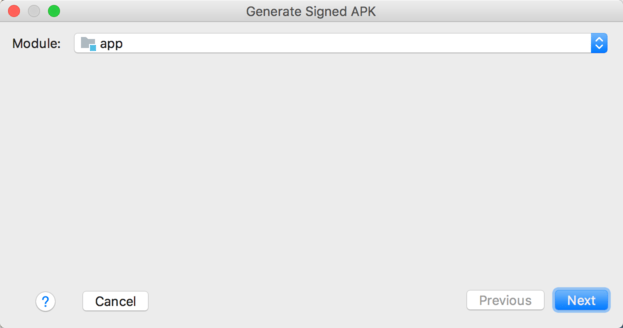
To create a keystore file, select the Build -> Generate Signed APK… menu option to display the Generate Signed APK Wizard dialog as shown in Figure 87-6:
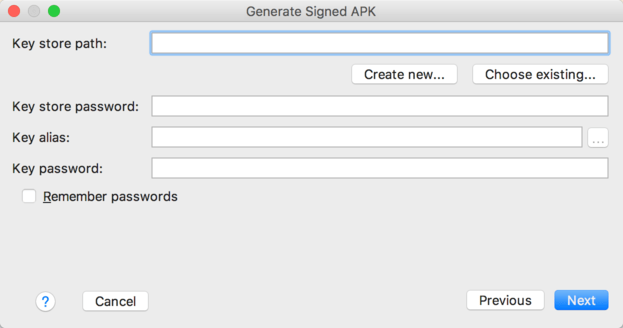
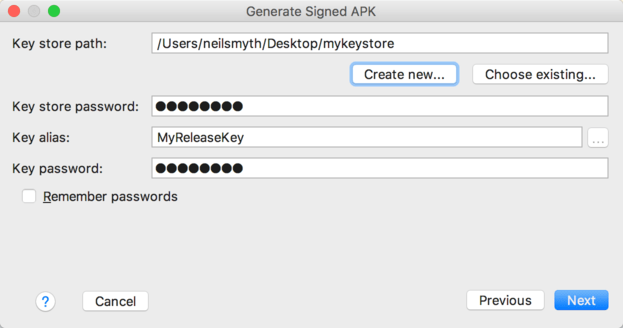
Select the module to be generated before clicking on the Next button to proceed to the key store selection screen:
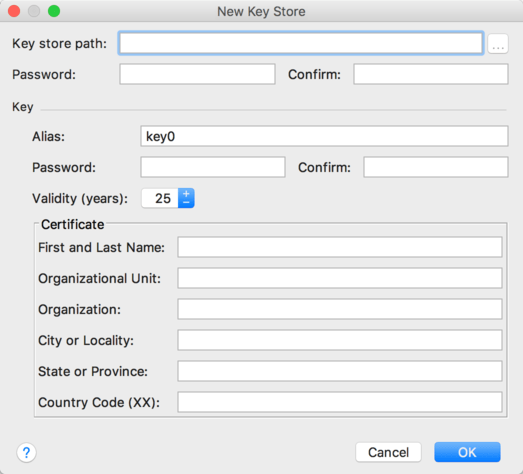
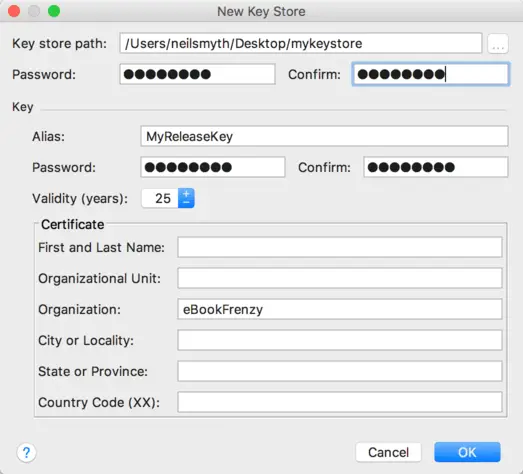
In the event that you have an existing release keystore file, click on the Choose existing… button and navigate to and select the file. In the event that you have yet to create a keystore file, click on the Create new… button to display the New Key Store dialog (Figure 87-8). Click on the button to the right of the Key store path field and navigate to a suitable location on your file system, enter a name for the keystore file (for example, release.keystore.jks) and click on the OK button.
The New Key Store dialog is divided into two sections. The top section relates to the keystore file. In this section, enter a strong password with which to protect the keystore file into both the Password and Confirm fields. The lower section of the dialog relates to the upload key that will be stored in the key store file.
Within the Certificate section of the New Key Store dialog, enter the following details:
An alias by which the key will be referenced. This can be any sequence of characters, though only the first 8 are used by the system.
A suitably strong password to protect the key.
The number of years for which the key is to be valid (Google recommends a duration in excess of 25 years).
In addition, information must be provided for at least one of the remaining fields (for example, your first and last name, or organization name).
Once the information has been entered, click on the OK button to proceed with the package creation.
Creating the Application APK File
The next task to be performed is to instruct Android Studio to build the application APK package file in release mode and then sign it with the newly created private key. At this point the Generate Signed APK Wizard dialog should still be displayed with the keystore path, passwords and key alias fields populated with information:
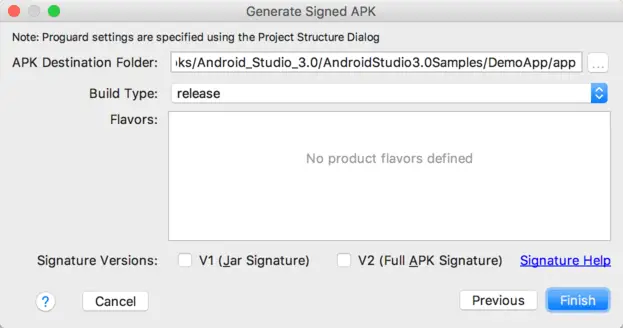
Assuming that the settings are correct, click on the Next button to proceed to the APK generation screen (Figure 87-11). Within this screen, review the Destination APK path: setting to verify that the location into which the APK file will be generated is acceptable. In the event that another location is preferred, click on the button to the right of the text field and navigate to the desired file system location.
Two signature options are provided for selection within the APK generation dialog. Select both the V1 (Jar Signature) and V2 (Full APK Signature). This provides additional security to protect the APK from malicious alteration together with faster app installation times. If problems occur when using the V2 option, repeat the generation process using only the V1 option.
The Gradle system will now compile the application in release mode. Once the build is complete, a dialog will appear providing the option to open the folder containing the APK file in an explorer window, or to load the file into the APK Analyzer:
At this point the application is ready to be submitted to the Google Play store. Click on the locate link to open a filesystem browser window. The file should be named app-release.apk and be located in the app/release sub-directory of the project folder.
The private key generated as part of this process should be used when signing and releasing future applications and, as such, should be kept in a safe place and securely backed up.
The final step in the process of bringing an Android application to market involves submitting it to the Google Play Developer Console. Once submitted, the application will be available for download from the Google Play App Store.
Uploading New APK Versions to the Google Play Developer Console
Once the app profile has been created, select the App Releases option in the left-hand navigation panel and click on the Alpha, Beta or Production Manage button, depending on what stage your app is at:
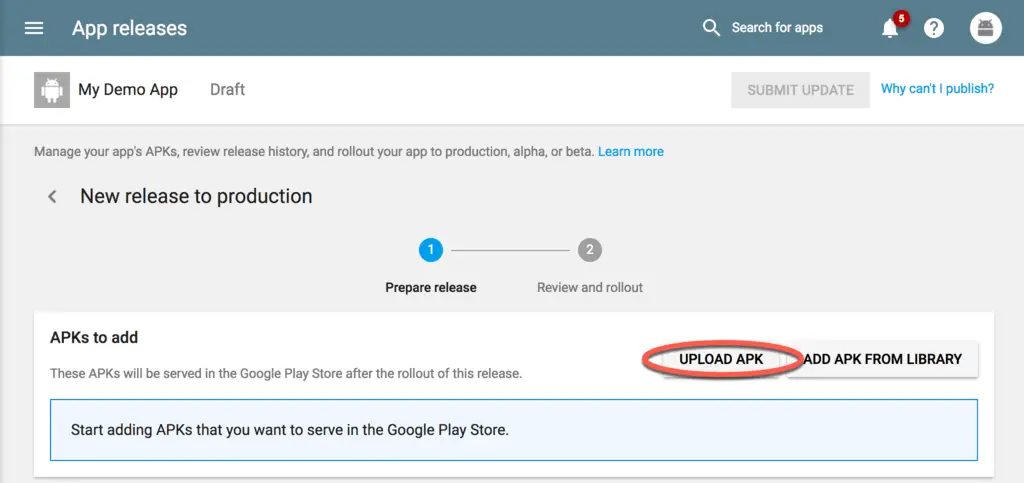
Within the Production management screen, click on the Create Release button and, on the subsequent screen, click on the Upload APK button:
Navigate to the APK file generated earlier in this chapter and select and upload it to the Google Play console. Once the file has been uploaded, review the settings and then click on the Review button. Assuming that all of the information settings are correct, start the production process by clicking on the Start Rollout button. If the rollout button is disabled, click on the Why can’t I publish? link next to the Save Draft button in the top right-hand corner of the screen. This will provide a list of settings that need to be completed before the app can be published for release or testing.
Managing Testers
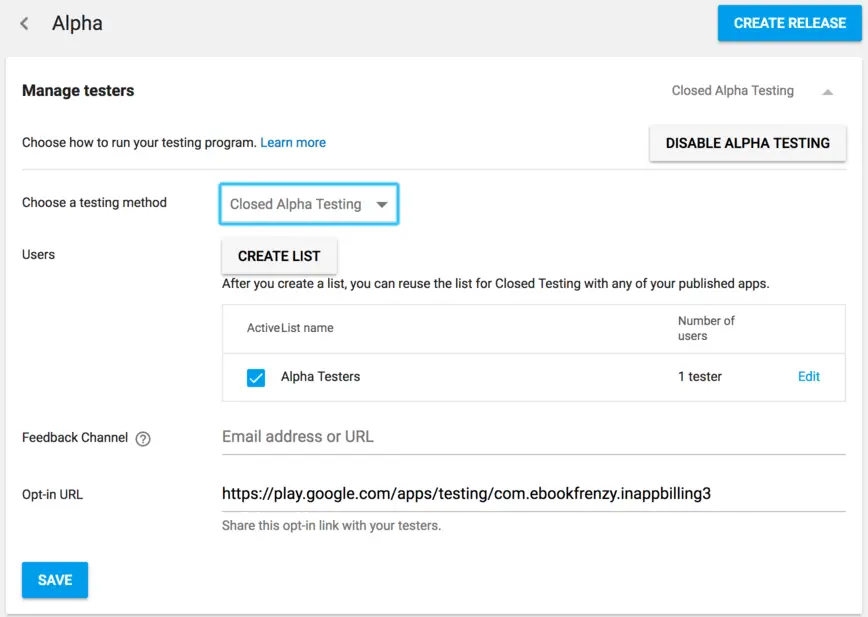
If the app is still in the Alpha or Beta testing phase, a list of authorized testers may be specified by selecting the app from within the Google Play console, clicking on App releases in the navigation panel, selecting the Manage button for either the Alpha or Beta release and unfolding the Manage testers section of the release screen as shown in Figure 87-15:
The following options are available for Alpha and Beta app testing:
Closed Testing – Testing is only available for designated users identified by email address or membership in Google Groups and Google+ communities.
Open Testing – The app is made available to all users within the Google Play Store. Users are provided with a mechanism to provide feedback to you during testing. The total number of testers may also be specified (though the number cannot be less than 1000 users).
To configure testing, select the type of testing to be performed and fill in the maximum number of users for open testing, or the list of users for closed testing and save the settings. The opt-in URL can be provided to the test users and used to accept the testing invitation and download the app from the Google Play Store.
Uploading Instant App APK Files
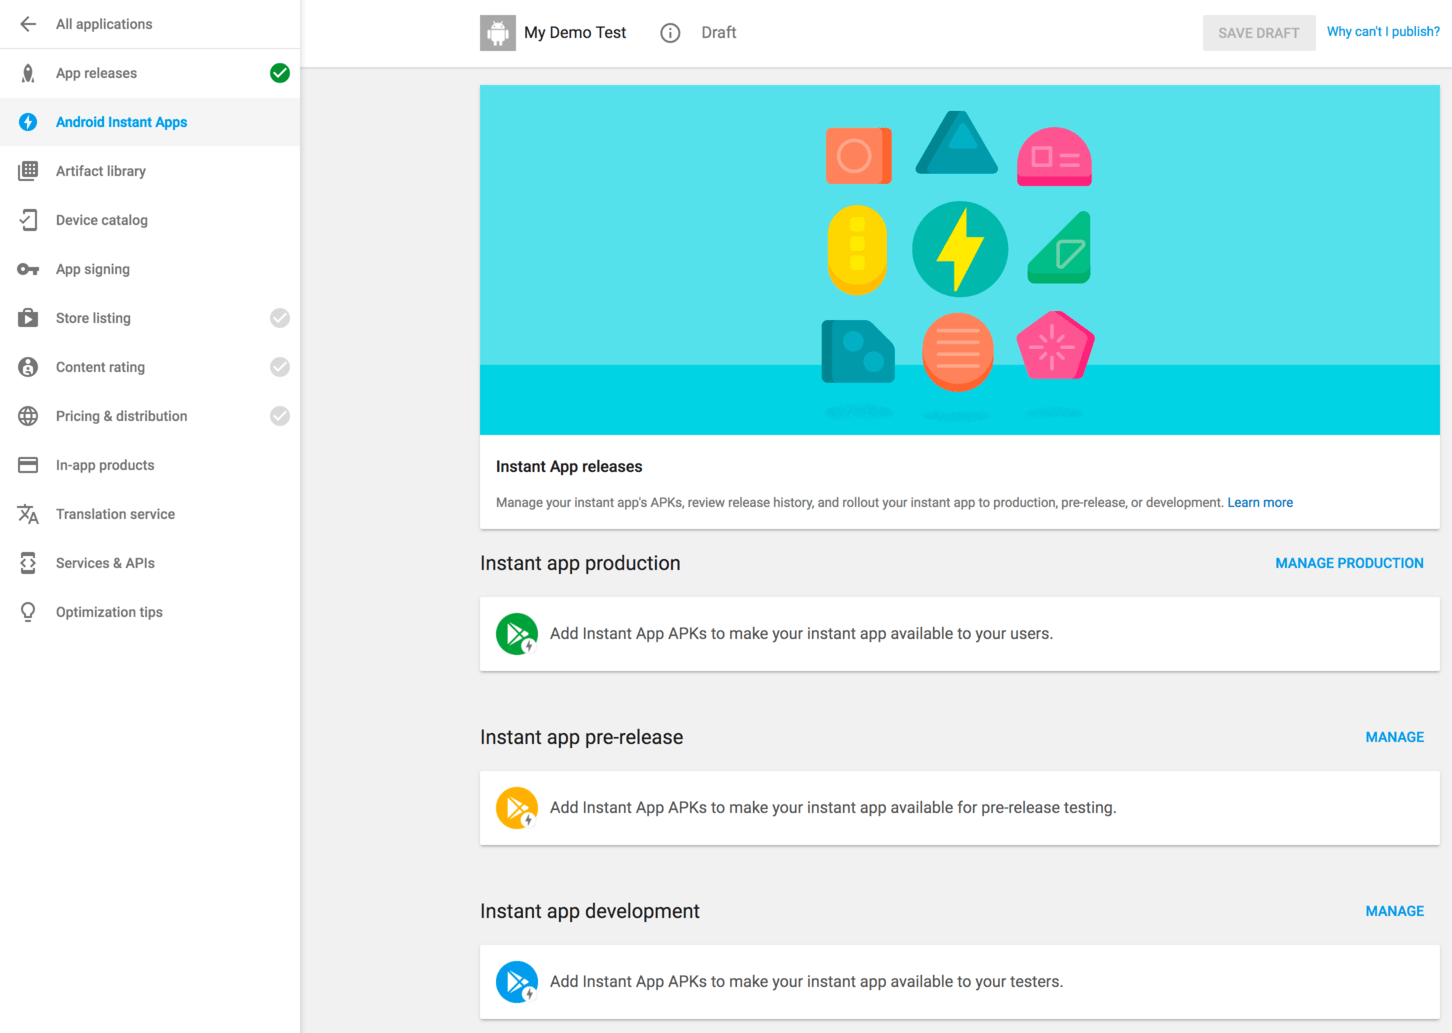
The process for uploading Instant App APK files is similar to that for a standard app. From within the Google Play console, select the app from the dashboard followed by the Android Instant Apps option in the navigation panel as shown in Figure 87-16:
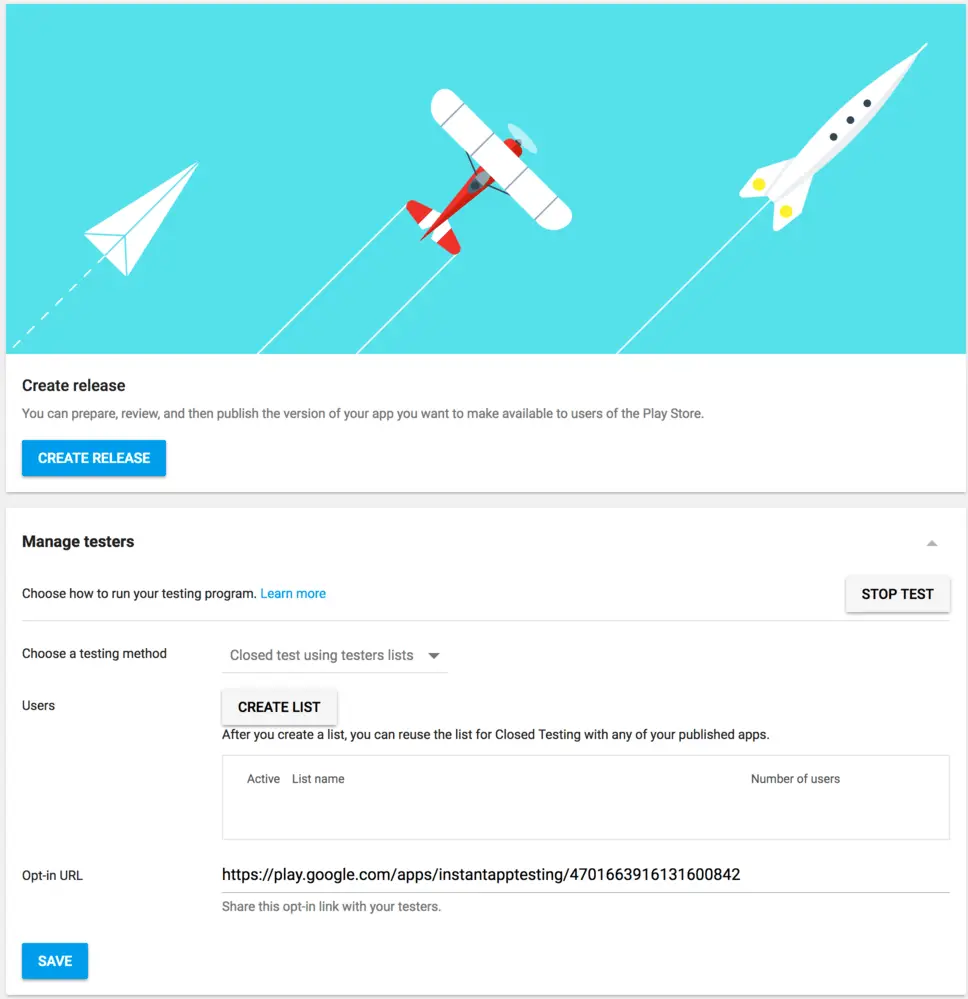
Select the option to upload APKs for development, pre-release or testing purposes. If the APKs are to be uploaded for development or pre-release testing, use the Manage testers section of the subsequent screen to enter a list of Gmail email addresses for the users that will be testing the app, then click on the Save button followed by the Create Release button:
Return to Android Studio and follow the previous steps to build the Instant App module of the project using release mode and to generate signed versions of the Instant App APK files. When the build is complete, the Instant App APK files will be packaged in a ZIP file within the <module name>/release folder of the project directory. This file may be uploaded to the console without first extracting the separate APK files.
Uploading New APK Revisions
The first APK file uploaded for your application will invariably have a version code of 1. If an attempt is made to upload another APK file with the same version code number, the console will reject the file with the following error:
You need to use a different version code for your APK because you already have
one with version code 1.
To resolve this problem, the version code embedded into the APK file needs to be increased. This is performed in the module level build.gradle file of the project. By default, this file will typically read as follows:
apply plugin: 'com.android.application'

android {
    compileSdkVersion 26
    buildToolsVersion "26.0.2"
    defaultConfig {
        applicationId "com.ebookfrenzy.demoapp"
        minSdkVersion 14
        targetSdkVersion 26
        versionCode 1
        versionName "1.0"
        testInstrumentationRunner "android.support.test.runner.AndroidJUnitRunner"
    }
    buildTypes {
        release {
            minifyEnabled false
            proguardFiles getDefaultProguardFile('proguard-android.txt'), 'proguard-rules.pro'
        }
    }
}

dependencies {
    implementation fileTree(dir: 'libs', include: ['*.jar'])
    implementation 'com.android.support:appcompat-v7:26.0.2'
    implementation 'com.android.support.constraint:constraint-layout:1.0.2'
    implementation 'com.android.support:design:26.0.2'
    testImplementation 'junit:junit:4.12'
    androidTestImplementation('com.android.support.test.espresso:espresso-core:3.0.1', {
        exclude group: 'com.android.support', module: 'support-annotations'
    })
}
To change the version code, simply change the number declared next to versionCode. To also change the version number displayed to users of your application, change the versionName string. For example:
versionCode 2
versionName "2.0"
Having made these changes, rebuild the APK file and perform the upload again.
Analyzing the APK File
Android Studio provides the ability to analyze the content of an APK file. This can be useful, for example, when attempting to find out why the APK file is larger than expected or to review the class structure of the application’s dex file.
To analyze an APK file, select the Android Studio Build -> Analyze APK… menu option and navigate to and choose the APK file to be reviewed. Once loaded into the tool, information will be displayed about the raw and download size of the package together with a listing of the file structure of the package as illustrated in Figure 87-19:
Selecting the classes.dex file will display the class structure of the file in the lower panel. Within this panel, details of the individual classes may be explored down to the level of the methods within a class:
Similarly, selecting a resource or image file within the file list will display the file content within the lower panel. The size differences between two APK files may be reviewed by clicking on the Compare with previous APK… button and selecting a second APK file.
Enabling Google Play Signing for an Existing App
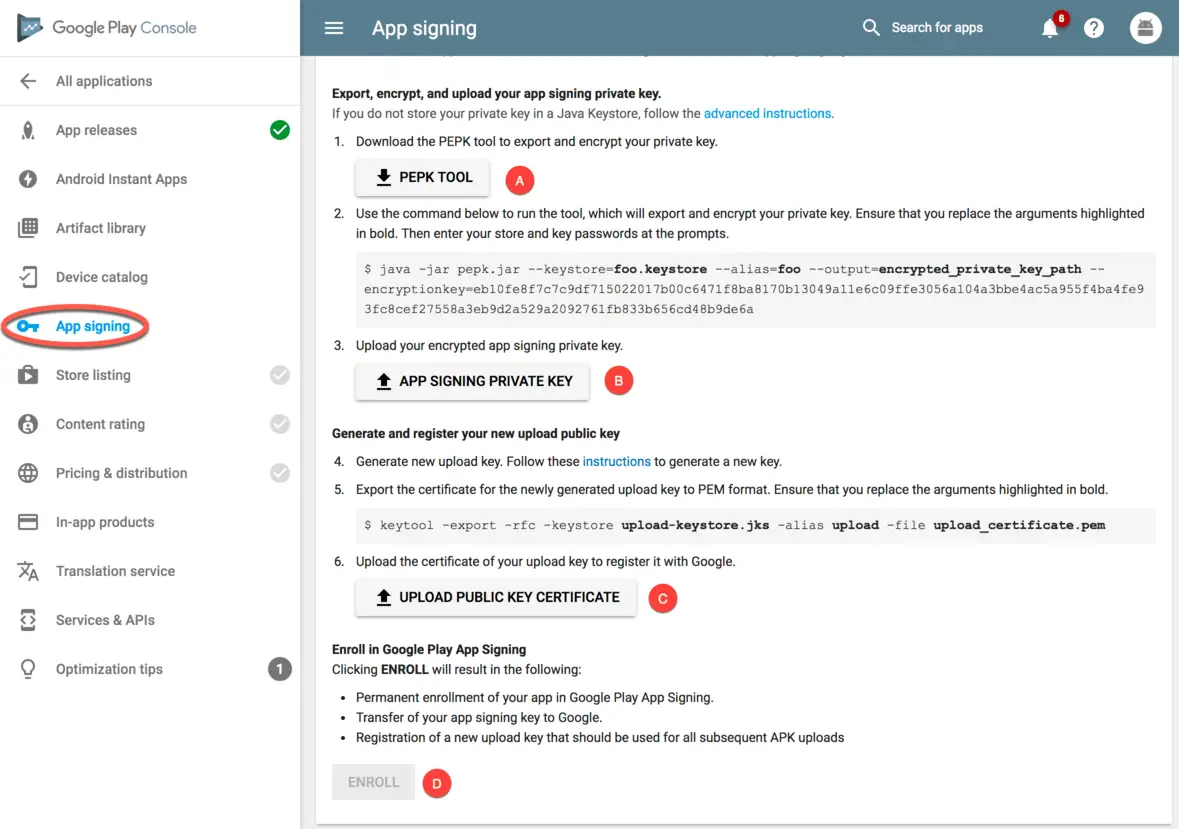
To enable Google Play Signing for an app already registered within the Google Play console, begin by selecting that app from the list of apps in the console dashboard. Once selected, click on the App signing link in the left-hand navigation panel as shown in Figure 87-21:
The first step is to click on the button to download the PEPK Tool (A) which will be used to encrypt the app signing key for the project. Once downloaded, copy it to the directory containing your existing keystore file and run the following command where (<your app signing key file> and <your alias> are replaced by the name of your keystore file and the corresponding alias key respectively):
java -jar pepk.jar --keystore=<your app signing key file> --alias=<your alias> --output=encrypted_private_key_path --encryptionkey=<your app signing key>
Enter the keystore and key passwords when prompted, then check that a file named encrypted_private_key_path has been generated. This file contains your app signing key encrypted for uploading to the Google Play Store. Return to the Google Play console, click on the App Signing Key button (B) and upload the encrypted_private_key_path file.
Next, follow the steps outlined earlier in this chapter to generate the upload key and store it in a new keystore file. In a terminal or command-prompt window, change directory to the location of the upload keystore file and run the following command to convert the keystroke into a PEM certificate format file:
keytool -export -rfc -keystore <your upload key file> -alias <your alias> -file upload_certificate.pem
With the file generated, click on the Upload Public Key Certificate button (C) in the Google Play console and upload the PEM certificate file.
Finally, enroll the app in Google Play Signing by clicking on the Enroll button (D). Once the app is enrolled, the new upload keystore file must be used whenever the signed APK file is generated within Android Studio.
Summary
Once an app project is either complete, or ready for user testing, it can be uploaded to the Google Play console and published for production, alpha or beta testing. Before the app can be uploaded, an app entry must be created within the console including information about the app together with screenshots to be used within the Play Store. A release APK file is then generated and signed with an upload key from within Android Studio. After the APK file has been uploaded, Google Play removes the upload key and replaces it with the securely stored app signing key and the app is ready to be published.
The content of an APK file can be reviewed at any time by loading it into the Android Studio APK Analyzer tool.
| Previous | Table of Contents | |
| Handling Different Android Devices and Displays in Kotlin |


