Integrating Maps into iOS 11 Applications using MKMapItem
Learn SwiftUI and take your iOS Development to the Next Level |
If there is one single fact about Apple that we can state with any degree of certainty, it is that the company is fanatical about retaining control of its own destiny. One glaring omission in this overriding corporate strategy has been the reliance on a competitor (in the form of Google) for mapping data in iOS. This dependency officially ended with iOS 6 through the introduction of Apple Maps.
In iOS 8, Apple Maps officially replaced the Google-based map data with data provided primarily by a company named TomTom (but also including technology from other companies, including some acquired by Apple for this purpose). Headquartered in the Netherlands, TomTom specializes in mapping and GPS systems. Of particular significance, however, is that TomTom (unlike Google) does not make smartphones, nor does it develop an operating system that competes with iOS, making it a more acceptable partner for Apple.
As part of the iOS 6 revamp of mapping, the SDK also introduced a class in the form of MKMapItem, designed solely for the purpose of easing the integration of maps and turn-by-turn directions into iOS applications. This was further enhanced in iOS 9 with the introduction of support for transit times, directions and city flyover support.
For more advanced mapping requirements, the iOS SDK also includes the original classes of the MapKit framework, details of which will be covered in later chapters.
MKMapItem and MKPlacemark Classes
The purpose of the MKMapItem class is to make it easy for applications to launch maps without having to write significant amounts of code. MKMapItem works in conjunction with the MKPlacemark class, instances of which are passed to MKMapItem to define the locations that are to be displayed in the resulting map. A range of options are also provided with MKMapItem to configure both the appearance of maps and the nature of directions that are to be displayed (i.e. whether directions are to be for driving, walking or public transit).
An Introduction to Forward and Reverse Geocoding
It is difficult to talk about mapping, in particular when dealing with the MKPlacemark class, without first venturing into the topic of geocoding. Geocoding can best be described as the process of converting a textual based geographical location (such as a street address) into geographical coordinates expressed in terms of longitude and latitude.
Within the context of iOS development, geocoding may be performed by making use of the CLGeocoder class which is used to convert a text based address string into a CLLocation object containing the coordinates corresponding to the address. The following code, for example, converts the street address of the Empire State Building in New York to longitude and latitude coordinates:
let addressString = "350 5th Avenue New York, NY"

CLGeocoder().geocodeAddressString(addressString,
        completionHandler: {(placemarks, error) in

    if error != nil {
        print("Geocode failed with error: \(error!.localizedDescription)")
    } else if let marks = placemarks, marks.count > 0 {
        let placemark = marks[0]
        if let location = placemark.location {
            let coords = location.coordinate

            print(coords.latitude)
            print(coords.longitude)
        }
    }
})
The code simply calls the geocodeAddressString method of a CLGeocoder instance, passing through a string object containing the street address and a completion handler to be called when the translation is complete. Passed as arguments to the handler are an array of CLPlacemark objects (one for each match for the address) together with an Error object which may be used to identify the reason for any failures.
For the purposes of this example the assumption is made that only one location matched the address string provided. The location information is then extracted from the CLPlacemark object at location 0 in the array and the coordinates displayed on the console.
The above code is an example of forward-geocoding in that coordinates are calculated based on a text address description. Reverse-geocoding, as the name suggests, involves the translation of geographical coordinates into a human readable address string. Consider, for example, the following code:
let newLocation = CLLocation(latitude: 40.74835, longitude: -73.984911)

CLGeocoder().reverseGeocodeLocation(newLocation, completionHandler: {(placemarks, error) in
    if error != nil {
        print("Geocode failed with error: \(error!.localizedDescription)")
    }

    if let marks = placemarks, marks.count > 0 {
        let placemark = marks[0]
        let postalAddress = placemark.postalAddress

        if let address = postalAddress?.street,
            let city = postalAddress?.city,
            let state = postalAddress?.state,
            let zip = postalAddress?.postalCode {

                print("\(address) \(city) \(state) \(zip)")
        }
    }
})
In this case, a CLLocation object is initialized with longitude and latitude coordinates and then passed through to the reverseGeocodeLocation method of a CLGeocoder object. The method passes through to the completion handler an array of matching addresses in the form of CLPlacemark objects. Each placemark contains the address information for the matching location in the form of a CNPostalAddress object. Once again, the code assumes a single match is contained in the array and accesses and displays the address, city, state and zip properties of the postal address object on the console.
When executed, the above code results in output which reads:
338 5th Ave New York New York 10001
It should be noted that the geocoding is not actually performed on the iOS device, but rather on a server to which the device connects when a translation is required and the results subsequently returned when the translation is complete. As such, geocoding can only take place when the device has an active internet connection.
Learn SwiftUI and take your iOS Development to the Next Level |
Creating MKPlacemark Instances
Each location that is to be represented when a map is displayed using the MKMapItem class must be represented by an MKPlacemark object. When MKPlacemark objects are created, they must be initialized with the geographical coordinates of the location together with an NSDictionary object containing the address property information. Continuing the example for the Empire State Building in New York, an MKPlacemark object would be created as follows:
import Contacts
import MapKit
.
.
let coords = CLLocationCoordinate2DMake(40.7483, -73.984911)

let address = [CNPostalAddressStreetKey: "350 5th Avenue",
               CNPostalAddressCityKey: "New York",
               CNPostalAddressStateKey: "NY",
               CNPostalAddressPostalCodeKey: "10118",
               CNPostalAddressISOCountryCodeKey: "US"]

let place = MKPlacemark(coordinate: coords, addressDictionary: address)
While it is possible to initialize an MKPlacemark object passing through a nil value for the address dictionary, this will result in the map appearing, albeit with the correct location marked, but it will be tagged as “Unknown” instead of listing the address. The coordinates are, however, mandatory when creating an MKPlacemark object. In the event that the application knows the text address but not the coordinates of a location, geocoding will need to be used to obtain the coordinates prior to creating the MKPlacemark instance.
Working with MKMapItem
Given the tasks that it is able to perform, the MKMapItem class is actually extremely simple to use. In its simplest form, it can be initialized by passing through a single MKPlacemark object as an argument, for example:
let mapItem = MKMapItem(placemark: place)
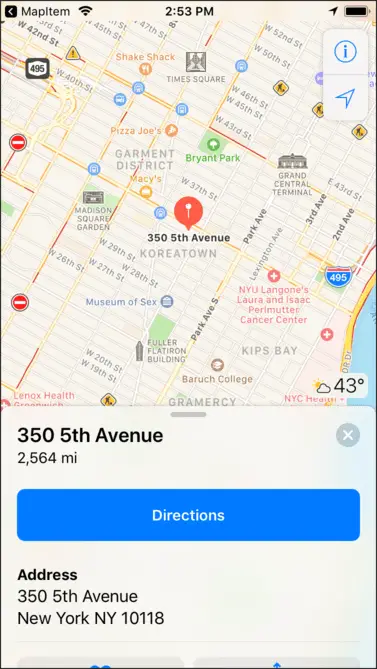
Once initialized, the openInMaps(launchOptions:) method will open the map positioned at the designated location with an appropriate marker as illustrated in Figure 76 1:
mapItem.openInMaps(launchOptions: nil)
Figure 76-1
Similarly, the map may be initialized to display the current location of the user’s device via a call to the MKMapItem forCurrentLocation method:
let mapItem = MKMapItem.forCurrentLocation()
Multiple locations may be tagged on the map by placing two or more MKMapItem objects in an array and then passing that array through to the openMaps(with:) class method of the MKMapItem class. For example:
let mapItems = [mapItem1, mapItem2, mapItem3]

MKMapItem.openMaps(with: mapItems, launchOptions: nil)
Learn SwiftUI and take your iOS Development to the Next Level |
MKMapItem Options and Configuring Directions
In the example code fragments presented in the preceding sections, a nil value was passed through as the options argument to the MKMapItem methods. In actual fact, there are a number of configuration options that are available for use when opening a map. These values need to be set up within an NSDictionary object using a set of pre-defined keys and values:
- MKLaunchOptionsDirectionsModeKey – Controls whether directions are to be provided with the map. In the event that only one placemarker is present, directions from the current location to the placemarker will be provided. The mode for the directions should be one of either MKLaunchOptionsDirectionsModeDriving, MKLaunchOptionsDirectionsModeWalking or MKLaunchOptionsDirectionsModeTransit.
- MKLaunchOptionsMapTypeKey – Indicates whether the map should display standard, satellite, hybrid, flyover or hybrid flyover map images.
- MKLaunchOptionsMapCenterKey – Corresponds to a CLLocationCoordinate2D structure value containing the coordinates of the location on which the map is to be centered.
- MKLaunchOptionsMapSpanKey – An MKCoordinateSpan structure value designating the region that the map should display when launched.
- MKLaunchOptionsShowsTrafficKey – A Boolean value indicating whether or not traffic information should be superimposed over the map when it is launched.
- MKLaunchOptionsCameraKey – When displaying a map in 3D flyover mode, the value assigned to this key takes the form of an MKMapCamera object configured to view the map from a specified perspective.
The following code, for example, opens a map with traffic data displayed and includes turn-by-turn driving directions between two map items:
let mapItems = [mapItem1, mapItem2]

let options = [MKLaunchOptionsDirectionsModeKey:
                        MKLaunchOptionsDirectionsModeDriving,
                MKLaunchOptionsShowsTrafficKey: true] as [String : Any]

MKMapItem.openMaps(with: mapItems, launchOptions: options)
Adding Item Details to an MKMapItem
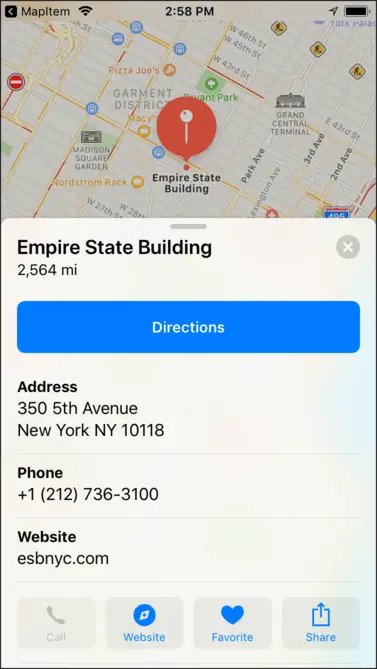
When a location is marked on a map, the address is displayed together with a blue arrow which, when selected, displays an information card for that location.
The MKMapItem class allows additional information to be added to a location through the name, phoneNumber and url properties. The following code, for example, adds these properties to the map item for the Empire State Building:
mapItem.name = "Empire State Building"
mapItem.phoneNumber = "+12127363100"
mapItem.url = URL(string: "http://esbnyc.com")

mapItem.openInMaps(launchOptions: nil)
When the code is executed, the map place marker displays the location name instead of the address together with the additional information:
Figure 76-2
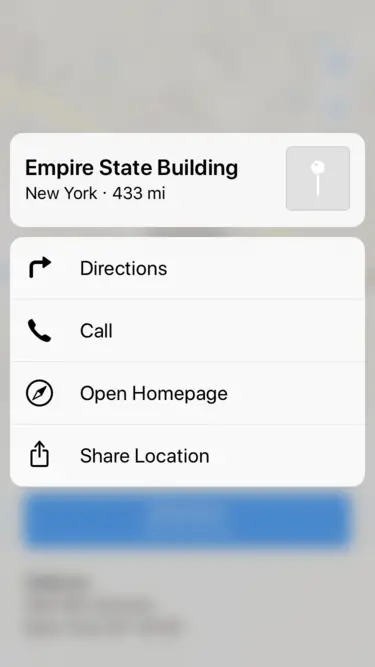
A force touch performed on the marker displays a popover panel containing options to call the provided number or visit the website:
Figure 76-3
Summary
iOS 6 replaced Google Maps with maps provided by TomTom. Unlike Google Maps, which were assembled from static images, the new Apple Maps are dynamically rendered resulting in clear and smooth zooming and more precise region selections. iOS 6 also introduced the MKMapItem class, the purpose of which is to make it easy for iOS application developers to launch maps and provide turn-by-turn directions with the minimum amount of code.
Within this chapter, the basics of geocoding and the MKPlacemark and MKMapItem classes have been covered. The next chapter, entitled An Example iOS 11 MKMapItem Application, will work through the creation of an example application that utilizes the knowledge covered in this chapter.
Learn SwiftUI and take your iOS Development to the Next Level |


