IPad iOS 4 SDK Directory Handling and File I/O – A Worked Example (Xcode 4)
| Previous | Table of Contents | Next |
| Working with Files on the iPad with iOS 4 (Xcode 4) | Data Persistence on the iPad using Archiving with iOS 4 (Xcode 4) |
Learn SwiftUI and take your iOS Development to the Next Level |
In the Working with Directories on the iPad with iOS 4 and Working with Directories on the iPad with iOS 4 chapters of this book we discussed in some detail the steps involved in working with the iOS file system in terms of both file and directory handling from within an iPad application. The goal of this chapter is to put this theory into practice by working through the creation of a simple iPad application intended to demonstrate some of the key concepts outlined in the preceding chapters.
The Example iPad Application
The steps in this chapter walk through the creation of a simple iOS 4 iPad application that consists of a text view object and a button. When the user touches the button after entering text into the text view, that text is saved to a file. The next time the application is launched the content of the file is read by the application and pre-loaded into the text view.
Setting up the Application project
The first step in creating the application is to set up a new project. To do so, start the Xcode environment and select the option to create a new project (or select the File -> New Project menu option if Xcode is already running or the welcome screen does not appear by default).
Select the View-based Application template, ensure that iPad is selected from the Device Family and name the project FileExample.
Defining the Actions and Outlets
The application user interface is going to consist of a text view and a button. Before we design the user interface, however, we need to declare the outlet and action that correspond to these visual components.
Begin by selecting the FileExampleViewController.h file from the file list in the project navigator and modify the view controller interface declaration as follows to add the action and outlet:
#import <UIKit/UIKit.h>

@interface FileExampleViewController : UIViewController {
    UITextView *textBox;
    UIButton *saveButton;
}
@property (nonatomic, retain) IBOutlet UITextView *textBox;
-(IBAction)saveText;
@end
The next step is to synthesize the accessors for the textBox outlet and to create a template method for the saveText action method. It is also necessary to ensure that memory allocated to the is released when the application exits. This, of course, is performed within the FileExampleViewController.m implementation file, which should be modified as follows:
#import "FileExampleViewController.h"

@implementation FileExampleViewController
@synthesize textBox;

- (void)saveText
{
}.
.
.
- (void)viewDidUnload {
        // Release any retained subviews of the main view.
        // e.g. self.myOutlet = nil;
        self.textBox = nil;
}
.
.
- (void)dealloc {
        [textBox release];
        [super dealloc];
}
@end
We will return to the code later to add the required functionality, but before doing so, we need to design the user interface for our application.
Designing the User Interface
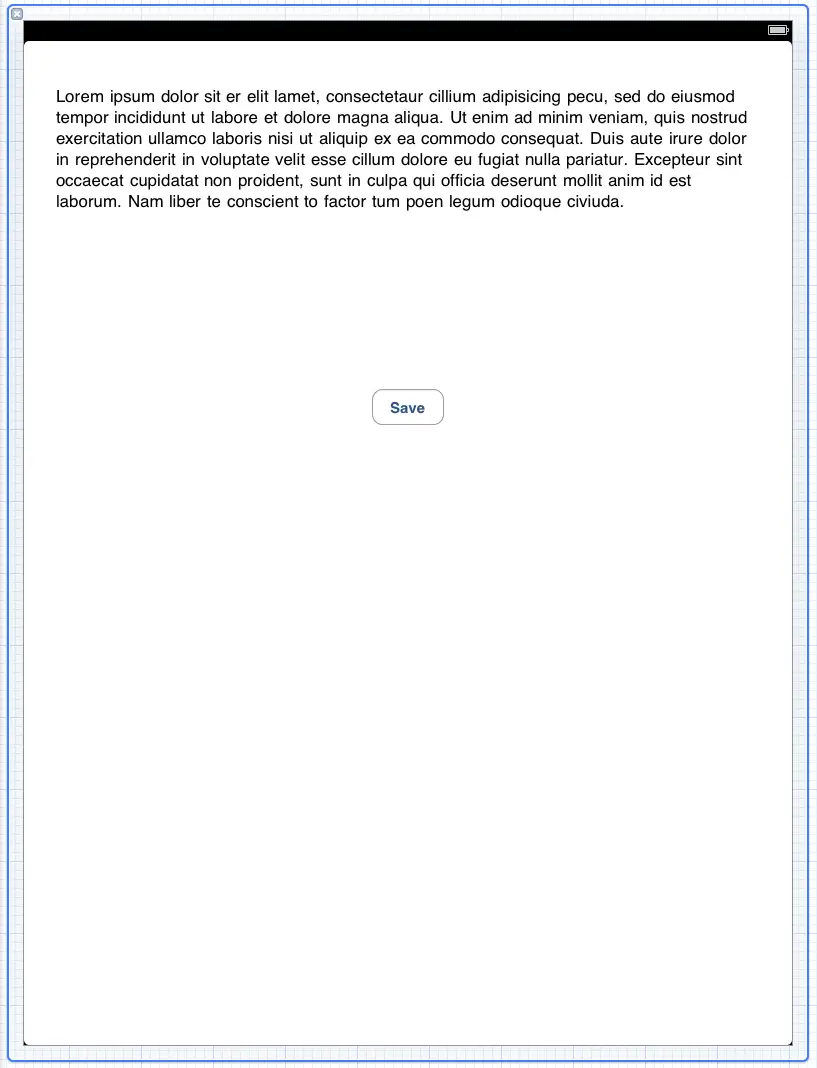
As previously described, our application is going to consist of a button and a text view. To begin the user interface design process, select the FileExampleViewController.xib file to load it the Interface Builder environment. Drag a UIButton and then a UITextView from the Object library panel (View -> Utilities -> Object Library) onto the view. Use the resize handles on the TextView object to shrink the object down so that it is approximately a third of the height of the view. Double click on the button and change the text to "Save". Position the components and resize the width of the text field so that the layout appears as illustrated in the following figure:
The next step is to establish the connections between the user interface components and the action and outlet created in the view controller code. Open the Connections Inspector panel (View -> Utilities -> Connections Inspector) and select the button object in the view window so that the available events for that object are listed. Click in the small circle to the right of the Touch Up Inside event and drag the blue line to the File’s Owner object. Release the mouse button and select the saveText action method from the resulting menu to create the connection.
Learn SwiftUI and take your iOS Development to the Next Level |
Checking for the Data File on Application Startup
Each time the application is launched by the user it will need to check to see if the data file already exists (if the user has not previously saved any text the file will not have been created). If the file does exist, the contents need to be read by the application and displayed within the text field. A good place to put initialization code of this nature is in the viewDidLoad method of the view controller. With this in mind, select the FileExampleViewController.m file and scroll down to the viewDidLoad method. Remove the comment markers from around the method and edit it as follows:
// Implement viewDidLoad to do additional setup after loading the view, typically from a nib.
- (void)viewDidLoad {
        NSFileManager *filemgr;
        NSString *dataFile;
        NSString *docsDir;
        NSArray *dirPaths;

        filemgr = [NSFileManager defaultManager];

        // Identify the documents directory
        dirPaths = NSSearchPathForDirectoriesInDomains(
           NSDocumentDirectory, NSUserDomainMask, YES);

        docsDir = [dirPaths objectAtIndex:0];

        // Build the path to the data file
        dataFile = [docsDir stringByAppendingPathComponent:
           @"datafile.dat"];

        // Check if the file already exists
        if ([filemgr fileExistsAtPath: dataFile])
        {
                // Read file contents and display in textBox
                NSData *databuffer;
                databuffer = [filemgr contentsAtPath: dataFile];

                NSString *datastring = [[NSString alloc]
                  initWithData: databuffer
                  encoding:NSASCIIStringEncoding];

                textBox.text = datastring;
                [datastring release];
        }

        [filemgr release];
        [super viewDidLoad];
}
Before proceeding we need to take some time to talk about what the above code is doing. First, we declare some variables that will be used in the method and then create an instance of the NSFileManager class. Because each iOS application on an iPad device has its own Documents directory, we next make the appropriate calls to identify that directory and assign the result to the docsDir. Once we know where the documents directory is located we construct the full path to our file (which is named datafile.dat) before checking whether the file already exists. If it exists, we read the contents of the file and assign it to the text property of our text field object so that it is visible to the user. Finally, we release the file manager object.
Now that we have the initialization code implemented we need to write the code for our action method.
Implementing the Action Method
When the user enters text into our text field component and touches the save button on the iPad screen, the text needs to be saved to the datafile.dat file located in the application’s Documents directory. In order to make this happen we need, therefore, to implement the code in our saveText action method. Select the FileExampleViewController.m file if it is not already open and modify the template saveText method we created previously so that it reads as follows:
- (void)saveText:
{
        NSFileManager *filemgr;
        NSData *databuffer;
        NSString *dataFile;
        NSString *docsDir;
        NSArray *dirPaths;

        filemgr = [NSFileManager defaultManager];

        dirPaths = NSSearchPathForDirectoriesInDomains(
           NSDocumentDirectory, NSUserDomainMask, YES);

        docsDir = [dirPaths objectAtIndex:0];
        dataFile = [docsDir
          stringByAppendingPathComponent: @"datafile.dat"];
        databuffer = [textBox.text
          dataUsingEncoding: NSASCIIStringEncoding];
        [filemgr createFileAtPath: dataFile
          contents: databuffer attributes:nil];
        [filemgr release];
}
This code creates a file manager instance, identifies the documents directory and constructs the full path to our data file. It then converts the text contained in the text field object and assigns it to an NSData object the contents of which, in turn, are written to the data file by calling the createFileAtPath method of the file manager object.
Building and Running the Example
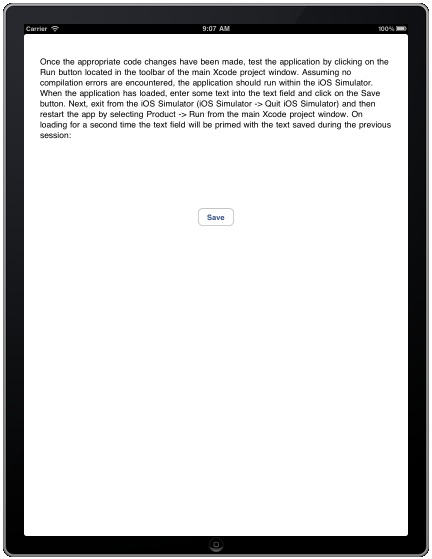
When the application has loaded, enter some text into the text view and click on the Save button. Next, exit from the iOS Simulator (iOS Simulator -> Quit iOS Simulator) and then restart the app by selecting Product -> Run from the main Xcode project window. On loading for a second time the text field will be primed with the text saved during the previous session:
Learn SwiftUI and take your iOS Development to the Next Level |
| Previous | Table of Contents | Next |
| Working with Files on the iPad with iOS 4 (Xcode 4) | Data Persistence on the iPad using Archiving with iOS 4 (Xcode 4) |


