Extending and Shrinking Windows Server 2008 Partitions and Volumes
| Previous | Table of Contents | Next |
| Creating and Managing GPT Disk Partitions on Windows Server 2008 Basic Disks | Creating and Managing Simple and Spanned Volumes on Windows Server 2008 |
| Purchase and download the full PDF and ePub versions of this eBook only $9.99 |
Shrinking a Windows Server 2008 Partition Using Disk Management
The partitions on an MBR disk may be shrunk to a smaller size using the Disk Management snap-in. This can be accessed either from the Server Manager or Computer Management tools. To launch the Server Manager open the Start menu and click on the Server Manager option, or click on the Server Manager icon in the task bar. Alternatively launch Computer Management from Start -> All Programs -> Administration Tools -> Computer Management or run compmgmt.csc.
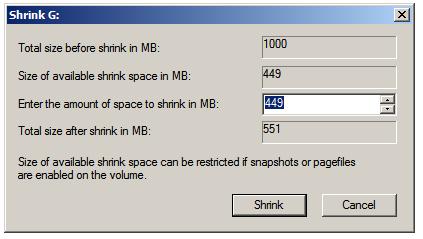
Within Disk Management right click on the volume to that needs to be resized and select Shrink Volume... from the popup menu to invoke the Shrink dialog as shown below:
Specify the amount by which the volume is to shrink and click on the Shrink button to initiate the resize.
Shrinking a Partition from the Command Line
In addition to the Disk Management interface, Windows Server 2008 allows disk volumes and partitions to be shrunk from the command-line using the diskpart tool. Invoke this tool by typing diskpart at a command prompt or in a Run dialog box. The tool will start and display a DISKPART> prompt.
The first step is to identify the disks on the system. This information is obtained using the list disk command:
DISKPART> list disk

  Disk ###  Status      Size     Free     Dyn  Gpt
  --------  ----------  -------  -------  ---  ---
  Disk 0    Online        30 GB      0 B
  Disk 1    Online        10 GB      0 B
For the purposes of this tutorial we will be working on a partition on disk 1. To select the required disk use the select disk command:
DISKPART> select disk 1

Disk 1 is now the selected disk.
Having selected the disk the next step is to select the partition which is to be reduced in size. To obtain a list of partitions on the selected disk the list partition command is used:
DISKPART> list partition

  Partition ###  Type              Size     Offset
  -------------  ----------------  -------  -------
  Partition 1    Primary           1000 MB  1024 KB
  Partition 2    Primary           1000 MB  1001 MB
  Partition 3    Primary            998 MB  2001 MB
  Partition 0    Extended          7238 MB  3001 MB
  Partition 4    Logical           1000 MB  3002 MB
  Partition 5    Logical           6236 MB  4003 MB
For this example we are going to shrink partition 3 so need to select this partition using select partition:
DISKPART> select partition 3

Partition 3 is now the selected partition.
With the appropriate disk and partition selected the next task is to identify the amount by which the partition can be reduced. To aid in this calculation the diskpart shrink querymax command is used:
DISKPART> shrink querymax

The maximum number of reclaimable bytes is:  448 MB
As indicated in the above output, the partition may be reduced in size by a total of 448Mb. To perform the size reduction the shrink desired command is used:
DISKPART> shrink desired 447

DiskPart successfully shrunk the volume by:  447 MB
The partition has now successfully been reduced in size.
Extending a Partition Using Disk Management
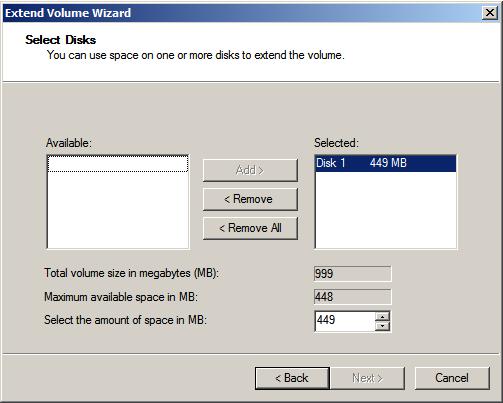
In addition to shrinking partitions, the Disk Management interface also provides the ability to extend a partition to make use of otherwise unallocated free space on a disk. To extend a volume, right click on the volume in the graphical view of the Disk Management screen and select Extend Volume... to invoke the Extend Volume Wizard. Click Next on the welcome screen to proceed to the disk selection process shown below: <google>WIN28BOX</google>
The above screen lists any disks which are available to assign space to the partition being extended. In the case of dynamic disks, space may be allocated from any disks available on the system. In the case of basic disks, only space from the current disk are available. Since this is a basic disk the current disk drive is already placed in the Selected column. Define the amount of space to use for the volume extension using the Select the amount of space in MB field. If the Next button is disabled it means that more space has been requested than is available on the disk. Reduce the size of the space until the Next button is enabled and click on it to proceed to the summary screen. Assuming the summary matches the requirements of the extension click on Finish to extend the volume.
Extending a Partition from the Command Line
As with shrinking partitions, Windows Server 2008 allows disk volumes and partitions to be extended from the command-line using the diskpart tool. Invoke this tool by typing diskpart at a command prompt or in a Run dialog box. The tool will start and display a DISKPART> prompt.
The first step is to identify the disks on the system. This information is obtained using the list disk command:
DISKPART> list disk

  Disk ###  Status      Size     Free     Dyn  Gpt
  --------  ----------  -------  -------  ---  ---
  Disk 0    Online        30 GB      0 B
  Disk 1    Online        10 GB      0 B
For the purposes of this tutorial we will once again be working on a partition on disk 1. To select the required disk use the select disk command:
DISKPART> select disk 1

Disk 1 is now the selected disk.
Having selected the disk the next step is to select the partition which is to be extended. To obtain a list of partitions on the selected disk the list partition command is used:
DISKPART> list partition

  Partition ###  Type              Size     Offset
  -------------  ----------------  -------  -------
  Partition 1    Primary           1000 MB  1024 KB
  Partition 2    Primary           1000 MB  1001 MB
  Partition 3    Primary            551 MB  2001 MB
  Partition 0    Extended          7238 MB  3001 MB
  Partition 4    Logical           1000 MB  3002 MB
  Partition 5    Logical           6236 MB  4003 MB
For this example we are going to extend partition 3 so need to select this partition using select partition:
DISKPART> select partition 3

Partition 3 is now the selected partition.
With the appropriate disk and partition selected the next task is to decide on the amount by which the partition can be extended. The extend command be used in a number of different ways. For example, a partition may be extended by a specified number of MB by using the size= option. For example, to increase the size of a partition by 3GB:
DISKPART> extend size=3000

There is not enough usable free space on specified disk(s) to extend the
volume.
Clearly, in this case, the disk does not have sufficient free space to fulfill our extension request. An alternative approach is to let diskpart allocate all the available space to the selected partition. This avoids the need to know how space is actually available:
DISKPART> extend

DiskPart successfully extended the volume.
In the case of dynamic disks, the extend command can also be used to allocated disk space from other disk drives (a concept known as a spanned volume). In this case the disk= directive must be specified as part of the extend command. For example to extend the currently selected partition (on disk 1) by 6GB using space from disk 2:
DISKPART> extend size=6000 disk=2
More detailed information on dynamic disks and spanned volumes can be found in the chapter of this book entitled Creating and Managing Simple and Spanned Volumes on Windows Server 2008.
| Purchase and download the full PDF and ePub versions of this eBook only $9.99 |


