Configuring the CentOS Desktop Menu System
| Previous | Table of Contents | Next |
| Configuring the CentOS Desktop Panels | Browsing My Computer, Files and Folders on the CentOS Desktop |
|
You are reading a sample chapter from the CentOS 5 Essentials Essentials book. Purchase a copy of the fully updated CentOS 8 edition in eBook ($24.99) or Print ($36.99) format CentOS 8 Essentials Print and eBook (ePub/PDF/Kindle) editions contain 31 chapters and over 260 pages. Learn more... |
The CentOS GNOME desktop is initially configured with Application, Places and System menus located in the panel running across the top of the desktop area. As new software packages are added additional options will be added to the menus (typically the Applications menu).
Aside from adding new software packages, the desktop menus may also be fully customized by the user in terms of adding new menu items, adding new menus, and changing the order of items in the menu.
Customizing a CentOS Desktop Menu
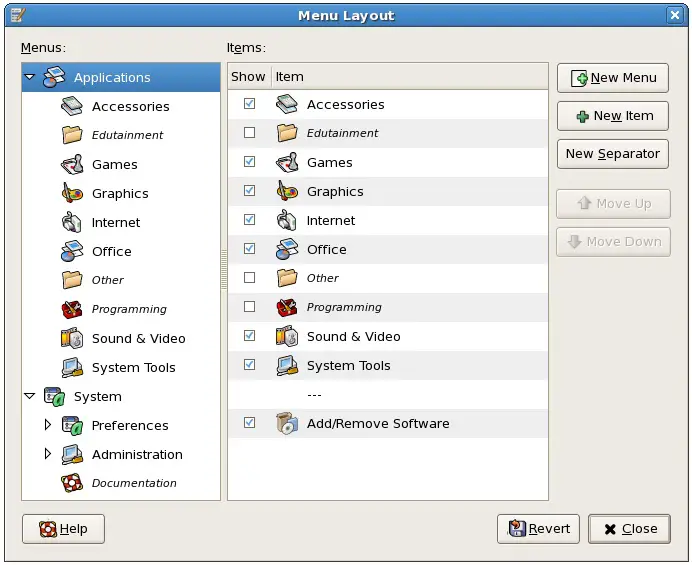
To customize a menu, right click over the menu name in the panel and select Edit Menus. The Main Menu dialog will subsequently appear as follows:
The left hand panel lists the main top level menus together with the sub menus for each menu (for example Accessories is a sub menu of the Applications menu). Selecting an entry in the Menus list causes a list of items in that menu to appear in the right hand panel.
Moving Menu Items
The position of existing items in a menu may be moved up or down or down to a new location simply by selecting the item in the list and pressing the Move Up and Move Down buttons respectively.
Adding and Deleting a Menu Item
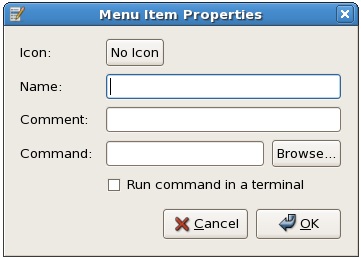
A new item may be added to a menu by selecting the menu in the left hand Menus list and clicking the New Item button. This will display the Menu Item Properties dialog as illustrated in the following figure:

In the Name field, enter the name to be displayed in the menu. Next enter the path and name of the command to be launched when the menu item is selected into the Command field. If you are unsure of the full path to the tool, use the Browse option to navigate the file system to find the application executable. For example, we might want to add a menu option to launch the gedit editing tool. To do so we would enter GEdit into the Name field and gedit into the Command field. The Comment field provides a place to enter optional descriptive text which will be displayed if the mouse pointer hovers over the menu option. If you would like to designate an icon to appear next to the text in the menu click on the No icon and navigate to the image you would like to use.
A menu item may be hidden or deleted entirely. Hide a menu item simply by turning off the toggle next to the item in the menu configuration dialog. Delete an item by right clicking it in the menu configuration dialog and selecting Delete from the popup menu.
|
You are reading a sample chapter from the CentOS 5 Essentials Essentials book. Purchase a copy of the fully updated CentOS 8 edition in eBook ($24.99) or Print ($36.99) format CentOS 8 Essentials Print and eBook (ePub/PDF/Kindle) editions contain 31 chapters and over 260 pages. Learn more... |
| Previous | Table of Contents | Next |
| Configuring the CentOS Desktop Panels | Browsing My Computer, Files and Folders on the CentOS Desktop |


