A Guided Tour of the Ubuntu 10.x GNOME Desktop
| Previous | Table of Contents | Next |
| Logging into the Ubuntu 10.x GNOME Desktop | Ubuntu 10.x Screensaver, Desktop Lock and Power Management Configuration |
In this chapter of Ubuntu Essentials we will provide a guided tour of the Ubuntu 10.10 GNOME Desktop. The purpose of this overview is to provide a detailed explanation of how the desktop works and what the various areas, menus and icons are for. As each area is described you will be referred to a later chapter where the configuration of that particular desktop feature or function will be covered in more detail.
The Ubuntu GNOME Desktop
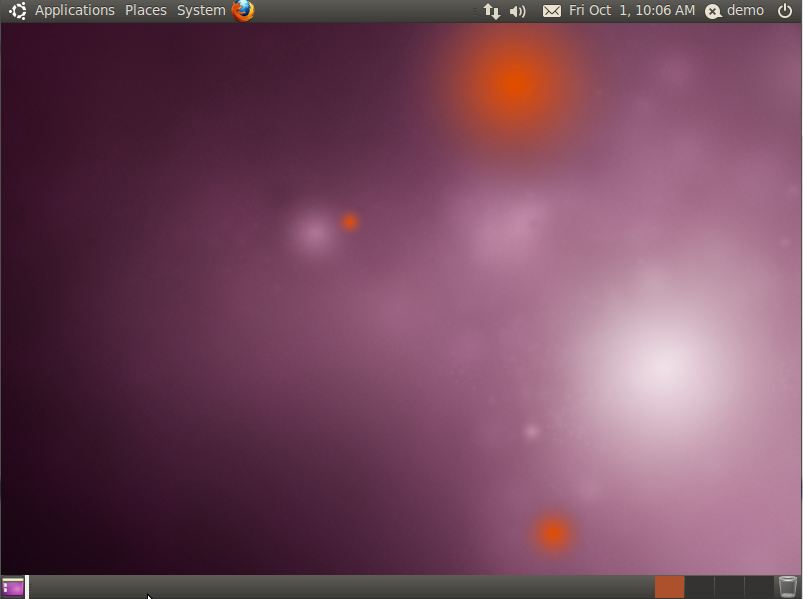
Once you have entered a valid user name and password the login process will initiate and the Ubuntu GNOME Desktop will load. The amount of time it takes before the desktop appears will depend on a variety of factors, not the least of which is the computer's processor speed and memory resources. The more memory installed in the system and the faster the processor, the quicker the desktop will appear. The following figure shows a new, unaltered Ubuntu desktop immediately after a successful log in.
Assuming you have now logged successfully into an Ubuntu GNOME Desktop session, and have a screen in front of you similar to the one shown above, we can begin to explore the desktop in more detail.
The Desktop Background
The desktop background constitutes the colorful graphics in the above figure. If you don't like the default desktop you can change it to either a digital picture or an image of your choosing. To find out more about customizing the background read Changing the Ubuntu 10.x GNOME Desktop Background.
The desktop also provides a location for folders and applications for which quick access is required. For more details on these desktop features refer to Browsing My Computer, Files and Folders on the Ubuntu 10.x Desktop.
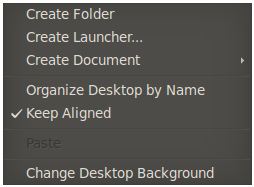
Clicking with the right mouse button on any area of the desktop background presents the following popup menu containing a number of useful options for changing or adding items to the desktop:
- Create Folder - Creates a new folder on the desktop. A new folder icon appears on the desktop with a field provided for the user to enter a folder name. The folder is physically located in the Desktop folder of the user's home directory.
- Create Launcher - Allows an icon to be placed on the desktop which, when double clicked, launches a specified application. Another way to add application launchers to the desktop is to find them in the menu systems at the top of the screen, right click on them and select Add this launcher to desktop.
- Organize Desktop by Name – Orders desktop icons alphabetically by name
- Create Document - Creates a new document on the desktop (the resulting file is physically located in the Desktop folder of the current user's home directory).
- Clean Up by Name - Sorts and organizes the desktop icons into alphabetical order.
- Keep Aligned - A toggle setting which dictates whether icons should be neatly aligned on the desktop or allowed to be placed arbitrarily around the desktop.
- Paste – Pastes an item that is currently held in the clipboard to the desktop
- Change Desktop Background - Allows a different background image to be specified.
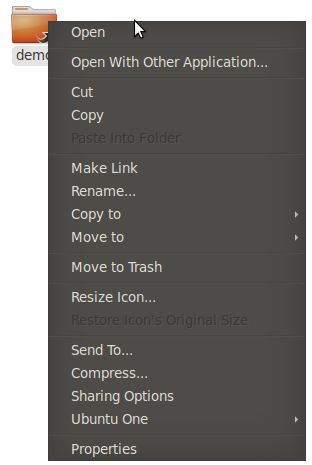
Right clicking on an icon produces the following menu allowing tasks to be performed on the selected item:
The Desktop Panels
The bars across the top and bottom of the desktop are called panels. Both the content and position of these panels can be configured, a topic which is covered in detail in Configuring the Ubuntu 10.x Desktop Panels.
By default the top panel appears as illustrated in the following figure:
The Application menu provides access to the applications installed on the system. This menu also includes an option to add or remove additional applications.
The Places menu provides a list of locations which, when selected, are opened in file browser windows. Available locations include devices (such as disk or CD/DVD Drives), the current user's home folder and other systems on the network. The System menu provides options for configuring the system and desktop environment (including factors such as the desktop theme and effects).
The right hand side of the panel includes:
- Network status indicator. Left and right click to access network configuration options.
- Volume control. Click to adjust.
- Email and IM status. Click to access configuration options
- Date and Time. Click to access settings.
- Instant Messenger status and user name. Click to change status to Available, Away, Offline etc.
- A power button that allows the user to log out of the current session, switch user, suspend, shut down or restart the system
The bottom desktop panel contains three items by default but may similarly be configured as described in Configuring the Ubuntu Desktop Panels. By default the bottom panel appears as follows:
The icon on the far left of the panel is used to hide and show all windows on the desktop. The area containing squares controls the currently displayed virtual workspace. The Ubuntu GNOME desktop allows multiple workspaces to be active at any one time with different applications visible on different workspaces. To switch to a different desktop, simply click on one of the squares in the bottom toolbar. If your mouse has a scroll wheel, click on a workspace in the panel and then scroll back and forth through the workspaces. Alternatively, hold down the Ctrl and Alt keys simultaneously and transition through the workspaces using the left and right arrow keys.
By default four workspaces are configured, though this number can be increased or decreased (see Configuring the Ubuntu 10.x Desktop Panels).
In the central area of the bottom panel a button will appear for each application that is currently running on the current workspace. Clicking on a button will cause the application to be displayed or moved to the top of the window stack if it is currently obscured.
The final item on the bottom panel is the trash can. Items may be dragged and dropped into the trash can. Right click on the icon to access options to open or empty the trash can.
Summary
In this chapter we have looked at the Ubuntu implementation of the GNOME desktop. In the next chapter we will look at customizing screensaver and desktop lock and configuring power management settings.
| Previous | Table of Contents | Next |
| Logging into the Ubuntu 10.x GNOME Desktop | Ubuntu 10.x Screensaver, Desktop Lock and Power Management Configuration |


