Configuring Disk Mirroring (RAID 1) on Windows Server 2008 R2
The focus of this chapter of Windows Server 2008 R2 Essentials is the configuration of disk mirroring (RAID 1) on a Windows Server 2008 R2 system. It is assumed in this chapter that the reader has a basic understanding of the difference between basic and dynamic disks within the context of Windows Server 2008 R2. For information on this subject Creating and Managing Simple and Spanned Volumes on Windows Server 2008 R2 is recommended as background reading.
Note that the focus of this chapter is the mirroring of data disks. For details of mirroring system disks refer instead to Mirroring Windows Server 2008 R2 GBT and MBR Boot and System Disks.
An Overview of Disk Mirroring (RAID 1)
Disk mirroring consists of two identical volumes on two different physical disk drives. Any data is written to the mirrored volume is, in fact, written to both disk drives such that if one disk drive fails the data will still be available on the other disk. Unlike striping, which increases I/O performance, mirroring will actually reduce performance for the simple reason that all data write transactions have to be performed twice - once on each drive in the mirrored set.
Creating a Mirrored (RAID 1) Set using Disk Management
The remainder of this chapter assumes that the disks in question have been converted from basic disks to dynamic disks. For details on performing this task refer to the initial sections of Creating and Managing Simple and Spanned Volumes on Windows Server 2008 R2.
In this section a mirrored set will be created using two similarly sized disk drives connected to a Windows Server 2008 R2 system. Begin the process by invoking the Disk Management snap-in. This can be achieved by typing compmgmt.msc at a command prompt window or Run dialog and selecting Storage -> Disk Management. The system used in this example contains three disks numbered 0, 1 and 2 respectively. Disk 0 is the system disk and disks 1 and 2 will be used to create a mirrored set.
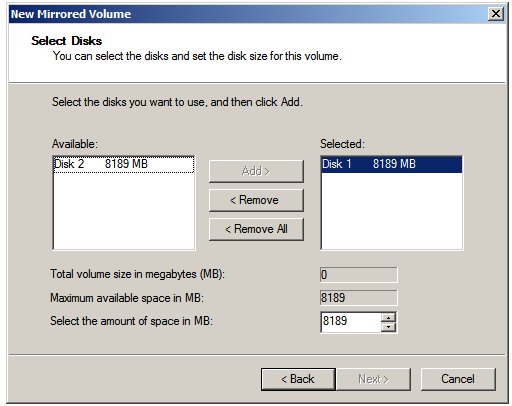
Within the Disk Management tool right click on the unallocated space in the graphical view of the first disk to be used in the mirror set and select New Mirrored Volume... to invoke the New Mirrored Volume wizard. Click Next on the welcome screen to proceed to the disk selection screen. As mentioned previously, a mirrored set must be comprised of two disk drives. Initially, the wizard only lists the currently selected disk in the Selected column. In order to proceed, one more disk is required. To add a disk to the mirrored set, select a suitable disk from the available disks in the left hand column and click on Add to add it to the selected disks list:
With the necessary disks selected click Next to proceed and assign a drive letter or mount point for the volume. The Next button will then proceed to the Format Volume screen where the file system type and compression options may be selected. To view the summary screen, press the Next button. Assuming the summary is acceptable the Finish button will format the volumes and create the mirrored volume ready for use.
Creating a Mirrored (RAID 1) Volume from the Command Prompt
Windows Server 2008 R2 Mirrored (RAID 1) volumes may also be created from the command prompt using the diskpart tool. This may be launched either from a command prompt window, or from the Run dialog simply by entering diskpart at the prompt. Once invoked the DISKPART> prompt will displayed, ready to receive commands.
The first step in creating a mirrored set using diskpart is to identify the disks to be used. This can be achieved using the list disk command:
DISKPART> list disk
  Disk ###  Status      Size     Free     Dyn  Gpt
  --------  ----------  -------  -------  ---  ---
  Disk 0    Online        30 GB      0 B
  Disk 1    Online         8 GB  8189 MB
  Disk 2    Online         8 GB  8189 MB
For the purposes of this tutorial we will be creating a mirrored volume based on a set consisting of disks 1 and 2. The mirrored volume is created by first creating a simple volume on the first disk and then adding a second disk to the mirrored set. The first volume is created using the create volume command combined with the disk= directive. The size of the volume may also be specified using the size= directive. Omission of the size= option will cause diskpart to create volume which occupies all the available space on the designated disk. For example:
DISKPART>create volume simple disk=1
Having created the first volume on disk 1 the next step is to add the mirror volume on disk 2. This is achieved using the add command as follows:
add disk=2
The list volume command may be used to verify the new configuration:
DISKPART> list volume
  Volume ###  Ltr  Label        Fs     Type        Size     Status     Info
  ----------  ---  -----------  -----  ----------  -------  ---------  --------
  Volume 0     D                       DVD-ROM         0 B  No Media
  Volume 1     C                NTFS   Partition     30 GB  Healthy    System
* Volume 2                      RAW    Mirror      8189 MB  Healthy
As shown above the new volume is listed as volume 2 and shown as Mirror. The volume is also listed as RAW because it has not yet been formatted with a file system. This, too, can be achieved within the diskpart tool:
DISKPART> select volume 2
DISKPART> format fs=ntfs label="Mirrored Volume"
  100 percent completed
Once formatted, the last task is to assign either a drive letter or mount point to the volume by which it will be accessed: To assign a drive letter:
DISKPART> assign letter=E:
DiskPart successfully assigned the drive letter or mount point.
To assign a mount point:
DISKPART> assign mount=\bigvol
DiskPart successfully assigned the drive letter or mount point.
Once assigned a drive letter or mount point, the new mirrored volume is ready for use.
Adding a Mirror to an Existing Volume
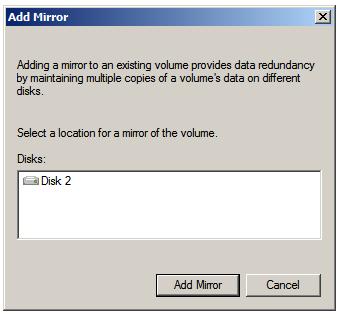
A mirror may be added to an existing volume using either the Disk Management snap-in, or from the command-prompt using the diskpart tool. When a mirror is added to an existing volume Windows creates a second volume equal in size and file system type on a second disk of your choice and copies (a process also known as resynching) the data on the existing volume to the mirror. To mirror to an existing volume using Disk management, right click on the existing volume in the graphical view and select Add Mirror to invoke the Add Mirror dialog shown below:
The above dialog will list disks eligible to act as a mirror for the existing volume. Select the desired disk and click on Next. A warning dialog may appear notifying you of any additional changes that may be made as a result of the addition (such as converting basic disks to dynamic disks). Click Yes to proceed. The resynching process will now begin, the progress of which will be displayed in the graphical view.
To add a mirror to an existing volume from the command prompt, start diskpart and identify the existing volume using the list volume command:
DISKPART> list volume

  Volume ###  Ltr  Label        Fs     Type        Size     Status     Info
  ----------  ---  -----------  -----  ----------  -------  ---------  --------
  Volume 0     D                       DVD-ROM         0 B  No Media
  Volume 1     C                NTFS   Partition     30 GB  Healthy    System
  Volume 2     E   My Volume    NTFS   Partition   8189 MB  Healthy
The volume to be mirrored in this example is Volume 2. Having identified the volume, a disk to contain the mirror needs to be found using the list disk command:
DISKPART> list disk
  Disk ###  Status      Size     Free     Dyn  Gpt
  --------  ----------  -------  -------  ---  ---
  Disk 0    Online        30 GB      0 B
* Disk 1    Online         8 GB      0 B
  Disk 2    Online         8 GB  8189 MB
From the above information it is clear that Volume 2 is 8189 MB in size. In order to be able to mirror this volume, a disk with at least 8189 MB is required. Clearly, disk 2 meets this requirement. Therefore, all that needs to be done is to add disk 2 as the mirror disk for our volume using the add disk command. Note that if the disks are not dynamic disks they will need to be converted with the convert dynamic command:
select disk 1
convert dynamic
select disk 2
convert dynamic
The next step is to select the existing volume on disk 1:
DISKPART> select disk 1
DISKPART> select volume 2

Volume 2 is the selected volume.
Finally, the mirrored set can be created using the add= command, passing through the number of the disk to be used as the mirror (in this case disk 2):
DISKPART> add disk=2
DiskPart succeeded in adding a mirror to the volume.
At this point Windows Server 2008 R2 will begin the resynching process which, depending on the size of the volume being mirrored may take some time. This fact is reported by the show volume command which lists the volume as being of type Mirror with a status of Rebuild. Once the resynching process is complete the status will be displayed as Healthy.
Breaking and Removing Mirrored Sets
A Windows Server 2008 R2 mirror may be broken (which creates two separate and independent volumes containing identical data) or removed (which removes the data on the mirror leaving free space on the designated mirror disk.)
To break a mirror from the Disk Management snap-in right click on one of the volumes in the set in graphical view and select Break Mirrored Volume from the pop-up menu.
To break a mirror set from the command line use the break command, specifying one of the two disks in the mirrored set:
DISKPART>break disk=2
To remove a mirror from a mirrored set, removing all mirrored data and leaving free space on the disk right click on the mirror volume to be removed in the Disk Management graphical view and select Remove Mirror. Alternatively, use the diskpart break command with the NOKEEP option:
DISKPART>break nokeep disk=2
Recovering a Mirrored Set
If one of the disks in a mirrored set fails the good news is that, unlike striped volumes, all the data is still present on the remaining healthy disk (this, after all is the whole point of disk mirroring). In this situation, however, it is important to replace the faulty disk and rebuild the mirror before the healthy drive also fails.
To achieve this right click on the failed volume and select Remove Mirror. Next, identify a suitable alternate or newly installed drive with sufficient space to act as a mirror. Right click on the existing, healthy volume from the original mirrored set, select Add Mirror from the resulting menu, select the new disk in the Add Mirror dialog and click on Add Mirror. Windows will now rebuild the mirror using space on the new disk. As noted above, this process can take some time depending on the size of the volume in question.


