Using Firestarter to Configure a Fedora Linux Firewall
In Basic Ubuntu Linux Firewall Configuration we looked at how the lokkit tools provide a very basic and high level mechanism for configuring the underlying iptable firewall rules on Ubuntu Linux. In this chapter we will look at a more advanced and flexible firewall configuration tool called Firestarter. As we will see, Firestarter provides a greater level of control over both inbound and outbound network traffic and connections.
Installing Firestarter on Ubuntu Linux
Firestarter is not installed by default when Ubuntu Linux is first installed. The first step in using Firestarter, therefore, is to install it.
Firestarter may be installed using either the Synaptic Package Manager or at the Linux command-line using the apt-get utility. To download Firestarter using Synaptic select the System desktop menu and then click on Synaptic Package Manager in the Administration sub-menu. Enter your password when prompted to do so. Click on the Search button in the toolbar and search for firestarter. After the search completes, you will see firestarter in the package list. Simply click on the check box and follow the instructions to install the firestarter package.
To install from the command line, begin by opening a terminal window by selecting the Applications menu and selecting Terminal from the Accessories menu. In the terminal window enter the following command and press enter to execute it:
sudo apt-get install firestarter
Enter your password when prompted to do so and wait while Firestarter is downloaded and installed.
Running Firestarter
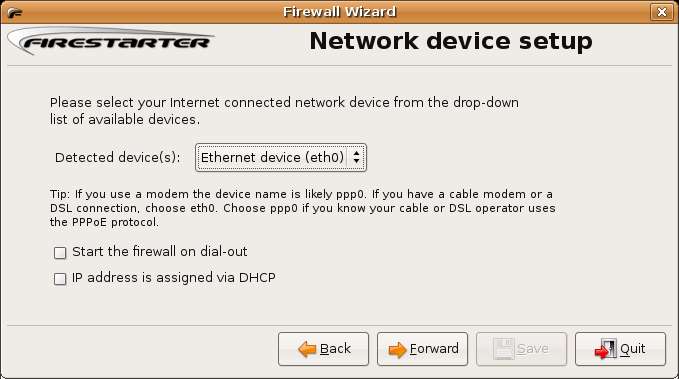
Firestarter will now be listed in the System->Administration desktop menu. To launch Firestarter select this menu option. The first time Firestarter is run it will ask a number of questions about your network environment. Click Forward on the first introductory screen to display the following screen:
Select the device on which you wish to have the firewall operate. If you are connected to a network this is likely to be eth0. If you are connected directly to a cable or DSL modem this may be ppp. If your system obtains an IP address from a DHCP server check this option. Click Forward' when you are ready to move to the next screen:
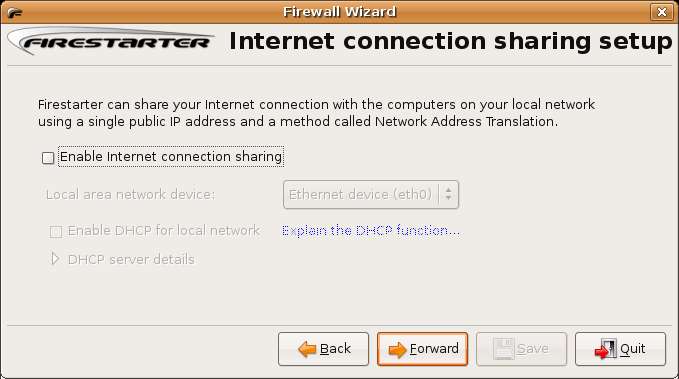
This page controls whether Internet Connection Sharing is to used. Firestarter allows you to configure a single Linux system as the gateway to the internet. All other computers on your network then access the internet through the gateway system. The computers that access the internet through the gateway system will appear, to the outside world, to have the same IP address as the gateway system. This is essentially a mechanism for sharing a single internet connection amongst a network of multiple computers whilst masking the identity (i.e the IP address) of those computers. Note that this configuration requires that you have two network cards installed in the system - one for the internet connection and another for the local area network.
Check Enable Internet Connection Sharing if you wish to use this feature. If you would like the system running Firestarter to also allocate IP addresses to the client machines also check the Enable DHCP for local network box.
If the option is disabled it may be that DHCP server is not installed on your system. To install it either use the Synaptic Package Manager to search for, and install a package called dhcp or install it from the command line as follows:
sudo apt-get install dhcp
Once the DHCP server is installed, exit and restart Firestarter and this time the Enable DHCP for local network option should be enabled.
Click Forward to proceed. Finally the wizard is ready to start the firewall. Click the Save button to save your settings, start the firewall and launch the Firestarter application.
Using Firestarter
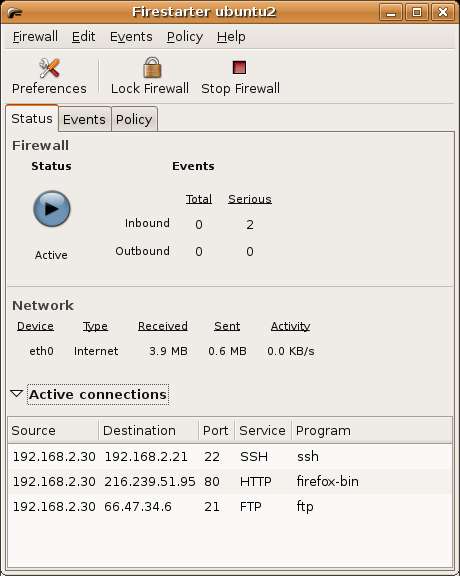
The following screenshot shows the Firestater user interface:
The Firestarter Status Screen
In the above screen the Status page is displayed showing that the Firewall is running, the number of events detected, the volume of data that has been sent and received by the system since the firewall was activated and a list of active connections.
In the above example there are outbound SSH, FTP and HTTP connections active. This means that someone is connected to another system using SSH, an FTP session is active to upload or download files and a web browser is running. This list is updated in real-time to reflect any new or closed connections.
The Firestarter Events Screen
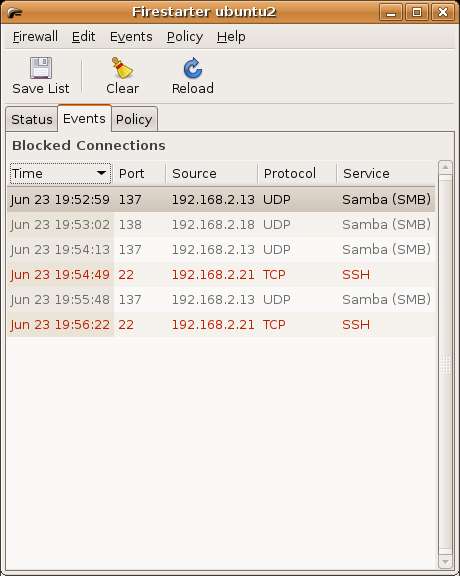
Also in the above example it appears that two serious events have been detected by the firewall. To learn more about these events select the Events tab to show the list of events:
In the above example we see some attempts by the systems at IP addresses 192.168.2.13 and 192.168.2.13 to connect to our system. Because these are Samba messages we can assume that they are safe. Samba is a system which allows Windows systems to access Linux filesystems and other resources over a network connection. Upon investigation it turns out that both of these IP addresses are assigned to Windows XP systems on the local network. Clearly these systems send out a message every now and then to see if there are any new network resources to add to their lists.
The events of concern to us are the ones in red. These indicate that the firewall rejected attempts by the system at IP address 192.168.2.21 to establish an SSH connection with our system. SSH is a protocol for establishing remote connections between computer systems for the purposes of creating a terminal session, executing programs and transferring files. Clearly such an event is a matter of concern, but fortunately the firewall detected and blocked the connection for us.
Right clicking on a blocked event in the list displays menu containing a number of options. From this menu it is possible to allow connections from this external IP address (for example if you find the access attempt was valid), enable connections of this type from any source and also disable the port used for this type of connection. It is also possible to look up host names so that system names, rather than IP addresses are displayed.
The Firestarter Policy Screen
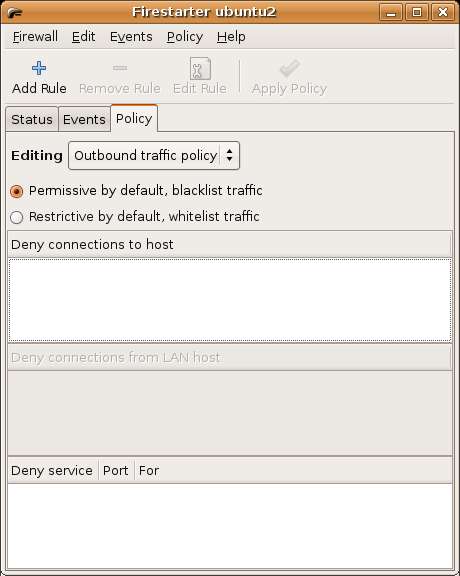
The Policy screen lists any policy rules which have been set up on the firewall. By default the screen appears as follows (with no rules defined). In the next section of this chapter we will look at defining firewall security policy.
Defining Firewall Policies
Probably the most important task in configuring a firewall is defining policy. This essentially involves specifying what traffic will be permitted by the firewall. Policy is defined in the Policy screen of the Firestarter user interface (as shown above).
Defining Inbound Policy
Firestarter allows Policy to be defined for both inbound and outbound traffic via the Editing. Select either Outbound policy or Inbound policy depending on the rules you wish to edit.
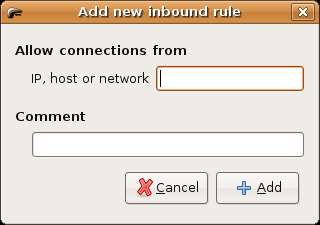
We will begin by looking at inbound traffic policy. With Inbound policy selected we can specify the hosts from which we will allow inbound connections. To do so, click in the Allow connections from host area of the screen area of the screen so that the Add Rule toolbar button activates. Click on the Add Rule button to invoke the Add new inbound rule dialog as shown below:
Enter the host name or IP address of the host for which you wish to enable connections and an optional comment and click the Add button to add the rule. The IP address or host name will now be listed in the Policy screen. Click on the Apply Policy button located in the toolbar to make this policy active.
Firestarter also allows inbound connections to TCP/IP services to be controlled. TCP/IP defines a set of services that can be provided by a network host. These cover services such as HTTP (for running a web server), NFS (for remote access to file systems), SSH (for remote access and file copying between systems). Each of these services runs on a particular network port (for a complete list of services and their respective ports refer to Primary TCP/IP Port Assignments and Descriptions).
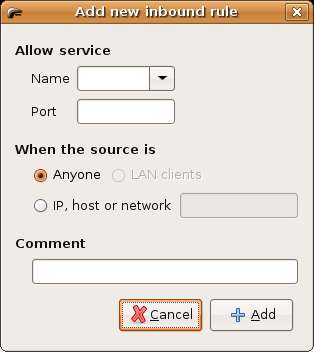
To define Policy for services click in the Allow service area of the Policy screen and click the Add Rule toolbar button to access the add rule dialog:
Select the name of the service you wish to enable (for example if you plan to host a web site on your system you will select HTTP). Once selected, Firestarter will fill in the corresponding port number automatically. Finally, choose to allow access for everyone, or just from specific hosts. If using Internet Connection Sharing you may also allow service access for the client systems sharing the internet connection. Click the Add button to close the Add dialog and click on the Apply Policy to activate the new rule.
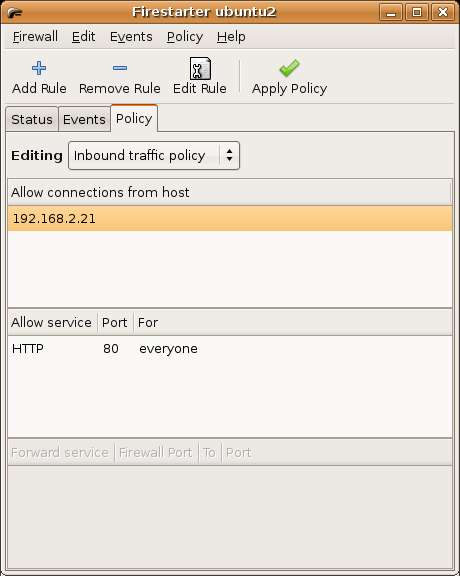
The following screenshot shows the Policy screen with rules defined to allow IP address 192.168.2.21 to establish connections to our system, and to allow anyone to HTTP service to request web pages from a web server on port 80.
Defining Outbound Policy
Outbound Policy controls the types of outbound connections that may be established through the firewall. For example access for users to particular hosts, web sites or services may be blocked. The Outbound Policy editing screen is shown below:
Firestater provides two modes for defining outbound policy. Permissive by default allows all outbound connections except those specified as being blacklisted by the policy. Restrictive by default blocks all outbound connections except those specified as being permissible by the policy.
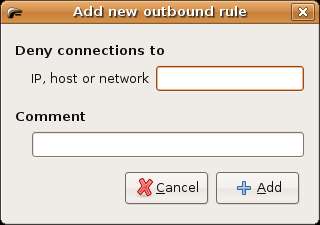
Connections to a specific host may be prevented by selecting Permissive by default, clicking in the Deny connections to host area of the screen and pressing the Add Rule toolbar button. The Add new outbound rule dialog will appear as follows:
Enter any IP address, hostname or URL you wish to block. For example enter http://www.cnn.com. Add the rule and click on Apply Policy in the toolbar. Once the policy is applied start a web browser and try to access the CNN web site. You will find access is blocked. Remove the rule and re-apply policy and you will find you are once again able to access the CNN web site.
Firestarter also allows outbound connections to be controlled on a per services and per source basis. For example, to block connections to all external services select Restrictive by default and click on Apply Policy. Any attempt to access a web site using a web browser will result in a connection failure. To allow HTTP connections click in the Allow service section of the Policy screen and click on Add Policy. Select HTTP as the service and make sure the Anyone toggle is selected. Click on Apply Policy and try to visit a web site. You will now find that HTTP connections are now allowed, while connections to all other services are still blocked.
Summary
In this chapter we have looked at a more advanced way of configuring and monitoring a firewall using the Firestarter application.
