Creating an Android 6 Virtual Device (AVD) in Android Studio
| Previous | Table of Contents | Next |
| A Tour of the Android Studio User Interface | Testing Android Studio Apps on a Physical Android 6 Device |
In the course of developing Android apps in Android Studio it will be necessary to compile and run an application multiple times. An Android application may be tested by installing and running it either on a physical device or in an Android Virtual Device (AVD) emulator environment. Before an AVD can be used, it must first be created and configured to match the specification of a particular device model. The goal of this chapter, therefore, is to work through the steps involved in creating such a virtual device using the Nexus 9 tablet as a reference example.
About Android Virtual Devices
AVDs are essentially emulators that allow Android applications to be tested without the necessity to install the application on a physical Android based device. An AVD may be configured to emulate a variety of hardware features including options such as screen size, memory capacity and the presence or otherwise of features such as a camera, GPS navigation support or an accelerometer. As part of the standard Android Studio installation, a number of emulator templates are installed allowing AVDs to be configured for a range of different devices. Additional templates may be loaded or custom configurations created to match any physical Android device by specifying properties such as processor type, memory capacity and the size and pixel density of the screen. Check the online developer documentation for your device to find out if emulator definitions are available for download and installation into the AVD environment.
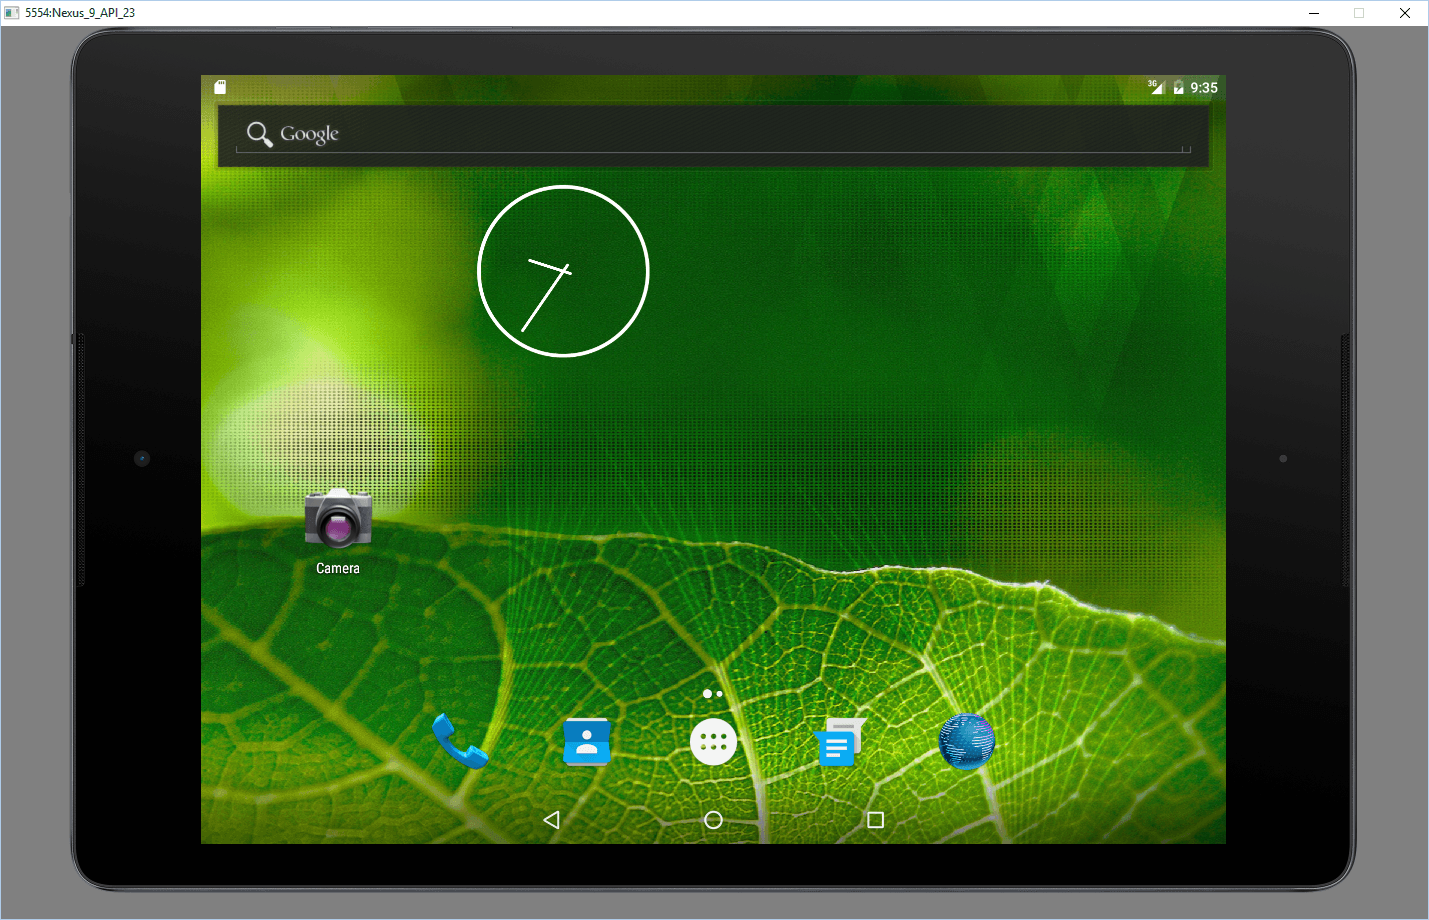
When launched, an AVD will appear as a window containing an emulated Android device environment. Figure 5-1, for example, shows an AVD session configured to emulate the Google Nexus 9 model.
New AVDs are created and managed using the Android Virtual Device Manager, which may be used either in command-line mode or with a more user-friendly graphical user interface.
Figure 5-1
Creating a New AVD
In order to test the behavior of an application in the absence of a physical device, it will be necessary to create an AVD for a specific Android device configuration.
To create a new AVD, the first step is to launch the AVD Manager. This can be achieved from within the Android Studio environment by selecting the Tools -> Android -> AVD Manager menu option from within the main window. Alternatively, the tool may be launched from a terminal or command-line prompt using the following command:
android avd
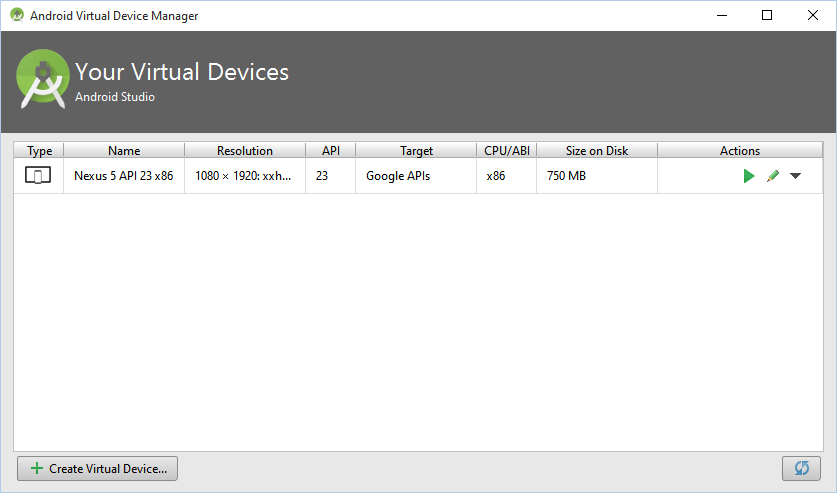
Once launched, the tool will appear as outlined in Figure 5 2. Assuming a new Android Studio installation, only a Nexus 5 AVD will currently be listed:
Figure 5-2
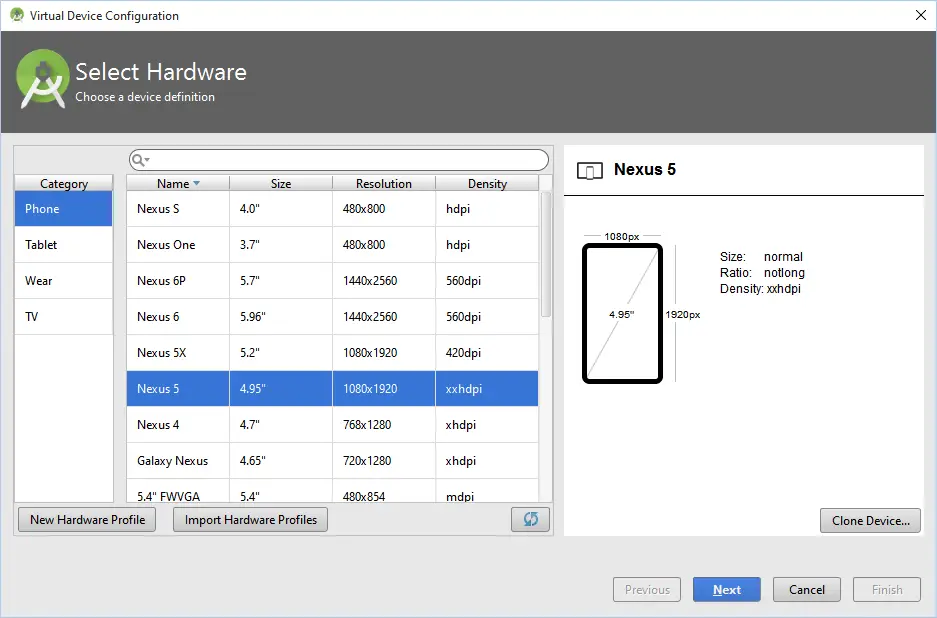
To add an additional AVD, begin by clicking on the Create Virtual Device button in order to invoke the Virtual Device Configuration dialog:
Figure 5-3
Within the dialog, perform the following steps to create a Nexus 9 compatible emulator:
1. From the Category panel, select the Tablet option to display the list of available Android tablet AVD templates.
2. Select the Nexus 9 device option and click Next.
3. On the System Image screen, select the latest version of Android (at time of writing this is Marshmallow, API level 23, Android 6.0) for the x86 ABI. Note that if the system image has not yet been installed a Download link will be provided next to the Release Name. Click this link to download and install the system image before selecting it.
4. Click Next to proceed and enter a descriptive name (for example Nexus 9) into the name field or simply accept the default name.
5. Click Finish to create the AVD.
With the AVD created, the AVD Manager may now be closed. If future modifications to the AVD are necessary, simply re-open the AVD Manager, select the AVD from the list and click on the pencil icon in the Actions column of the device row in the AVD Manager.
Starting the Emulator
To perform a test run of the newly created AVD emulator, simply select the emulator from the AVD Manager and click on the launch button (the green triangle in the Actions column). The emulator will appear in a new window and, after a short period of time, the “android” logo will appear in the center of the screen. The amount of time it takes for the emulator to start will depend on the configuration of both the AVD and the system on which it is running. In the event that the startup time on your system is considerable, do not hesitate to leave the emulator running. The system will detect that it is already running and attach to it when applications are launched, thereby saving considerable amounts of startup time.
The emulator probably defaulted to appearing full size and in landscape orientation. It is useful to be aware that these default options can be changed. Within the AVD Manager, select the new Nexus 9 entry and click on the pencil icon in the Actions column of the device row. In the configuration screen locate the Startup size and orientation section and change the Scale menu to 2dp on device = 1px on screen to reduce the size of the emulator on the screen. Exit and restart the emulator session to see this change take effect.
Running the Application in the AVD
With an AVD emulator configured, the example AndroidSample application created in the earlier chapter now can be compiled and run. With the AndroidSample project loaded into Android Studio, simply click on the run button represented by a green triangle located in the Android Studio toolbar as shown in Figure 5 4 below, select the Run -> Run… menu option or use the Shift+F10 keyboard shortcut:
Figure 5-4
By default, Android Studio will respond to the run request by displaying the Choose Device dialog. This provides the option to execute the application on an AVD instance that is already running, or to launch a new AVD session specifically for this application. Figure 5 5 lists the previously created Nexus 9 AVD as a running device as a result of the steps performed in the preceding section. With this device selected in the dialog, click on OK to install and run the application on the emulator.
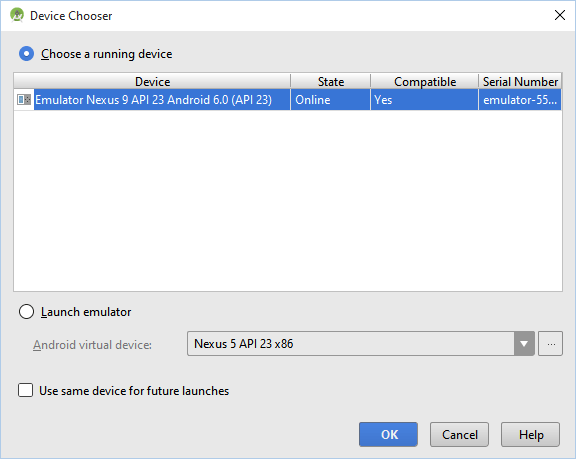
Figure 5-5
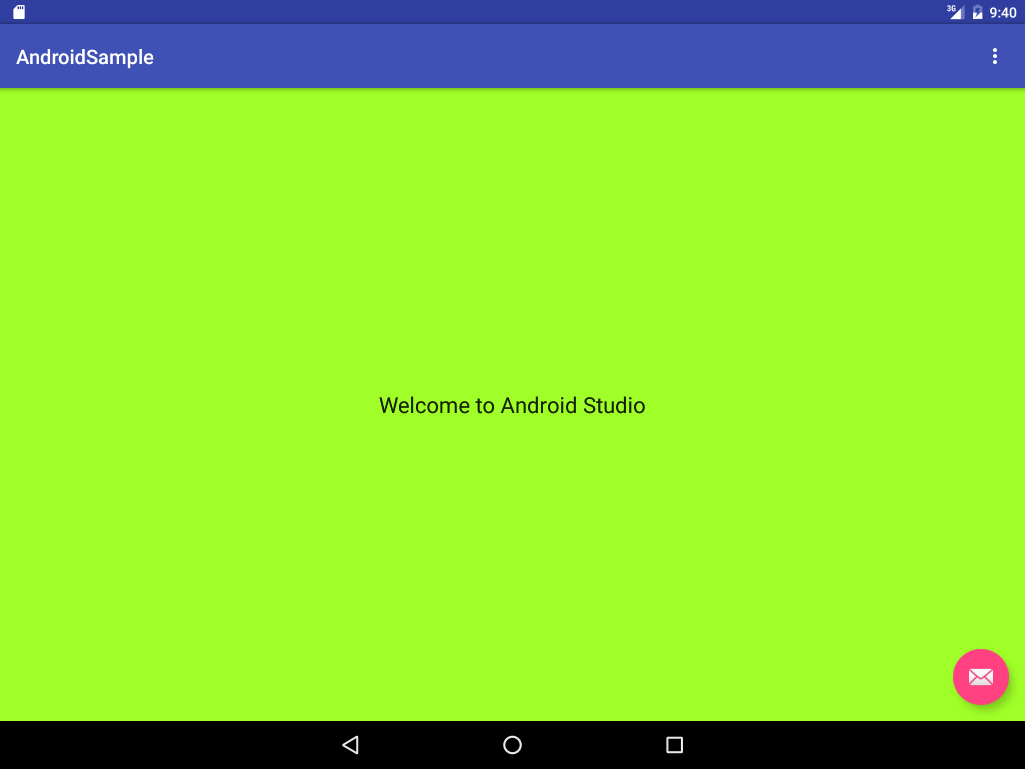
Once the application is installed and running, the user interface for the AndroidSampleActivity class will appear within the emulator:
Figure 5-6
In the event that the activity does not automatically launch, check to see if the launch icon has appeared among the apps on the emulator. If it has, simply click on it to launch the application. Once the run process begins, the Run and Android tool windows will become available. The Run tool window will display diagnostic information as the application package is installed and launched. Figure 5 7 shows the Run tool window output from a successful application launch:
Figure 5-7
If problems are encountered during the launch process, the Run tool will provide information that will hopefully help to isolate the cause of the problem.
Assuming that the application loads into the emulator and runs as expected, we have safely verified that the Android development environment is correctly installed and configured.
Run/Debug Configurations
A particular project can be configured such that a specific device or emulator is used automatically each time it is run from within Android Studio. This avoids the necessity to make a selection from the device chooser each time the application is executed. To review and modify the Run/Debug configuration, click on the button to the left of the run button in the Android Studio toolbar and select the Edit Configurations… option from the resulting menu:
Figure 5-8
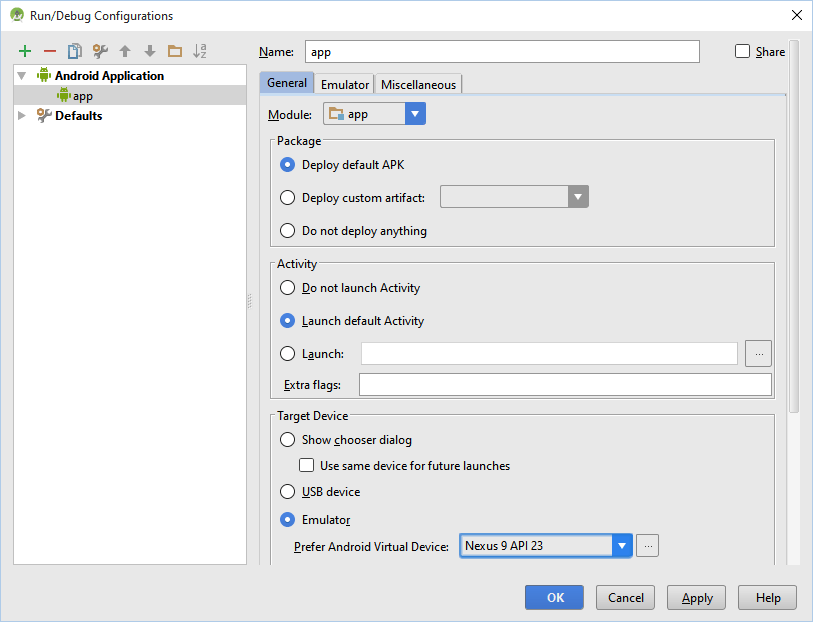
In the Run/Debug Configurations dialog, the application may be configured to always use a preferred emulator by enabling the Emulator option listed in the Target Device section and selecting the emulator from the drop down menu. Figure 5-9, for example, shows the AndroidSample application configured to run by default on the previously created Nexus 9 emulator:
Figure 5-9
Be sure to switch the Target Device setting back to "Show chooser dialog" mode before moving on to the next chapter of the book.
Stopping a Running Application
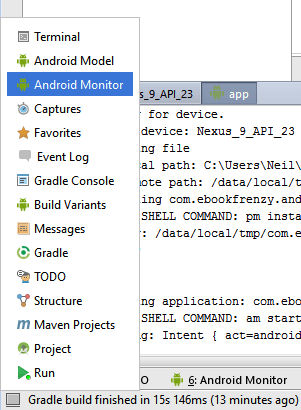
When building and running an application for testing purposes, each time a new revision of the application is compiled and run, the previous instance of the application running on the device or emulator will be terminated automatically and replaced with the new version. It is also possible, however, to manually stop a running application from within Android Studio.
Figure 5-10
Once the Android tool window appears, select the androidsample app menu highlighted in Figure 5-11 below:
Figure 5-11
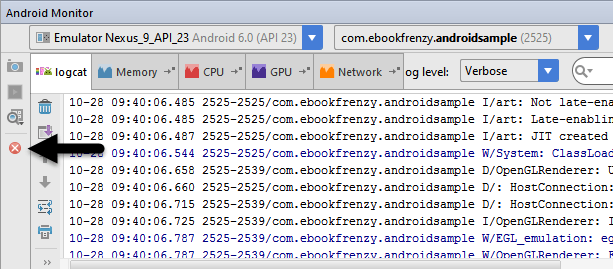
With the process selected, stop it by clicking on the red Terminate Application button in the vertical toolbar to the left of the process list:
Figure 5-12
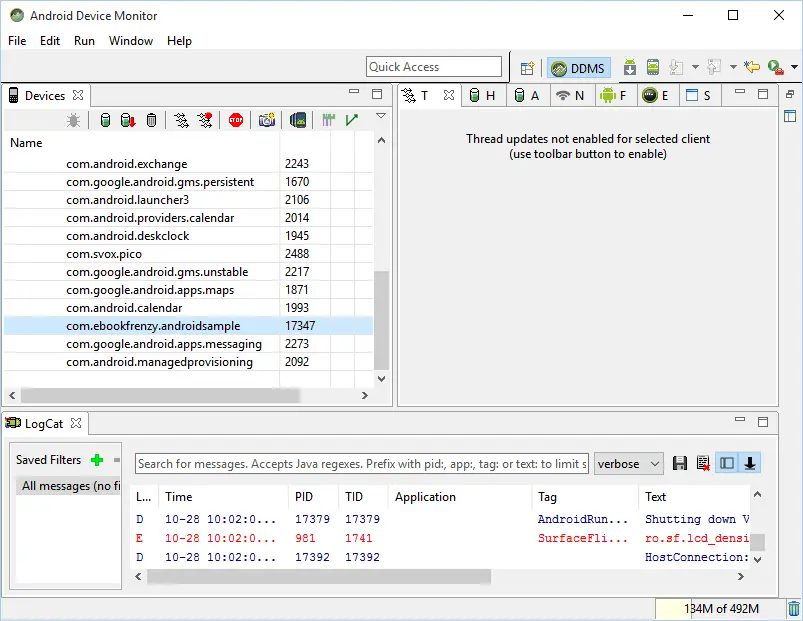
An alternative to using the Android tool window is to open the Android Device Monitor. This can be launched via the Tools -> Android -> Android Device Monitor menu option. Once launched, the process may be selected from the list (Figure 5-13) and terminated by clicking on the red Stop button located in the toolbar above the list.
Figure 5-13
AVD Command-line Creation
As previously discussed, in addition to the graphical user interface it is also possible to create a new AVD directly from the command-line. This is achieved using the android tool in conjunction with some command-line options. Once initiated, the tool will prompt for additional information before creating the new AVD.
Assuming that the system has been configured such that the Android SDK tools directory is included in the PATH environment variable, a list of available targets for the new AVD may be obtained by issuing the following command in a terminal or command window:
android list targets
The resulting output from the above command will contain a list of Android SDK versions that are available on the system. For example:
Available Android targets:
----------
id: 1 or "Google Inc.:Google APIs:23"
     Name: Google APIs
     Type: Add-On
     Vendor: Google Inc.
     Revision: 1
     Description: Android + Google APIs
     Based on Android 6.0 (API level 23)
     Libraries:
      * com.google.android.media.effects (effects.jar)
          Collection of video effects
      * com.android.future.usb.accessory (usb.jar)
          API for USB Accessories
      * com.google.android.maps (maps.jar)
          API for Google Maps
     Skins: HVGA, QVGA, WQVGA400, WQVGA432, WSVGA, WVGA800 (default), WVGA854, WXGA720, WXGA800, WXGA800-7in
 Tag/ABIs : google_apis/x86
The syntax for AVD creation is as follows:
android create avd -n <name> -t <targetID> [-<option> <value>]
For example, to create a new AVD named Nexus9 using the target id for the Android 6.0 API level 23 device (in this case id 1) using the Google x86 ABI, the following command may be used:
android create avd -n Nexus9 -t 1 --abi "google_apis/x86"
The android tool will create the new AVD to the specifications required for a basic Android 6.0 device, also providing the option to create a custom configuration to match the specification of a specific device if required. Once a new AVD has been created from the command line, it may not show up in the Android Device Manager tool until the Refresh button is clicked.
In addition to the creation of new AVDs, a number of other tasks may be performed from the command line. For example, a list of currently available AVDs may be obtained using the list avd command line arguments:
android list avd

Available Android Virtual Devices:
    Name: Nexus9
    Path: C:\Users\Neil\.android\avd\Nexus9.avd
  Target: Google APIs (Google Inc.)
          Based on Android 6.0 (API level 23)
 Tag/ABI: google_apis/x86
    Skin: WVGA800
---------
    Name: Nexus_5_API_23_x86
  Device: Nexus 5 (Google)
    Path: C:\Users\Neil\.android\avd\Nexus_5_API_23_x86.avd
  Target: Google APIs (Google Inc.)
          Based on Android 6.0 (API level 23)
 Tag/ABI: google_apis/x86
    Skin: nexus_5
  Sdcard: 200M
Snapshot: no
---------
    Name: Nexus_9_API_23
  Device: Nexus 9 (Google)
    Path: C:\Users\Neil\.android\avd\Nexus_9_API_23.avd
  Target: Google APIs (Google Inc.)
          Based on Android 6.0 (API level 23)
 Tag/ABI: google_apis/x86
    Skin: nexus_9
  Sdcard: C:\Users\Neil\.android\avd\Nexus_9_API_23.avd\sdcard.img
Snapshot: no
Similarly, to delete an existing AVD, simply use the delete option as follows:
android delete avd –n <avd name>
Android Virtual Device Configuration Files
By default, the files associated with an AVD are stored in the .android/avd sub-directory of the user’s home directory, the structure of which is as follows (where <avd name> is replaced by the name assigned to the AVD):
<avd name>.avd/config.ini
<avd name>.avd/userdata.img
<avd name>.ini
The config.ini file contains the device configuration settings such as display dimensions and memory specified during the AVD creation process. These settings may be changed directly within the configuration file and will be adopted by the AVD when it is next invoked.
The <avd name>.ini file contains a reference to the target Android SDK and the path to the AVD files. Note that a change to the image.sysdir value in the config.ini file will also need to be reflected in the target value of this file.
Moving and Renaming an Android Virtual Device
The current name or the location of the AVD files may be altered from the command line using the android tool’s move avd argument. For example, to rename an AVD named Nexus9 to Nexus9B, the following command may be executed:
android move avd -n Nexus9 -r Nexus9B
To physically relocate the files associated with the AVD, the following command syntax should be used:
android move avd -n <avd name> -p <path to new location>
For example, to move an AVD from its current file system location to /tmp/Nexus9Test:
android move avd -n Nexus9 -p /tmp/Nexus9Test
Note that the destination directory must not already exist prior to executing the command to move an AVD.
Summary
A typical application development process follows a cycle of coding, compiling and running in a test environment. Android applications may be tested on either a physical Android device or using an Android Virtual Device (AVD) emulator. AVDs are created and managed using the Android AVD Manager tool which may be used either as a command line tool or using a graphical user interface. When creating an AVD to simulate a specific Android device model it is important that the virtual device be configured with a hardware specification that matches that of the physical device.
| Previous | Table of Contents | Next |
| A Tour of the Android Studio User Interface | Testing Android Studio Apps on a Physical Android 6 Device |


