Designing an Android User Interface using the Graphical Layout Tool
| Previous | Table of Contents | Next |
| Understanding Android Views, View Groups and Layouts | Creating an Android User Interface in Java Code |
By far the easiest and most productive mechanism for designing a user interface for an Android application is to make use of the Graphical Layout tool. This is supplied as part of the Android ADT plug-in and is accessible from within the Eclipse IDE. The goal of this chapter is to provide an overview of how to create a user interface using this tool. The exercise included in this chapter will also be used as an opportunity to outline the creation of an activity starting with a “bare-bones” Eclipse project.
Having covered the use of the Graphical Layout tool, the chapter will also provide an overview of the concepts behind manually writing and editing XML layout resource files before introducing the Hierarchy Viewer tool.
The Android Graphical Layout Tool
As has been demonstrated in previous chapters, the Graphical Layout tool provides a “what you see is what you get” (WYSIWYG) environment in which views can be selected from a palette and then dragged and dropped onto a canvas representing the display of an Android device. Once a view has been placed on the canvas, it can be moved and resized (subject to the constraints of the parent view). Further, right-clicking on a view invokes a menu through which a wide variety of properties relating to the selected view may be modified. Under the surface, the Graphical Layout tool actually constructs an XML resource file containing the definition of the user interface that is being designed.
A Graphical Layout Tool Example
The first step in this phase of the example is to create a new Eclipse project. Begin, therefore, by launching Eclipse and selecting the File -> New -> Android Application Project… menu option. Within the resulting new project dialog, name both the application and project LayoutSample.
Enter the package name using your reverse domain name and the application name as outlined in Creating an Example Android Application (for example com.mycompany.layoutsample), or use the default com.example temporary name if you do not yet have a domain name. Select Android 2.2 as the minimum SDK and the latest Android version for the Target SDK and Compile with settings and click Next to proceed.
In previous examples, we have requested that Eclipse create a template activity for the project. We will, however, be using this tutorial to learn how to create an entirely new activity and corresponding layout resource file manually within Eclipse, so make sure that the toggle next to Create Activity is switched off on the Configure Project screen. Accept the default launcher icon settings on the next screen before clicking on Finish to create the new project.
Adding an XML Resource File to the Project
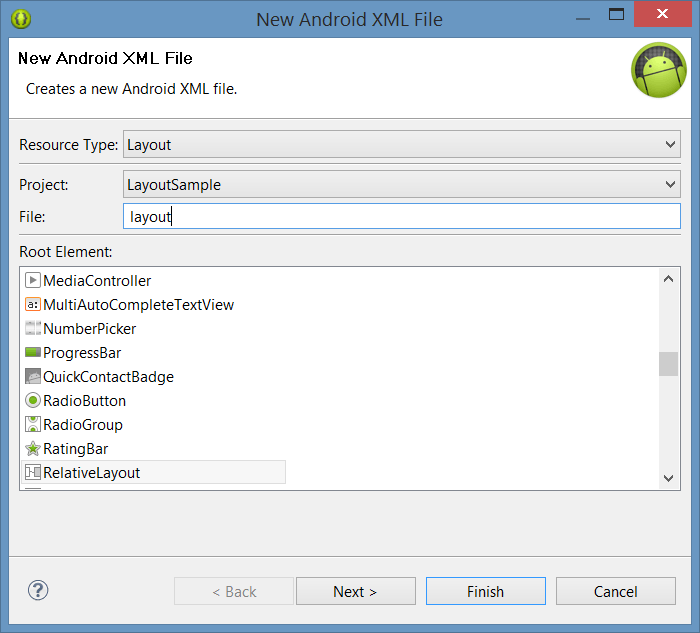
The next task is to add our own XML layout resource file to the project to contain the user interface design. Right-click on the LayoutSample project name in the Package Explorer panel and select New -> Android XML File… from the resulting menu. In the next screen, name the file layout and select RelativeLayout for the Root Element as illustrated in Figure 13-1:
Figure 13-1
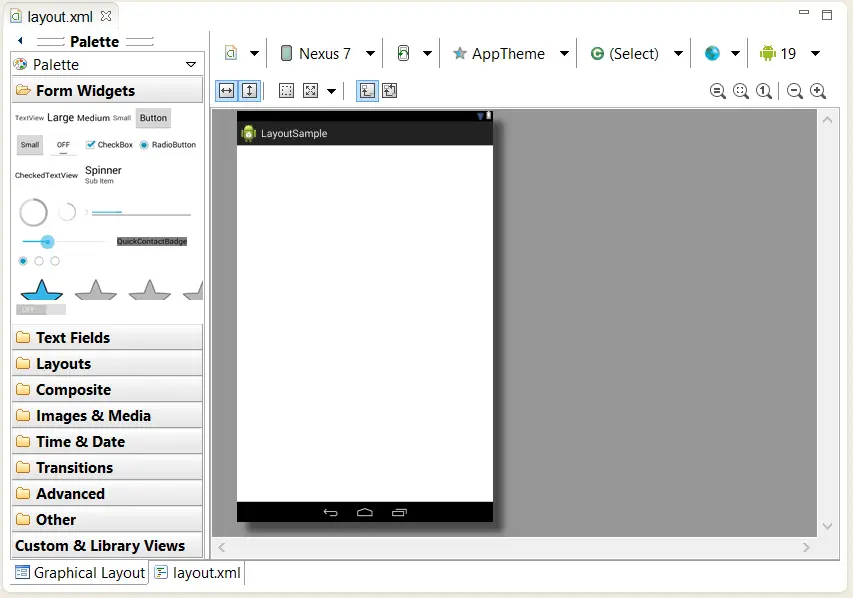
Remaining on the same screen, click Finish to create the layout resource file. Using the Package Explorer window, locate the new layout.xml file (which by default will have been placed in the res -> layout project folder) and double-click on it to load it into the Graphical Layout tool. Using the configuration menu at the top of the layout tool, select the Amazon KindleFire HD 7” device configuration and change the orientation to Portrait if it defaults to Landscape. Once loaded, the Graphical Layout panel should appear as illustrated in Figure 13-2:
Figure 13-2
Along the left-hand side of the layout tool is the palette. This contains the different categories of views that are available within the Android SDK for inclusion in user interface designs. Selecting a category heading will display the view types within that category.
To add a view to the user interface, simply locate it in the palette and drag and drop it onto the visual representation of the device display. Views may also be added by dragging views from the palette and dropping them over the parent view in the Outline panel located by default to the right of the Graphical Layout panel in the Eclipse main window.
Once in place, the view may only be moved and resized if permitted by the parent view (in the case of this example, a RelativeLayout view). Unwanted changes made to the layout may be undone by selecting the Edit -> Undo menu option or pressing the Ctrl-Z keyboard sequence (Command-Z for Mac OS X).
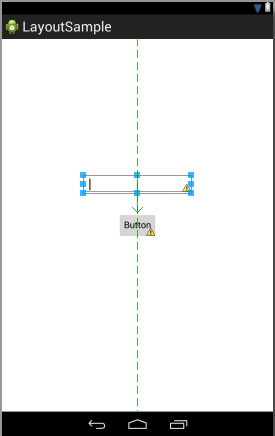
From within the Form Widgets palette category, drag a Button view object into the center of the display view. Note that green horizontal and vertical dashed lines appear to indicate the center axes of the display. Once centered, release the mouse button to drop the view into position. Repeat these steps to place a plain text EditText view (the top item located under the Text Fields palette category) directly above the Button object in the display view as illustrated in Figure 13-3:
Figure 13-3
Editing View Properties
Once a view object has been placed into the user interface, the properties of that view may also be modified from within the Graphical Layout tool. In the first instance, the width of the EditText object may be inadequate for allowing the user to enter text. In order to change this, right-click over the EditText object and select Layout Width -> Other… from the resulting context menu. In the custom attribute dialog, enter a value for the desired width of the field. The value must include a unit of measurement from the following list:
- in – Inches
- mm – Millimeters
- pt – Points (1/72 of an inch)
- dp – Density-independent pixels. An abstract unit of measurement based on the physical density of the device display relative to a 160dpi display baseline.
- sp – Scale-independent pixels. Similar to dp but scaled based on the user’s font preference.
- px – Actual screen pixels. Use is not recommended since different displays will have different pixels per inch. Use dp in preference to this unit.
For the purposes of this example, we will use device independent pixels as our unit of measurement, so enter 350dp into the dialog and click on the OK button. The width of the EditText view should change accordingly. Before proceeding, be sure to save the layout design file (Ctrl-S).
Using the View Properties Sheet
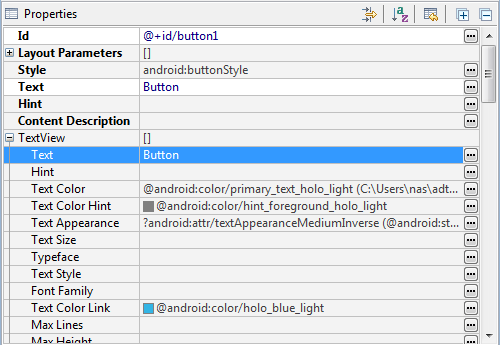
In addition to the context menu approach to modifying view properties, another option is to use the View Properties sheet. By default, this panel is displayed within the Eclipse window immediately beneath the Outline panel. The properties sheet displays a list of all the properties available for the currently selected view object. The current value (if any) for each property is listed in the right-hand column of the sheet and may be changed to a new value by clicking within the corresponding cell. For properties where a pre-defined range of options is available, a button to launch a settings dialog will appear from which a selection may be made. Figure 13-4, for example, shows the property sheet for the Button view:
Figure 13-4
Once the property sheet is visible, it will automatically update to reflect the corresponding properties of any view that is selected within the display canvas.
Before proceeding, take some time to explore the options available for changing the attributes of the view objects currently in the display. An overview of every possible attribute for each view type (there are, quite literally, hundreds for some view types) is far beyond the scope of this book. Suffice it to say that most properties can be accessed and modified using either the menu or Properties Sheet.
Designing a more complex user interface layout is a continuation of the steps outlined above. Simply drag and drop views onto the display, position and set properties as needed and nest layouts as required.
Save the user interface design file before proceeding.
Creating a New Activity
The next step in the project is to create a new activity to go with the layout we have designed. Once again, because we instructed Eclipse not to create an activity for us, we are now going to create our own. This will be a valuable learning exercise since there are many instances in the course of developing Android applications where new activities need to be created from the ground up.
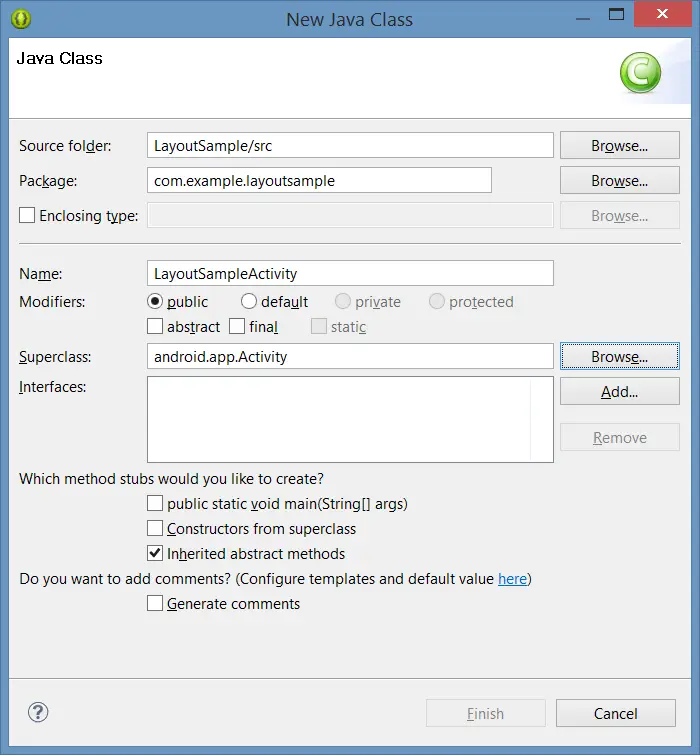
Right-click on the LayoutSample project in the Package Explorer panel and select the New -> Class menu option. In the resulting New Java Class dialog (Figure 13-5), we will need to configure the new activity class. Begin by clicking in the Package text field. Within this field, we need to enter the package name of our project. Either this can be typed manually, or the Ctrl-Space keyboard combination used to pop up a Content Assist panel containing a list of package names from which to choose. In this case, type in the package name for the application as declared when the project was created, for example com.example.layoutsample.
Name the new activity LayoutSampleActivity. Since most activities are subclassed from the Activity class, change the Superclass value from java.lang.Object to android.app.Activity before clicking on Finish to create the new class.
Figure 13-5
Locate the source file for the newly created activity, which will be located within the Package Explorer under LayoutSample -> src -> <packagename> -> LayoutSampleActivity.java. Double-click on the file to load it into the source code editor where it should read as follows:
package com.example.layoutsample;

import android.app.Activity;

public class LayoutSampleActivity extends Activity {

}
Clearly, Eclipse has generated only the outline template of the new class. In order to ensure that the user interface layout is displayed when the activity is launched we will need to override the onCreate() method of the Activity superclass and set the layout created above in the layout.xml file as the activity’s content view. With these requirements in mind, modify the LayoutSampleActivity.java file so that it reads as follows:
package com.example.LayoutSample;

import android.app.Activity;
import android.os.Bundle;

public class LayoutSampleActivity extends Activity {
    @Override
    public void onCreate(Bundle savedInstanceState) {
        super.onCreate(savedInstanceState);
        setContentView(R.layout.layout);
    }
}
With the activity created and modified to display the layout contained in layout.xml, all that remains is to modify the application’s manifest file so that the activity is launched when the application starts. Save the source file before proceeding.
Adding the New Activity to the Manifest File
The chapter entitled The Anatomy of an Android Application described briefly the concept of the application manifest file. Each Android application has associated with it a manifest file containing an XML based description of the application, including information about the activities that it contains. By default this file is named AndroidManifest.xml and, as with all project files, it can be located in the Package Explorer under the tree for each project.
In order to notify the Android runtime system about the existence of the LayoutSampleActivity activity, it will be necessary to add an entry for the activity to this manifest file.
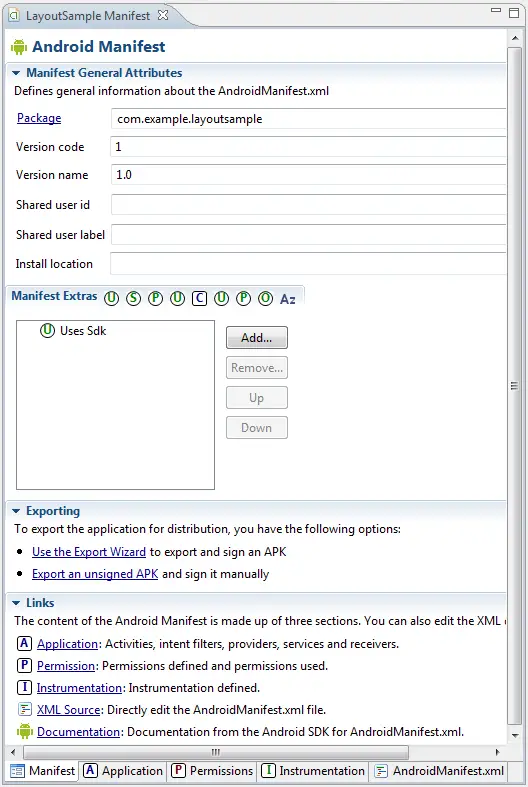
Locate the AndroidManifest.xml file for the LayoutSample project and double click on it to load the Manifest editor panel as illustrated in Figure 13-6:
Figure 13-6
We will add the activity entry directly into the XML file, so select the AndroidManifest.xml tab located along the bottom edge of the manifest editor. Once selected, the content should appear in the editing panel as follows:
<manifest xmlns:android="http://schemas.android.com/apk/res/android"
    package="com.example.layoutsample"
    android:versionCode="1"
    android:versionName="1.0" >

    <uses-sdk
        android:minSdkVersion="19"
        android:targetSdkVersion="19" />

    <application
        android:allowBackup="true"
        android:icon="@drawable/ic_launcher"
        android:label="@string/app_name"
        android:theme="@style/AppTheme" >
    </application>
</manifest>
At present, the manifest contains the standard template information for an Android application. Absent, however, is an entry for our LayoutSampleActivity activity. Within the editor panel, therefore, modify the XML so that it reads as follows:
<?xml version="1.0" encoding="utf-8"?>
<manifest xmlns:android="http://schemas.android.com/apk/res/android"
    package="com.ebookfrenzy.LayoutSample"
    android:versionCode="1"
    android:versionName="1.0" >

    <uses-sdk android:minSdkVersion="10" />

    <application
        android:icon="@drawable/ic_launcher"
        android:label="@string/app_name"
        android:theme="@style/AppTheme" >
        <activity
            android:label="@string/app_name"
            android:name=".LayoutSampleActivity" >
            <intent-filter >
              <action android:name="android.intent.action.MAIN" />

              <category android:name="android.intent.category.LAUNCHER" />
            </intent-filter>
        </activity>
    </application>
</manifest>
The directives between the <activity> and </activity> tags serve to notify the Android runtime system that the application contains the new activity and that the activity can be launched at runtime.
Running the Application
All that remains is to test that the application runs. Right-click on the LayoutSample project name in the Package Explorer panel and select Run As -> Android Application. Select either the simulator or a physical Android device and wait for the application to start. Assuming the absence of errors, the application and activity should launch and appear exactly as designed using the Graphical Layout tool.
Manually Creating an XML Layout
It is important to keep in mind when using the Graphical Layout tool that all it is really doing is providing a user friendly approach to creating XML layout resource files. At any time during the design process, the underlying XML can be viewed and directly edited simply by clicking on the tab displaying the filename (in this case layout.xml) located at the bottom of the Graphical Layout tool panel. To return to the tool, simply click on the Graphical Layout tab.
Whilst the design of layouts using the layout tool greatly improves productivity, it is still possible to create XML layouts by manually editing the XML. The structure of an XML layout file is actually straightforward and follows the hierarchical approach of the view tree. The first line of an XML resource file should include the following standard declaration:
<?xml version="1.0" encoding="utf-8"?>
This declaration should be followed by the root element of the layout, typically a container view such as a layout. This is represented by both opening and closing tags and any properties that need to be set on the view. The following XML, for example, declares a RelativeLayout view as the root element and sets properties such that it fills all the available space of the device display:
<?xml version="1.0" encoding="utf-8"?>
<RelativeLayout xmlns:android="http://schemas.android.com/apk/res/android"
    android:layout_width="match_parent"
    android:layout_height="match_parent" >

</RelativeLayout>
Any children that need to be added to the RelativeLayout parent must be nested within the opening and closing tags. In the following example, a Button and an EditText field have been added as children to the RelativeLayout view:
<?xml version="1.0" encoding="utf-8"?>
<RelativeLayout xmlns:android="http://schemas.android.com/apk/res/android"
    android:layout_width="match_parent"
    android:layout_height="match_parent" >


    <Button
        android:id="@+id/button1"
        android:layout_width="wrap_content"
        android:layout_height="wrap_content"
        android:layout_centerHorizontal="true"
        android:layout_centerVertical="true"
        android:text="Button" />

    <EditText
        android:id="@+id/editText1"
        android:layout_width="350dp"
        android:layout_height="wrap_content"
        android:layout_above="@+id/button1"
        android:layout_centerHorizontal="true"
        android:layout_marginBottom="38dp"
        android:ems="10"/>

</RelativeLayout>
The EditText view, on the other hand, has a width declared as 350dp, is centered horizontally within the parent and positioned 38dp above the button1 view.
This XML file is, of course, the layout that was created using the Graphical Layout tool in this chapter.
When to write XML manually as opposed to using the Graphical Layout tool is a matter of personal preference. There are, however, advantages to using the layout tool.
Firstly, the layout tool provides instant visual feedback on the appearance of a user interface in real-time as it is being built. At best, a developer writing XML will need to switch continually back and forth between the XML editor and the layout tool in order to view the current state of the layout. Additionally, the layout tool avoids the necessity to learn the intricacies of the various property values of the Android SDK view classes. Rather than continually refer to the Android documentation to find the correct keywords and values, most properties can be located by navigating the menu system within the layout tool or by referring to the Properties Sheet. Lastly, in terms of productivity alone, it is difficult to conceive of being able to write and correct XML faster than a layout can be designed using the Graphical Layout tool.
All the advantages of the Graphical Layout tool aside, it is important to keep in mind that the two approaches to user interface design are in no way mutually exclusive. As an application developer, it is quite likely that you will end up designing user interfaces within the layout tool whilst performing fine-tuning and layout tweaks of the design by directly editing the generated XML resources. Both views of the interface design are, after all, a single mouse click apart within the Eclipse environment making it easy to switch back and forth as needed. In fact, a useful tip to remember is that double clicking on a view in the display canvas will automatically jump to and highlight the XML for that view in the resource file.
Using the Hierarchy Viewer
A useful tool for closely inspecting the view hierarchy of an activity is the Hierarchy Viewer. This tool is part of the Android ADT suite and can be launched either from the command-line or within the Eclipse IDE. The main purpose of the tool is to provide a detailed overview of the entire view tree for activities within currently running applications, and to provide information about the performance of each view contained therein.
When the Hierarchy Viewer appears, it will consist of a number of different panels. The left hand panel, illustrated in Figure 13-7, lists all the activities currently running on the device. The activity listed in bold is the current foreground activity, which should, in this case, be LayoutSampleActivity.
Figure 13-7
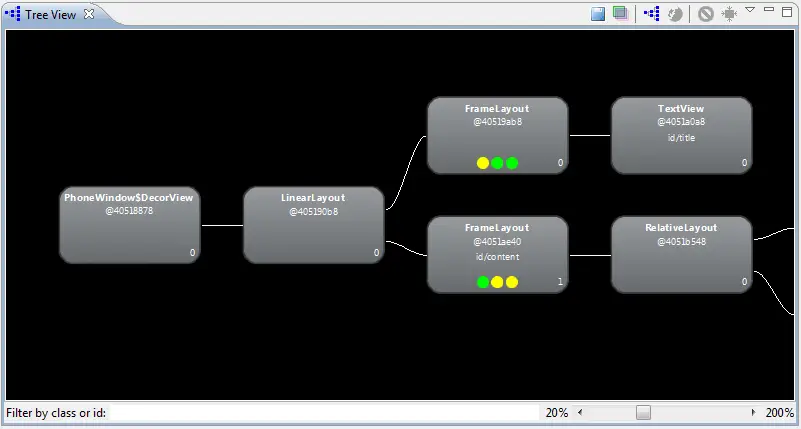
Selecting the activity will cause the hierarchy to load into the Tree View panel as shown in Figure 13-8 (note that there may be a short delay between selection of the activity and the hierarchy diagram appearing):
Figure 13-8
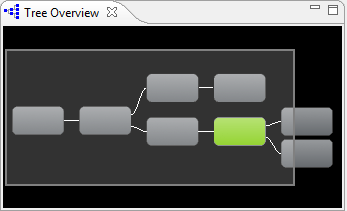
Whilst it is possible to zoom in and out of the tree view using the scale at the bottom of the panel or by spinning the mouse wheel, in most cases the tree will be too large to view entirely within the Tree View panel. To move the view window around the tree simply click and drag in the Tree View panel, or move the lens within the Tree Overview panel (Figure 13-9):
Figure 13-9
When reviewing the tree view, keep in mind that some views in addition to those included in the activity layout will be displayed. These are the views and layouts that, for example, display the status bar across the top of the screen and provide an area for the activity to be displayed.
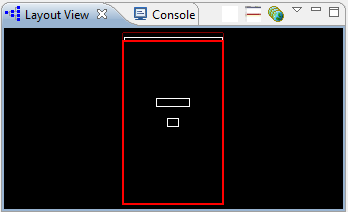
Selecting a node in the Tree View will cause the corresponding element in the user interface representation to be highlighted in red in the Layout View. In Figure 13-10 the RelativeLayout view is currently selected:
Figure 13-10
Similarly, selecting views from the Layout View will cause the corresponding node in the Tree View to highlight and move into view.
Additional information about a view can be obtained by selecting the node within the Tree View. A panel will then popup next to the node providing details on the performance of the view in terms of the time it took the view to measure, lay itself out and draw on the screen. The colored dots within the node indicate the performance in each category (with red indicating slower performance) for the view relative to other views in the activity. Container views with larger numbers of child views may display red status simply because the view has to wait for each child to render. This is not necessarily an indication of a performance problem with that view.
Double clicking on a node will display a rendering of how the view appears within the application user interface. Options are also available within the tool to perform tasks such as invalidating a selected layout view (thereby forcing it to be redrawn) and to save the tree view as a PNG image file.
Summary
The Graphical Layout tool, supplied as part of the Android ADT, provides a visually intuitive method for designing user interfaces. Using a drag and drop paradigm combined with a set of property editors, the tool provides considerable productivity benefits to the application developer.
User interface designs may also be implemented by manually writing the XML layout resource files, the format of which is well structured and easily understood.
The fact that the Graphical Layout tool generates XML resource files means that these two approaches to interface design can be combined to provide a “best of both worlds” approach to user interface development.
Finally, a detailed overview of the view tree for an activity and an indication of the performance of each view within that activity can be obtained using the Hierarchy Viewer tool.
| Previous | Table of Contents | Next |
| Understanding Android Views, View Groups and Layouts | Creating an Android User Interface in Java Code |


