Using Storyboards in Xcode 6
| Previous | Table of Contents | Next |
| Using Size Classes to Design Universal iOS User Interfaces | Using Xcode 6 Storyboards to Create an iOS 8 Tab Bar Application |
<google>BUY_IOS8</google>
Storyboarding is a feature built into Xcode that allows both the various screens that comprise an iOS application and the navigation path through those screens to be visually assembled. Using the Interface Builder component of Xcode, the developer simply drags and drops view and navigation controllers onto a canvas and designs the user interface of each view in the normal manner. The developer then drags lines to link individual trigger controls (such as a button) to the corresponding view controllers that are to be displayed when the control is selected by the user. Having designed both the screens (referred to in the context of storyboarding as scenes) and specified the transitions between scenes (referred to as segues) Xcode generates all the code necessary to implement the defined behavior in the completed application. The style of transition for each segue (page fold, cross dissolve etc) may also be defined within Interface Builder. Further, segues may also be triggered programmatically in situations where behavior cannot be defined graphically using Interface Builder.
The finished design is saved by Xcode to a storyboard file. Typically, an application will have a single storyboard file, though there is no restriction preventing the use of multiple storyboard files within a single application.
The remainder of this chapter will work through the creation of a simple application using storyboarding to implement multiple scenes with segues defined to allow user navigation.
Creating the Storyboard Example Project
Begin by launching Xcode and creating a new project named Storyboard using the Single View Application template with the device and language menus set to Universal and Swift respectively. Save the project to a suitable location by clicking on the Create button.
Accessing the Storyboard
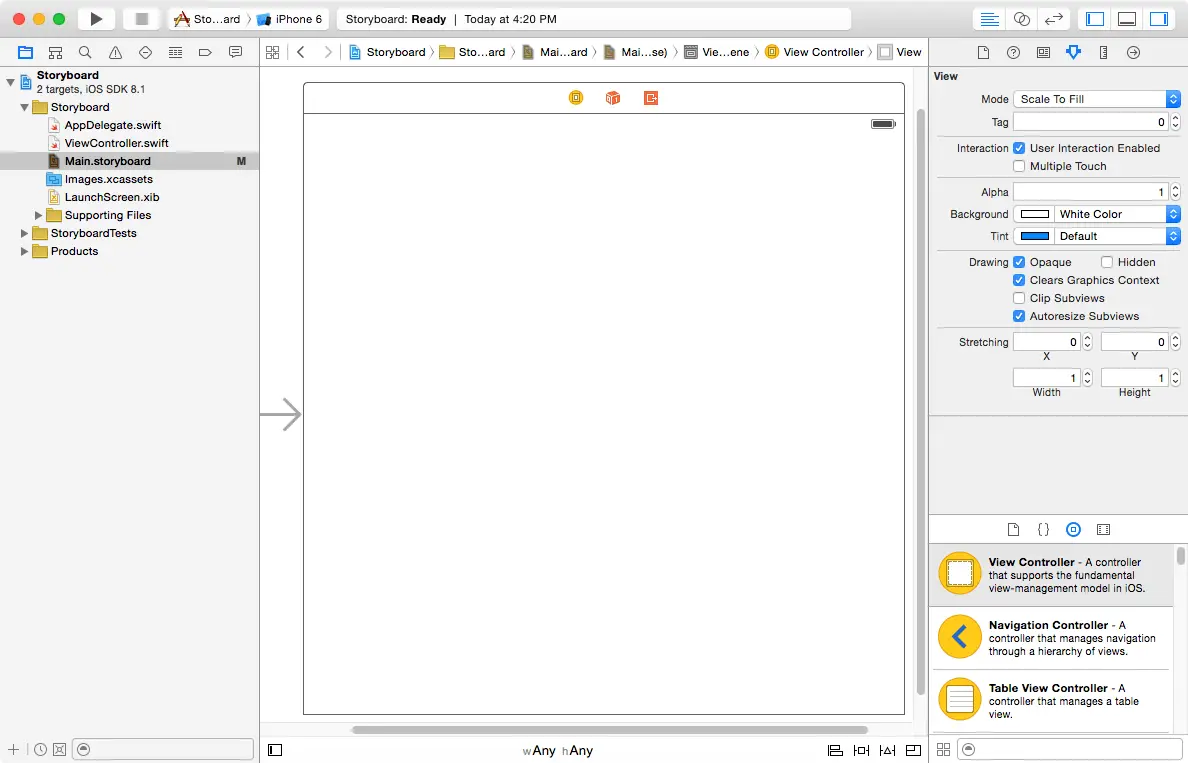
Upon creation of the new project, Xcode will have created what appears to be the usual collection of files for a single view application, including a storyboard file named Main.storyboard. Select this file in the project navigator panel to view the storyboard canvas as illustrated in Figure 25-1:
Figure 25-1
The view displayed on the canvas is the view for the ViewController class created for us by Xcode when we selected the Single View Application template. The arrow pointing inwards to the left side of the view indicates that this is the initial view controller and will be the first view displayed when the application launches. To change the initial view controller simply drag this arrow to any other scene in the storyboard and drop it in place.
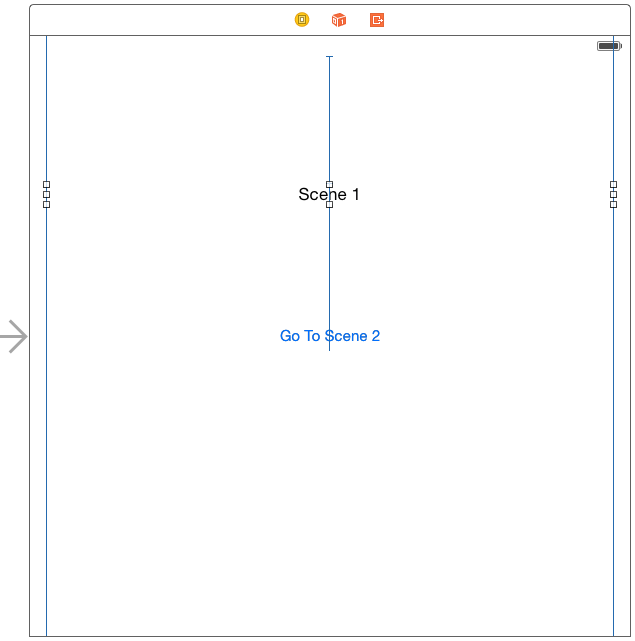
Objects may be added to the view in the usual manner by dragging and dropping items from the Object Library (View -> Utilities -> Show Object Library) onto the view canvas. For the purposes of this example, drag a label and a button onto the view canvas. Using the properties panel, change the label text to Scene 1 and the button text to Go to Scene 2. Resize the label so that it extends horizontally to the blue guidelines at the sides of the containing view and configure centered text alignment.
Figure 25-2
Using the Resolve Auto Layout Issues menu, select the Reset to Suggested Constraints option listed under All Views in View Controller.
In order to manipulate text displayed on the label object from within the application code it will be necessary to first establish an outlet. Select the label in the storyboard canvas and display the Assistant Editor (View -> Assistant Editor -> Show Assistant Editor). Check that the Assistant Editor is showing the content of the ViewController.swift file and then Ctrl-click on the label and drag the resulting line to just below the class declaration line in the Assistant Editor panel. In the resulting connection dialog, enter scene1Label as the outlet name and click on the Connect button. Upon completion of the connection, the top of the ViewController.swift file should read as follows:
import UIKit

class ViewController: UIViewController {

    @IBOutlet weak var scene1Label: UILabel!
Adding Scenes to the Storyboard
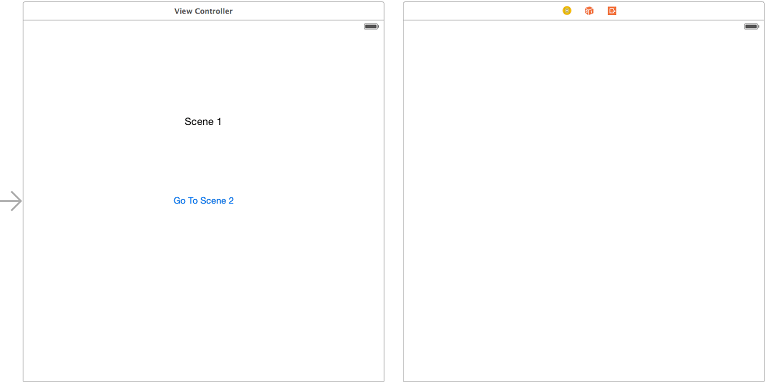
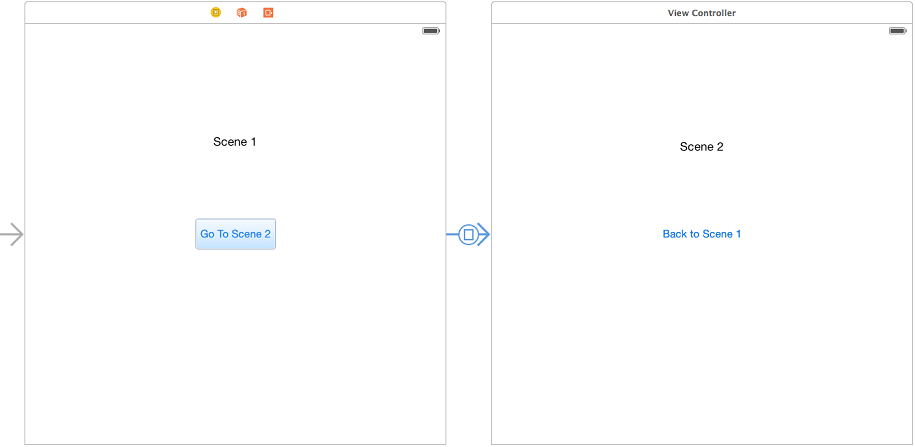
To add a second scene to the storyboard, simply drag a View Controller object from the Object Library panel onto the canvas. Figure 25 3 shows a second scene added to a storyboard:
Figure 25-3
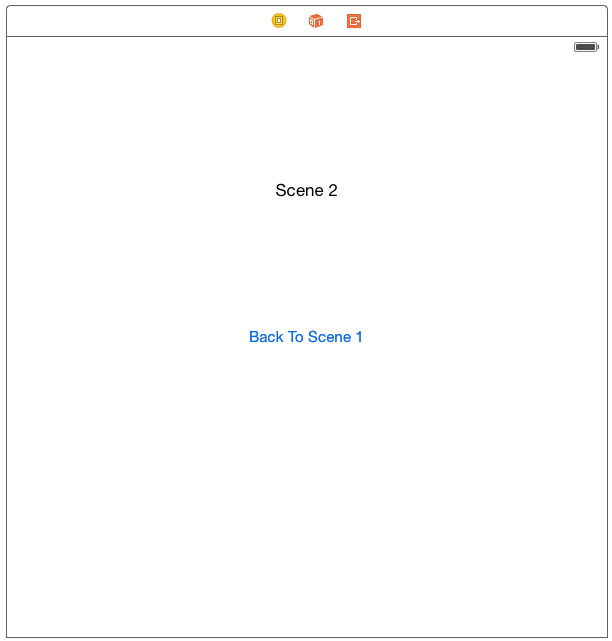
Drag and drop a label and a button into the second scene and configure the objects so that the view appears as follows, making sure to stretch the label horizontally so that it extends to the blue margin guidelines with centered text alignment. Repeat the steps performed for the first scene to configure the necessary Auto Layout constraints on the two views.
Figure 25-4
As many scenes as necessary may be added to the storyboard, but for the purposes of this exercise we will use just two scenes. Having implemented the scenes the next step is to configure segues between the scenes.
Configuring Storyboard Segues
As previously discussed, a segue is the transition from one scene to another within a storyboard. Within the example application, touching the Go To Scene 2 button will segue to scene 2. Conversely, the button on scene 2 is intended to return the user to scene 1. To establish a segue, hold down the Ctrl key on the keyboard, click over a control (in this case the button on scene 1) and drag the resulting line to the scene 2 view. Upon releasing the mouse button a menu will appear. Select the show menu option to establish the segue.
Figure 25-5
As more scenes are added to a storyboard, it becomes increasingly difficult to see more than a few scenes at one time on the canvas. To zoom out double click on the canvas. To zoom back in again simply double click once again on the canvas. Ctrl-clicking on the storyboard canvas background will provide a menu containing a number of zoom level options.
Configuring Storyboard Transitions
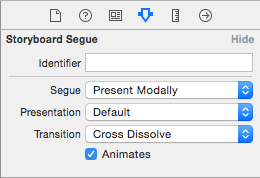
<google>ADSDAQBOX_FLOW</google> Xcode provides the option to change the visual appearance of the transition that takes place during a segue. By default a Cover Vertical transition is performed whereby the new scene slides vertically upwards from the bottom of the view to cover the currently displayed scene. To change the transition, select the corresponding segue line, display the Attributes Inspector (View -> Utilities -> Show Attributes Inspector) and modify the Transition setting. In Figure 25-6 the transition has been changed to Cross Dissolve:
Figure 25-6
If animation is not required during the transition, turn off the Animates option. To delete a segue from a storyboard simply select the segue line in the storyboard canvas and press the keyboard delete key.
Compile and run the application. Note that touching the “Go to Scene 2” button causes Scene 2 to appear. <google>BUY_IOS8</google>
Associating a View Controller with a Scene
At this point in the example we have two scenes but only one view controller (the one created by Xcode when we selected Single View Application). Clearly in order to be able to add any functionality behind scene 2 it too will need a view controller. The first step, therefore, is to add the class source file for a view controller to the project. Ctrl-click on the Storyboard target at the top of the project navigator panel and select New File… from the resulting menu. In the new file panel, select Source listed under iOS in the left hand panel followed by Cocoa Touch Class in the main panel and click Next to proceed. On the options screen verify that the Subclass of menu is set to UIViewController and that the Also create XIB file option is deselected (since the view already exists in the storyboard there is no need for an XIB user interface file) and name the class Scene2ViewController.
Select the Main.storyboard file in the project navigator panel and select the View Controller button located in the panel beneath the Scene 2 view as shown in Figure 25-7:
Figure 25-7
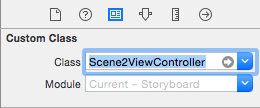
With the view controller for scene 2 selected within the storyboard canvas, display the Identity Inspector (View -> Utilities -> Identity Inspector) and change the Class from UIViewController to Scene2ViewController:
Figure 25-8
Scene 2 now has a view controller and corresponding Swift source file where code may be written to implement any required functionality.
Select the label object in scene 2 and display the Assistant Editor. Make sure that the Scene2ViewController.swift file is displayed in the editor and then establish an outlet for the label named scene2Label.
Passing Data Between Scenes
One of the most common requirements when working with storyboards involves the transfer of data from one scene to another during a segue transition. This is achieved using the prepareForSegue method.
Before a segue is performed by the storyboard runtime environment, a call is made to the prepareForSegue method of the current view controller. If any tasks need to be performed prior to the segue taking place simply implement this method in the current view controller and add code to perform any necessary tasks. Passed as an argument to this method is a segue object from which a reference to the destination view controller may be obtained and subsequently used to transfer data.
To see this in action, begin by selecting Scene2ViewController.swift and adding a new variable property:
import UIKit

class Scene2ViewController: UIViewController {

    @IBOutlet weak var scene2Label: UILabel!

    var labelText: String?
.
.
.
This property will hold the text to be displayed on the label when the storyboard transitions to this scene. As such, some code needs to be added to the viewDidLoad method located in the Scene2ViewController.swift file:
override func viewDidLoad() {
    super.viewDidLoad()
    scene2Label.text = labelText
}
Finally, select the ViewController.swift file and implement the prepareForSegue method as follows:
override func prepareForSegue(segue: UIStoryboardSegue, sender: AnyObject?) {
    let destination = segue.destinationViewController
					as Scene2ViewController
    destination.labelText = "Arrived from Scene 1"
}
All this method does is obtain a reference to the destination view controller and then assigns a string to the labelText property of the object so that it appears on the label.
Compile and run the application once again and note that when scene 2 is displayed the new label text appears. We have, albeit using a very simple example, transferred data from one scene to the next.
Unwinding Storyboard Segues
The next step is to configure the button on scene 2 to return to scene 1. It might seem as though the obvious choice is to simply implement a segue from the button on scene 2 to scene 1. Instead of returning the original instance of scene 1, however, this would create an entirely new instance of the ViewController class. If a user were to perform this transition repeatedly the application would continue to use more memory and would eventually be terminated by the operating system.
The application should instead make use of the Storyboard unwind feature. This involves implementing a method in the view controller of the scene to which the user is to be returned and then connecting a segue to that method from the source view controller. This enables an unwind action to be performed across multiple levels of scene.
To implement this in our example application, begin by selecting the ViewController.swift file and implementing a method to be called by the unwind segue named returned:
@IBAction func returned(segue: UIStoryboardSegue) {
    scene1Label.text = "Returned from Scene 2"
}
All that is required of this method for this example is that it set some new text on the label object of scene 1. Once the method has been added, it is important to save the ViewController.swift file before continuing.
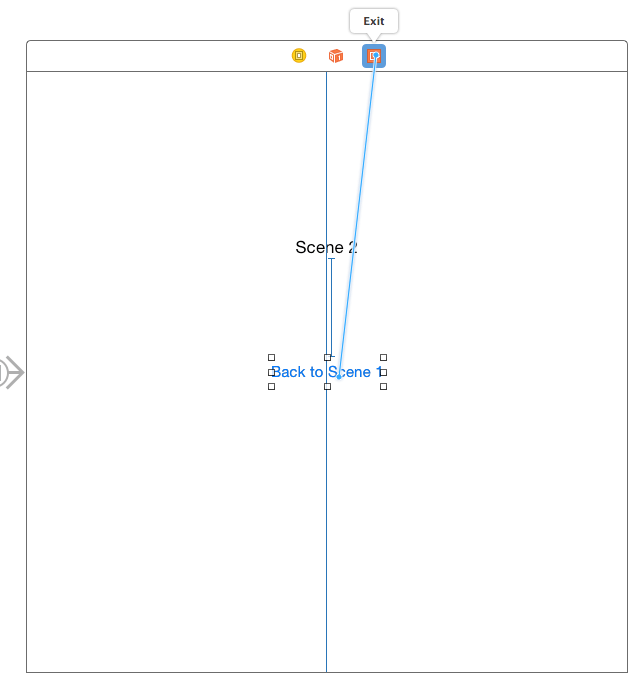
The next step is to establish the unwind segue. To achieve this, locate scene 2 within the storyboard canvas and Ctrl-click and drag from the button view to the “exit” icon (the orange button with the white square and the right facing arrow pointing outward shown in Figure 25 9) in the panel located along the top edge of the scene view. Release the line and select the returned method from the resulting menu:
Figure 25-9
Once again, run the application and note that the button on scene 2 now returns to scene 1 and, in the process, calls the returned method resulting in the label on scene 1 changing.
Triggering a Storyboard Segue Programmatically
In addition to wiring up controls in scenes to trigger a segue, it is also possible to initiate a preconfigured segue from within the application code. This can be achieved by assigning an identifier to the segue and then making a call to the performSegueWithIdentifier method of the view controller from which the segue is to be triggered. To set the identifier of a segue, select it in the storyboard canvas, display the Attributes Inspector (View -> Utilities -> Show Attributes Inspector) and set the value in the Identifier field.
Assuming a segue with the identifier of SegueToScene1, this could be triggered from within code as follows:
self.performSegueWithIdentifier("SegueToScene1", sender: self)
Summary
The Storyboard feature of Xcode allows for the navigational flow between the various views in an iOS application to be visually constructed without the need to write code. In this chapter we have covered the basic concepts behind storyboarding and worked through the creation of an example iOS application using storyboards and, in doing so, also explored the storyboard unwind feature.
<google>BUY_IOS8</google>
| Previous | Table of Contents | Next |
| Using Size Classes to Design Universal iOS User Interfaces | Using Xcode 6 Storyboards to Create an iOS 8 Tab Bar Application |
