An Android 8 Notifications Kotlin Tutorial
Notifications provide a way for an app to convey a message to the user when the app is either not running or is currently in the background. A messaging app might, for example, issue a notification to let the user know that a new message has arrived from a contact. Notifications can be categorized as being either local or remote. A local notification is triggered by the app itself on the device on which it is running. Remote notifications, on the other hand, are initiated by a remote server and delivered to the device for presentation to the user.
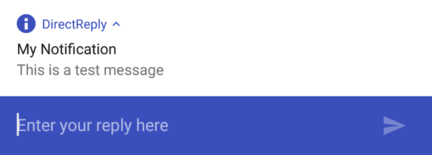
Notifications appear in the notification drawer that is pulled down from the status bar of the screen and each notification can include actions such as a button to open the app that sent the notification. Android 7 has also introduced Direct Reply, a feature that allows the user to type in and submit a response to a notification from within the notification panel.
The goal of this chapter is to outline and demonstrate the implementation of local notifications within an Android app. The next chapter (“An Android 8 Direct Reply Notification Tutorial”) will cover the implementation of direct reply notifications.
Although outside the scope of this book, the use of Firebase to initiate and send remote notifications is covered in detail in a companion book titled Firebase Essentials – Android Edition.
An Overview of Notifications
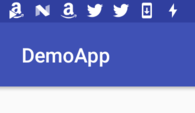
When a notification is initiated on an Android device, it appears as an icon in the status bar. Figure 58-1, for example, shows a status bar with a number of notification icons:
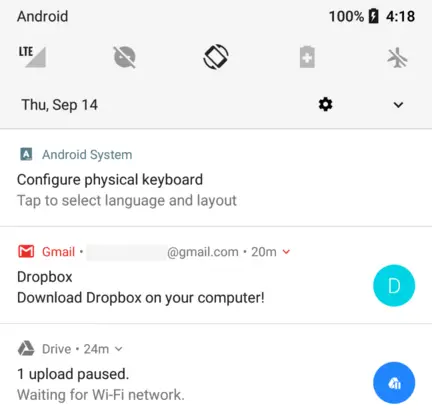
To view the notifications, the user makes a downward swiping motion starting at the status bar to pull down the notification drawer as shown in Figure 58-2:
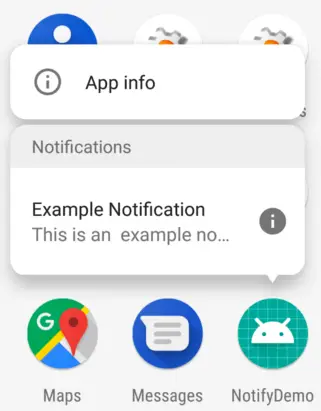
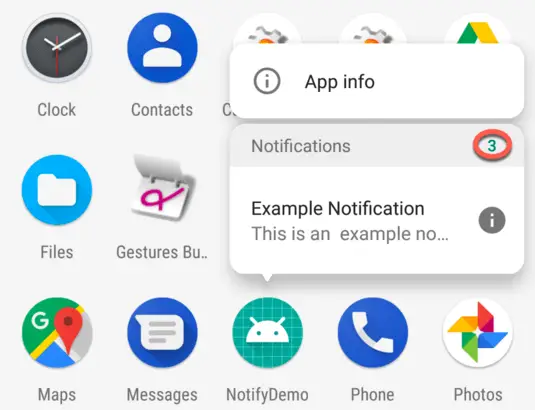
In devices running Android 8 or newer, performing a long press on an app launcher icon will display any pending notifications associated with that app as shown in Figure 58-3:
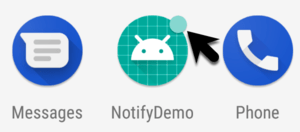
Android 8 also supports notification badges that appear on app launcher icons when a notification is waiting to be seen by the user.
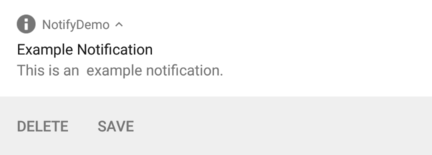
A typical notification will simply display a message and, when tapped, launch the app responsible for issuing the notification. Notifications may also contain action buttons which perform a task specific to the corresponding app when tapped. Figure 58-4, for example, shows a notification containing two action buttons allowing the user to either delete or save an incoming message.
It is also possible for the user to enter an in-line text reply into the notification and send it to the app, as is the case in Figure 58-5 below. This allows the user to respond to a notification without having to launch the corresponding app into the foreground.
The remainder of this chapter will work through the steps involved in creating and issuing a simple notification containing actions. The topic of direct reply support will then be covered in the next chapter entitled “An Android 8 Direct Reply Notification Tutorial”.
Creating the NotifyDemo Project
Start Android Studio and create a new project, entering NotifyDemo into the Application name field and ebookfrenzy.com as the Company Domain setting before clicking on the Next button.
On the form factors screen, enable the Phone and Tablet option and set the minimum SDK setting to API 26: Android 8.0 (Oreo). Continue through the screens, requesting the creation of an Empty Activity named NotifyDemoActivity with a corresponding layout file named activity_notify_demo.
Designing the User Interface
The main activity will contain a single button, the purpose of which is to create and issue an intent. Locate and load the activity_notify_demo.xml file into the Layout Editor tool and delete the default TextView widget.
With Autoconnect enabled, drag and drop a Button object from the panel onto the center of the layout canvas as illustrated in Figure 58-6.
With the Button widget selected in the layout, use the Attributes panel to configure the onClick property to call a method named sendNotification.
Creating the Second Activity
For the purposes of this example, the app will contain a second activity which will be launched by the user from within the notification. Add this new activity to the project by right-clicking on the com.ebookfrenzy.notifydemo package name located in app -> java and select the New -> Activity -> Empty Activity menu option to display the New Android Activity dialog.
Enter ResultActivity into the Activity Name field and name the layout file activity_result. Since this activity will not be started when the application is launched (it will instead be launched via an intent from within the notification), it is important to make sure that the Launcher Activity option is disabled before clicking on the Finish button.
Open the layout for the second activity (app -> res -> layout -> activity_result.xml) and drag and drop a TextView widget so that it is positioned in the center of the layout. Edit the text of the TextView so that it reads “Result Activity” and extract the property value to a string resource.
Creating a Notification Channel
Before an app can send a notification, it must first create a notification channel. A notification channel consists of an ID that uniquely identifies the channel within the app, a channel name and a channel description (only the latter two of which will be seen by the user). Channels are created by configuring a NotificationChannel instance and then passing that object through to the createNotificationChannel() method of the NotificationManager class. For this example, the app will contain a single notification channel named “NotifyDemo News”. Edit the NotifyDemoActivty.kt file and implement code to create the channel when the app starts:
.
.
import android.app.NotificationChannel
import android.app.NotificationManager
import android.content.Context
import android.graphics.Color

class NotifyDemoActivity : AppCompatActivity() {

    private var notificationManager: NotificationManager? = null

    override fun onCreate(savedInstanceState: Bundle?) {
        super.onCreate(savedInstanceState)
        setContentView(R.layout.activity_notify_demo)

        notificationManager =
                  getSystemService(
                   Context.NOTIFICATION_SERVICE) as NotificationManager

        createNotificationChannel(
                "com.ebookfrenzy.notifydemo.news",
                "NotifyDemo News",
                "Example News Channel")
    }

    private fun createNotificationChannel(id: String, name: String,
                                            description: String) {

        val importance = NotificationManager.IMPORTANCE_LOW
        val channel = NotificationChannel(id, name, importance)

        channel.description = description
        channel.enableLights(true)
        channel.lightColor = Color.RED
        channel.enableVibration(true)
        channel.vibrationPattern =
            longArrayOf(100, 200, 300, 400, 500, 400, 300, 200, 400)
        notificationManager?.createNotificationChannel(channel)
    }
}
The code declares and initializes a NotificationManager instance and then creates the new channel with a low important level (other options are high, low, max, min and none) with the name and description properties configured. A range of optional settings are also added to the channel to customize the way in which the user is alerted to the arrival of a notification. These settings apply to all notifications sent to this channel. Finally, the channel is created by passing the notification channel object through to the createNotificationChannel() method of the notification manager instance.
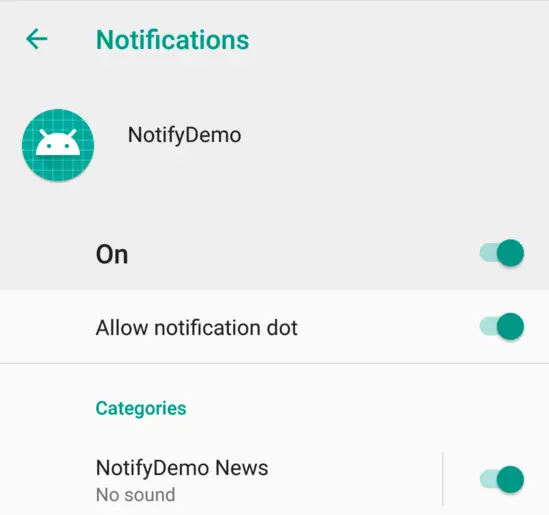
With the code changes complete, compile and run the app on a device or emulator running Android 8. After the app has launched, place it into the background and open the Setting app. Within the Settings app, select the Apps & notifications option followed by App info. On the App info screen locate and select the NotifyDemo project and, on the subsequent screen, tap the App notifications entry. The notification screen should list the NotifyDemo News category as being active for the user:
Although not a requirement for this example, it is worth noting that a channel can be deleted from with the app via a call to the deleteNotificationChannel() method of the notification manager, passing through the ID of the channel to be deleted:
val channelID = "com.ebookfrenzy.notifydemo.news"
notificationManager?.deleteNotificationChannel(channelID)
Creating and Issuing a Basic Notification
Notifications are created using the Notification.Builder class and must contain an icon, title and content. Open the NotifyDemoActivity.kt file and implement the sendNotification() method as follows to build a basic notification:
.
.
import android.app.Notification
import android.view.View
.
.
fun sendNotification(view: View) {

    val channelID = "com.ebookfrenzy.notifydemo.news"

    val notification = Notification.Builder(this@NotifyDemoActivity,
            channelID)
            .setContentTitle("Example Notification")
            .setContentText("This is an  example notification.")
            .setSmallIcon(android.R.drawable.ic_dialog_info)
            .setChannelId(channelID)
            .build()

}
Once a notification has been built, it needs to be issued using the notify() method of the NotificationManager instance. The code to access the NotificationManager and issue the notification needs to be added to the sendNotification() method as follows:
fun sendNotification(view: View) {

    val notificationID = 101

    val channelID = "com.ebookfrenzy.notifydemo.news"

    val notification = Notification.Builder(this@NotifyDemoActivity,
            channelID)
            .setContentTitle("Example Notification")
            .setContentText("This is an  example notification.")
            .setSmallIcon(android.R.drawable.ic_dialog_info)
            .setChannelId(channelID)
            .build()

    notificationManager?.notify(notificationID, notification)
}
Note that when the notification is issued, it is assigned a notification ID. This can be any integer and may be used later when updating the notification.
Compile and run the app and tap the button on the main activity. When the notification icon appears in the status bar, touch and drag down from the status bar to view the full notification:
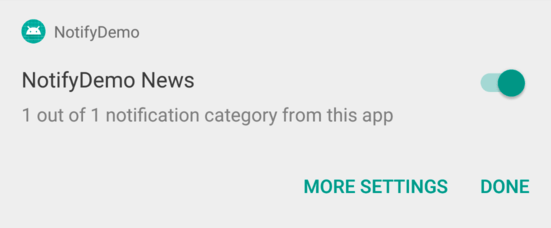
Click and slide right on the notification, then select the settings gear icon to view additional information about the notification:
Next, place the app in the background, navigate to the home screen displaying the launcher icons for all of the apps and note that a notification badge has appeared on the NotifyDemo launcher icon as indicated by the arrow in Figure 58-10:
Performing a long press over the launcher icon will display a popup containing the notification:
If more than one notification is pending for an app, the long press menu popup will contain a count of the number of notifications (highlighted in the above figure). This number may be configured from within the app by making a call to the setNumber() method when building the notification:
val notification = Notification.Builder(this@NotifyDemoActivity,
        channelID)
        .setContentTitle("Example Notification")
        .setContentText("This is an  example notification.")
        .setSmallIcon(android.R.drawable.ic_dialog_info)
        .setChannelId(channelID)
        .setNumber(10)
        .build()
As currently implemented, tapping on the notification has no effect regardless of where it is accessed. The next step is to configure the notification to launch an activity when tapped.
Launching an Activity from a Notification
A notification should ideally allow the user to perform some form of action, such as launching the corresponding app, or taking some other form of action in response to the notification. A common requirement is to simply launch an activity belonging to the app when the user taps the notification.
This approach requires an activity to be launched and an Intent configured to launch that activity. Assuming an app that contains an activity named ResultActivity, the intent would be created as follows:
val resultIntent = Intent(this, ResultActivity::class.java)
This intent needs to then be wrapped in a PendingIntent instance. PendingIntent objects are designed to allow an intent to be passed to other applications, essentially granting those applications permission to perform the intent at some point in the future. In this case, the PendingIntent object is being used to provide the Notification system with a way to launch the ResultActivity activity when the user taps the notification panel:
val pendingIntent = PendingIntent.getActivity(
                this,
                0,
                resultIntent,
                PendingIntent.FLAG_UPDATE_CURRENT)
All that remains is to assign the PendingIntent object during the notification build process using the setContentIntent() method.
Bringing these changes together results in a modified sendNotification() method which reads as follows:
.
.
import android.app.PendingIntent
import android.content.Intent
import android.graphics.drawable.Icon
.
.
class NotifyDemoActivity : AppCompatActivity() {

    fun sendNotification(view: View) {

        val notificationID = 101
        val resultIntent = Intent(this, ResultActivity::class.java)

        val pendingIntent = PendingIntent.getActivity(
                this,
                0,
                resultIntent,
                PendingIntent.FLAG_UPDATE_CURRENT
        )

        val channelID = "com.ebookfrenzy.notifydemo.news"

        val notification = Notification.Builder(this@NotifyDemoActivity,
                channelID)
                .setContentTitle("Example Notification")
                .setContentText("This is an  example notification.")
                .setSmallIcon(android.R.drawable.ic_dialog_info)
                .setChannelId(channelID)
                .setContentIntent(pendingIntent)
                .build()

        notificationManager?.notify(notificationID, notification)
    }
.
.
Compile and run the app once again, tap the button and display the notification drawer. This time, however, tapping the notification will cause the ResultActivity to launch.
Adding Actions to a Notification
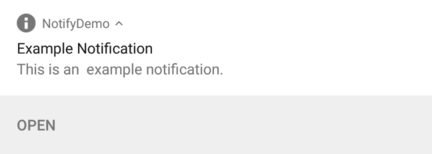
Another way to add interactivity to a notification is to create actions. These appear as buttons beneath the notification message and are programmed to trigger specific intents when tapped by the user. The following code, if added to the sendNotification() method, will add an action button labeled “Open” which launches the referenced pending intent when selected:
val icon: Icon = Icon.createWithResource(this, android.R.drawable.ic_dialog_info)

val action: Notification.Action =
        Notification.Action.Builder(icon, "Open", pendingIntent).build()

val notification = Notification.Builder(this@NotifyDemoActivity,
        channelID)
        .setContentTitle("Example Notification")
        .setContentText("This is an  example notification.")
        .setSmallIcon(android.R.drawable.ic_dialog_info)
        .setChannelId(channelID)
        .setContentIntent(pendingIntent)
        .setActions(action)
        .build()

notificationManager?.notify(notificationID, notification)
Add the above code to the method and run the app. Issue the notification and note the appearance of the Open action within the notification:
Tapping the action will trigger the pending intend and launch the ResultActivity.
Bundled Notifications
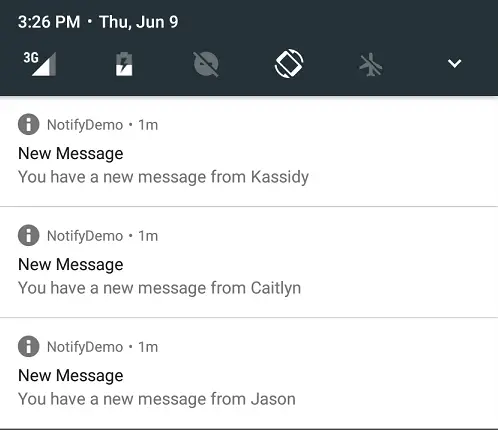
If an app has a tendency to regularly issue notifications there is a danger that those notifications will rapidly clutter both the status bar and the notification drawer providing a less than optimal experience for the user. This can be particularly true of news or messaging apps that send a notification every time there is either a breaking news story or a new message arrives from a contact. Consider, for example, the notifications in Figure 58-13:
Now imagine if ten or even twenty new messages had arrived. To avoid this kind of problem Android 7 allows notifications to be bundled together into groups.
To bundle notifications, each notification must be designated as belonging to the same group via the setGroup() method, and an additional notification must be issued and configured as being the summary notification. The following code, for example, creates and issues the three notifications shown in Figure 58-13 above, but bundles them into the same group. The code also issues a notification to act as the summary:
val GROUP_KEY_NOTIFY = "group_key_notify"

var builderSummary: Notification.Builder = Notification.Builder(this, channelID)
        .setSmallIcon(android.R.drawable.ic_dialog_info)
        .setContentTitle("A Bundle Example")
        .setContentText("You have 3 new messages")
        .setGroup(GROUP_KEY_NOTIFY)
        .setGroupSummary(true)

var builder1: Notification.Builder = Notification.Builder(this, channelID)
        .setSmallIcon(android.R.drawable.ic_dialog_info)
        .setContentTitle("New Message")
        .setContentText("You have a new message from Kassidy")
        .setGroup(GROUP_KEY_NOTIFY)

var builder2: Notification.Builder = Notification.Builder(this, channelID)
        .setSmallIcon(android.R.drawable.ic_dialog_info)
        .setContentTitle("New Message")
        .setContentText("You have a new message from Caitlyn")
        .setGroup(GROUP_KEY_NOTIFY)

var builder3: Notification.Builder = Notification.Builder(this, channelID)
        .setSmallIcon(android.R.drawable.ic_dialog_info)
        .setContentTitle("New Message")
        .setContentText("You have a new message from Jason")
        .setGroup(GROUP_KEY_NOTIFY)

var notificationId0 = 100
var notificationId1 = 101
var notificationId2 = 102
var notificationId3 = 103

notificationManager?.notify(notificationId1, builder1.build())
notificationManager?.notify(notificationId2, builder2.build())
notificationManager?.notify(notificationId3, builder3.build())
notificationManager?.notify(notificationId0, builderSummary.build())
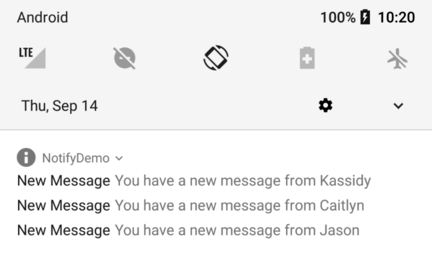
When the code is executed, a single notification icon will appear in the status bar even though four notifications have actually been issued by the app. Within the notification drawer, a single summary notification is displayed listing the information in each of the bundled notifications:
Pulling further downward on the notification entry expands the panel to show the details of each of the bundled notifications:
Summary
Notifications provide a way for an app to deliver a message to the user when the app is not running, or is currently in the background. Notifications appear in the status bar and notification drawer. Local notifications are triggered on the device by the running app while remote notifications are initiated by a remote server and delivered to the device. Local notifications are created using the NotificationCompat.Builder class and issued using the NotificationManager service.
As demonstrated in this chapter, notifications can be configured to provide the user with options (such as launching an activity or saving a message) by making use of actions, intents and the PendingIntent class. Notification bundling provides a mechanism for grouping together notifications to provide an improved experience for apps that issue a greater number of notifications.
