An iOS 10 Example SiriKit Messaging Extension
| Previous | Table of Contents | Next |
| An iOS 10 Example SiriKit Messaging Extension | Integrating Twitter and Facebook into iOS 10 Applications |
Learn SwiftUI and take your iOS Development to the Next Level |
In this, the final chapter focusing on SiriKit, an example project will be created that uses the Photo domain of SiriKit to allow the user to search for and display a photo taken on a specified date using Siri. In the process of designing this app, the tutorial will also demonstrate the use of the NSUserActivity class to allow processing of the intent to be transferred from the Intents Extension to the main iOS app.
About the SiriKit Photo Search Project
As the title of this chapter suggests, the project created in this tutorial is going to take the form of an app that uses the SiriKit Photo Search domain to locate photos in the Photo library. Specifically, the app will allow the user to use Siri to search for photos taken on a specific date. In the event that photos matching the date criteria are found, the main app will be launched and used to display the first photo taken on the chosen day.
Creating the SiriPhoto Project
Begin this tutorial by launching Xcode and selecting the options to create a Single View Application named SiriPhoto, using Swift as the programming language and with the Devices menu set to Universal.
Enabling the Siri Entitlement
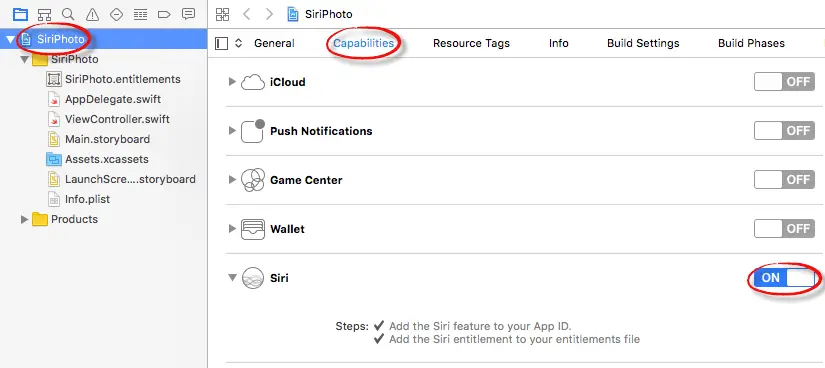
Once the main project has been created, the next step is to add the Siri entitlement to the list of capabilities enabled for the project. To achieve this, select the SiriPhoto target located at the top of the Project Navigator panel so that the main panel displays the project settings. From within this panel, select the Capabilities tab, locate the Siri entry and change the switch setting from Off to On as shown in Figure 102-1:
Figure 102-1
Once the Siri capability has been enabled for the project, an additional file named SiriPhoto.entitlements will have been added to the project.
Learn SwiftUI and take your iOS Development to the Next Level |
Obtaining Siri Authorization
In addition to enabling the Siri entitlement, the app must also seek authorization from the user to integrate the app with Siri. This is a two-step process which begins with adding an entry to the Info.plist file for the iOS app target for the NSSiriUsageDescription key with a corresponding string value explaining how the app makes use of Siri.
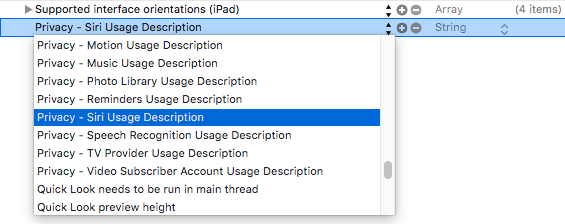
Select the Info.plist file, locate the bottom entry in the list of properties and hover the mouse pointer over the item. When the plus button appears, click on it to add a new entry to the list. From within the dropdown list of available keys, locate and select the Privacy – Siri Usage Description option as shown in Figure 102-2:
Figure 102-2
Within the value field for the property, enter a message to display to the user when requesting permission to use speech recognition. For example:
Siri support is used to perform photo searches.
Before closing the Info.plist file, now is also a convenient point to add an entry for the NSPhotoLibraryUsageDescription key, since the app will also need access to the photo library in order to search for images. Repeating the above steps, add a new entry for Privacy – Photo Library Usage Description with a suitable description string value. For example:
This app accesses your photo library to search and display photos.
In addition to adding the Siri usage description key, a call also needs to be made to the requestSiriAuthorization class method of the INPreferences class. The call will be made within the viewDidLoad method of the ViewController class. Edit the ViewController.swift file and modify it to import the Intents framework and to call the requestSiriAuthorization method:
import UIKit
import Intents

class ViewController: UIViewController {

    @IBOutlet weak var imageView: UIImageView!

    override func viewDidLoad() {
        super.viewDidLoad()

        INPreferences.requestSiriAuthorization({status in
            // Handle errors here
        })
    }
.
.
.
}
Before proceeding, compile and run the app on an iOS device. When the app loads, two consecutive dialogs will appear requesting authorization to use Siri and access the Photo Library. Select OK for both dialogs to provide authorization.
Designing the App User Interface
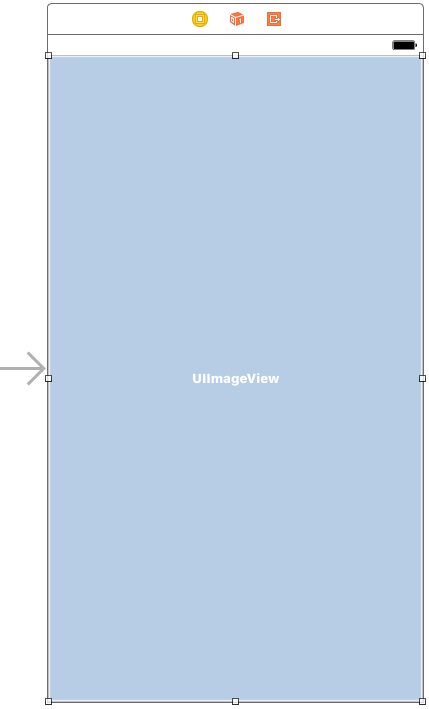
The user interface of the iOS app is going to consist solely of an ImageView which will be used to display the photo selected by the user. Select the Main.storyboard file from the Project Navigator panel and drag and drop an Image View object from the Object Library panel onto the scene canvas. Once added to the scene, resize the object so that it fills the entire screen (Figure 102-3):
Figure 102-3
Display the Auto Layout Resolve Auto Layout Issues menu and select the Reset to Suggested Constraints menu option located under the All Views in View Controller menu subheading. With the ImageView object selected, display the Attributes Inspector panel and change the Content Mode property to Aspect Fit.
In order to be able to assign an image to the Image View an outlet will be required. Display the Assistant Editor panel and establish an outlet connection from the Image View object named imageView.
Learn SwiftUI and take your iOS Development to the Next Level |
Adding the Intents Extension to the Project
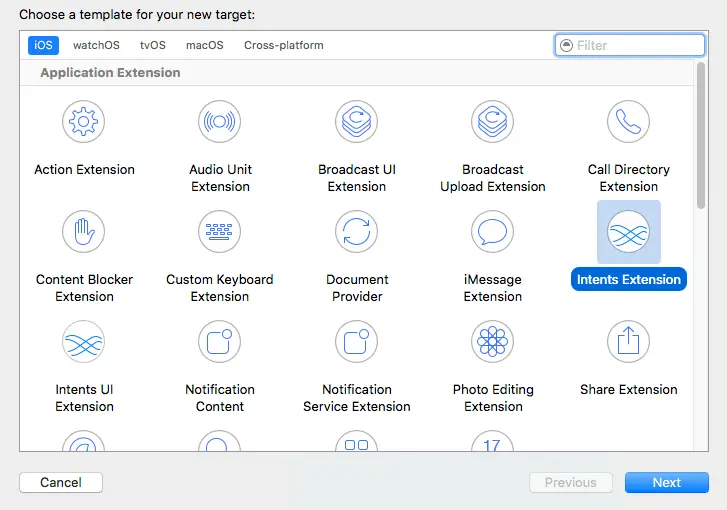
With some of the initial work on the iOS app complete, it is now time to add the Intents Extension to the project. Select Xcode’s File -> New -> Target… menu option to display the template selection screen. From the range of available templates, select the Intents Extension option as shown in Figure 102-4:
Figure 102-4
With the Intents Extension template selected, click on the Next button and enter SiriPhotoIntent into the Product Name field. Before clicking on the Finish button, turn off the Include UI Extension option (the UI Extension is not supported by the SiriKit Photo domain). When prompted to do so, enable the build scheme for the Intents Extension by clicking on the Activate button in the resulting panel.
Reviewing the Default Intents Extension
The files for the Intents Extension are located in the SiriPhotoIntent folder which will now be accessible from within the Project Navigator panel. Within this folder are an Info.plist file and a file named IntentHandler.swift. The IntentHandler.swift file contains the IntentHandler class declaration and has been preconfigured with the basic functionality for the example SiriKit message domain extension as covered in the previous chapter.
Modifying the Supported Intents
Currently we have an app which is intended to search for photos but is currently configured to send messages. Clearly some changes need to be made to implement the required functionality.
The first step is to configure the Info.plist file for the SiriPhotoIntent extension. Select this file and unfold the NSExtension settings until the IntentsSupported array is visible:
Figure 102-5
A review of the current values for this key will reveal that the extension is currently configured to handle intents associated with the SiriKit messages domain. This needs to be modified to support photo search intents. Change the string assigned to Item 0 to InSearchForPhotosIntent and then delete items 1 and 2. On completion of these steps the array should match that shown in Figure 102-6:
Figure 102-6
Modifying the IntentHandler Implementation
The IntentHandler class in the IntentHandler.swift file is currently declared as implementing message intent handling protocols. This now needs to be changed to indicate that the class is implementing photo search intent handling. Edit the IntentHandler.swift file and change the class declaration so it reads as follows:
import Intents

class IntentHandler: INExtension, INSearchForPhotosIntentHandling {
.
.
}
The only method currently implemented within the IntentHandler.swift file which can be reused for a Photo Search extension is the handler method. All of the other methods are specific to message handling and can be deleted from the file before continuing. On completion of this task, the file should read as follows:
Learn SwiftUI and take your iOS Development to the Next Level |
import Intents

class IntentHandler: INExtension, INSearchForPhotosIntentHandling {

    override func handler(for intent: INIntent) -> Any {
        return self
    }
}
The handler method is the entry point into the extension and is called by SiriKit when the user indicates that the SiriPhoto app is to be used to perform a task. When calling this method, SiriKit expects in return a reference to the object responsible for handling the intent. Since this will be the responsibility of the IntentHandler class, the handler method simply returns a reference to itself.
Implementing the Resolve Methods
SiriKit is aware of a range of parameters which can be used to specify photo search criteria. These parameters consist of the photo creation date, the geographical location where the photo was taken, the people in the photo and album in which it resides. For each of these parameters, SiriKit will call a specific resolve method on the IntentHandler instance. Each method is passed the current intent object and is required to notify Siri whether or not the parameter is required and, if so, whether the intent contains a valid property value. The methods are also passed a completion handler reference which must be called to notify Siri of the response.
The first method called by Siri is the resolveDateCreated method which should now be implemented in the IntentHandler.swift file as follows:
func resolveDateCreated(forSearchForPhotos
	intent: INSearchForPhotosIntent,
	with completion: @escaping
		(INDateComponentsRangeResolutionResult) -> Void) {

    if intent.dateCreated != nil {
        completion(INDateComponentsRangeResolutionResult.success(
			with: intent.dateCreated!))
    } else {
        completion(INDateComponentsRangeResolutionResult.needsValue())
    }
}
The method verifies that the dateCreated property of the intent object contains a value. In the event that it does, the completion handler is called indicating to Siri that the date requirement has been successfully met within the intent. In this situation, Siri will call the next resolve method in the sequence.
If no date has been provided the completion handler is called indicating the property is still needed. On receiving this response, Siri will ask the user to provide a date for the photo search. This process will repeat until either a date is provided or the user abandons the Siri session.
The SiriPhoto app is only able to search for photos by date. The remaining resolver methods can, therefore, be implemented simply to return notRequired results to Siri. This will let Siri know that values for these parameters do not need to be obtained from the user. Remaining within the IntentHandler.swift file, implement these methods as follows:
Learn SwiftUI and take your iOS Development to the Next Level |
func resolveAlbumName(forSearchForPhotos intent: INSearchForPhotosIntent,
    with completion: @escaping (INStringResolutionResult) -> Void) {
    completion(INStringResolutionResult.notRequired())
}

func resolvePeopleInPhoto(forSearchForPhotos intent:
     INSearchForPhotosIntent, with completion: @escaping ([INPersonResolutionResult]) -> Void) {
    completion([INPersonResolutionResult.notRequired()])
}

func resolveLocationCreated(forSearchForPhotos intent:
    INSearchForPhotosIntent, with completion: @escaping (INPlacemarkResolutionResult) -> Void) {
        completion(INPlacemarkResolutionResult.notRequired())
}
With these methods implemented, the resolution phase of the intent handling process is now complete.
Implementing the Confirmation Method
When Siri has gathered the necessary information for the user, a call is made to the confirm method of the intent handler instance. The purpose of this call is to provide the handler with an opportunity to check that everything is ready to handle the intent. In the case of the SiriPhoto app, there are no special requirements so the method can be implemented to reply with a ready status:
func confirm(searchForPhotos intent: INSearchForPhotosIntent,
	completion: @escaping (INSearchForPhotosIntentResponse) -> Void)
{
    let response = INSearchForPhotosIntentResponse(code: .ready,
		userActivity: nil)
    completion(response)
}
Handling the Intent
The last step in implementing the extension is to handle the intent. After the confirm method indicates that the extension is ready, Siri calls the handle method. This method is, once again, passed the intent object and a completion handler to be called when the intent has been handled by the extension. Implement this method now so that it reads as follows:
func handle(searchForPhotos intent: INSearchForPhotosIntent, completion: @escaping (INSearchForPhotosIntentResponse) -> Void) {

    let response = INSearchForPhotosIntentResponse(code:
		INSearchForPhotosIntentResponseCode.continueInApp,
			userActivity: nil)

    if intent.dateCreated != nil {
        let calendar = Calendar(identifier: .gregorian)
        let startDate = calendar.date(from:
		(intent.dateCreated?.startDateComponents)!)
        let endDate = calendar.date(from:
		(intent.dateCreated?.endDateComponents)!)

        response.searchResultsCount = photoSearchFrom(startDate!,
							to: endDate!)
    }
    completion(response)
}
The above code requires some explanation. The method begins by creating a new intent response instance and configures it with a code to let Siri know that the intent handling will be continued within the main SiriPhoto app. The userActivity argument to the method is set to nil, instructing SiriKit to create an NSUserActivity object on our behalf:
let response = INSearchForPhotosIntentResponse(code:
		INSearchForPhotosIntentResponseCode.continueInApp,
			userActivity: nil)
Learn SwiftUI and take your iOS Development to the Next Level |
if intent.dateCreated != nil {

    let calendar = Calendar(identifier: .gregorian)
    let startDate = calendar.date(from:
			(intent.dateCreated?.startDateComponents)!)
    let endDate = calendar.date(from:
		(intent.dateCreated?.endDateComponents)!)

        response.searchResultsCount = photoSearchFrom(startDate!,
							to: endDate!)
}
completion(response)
If the extension returns a zero count via the searchResultsCount property of the response object, Siri will notify the user that no photos matched the search criteria. If one or more photo matches were found, Siri will launch the main SiriPhoto app and pass it the NSUserActivity object.
The final step in implementing the extension is to add the photoSearchFrom(to:) method to the IntentHandler.swift file (note also that the Photos framework needs to be imported):
import Photos
.
.
.
func photoSearchFrom(_ startDate: Date, to endDate: Date) -> Int {

    let fetchOptions = PHFetchOptions()

    fetchOptions.predicate = NSPredicate(format: "creationDate > %@ AND creationDate < %@", startDate as CVarArg, endDate as CVarArg)
    let fetchResult = PHAsset.fetchAssets(with: PHAssetMediaType.image,
			options: fetchOptions)
    return fetchResult.count
}
The method makes use of the standard iOS Photos framework to perform a search of the Photo library. It begins by creating a PHFetchOptions object. A predicate is then initialized and assigned to the fetchOptions instance specifying that the search is looking for photos taken between the start and end dates.
Finally, the search for matching images is initiated, and the resulting count of matches returned.
Testing the App
Though there is still some work to be completed for the main SiriPhoto app, the Siri extension functionality is now ready to be tested. Within Xcode, make sure that SiriPhotoIntent is selected as the current target and click on the run button. When prompted for a host app, select Siri and click the run button.
When Siri has started listening, say the following:
“Find a photo with SiriPhoto”
Learn SwiftUI and take your iOS Development to the Next Level |
Handling the NSUserActivity Object
The intent handler in the extension has instructed Siri to continue the intent handling process by launching the main SiriPhoto app. When the app is launched by Siri it will be provided the NSUserActivity object for the session containing the intent object. When an app is launched and passed an NSUserActivity object, the continue userActivity method of the app delegate is called and passed the activity object.
Edit the AppDelegate.swift file for the SiriPhoto target and implement this method so that it reads as follows:
func application(_ application: UIApplication,
	continue userActivity: NSUserActivity,
	restorationHandler: @escaping ([Any]?) -> Void) -> Bool {

    let viewController =
		self.window?.rootViewController as! ViewController
    viewController.handleActivity(userActivity)
    return true
}
The method obtains a reference to the root view controller of the app and then calls a method named handleActivity on that controller, passing through the user activity object as an argument. Select the ViewController.swift file and implement the handleActivity method as follows:
func handleActivity(_ userActivity: NSUserActivity) {

    let intent = userActivity.interaction?.intent
			as! INSearchForPhotosIntent

    if (intent.dateCreated?.startDateComponents) != nil {
        let calendar = Calendar(identifier: .gregorian)
        let startDate = calendar.date(from:
		(intent.dateCreated?.startDateComponents)!)
        let endDate = calendar.date(from:
		(intent.dateCreated?.endDateComponents)!)
        displayPhoto(startDate!, endDate!)
    }
}
Learn SwiftUI and take your iOS Development to the Next Level |
func displayPhoto(_ startDate: Date, _ endDate: Date) {

    let fetchOptions = PHFetchOptions()

    fetchOptions.predicate = NSPredicate(format: "creationDate > %@ AND creationDate < %@", startDate as CVarArg, endDate as CVarArg)
    let fetchResult = PHAsset.fetchAssets(with:
		PHAssetMediaType.image, options: fetchOptions)

    let imgManager = PHImageManager.default()

    imgManager.requestImage(for: fetchResult.firstObject! as PHAsset,
		targetSize: view.frame.size,
		contentMode: PHImageContentMode.aspectFill,
		options: nil,
		resultHandler: { (image, _) in
        self.imageView.image = image
    })
}
The displayPhoto method performs the same steps used by the intent handler to search the Photo library based on the search date parameters. Once the search results have returned, however, the PHImageManager instance is used to retrieve the image from the library and display it on the Image View object.
Testing the Completed App
Run the SiriPhotoIntent extension, once again selecting Siri as the containing app. When Siri launches, perform a photo search and, assuming photos are available for selected day, wait for the main SiriPhoto app to load. When the app has loaded, the first photo taken on the specified date should appear within the Image View.
Summary
This chapter has worked through the creation of a simple app designed to use SiriKit to locate a photo taken on a particular date. The example has demonstrated the creation of an Intents Extension and the implementation of the intent handler methods necessary to interact with the Siri environment, including resolving missing parameters in the Siri intent. The project also explored the use of the NSUserActivity class to transfer the intent from the extension to the main iOS app.
Learn SwiftUI and take your iOS Development to the Next Level |
| Previous | Table of Contents | Next |
| An iOS 10 Example SiriKit Messaging Extension | Integrating Twitter and Facebook into iOS 10 Applications |


