Email/Password Authentication using FirebaseUI Auth
| Previous | Table of Contents | Next |
| Firebase User Authentication | Testing and Customizing FirebaseUI Auth Authentication |
With the basics of Firebase authentication covered in the previous chapter, this chapter will demonstrate the implementation of email/password based authentication within an Android app using the FirebaseUI Auth API. Subsequent chapters will extend this example to include Firebase user authentication using phone number verification, Google, Facebook and Twitter.
Creating the Example Project
The first step in this exercise is to create the new project. Begin by launching Android Studio and, if necessary, closing any currently open projects using the File -> Close Project menu option so that the Welcome screen appears.
Select the Start a new Android Studio project quick start option from the welcome screen and, within the new project dialog, enter FirebaseAuth into the Application name field and your domain as the Company Domain setting (or make up a fictitious domain for testing purposes) before clicking on the Next button.
On the form factors screen, enable the Phone and Tablet option and set the minimum SDK to API 16: Android 4.1 (Jellybean). Continue through the project setup screens, requesting the creation of an Empty Activity named FirebaseAuthActivity and a corresponding layout named activity_firebase_auth.
Connecting the Project to Firebase
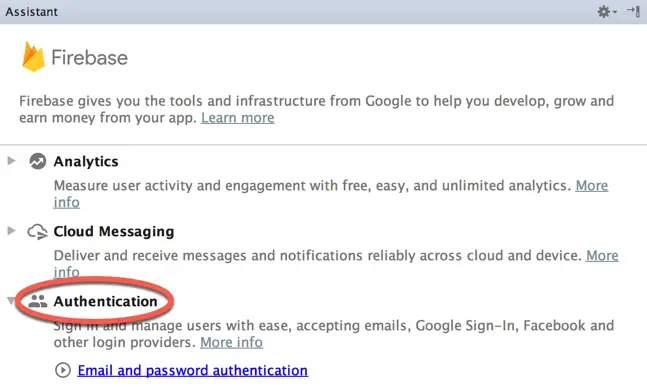
Before an Android Studio project can make use of the Firebase features, it must first be connected to a Firebase project using the Firebase assistant panel. Open the Firebase assistant by selecting the Tools -> Firebase menu option. When the Firebase assistant panel appears, locate and select the Authentication section as illustrated in Figure 4-1:
Figure 4-1
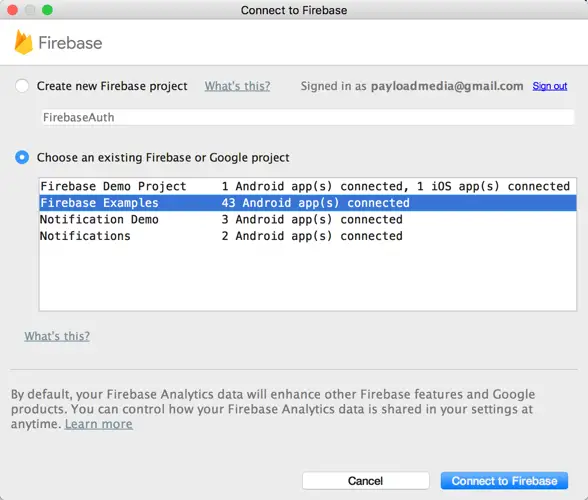
Click on the Email and password authentication link and, in the resulting panel, click on the Connect to Firebase button to display the Firebase connection dialog as shown in Figure 4-2 below.
Choose the option to store the app in an existing Firebase project and select the Firebase Examples project created in the Getting Started with Firebase chapter before clicking on the Connect to Firebase button:
Figure 4-2
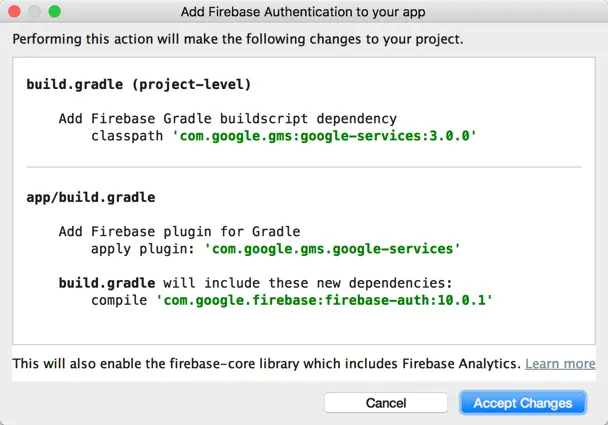
With the project’s Firebase connection established, refer to the Firebase assistant panel once again, this time clicking on the Add Firebase Authentication to your app button. A dialog will appear (Figure 4-3) outlining the changes that will be made to the project build configuration to enable Firebase authentication:
Figure 4-3
Click on the Accept Changes button to implement the changes to the project configuration.
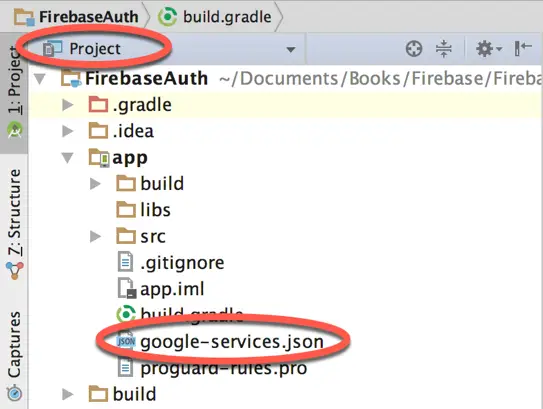
After these steps are complete, the FirebaseAuth project will have been added to the Firebase Examples project. The core Firebase libraries necessary for adding authentication have also been added to the build configuration. An additional configuration file has also been downloaded and added to the project. This file is named google-services.json and is located under FirebaseAuth -> app within the project tree structure. To access this file, switch the Project tool window into Project mode and navigate to the file as shown in Figure 4-4 below:
Figure 4-4
A review of the file content will reveal a wide range of Firebase client information that connects the app to the Firebase services including the project, app and client IDs, API keys and certificates. In general there is no need to manually edit this file. In the event that the file is deleted or corrupted, simply reconnect the app to Firebase using the Firebase assistant. Copies may also be downloaded from within the Firebase console.
Return the Project tool window to Android mode before proceeding.
Adding the FirebaseUI Project Dependencies
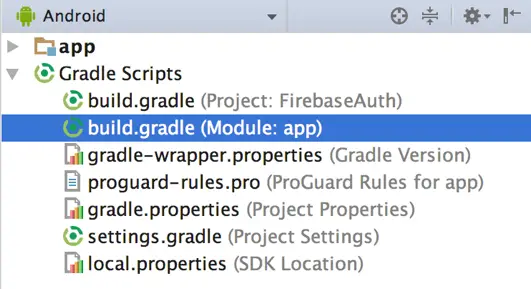
Since this project is going to make use of the FirebaseUI Auth API, two more dependencies need to be added to the module level build.gradle file for the project. Within the Project tool window, locate and double-click on the build.gradle (Module: app) file as shown in Figure 4-5 so that the file loads into the editor:
Figure 4-5
Once the Gradle file is open, modify the dependencies section to include the firebase-ui and firebase-ui-auth libraries (note that more recent versions of these libraries may have been released since this book was published):
dependencies {
    compile fileTree(dir: 'libs', include: ['*.jar'])
    androidTestCompile('com.android.support.test.espresso:espresso-core:2.2.2', {
        exclude group: 'com.android.support', module: 'support-annotations'
    })
    compile 'com.android.support:appcompat-v7:25.3.1'
    compile 'com.android.support.constraint:constraint-layout:1.0.2'
    compile 'com.google.firebase:firebase-auth:10.0.1'
    compile 'com.firebaseui:firebase-ui:2.0.1'
    compile 'com.firebaseui:firebase-ui-auth:2.0.1'
    testCompile 'junit:junit:4.12'
}
In addition to the FirebaseUI dependencies, the build system will also need to download some additional libraries in order to be able to support Twitter-based authentication. These libraries are available via Google’s Fabric.io platform and can be integrated into the Gradle build process for the project by adding a repository entry to the module level build.gradle file as follows:
.
.
.
    compile 'com.firebaseui:firebase-ui:2.0.1'
    compile 'com.firebaseui:firebase-ui-auth:2.0.1'
    testCompile 'junit:junit:4.12'
}

repositories {
    maven { url 'https://maven.fabric.io/public' }
}
.
.
Enabling Firebase Email/Password Authentication
Now that the Android Studio project has been configured to support Firebase authentication, some authentication settings need to be setup within the Firebase console. Open a browser window and navigate to your Firebase console at:
https://console.firebase.google.com/
Once signed into the Firebase console, select the Firebase Examples project from the list of available projects and note that the FirebaseAuth app has been added to the project.
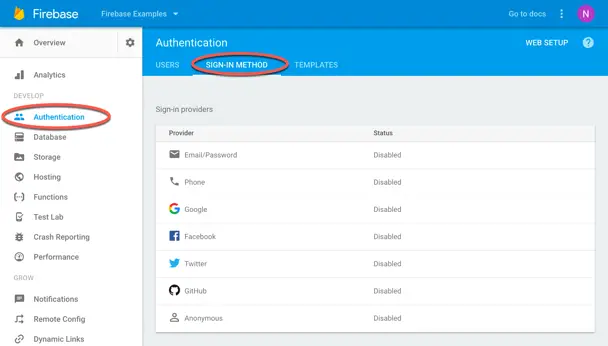
In the left-hand navigation panel, select the Authentication option and, in the resulting panel, select the Sign-In Methods tab as highlighted in Figure 4-6:
Figure 4-6
Note that by default none of the sign-in providers are enabled for apps residing within the Firebase Examples project. For the purposes of this example, only the Email/Password provider needs to be enabled. Click on the Email/Password entry in the providers list and turn on the Enabled switch when the settings dialog appears (Figure 4-7). Once the provider is enabled, click on the Save button to commit the change.
Figure 4-7
Adding the Signed-In Activity
The purpose of adding authentication to an app is to withhold access to functionality or content until a user’s identity has been established and verified. This means that areas of the app need to be inaccessible to the user until the authentication process has successfully completed. In this example project, the restricted area of the app will be represented by a second activity which is only presented after the user has signed in to the app.
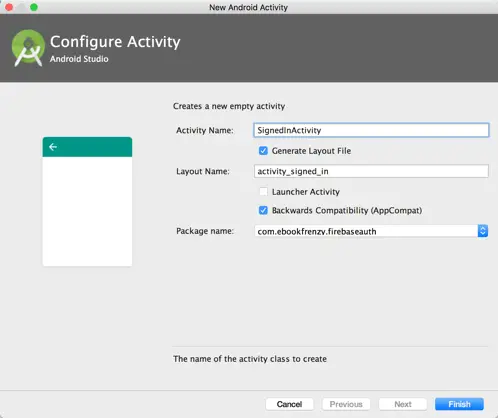
Add this second activity to the project now by locating the app -> java -> <yourdomain>.firebaseauth entry in the Project tool window and right-clicking on it. When the menu appears, select the New -> Activity -> Empty Activity menu option. In the New Android Activity dialog (Figure 4 8), name the activity SignedInActivity:
Figure 4-8
Before clicking on the Finished button, make sure that the Generate Layout File option is enabled and the Launcher Activity option disabled.
Designing the SignedInActivity Layout
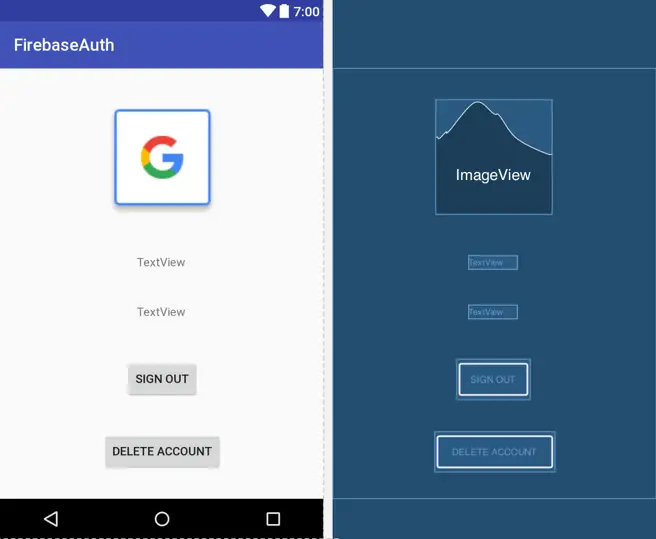
The user interface layout for the SignedInActivity is going to need to be able to display the user’s profile photo, email address and display name and also provide buttons for signing out of and deleting the account. Begin the design process by loading the activity_signed_in.xml file into the layout editor, turning off Autoconnect mode and adding and configuring widgets so that the layout matches Figure 4 9. When Android Studio requests an image to display on the ImageView, select the common_google_signin_btn_icon_dark icon from the list.
Figure 4-9
Select all five widgets, right-click on the ImageView and select Center Horizontally from the popup menu. Right-click on the ImageView again, this time selecting the Center Vertically menu option. The widgets should now be centered horizontally and constrained using a vertical chain configuration.
Using the Property tool window, change the IDs for the ImageView and two TextView widgets to imageView, email and displayname respectively. Also configure the two buttons to call onClick methods named signOut and deleteAccount.
Firebase Initialization Steps
Each time the app is launched, it will need to obtain an instance of the FirebaseAuth object and then check to verify whether the current user is already signed in to the app. If the user is already signed in, the app simply needs to launch SignedInActivity so that the user can interact with the app. In the event that the user has yet to sign in, the app will need to initiate the sign-in process.
Locate the FirebaseAuthActivty class within the Project tool window (app -> java -> <yourdomain>.firebaseauth -> FirebaseAuthActivity) and double click on it to load the Java file into the editor. Once loaded, modify the code so that it reads as follows:
package com.ebookfrenzy.firebaseauth;

import android.content.Intent;
import android.os.Bundle;
import android.support.v7.app.AppCompatActivity;

import com.google.firebase.auth.FirebaseAuth;

public class FirebaseAuthActivity extends AppCompatActivity {

    private FirebaseAuth auth;

    @Override
    protected void onCreate(Bundle savedInstanceState) {
        super.onCreate(savedInstanceState);
        setContentView(R.layout.activity_firebase_auth);

        auth = FirebaseAuth.getInstance();

        if (auth.getCurrentUser() != null) {
            startActivity(new Intent(this, SignedInActivity.class));
            finish();
        } else {
            authenticateUser();
        }
    }
}
The code has been implemented such that a method named authenticateUser() is called if the user is not currently signed in. Clearly the next step is to implement this method.
Initiating the Sign-in Process
It is the responsibility of the authenticateUser() method to present the user with options to sign into the app using existing email and password credentials, or to facilitate the creation of a new account if the user does not already have one. The authentication process also needs to take steps to verify that valid information has been entered and to allow the user to retrieve and reset a lost or forgotten password. In this example, all of these tasks will be performed for us by FirebaseUI Auth.
The code within the authenticateUser() method is going to use the createSignInIntentBuilder() method of the Firebase AuthUI instance to create a new intent object configured to meet the authentication requirements of our app. This intent will then be started using the startActivityForResult() method together with a request code that will be referenced when handling the activity result.
Remaining within the FirebaseAuthActivity.java file, implement the authenticateUser() method as follows:
package com.ebookfrenzy.firebaseauth;

import android.content.Intent;
import android.os.Bundle;
import android.support.v7.app.AppCompatActivity;

import com.firebase.ui.auth.AuthUI;

import com.firebase.ui.auth.ErrorCodes;
import com.firebase.ui.auth.IdpResponse;
import com.firebase.ui.auth.ResultCodes;
import com.google.firebase.auth.FirebaseAuth;

import java.util.ArrayList;
import java.util.List;

public class FirebaseAuthActivity extends AppCompatActivity {

    private FirebaseAuth auth;
    private static final int REQUEST_CODE = 101;

    private void authenticateUser() {
        startActivityForResult(
                AuthUI.getInstance().createSignInIntentBuilder()
                        .setAvailableProviders(getProviderList())
                        .setIsSmartLockEnabled(false)
                        .build(),
                REQUEST_CODE);
    }
.
.
}
In the above code, the list of sign-in providers to be supported by the app is obtained via a call to a method named getProviderList(). This method now needs to be implemented within the FirebaseAuthActivity class:
private List<AuthUI.IdpConfig> getProviderList() {

    List<AuthUI.IdpConfig> providers = new ArrayList<>();

    providers.add(
       new AuthUI.IdpConfig.Builder(AuthUI.EMAIL_PROVIDER).build());

    return providers;
}
For this chapter, only the email/password provider is needed, though additional providers such as Google, Facebook and Twitter will be added to the list in subsequent chapters.
Handling the Sign In Activity Result
The next task is to add some code to handle the result of the sign-in process after control is returned to the app from the AuthUI activity. When an activity is launched using the startActivityForResult() method, the result is passed to the originating activity via a call to the onActivityResult() method if it has been implemented. This method is passed the request code originally included in the start request (represented by the value assigned to the REQUEST_CODE constant in this example) together with a result code indicating whether the activity was successful. With the FirebaseAuthActivity.java file still in the editor, add the onActivityResult() method to the class so that it reads as follows:
@Override
protected void onActivityResult(int requestCode, int resultCode, Intent data) {
    super.onActivityResult(requestCode, resultCode, data);

    IdpResponse response = IdpResponse.fromResultIntent(data);

    if (requestCode == REQUEST_CODE) {

        if (resultCode == ResultCodes.OK) {
            startActivity(new Intent(this, SignedInActivity.class));
            return;
        }
    } else {
        if (response == null) {
            // User cancelled Sign-in
            return;
        }

        if (response.getErrorCode() == ErrorCodes.NO_NETWORK) {
            // Device has no network connection
            return;
        }

        if (response.getErrorCode() == ErrorCodes.UNKNOWN_ERROR) {
            // Unknown error occurred
            return;
        }
    }
}
The method begins by calling the superclass, then checks that the request code matches that referenced when the activity was started. This step is recommended to ensure that the handler is not being called in response to any other activities that may have been launched by the app. The response code is then extracted from the data, evaluated and, in the event that the sign-in process was successful, the SignedInActivity is launched giving the user access to the previously restricted area of the app. Tests have also been added to detect when the user cancelled the sign-in process or when the device does not have an active network connection
Handling the Sign-in
When the user has successfully signed in, the SignedInActivity activity is launched. For the purposes of this tutorial, this activity will simply display a subset of the information known about the user and the sign-in provider. The SignedInActivity layout is also designed to display the profile picture associated with the user’s account if one is available, though this will only be used in later chapters when Google, Facebook and Twitter sign-in support is added to the project. The layout also contains a button that allows the user to sign out of the app.
When the SignedInActivity activity starts, the FirebaseAuth object can be used to obtain a reference to the FirebaseUser object for the currently signed in user. It is from this object that details about the current user and sign-in provider can be obtained.
Locate the SignedInActivity.java class file within the project tool window and double click on it to load it into the code editor. Within the editor, modify the existing onCreate() method as follows:
package com.ebookfrenzy.firebaseauth;

import android.content.Intent;
import android.support.annotation.NonNull;
import android.support.v7.app.AppCompatActivity;
import android.os.Bundle;
import android.view.View;
import android.widget.TextView;

import com.firebase.ui.auth.AuthUI;
import com.google.android.gms.tasks.OnCompleteListener;
import com.google.android.gms.tasks.Task;
import com.google.firebase.auth.FirebaseAuth;
import com.google.firebase.auth.FirebaseUser;

public class SignedInActivity extends AppCompatActivity {

    @Override
    protected void onCreate(Bundle savedInstanceState) {
        super.onCreate(savedInstanceState);
        setContentView(R.layout.activity_signed_in);

        FirebaseUser currentUser =
		FirebaseAuth.getInstance().getCurrentUser();

        if (currentUser == null) {
            startActivity(new Intent(this, FirebaseAuthActivity.class));
            finish();
            return;
        }

        TextView email = (TextView) findViewById(R.id.email);
        TextView displayname = (TextView) findViewById(R.id.displayname);

        email.setText(currentUser.getEmail());
        displayname.setText(currentUser.getDisplayName());
    }
.
.
}
The code added to the onCreate() method performs a check to verify that the user is actually signed in and, if not, returns control to the original activity where the sign-in process will repeat. If, on the other hand, the user is signed in, a reference to the FirebaseUser instance for that user is obtained and used to access the email and display name. These values are then displayed on the TextView widgets in the user interface layout.
Signing Out
When the user interface layout for the SignedInActivity activity was designed earlier in this chapter, it included a button intended to allow the user to sign out of the app. This button was configured to call a method named signOut() when tapped by the user. Remaining in the SignedInActivity.java file, implement this method now so that it reads as follows:
public void signOut(View view) {
    AuthUI.getInstance()
            .signOut(this)
            .addOnCompleteListener(new OnCompleteListener<Void>() {
                @Override
                public void onComplete(@NonNull Task<Void> task) {
                    if (task.isSuccessful()) {
                        startActivity(new Intent(
				SignedInActivity.this,
				FirebaseAuthActivity.class));
                        finish();
                    } else {
                        // Report error to user
                    }
                }
            });
}
The method begins by calling the signOut() method of the AuthUI instance. The sign out process is handled asynchronously, so a completion handler is provided which will be called once the sign out is completed. In the case of a successful sign out, the user is returned to the main sign-in activity.
User Account Removal
The final task to be performed before testing the app is to implement the code for the Delete User button in the SignedInActivity layout. When added, this button was configured to call a method named deleteAccount() when tapped. The code for this method reads as follows and should now be added to the SignedInActivity.java file:
public void deleteAccount(View view) {
    AuthUI.getInstance()
            .delete(this)
            .addOnCompleteListener(new OnCompleteListener<Void>() {
                @Override
                public void onComplete(@NonNull Task<Void> task) {
                    if (task.isSuccessful()) {
                        startActivity(new Intent(SignedInActivity.this,
				 FirebaseAuthActivity.class));
                        finish();
                    } else {
                        // Notify user of error
                    }
                }
            });
}
As with the signing out process, the method begins by obtaining a reference to the AuthUI instance, this time making a call to the delete() method. The deletion process is, once again, an asynchronous task, requiring the provision of a completion handler to be called when the task completes. On a successful account deletion, the user is returned to the main activity.
With this task complete the example app is ready to be tested, an area that is covered in the next chapter entitled Testing and Customizing FirebaseUI Auth Authentication.
Summary
This chapter has provided a detailed tutorial to implementing email/password based authentication within an Android app using FirebaseUI Auth. FirebaseUI Auth provides a comprehensive, pre-built user authentication system including user interface and backend functionality that reduces the amount of code that needs to be written by the developer.
This authentication solution requires that a basic sequence of steps be performed consisting of connecting the Android Studio project to Firebase, adding Firebase build dependencies and enabling authentication for the project within the Firebase console. Once the configuration tasks are completed, the authentication process is initiated within the code of the Android app and listeners implemented to respond to results of the authentication process.
The next chapter, entitled Testing and Customizing FirebaseUI Auth Authentication, will focus on testing the app developed in this chapter and introduce some of the options available for customizing the user sign-in experience when using FirebaseUI Auth.
| Previous | Table of Contents | Next |
| Firebase User Authentication | Testing and Customizing FirebaseUI Auth Authentication |
