Marking Android Map Locations using Amazon Map Overlays
| Previous | Table of Contents | Next |
| A Kindle Fire Amazon Maps API Tutorial | An Overview of the Amazon In-App Purchasing API |
<google>BUY_KINDLE_FIRE</google>
The chapter entitled Working with the Amazon Maps API on the Kindle Fire included an overview of the concept of map overlays in the context of the Amazon Maps API. The previous chapter worked through the creation of an application that demonstrated the use of the MapView class to display a map centered at a specified geographical location. One key element missing from that example was a marker to designate that location on the map. This shortcoming will be addressed in this chapter by implementing a map overlay.
Creating the Map Overlay Class
Begin this tutorial by launching Eclipse and locating the MapExample project created in the previous chapter.
As outlined in Working with the Amazon Maps API on the Kindle Fire, the first step in working with map overlays is to subclass the ItemizedOverlay class. Right-click on the MapExample top-level item in the Eclipse Package Explorer panel and select the New -> Class menu option. In the resulting dialog, specify the package name for the application in the Package: field (or click in the text area and press Ctrl-space on the keyboard to use the Content Assist feature) and then, in the Name: field, enter MyMapOverlay.
Click on the Browse… button next to the Superclass: field and search for and select the ItemizedOverlay – com.example.geo.maps entry as the superclass. Finally, click Finish to add the new class to the project.
By default, Eclipse should automatically display the source code for the newly added MyMapOverlay.java class file, which should read as follows:
package com.example.mapexample;

import com.amazon.geo.maps.ItemizedOverlay;

public class MyMapOverlay extends ItemizedOverlay<Item> {

}
Now a set of mandatory methods needs to be added to the class to implement the overlay behavior:
package com.example.mapexample;

import java.util.ArrayList;

import android.app.AlertDialog;
import android.content.Context;
import android.graphics.drawable.Drawable;

import com.amazon.geo.maps.ItemizedOverlay;
import com.amazon.geo.maps.OverlayItem;

public class MyMapOverlay extends ItemizedOverlay<OverlayItem> {
    private ArrayList<OverlayItem> mOverlays =
             new ArrayList<OverlayItem>();
    Context mContext;

    public MyMapOverlay(Drawable marker) {
        super(boundCenterBottom(marker));
    }

    public MyMapOverlay(Drawable marker, Context context) {
        super(boundCenterBottom(marker));
        mContext = context;
    }

    public void addOverlay(OverlayItem overlay) {
        mOverlays.add(overlay);
        populate();
    }

    @Override
    protected OverlayItem createItem(int i) {
        return mOverlays.get(i);
    }

    @Override
    public int size() {
        return mOverlays.size();
    }

    @Override
    protected boolean onTap(int i) {

        OverlayItem item = mOverlays.get(i);
        AlertDialog.Builder dialog = new AlertDialog.Builder(mContext);
        dialog.setTitle(item.getTitle());
        dialog.setMessage(item.getSnippet());
        dialog.show();
        return true;
    }
}
These are largely standard implementations of these methods that can be used for most map overlays. They serve to ensure that items added to the overlay are handled correctly, that instances of the overlay can be created and passed an image to act as the marker and to display an alert dialog containing additional information when a marker is tapped by the user.
Adding the Drawable to the Project
When the overlay implementation is complete and the application runs, an image will appear at the location corresponding to the address entered by the user. Before this can happen, however, the image needs to be added to the project resources. The image used in this tutorial may be downloaded from the following URL:
http://www.ebookfrenzy.com/android_book/marker.png
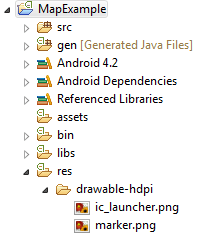
Once downloaded, return to Eclipse and unfold the res section of the project in the Package Explorer panel. Drag and drop the marker.png file onto the drawable-hdpi folder as shown in Figure 42-1:
Figure 42-1
Adding the Overlay to the MapView
All that remains is to add some code to the MyMapView class to implement the overlay. Edit the MyMapView.java class file and modify the onCreate() method as follows:
package com.example.mapexample;

import java.util.List;

import android.location.Address;
import android.os.Bundle;
import com.amazon.geo.maps.GeoPoint;
import com.amazon.geo.maps.MapActivity;
import com.amazon.geo.maps.MapController;
import com.amazon.geo.maps.MapView;
import com.amazon.geo.maps.Overlay;
import com.amazon.geo.maps.OverlayItem;
import android.graphics.drawable.Drawable;

public class MyMapView extends MapActivity {

	private static MapController mMapController;
	private static MapView mMapView;

	public void onCreate(Bundle savedInstanceState) {
        super.onCreate(savedInstanceState);
        setContentView(R.layout.my_map_view_layout);

        mMapView = (MapView) findViewById(R.id.mapview);
        mMapView.setBuiltInZoomControls(true);
        mMapController = mMapView.getController();

        Bundle extras = getIntent().getExtras();

        if (extras == null) {
		return;
        }

        Address address = (Address) extras.get("address");

        GeoPoint newLocation =
           new GeoPoint((int)(address.getLatitude() * 1E6),
                   (int)(address.getLongitude() *1E6));


	  List< Overlay > mapOverlays = mMapView.getOverlays();
        Drawable drawable =
			this.getResources().getDrawable(R.drawable.marker);

        MyMapOverlay newOverlay = new MyMapOverlay(drawable, this);

        OverlayItem overlayItem =
              new OverlayItem(newLocation, address.getAddressLine(0),
                     address.getAddressLine(1));

        newOverlay.addOverlay(overlayItem);
        mapOverlays.add(newOverlay);

        mMapController.setCenter(newLocation);
        mMapController.setZoom(18);
   }
.
.
}
The overlay code begins by obtaining a list of existing overlays assigned to the map view instance:
List< Overlay > mapOverlays = mMapView.getOverlays();
Next, a reference to the marker.png drawable resource is identified and used to create a new instance of our MyMapOverlay class:
Drawable drawable =
    this.getResources().getDrawable(R.drawable.marker);

MyMapOverlay newOverlay = new MyMapOverlay(drawable, this);
Each point on an overlay is represented by an OverlayItem instance. As such, a new OverlayItem instance is created and primed with the location of the marker and the first and second lines of the address (these are the strings that will appear in the alert dialog when the user taps on the marker in the map view):
OverlayItem overlayItem =
              new OverlayItem(newLocation, address.getAddressLine(0),
                     address.getAddressLine(1));
Finally, the OverlayItem is added to the instance of MyMapOverlay and then the new overlay is added to the list of existing overlays assigned to the map view so that it becomes visible:
newOverlay.addOverlay(overlayItem);
mapOverlays.add(newOverlay);
Testing the Application
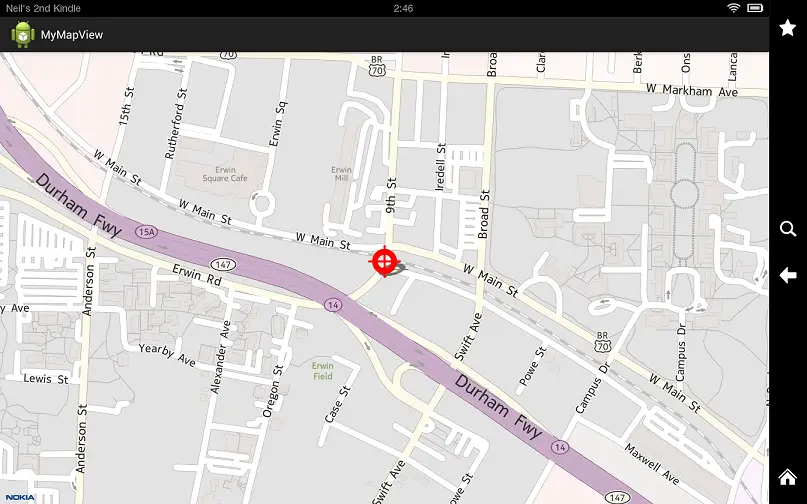
When the application is now compiled and run, the location corresponding to the address entered by the user will be marked on the map as illustrated in Figure 42 2:
Figure 42-2
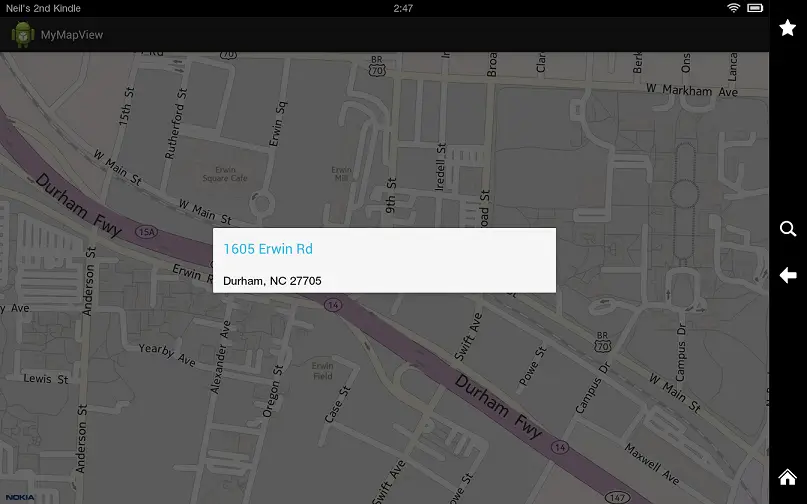
A tap gesture on the location marker will also display an alert dialog containing the first and second lines of the address:
Summary
This chapter has extended the example application created in the previous chapter to demonstrate the use of map overlays to place markers at specific locations on a map view.
<google>BUY_KINDLE_FIRE</google>
| Previous | Table of Contents | Next |
| A Kindle Fire Amazon Maps API Tutorial | An Overview of the Amazon In-App Purchasing API |


