Difference between revisions of "Creating Top-Level Menus in Visual Basic"
m (Text replacement - "<table border="0" cellspacing="0" width="100%">" to "<table border="0" cellspacing="0">") |
m (Text replacement - "<table border="0" cellspacing="0">" to "<table border="0" cellspacing="0" width="100%">") |
||
| Line 1: | Line 1: | ||
| − | <table border="0" cellspacing="0"> | + | <table border="0" cellspacing="0" width="100%"> |
<tr> | <tr> | ||
<td width="20%">[[Creating a Visual Basic MDI Form|Previous]]<td align="center">[[Visual Basic Essentials|Table of Contents]]<td width="20%" align="right">[[Creating Context Menus in Visual Basic|Next]]</td> | <td width="20%">[[Creating a Visual Basic MDI Form|Previous]]<td align="center">[[Visual Basic Essentials|Table of Contents]]<td width="20%" align="right">[[Creating Context Menus in Visual Basic|Next]]</td> | ||
Latest revision as of 20:00, 27 October 2016
| Previous | Table of Contents | Next |
| Creating a Visual Basic MDI Form | Creating Context Menus in Visual Basic |
| Purchase and download the fully updated Visual Basic 2010 edition of this eBook in PDF and ePub for only $9.99 |
Despite Microsoft's controversial move towards so called Ribbon based navigation, just about every other application still relies on menus to provide an easy way for users to navigate around a user interface. In fact, the jury is still out on whether Ribbon style interfaces of the type found in Microsoft Office 2007 are actually easier to use than menus.
Since it is almost impossible create an application without needing a menu of some sort, this chapter is dedicated entirely to the topic of creating top-level menus. The next chapter will cover(Creating Context Menus in Visual Basic). As you will see as we work through this topic, Visual Basic combined with Visual Studio make the creation of menus extremely easy.
Creating a Top-Level Menu
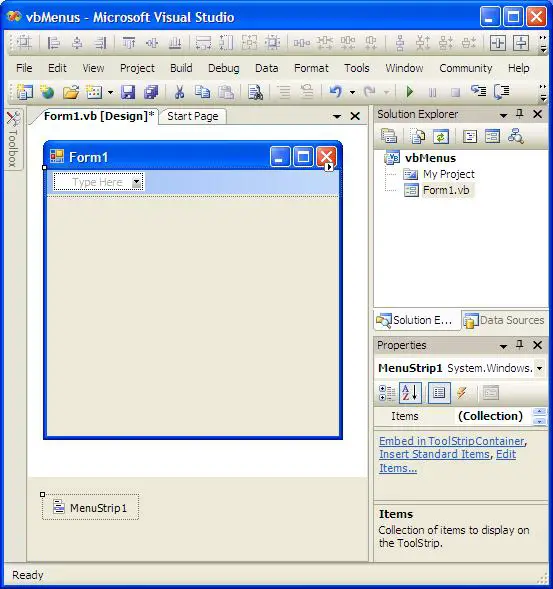
Top-level menus (the type of menus that run across the top of forms) are created using the Menu Strip control. The first step in creating a menu, therefore, is to add a Menu Strip control to the form. With your Visual Studio project loaded, and the Form to which you wish to add the menu selected, double click on the Menu Strip control in the Menus and Toolbars section of the Visual Studio Toolbox. You will notice that the Menu Strip object is added to the panel beneath the form, and that a Type Here field appears at the top of the form as follows:

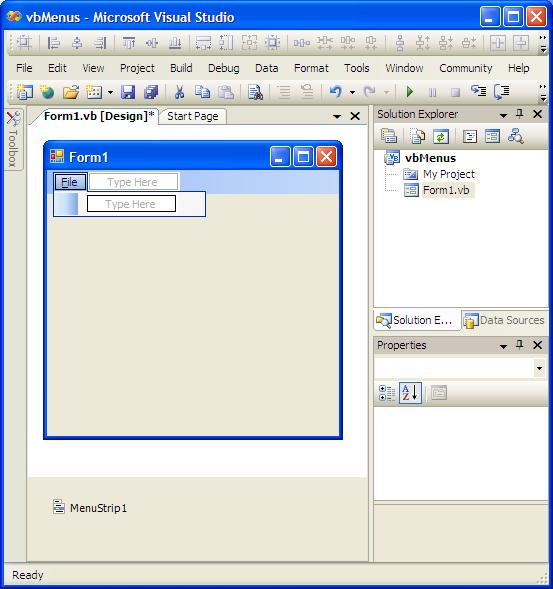
Use the Properties panel to change the name of the Menu Strip object to mainMenu. Click in the Type Here field at the top of the form and enter &File. This has the effect of creating a menu item object labeled "File". The ampersand (&) is added to instruct Visual Basic to use the 'F' at the beginning of the file as the accelerator key for this menu item. As such, pressing Alt+F when the application is running will be equivalent to clicking on the menu item with the mouse pointer. The location of the ampersand in the menu item Text property dictates the accelerator key. For example H&elp will declare 'e' as the accelerator for this particular menu item. Windows indicates the accelerator for a menu item by underlining the letter (as you will see by the underlined 'F' on your File menu item).
Once the File menu item has been added, Visual Studio will create both a drop down menu and a field to add another menu item as follows:
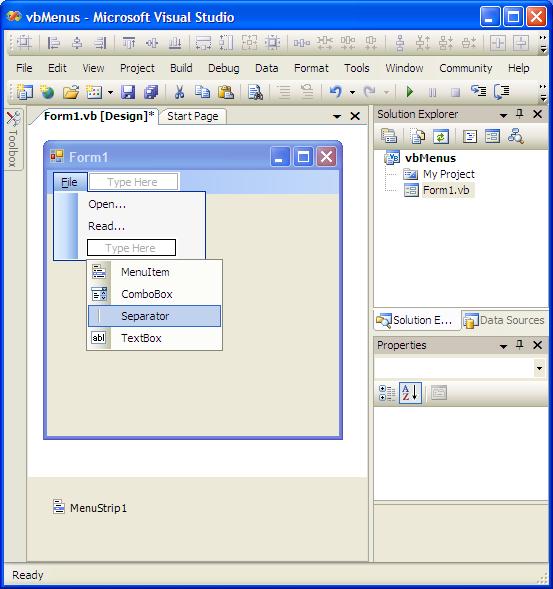
Click on the Type Here field and type &Open File.... When you have entered this text Visual Studio will add another Type Here field beneath the "Open File" entry. Click in this field and enter &Read File.... Once again, Visual Studio provides the opportunity to add another item. This time, however, we are going to add a different type of item to the menu. As you move the mouse pointer over the Type Here field, the field will highlight and a down arrow will appear to the right of the Type Here text. Clicking on this arrow drops down a menu of items to add to the menu:
The options available are as follows:
- MenuItem - Creates a sub-menu (also known as a pull-right menu) which essentially pops up a new menu to the right of the currently displayed menu.
- ComboBox - Adds a ComboBox control to the menu. Although you have the option of adding a ComboBox to your menu, you should resist the urge to do so. The placing of a ComboBox in a menu is not considered to be good user interface design.
- Separator - Places a separator after the last menu item to be added. Separators in menus are useful for distinguishing between groups of menu items.
- TextBox - Adds a TextBox control to the menu. As with the ComboBox, you should resist the temptation to add such a control to a menu as it violates GUI design convention.
For our example we will add a separator to our File menu. To do so, simply click on the separator option in the menu.
As the final entry in the File menu, add an E&xit item.
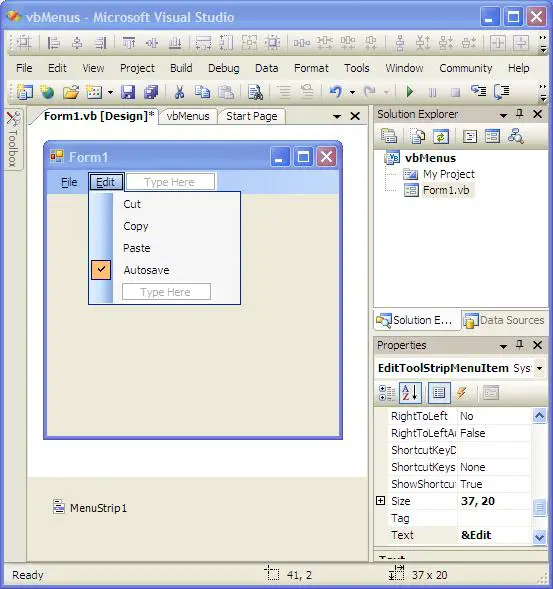
We will now create a second drop down menu. Click in the Type Here field next to the File menu and enter &Edit to create an Edit menu. Use the same technique outlined above to add Cut, Copy and Paste items to the Edit menu. Once completed the form layout should appear as follows:
The last task in creating our top-level menu is to add a Checked menu item. A checked menu item maintains state of being either set or unset. When a Checked item is set, a check mark appears and when they are unset the check mark disappears.
To create a Checked item in the menu enter Save on Exit in the Type Here field and then right click on the item to display the popup menu. From the menu, select Checked. The menu item will now be displayed with a check mark next to it. In the property panel for the checked menu item, change the Name property to SaveOnExitMenu.
The menu is now ready to be tested. Press the F5 key to build and run the application. When it appears, click on the File and Edit menus to confirm that they appear as you intended.
Deleting and Moving Menu Items
To delete a menu item in Visual Studio, simply right click on the item and select Delete from the popup menu. To move an item within the same menu, click and drag the item to the new position by holding down the mouse button. Release the button when the mouse pointer reaches the new location. To move an item from one menu to another, first right click over the menu item then select Cut from the popup menu. Next, click on the new menu to which you wish to move the item and, with the mouse position on the menu item you wish to appear below the new item, right click and select Paste.
Assigning Keyboard Shortcuts to Menu Items
It is conventional to allow menu items to be selected using the keyboard using what are known as keyboard shortcuts. These are key sequences that typically involve pressing a key whilst holding down the Ctrl, Alt or Shift key.
Keyboard shortcuts are defined by setting the ShortcutKeys property of a menu item object. For example, to configure the Exit menu item to use Ctrl-X select the menu item and click in the value field of the ShortcutKeys property in the Visual Studio Properties panel. A panel will appear providing the option to select Ctrl, Shift or Alt and also the key to be pressed in conjunction. Use this panel to configure the Ctrl+X key sequence for this menu item.
Programming Menu Items in Visual Basic
Now that we have designed a menu system in Visual Studio, the next step is to make the menu items do something when they are selected by a user. This is achieved using the event procedures of the individual menu options. We will demonstrate this using our example by wiring up the Exit menu option so that it closes the application, and by writing an event procedure for the Save on Exit menu option to change the checked status of the Checked menu item.
We will begin by writing a Visual Basic event procedure for when the Exit menu option is selected. In Visual Studio click on the File menu so that the menu drops down and double click on the Exit menu option. Visual Studio will subsequently display the Click event procedure for this menu item. All we need to do is add a Close() call to this procedure to exit the application:
Private Sub ExitToolStripMenuItem_Click(ByVal sender As System.Object, ByVal e As System.EventArgs)
            Handles ExitToolStripMenuItem.Click

        Close()

End Sub
Having made the appropriate change, press the F5 key to build and run the application. Selecting the Exit option from the File menu should now cause the application to close. Restart the application and try the Ctrl+X keyboard shortcut to Exit the application.
The final step is to write some Visual Basic code to change the setting of the SaveOnExitMenu object such that selecting the option in the menu changes the checked status. To achieve this, double click on the Save On Exit entry in the Edit menu to display the Click event procedure for this object. Enter the following Visual Basic code to invert the current setting of the Checked property of the SaveOnExitMenu object:
Private Sub SaveOnExitMenu_Click(ByVal sender As System.Object, ByVal e As System.EventArgs)
              Handles SaveOnExitMenu.Click

        SaveOnExitMenu.Checked = Not (SaveOnExitMenu.Checked)

End Sub
Press F5 to build and run the application once again. When Save on Exit is clicked, the checked status will change to either set or unset depending on the current setting.
| Purchase and download the fully updated Visual Basic 2010 edition of this eBook in PDF and ePub for only $9.99 |


