Difference between revisions of "Synchronizing iOS 9 Key-Value Data using iCloud"
(→Testing the Application) |
m (Text replacement - "<google>BUY_IOS9</google>" to "<htmlet>ios9</htmlet>") |
||
| Line 8: | Line 8: | ||
| − | < | + | <htmlet>ios9</htmlet> |
| Line 59: | Line 59: | ||
An application may register to be notified when stored values are changed by another application instance. This is achieved by setting up an observer on the NSUbiquitousKeyValueStoreDidChangeExternallyNotification notification. This notification is triggered when a change is made to any key-value pair in a specified key value store and is passed an array of strings containing the keys that were changed together with an NSNumber indicating the reason for the change. In the event that the available space for the key-value storage has been exceeded this number will match the NSUbiquitousKeyValueStoreQuotaViolationChange constant value. | An application may register to be notified when stored values are changed by another application instance. This is achieved by setting up an observer on the NSUbiquitousKeyValueStoreDidChangeExternallyNotification notification. This notification is triggered when a change is made to any key-value pair in a specified key value store and is passed an array of strings containing the keys that were changed together with an NSNumber indicating the reason for the change. In the event that the available space for the key-value storage has been exceeded this number will match the NSUbiquitousKeyValueStoreQuotaViolationChange constant value. | ||
| − | < | + | <htmlet>ios9</htmlet> |
== An iCloud Key-Value Data Storage Example == | == An iCloud Key-Value Data Storage Example == | ||
| Line 133: | Line 133: | ||
} | } | ||
</pre> | </pre> | ||
| − | < | + | <htmlet>ios9</htmlet> |
The method begins by allocating and initializing an instance of the NSUbiquitousKeyValueStore class and assigning it to the keyStore variable. Next, the stringForKey method of the keyStore object is called to check if the MyString key is already in the key-value store. If the key exists, the string value is assigned to the text property of the text field object via the textField outlet. | The method begins by allocating and initializing an instance of the NSUbiquitousKeyValueStore class and assigning it to the keyStore variable. Next, the stringForKey method of the keyStore object is called to check if the MyString key is already in the key-value store. If the key exists, the string value is assigned to the text property of the text field object via the textField outlet. | ||
| Line 186: | Line 186: | ||
| − | < | + | <htmlet>ios9</htmlet> |
Revision as of 20:34, 1 February 2016
| Previous | Table of Contents | Next |
| Using iCloud Storage in an iOS 9 Application | iOS 9 Database Implementation using SQLite |
Learn SwiftUI and take your iOS Development to the Next Level |
When considering the use of iCloud in an application it is important to note that the Apple ecosystem is not limited to the iOS platform. In fact, it also encompasses a range of Mac OS X based laptop and desktop computer systems, all of which have access to iCloud services. This increases the chance that a user will have the same app in one form or another on a number of different devices and platforms. Take, for the sake of an example, a hypothetical news magazine application. A user may have an instance of this application installed on both an iPhone and an iPad. If the user begins reading an article on the iPhone instance of the application and then switches to the same app on the iPad at a later time, the iPad application should take the user to the position reached in the article on the iPhone so that the user can resume reading.
This kind of synchronization between applications is provided by the Key-Value data storage feature of iCloud. The goal of this chapter is to provide an overview of this service and work through a very simple example of the feature in action in an iOS 9 application.
An Overview of iCloud Key-Value Data Storage
The primary purpose of iCloud Key-Value data storage is to allow small amounts of data to be shared between instances of applications running on different devices, or even different applications on the same device. The data may be synchronized as long as it is encapsulated in either an array, dictionary, string, NSDate, NSData, Boolean or NSNumber object.
iCloud data synchronization is achieved using the NSUbiquitousKeyValueStore class introduced as part of the iOS 5 SDK. Values are saved with a corresponding key using the setter method corresponding to the data type, the format for which is set<datatype> where <datatype> is replaced by the type of data to be stored (e.g. the setString method is used to save a string value). For example, the following code fragment creates an instance of an NSUbiquitousKeyValueStore object and then saves a string value using the key “MyString”:
var keyStore = NSUbiquitousKeyValueStore()
keyStore.setString("Saved String", forKey: "MyString")
Once key-value pairs have been saved locally they will not be synchronized with iCloud storage until a call is made to the synchronize method of the NSUbiquitousKeyValueStore method:
keyStore.synchronize()
It is important to note that a call to the synchronize method does not result in an immediate synchronization of the locally saved data with the iCloud store. iOS will, instead, perform the synchronization at what the Apple documentation refers to as “an appropriate later time”.
A stored value may be retrieved by a call to the appropriate method corresponding to the data type to be retrieved (the format of which is <datatype>forKey) and passing through the key as an argument. For example, the stored string in the above example may be retrieved as follows:
let storedString = keyStore.stringForKey("MyString")
Sharing Data Between Applications
As with iCloud document storage, key-value data storage requires the implementation of appropriate iCloud entitlements. In this case the application must have the com.apple.developer.ubiquity-kvstore-identifier entitlement key configured in the project’s entitlements file. The value assigned to this key is used to identify which applications are able to share access to the same iCloud stored key-value data.
If, for example, the ubiquity-kvstore-identifier entitlement key for an application named MyApp is assigned a value of ABCDE12345.com.mycompany.MyApp (where ABCDEF12345 is developer’s unique team or individual ID) then any other applications using the same entitlement value will also be able to access the same stored key-value data. This, by definition, will be any instance of the MyApp running on multiple devices, but applies equally to entirely different applications (for example MyOtherApp) if they also use the same entitlement value.
Data Storage Restrictions
iCloud key-value data storage is provided to meet the narrow requirement of performing essential synchronization between application instances, and the data storage limitations imposed by Apple clearly reflect this.
The amount of data that can be stored per key-value pair is 1MB. The per-application key-value storage limit is 1024 individual keys which, combined, must also not exceed 1MB in total.
Conflict Resolution
In the event that two application instances make changes to the same key-value pair, the most recent change is given precedence.
Receiving Notification of Key-Value Changes
An application may register to be notified when stored values are changed by another application instance. This is achieved by setting up an observer on the NSUbiquitousKeyValueStoreDidChangeExternallyNotification notification. This notification is triggered when a change is made to any key-value pair in a specified key value store and is passed an array of strings containing the keys that were changed together with an NSNumber indicating the reason for the change. In the event that the available space for the key-value storage has been exceeded this number will match the NSUbiquitousKeyValueStoreQuotaViolationChange constant value.
Learn SwiftUI and take your iOS Development to the Next Level |
An iCloud Key-Value Data Storage Example
The remainder of this chapter is devoted to the creation of an application that uses iCloud key-value storage to store a key with a string value using iCloud. In addition to storing a key-value pair, the application will also configure an observer to receive notification when the value is changed by another application instance.
Before starting on this project it is important to note that membership to the Apple Developer Program will be required as outlined in Joining the Apple Developer Program.
Begin the application creation process by launching Xcode and creating a new Single View Application project named iCloudKeys with the device menu set to Universal and Swift selected as the programming language.
Enabling the Application for iCloud Key Value Data Storage
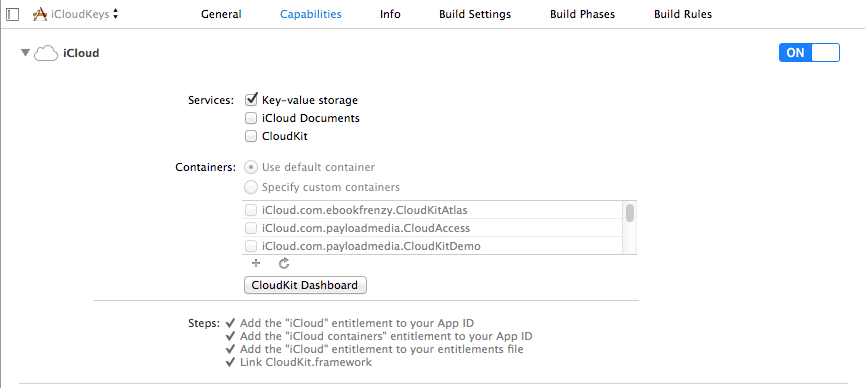
A mandatory step in the development of the application is to configure the appropriate iCloud entitlement. This is achieved by selecting the application target at the top of the Xcode project navigator panel and selecting the Capabilities tab in the main project settings panel. Switch on iCloud support and enable the Key-value storage option:
Figure 44-1
Once selected, Xcode will create an entitlements file for the project named iCloudKeys.entitlements containing the appropriate iCloud entitlements key-value pairs. Select the entitlements file from the project navigator and note the value assigned to the iCloud Key-Value Store key. By default this is typically comprised of your team or individual developer ID combined with the application’s Bundle identifier. Any other applications that use the same value for the entitlement key will share access to the same iCloud based key-value data stored by this application.
Designing the User Interface
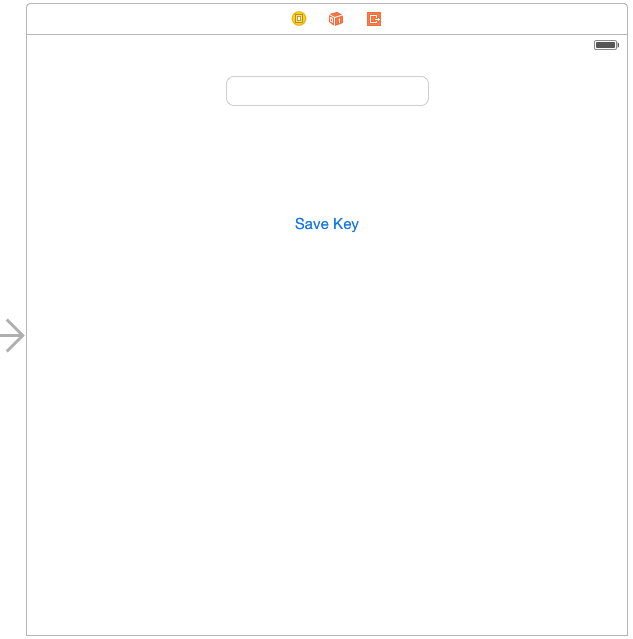
The application is going to consist of a text field into which a string may be entered by the user and a button which, when selected, will save the string to the application’s iCloud key-value data store. Select the Main.storyboard file, display the object library (View -> Utilities -> Show Object Library) and drag and drop the two objects into the view canvas. Double click on the button object and change the text to Store Key. The completed view should resemble Figure 44-2:
Figure 44-2
Click on the background View component in the layout, display the Resolve Auto Layout Issues menu and select the Reset to Suggested Constraints option listed under All Views in the View Controller.
Select the text field object in the view canvas, display the Assistant Editor panel and verify that the editor is displaying the contents of the ViewController.swift file. Ctrl-click on the text field object and drag to a position just below the class declaration line in the Assistant Editor. Release the line and in the resulting connection dialog establish an outlet connection named textField.
Finally, Ctrl-click on the button object and drag the line to the area immediately beneath the newly created outlet in the Assistant Editor panel. Release the line and, within the resulting connection dialog, establish an Action method on the Touch Up Inside event configured to call a method named saveKey.
Implementing the View Controller
In addition to the action and outlet references created above, an instance of the NSUbiquitousKeyStore class will be needed. Choose the ViewController.swift file, therefore, and modify it as follows:
class ViewController: UIViewController {

    var keyStore: NSUbiquitousKeyValueStore?

    @IBOutlet weak var textField: UITextField!
.
.
.
Modifying the viewDidLoad Method
The next step is to modify the viewDidLoad method of the view controller. Remaining within the ViewController.swift file, locate the viewDidLoad method and modify it so that it reads as follows:
override func viewDidLoad() {
    super.viewDidLoad()

    keyStore = NSUbiquitousKeyValueStore()

    let storedString = keyStore?.stringForKey("MyString")

    if let stringValue = storedString {
        textField.text = stringValue
    }

    NSNotificationCenter.defaultCenter().addObserver(self,
        selector: "ubiquitousKeyValueStoreDidChange:",
        name: NSUbiquitousKeyValueStoreDidChangeExternallyNotification,
        object: keyStore)
}
Learn SwiftUI and take your iOS Development to the Next Level |
Finally, the method sets up an observer to call the ubiquitousKeyValueStoreDidChange method when the stored key value is changed by another application instance.
Having implemented the code in the viewDidLoad method the next step is to write the ubiquitousKeyValueStoreDidChange method.
Implementing the Notification Method
Within the context of this example application the ubiquitousKeyValueStoreDidChange method, which is triggered when another application instance modifies an iCloud stored key-value pair, is provided to notify the user of the change via an alert message and to update the text in the text field with the new string value. The code for this method, which needs to be added to the ViewController.swift file is as follows:
func ubiquitousKeyValueStoreDidChange(notification: NSNotification) {

    let alert = UIAlertController(title: "Change detected",
            message: "iCloud key-value-store change detected",
        preferredStyle: UIAlertControllerStyle.Alert)

    let cancelAction = UIAlertAction(title: "OK",
            style: .Cancel, handler: nil)

    alert.addAction(cancelAction)
    self.presentViewController(alert, animated: true,
                completion: nil)
    textField.text = keyStore?.stringForKey("MyString")
}
Implementing the saveData Method
The final coding task involves implementation of the saveData action method. This method will be called when the user touches the button in the user interface and needs to be implemented in the ViewController.swift file:
@IBAction func saveKey(sender: AnyObject) {
    keyStore?.setString(textField.text, forKey: "MyString")
    keyStore?.synchronize()
}
The code for this method is quite simple. The setString method of the keyStore object is called, assigning the current text property of the user interface textField object to the “MyString” key. The synchronize method of the keyStore object is then called to ensure that the key-value pair is synchronized with the iCloud store.
Testing the Application
Click on the run button in the Xcode toolbar and, once the application is installed and running on the device or iOS Simulator, enter some text into the text field and touch the Store Key button. Stop the application from running by clicking on the stop button in the Xcode toolbar then re-launch by clicking the run button. When the application reloads, the text field should be primed with the saved value string.
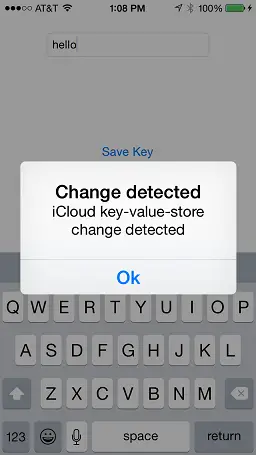
In order to test the change notification functionality, install the application on both a device and the iOS simulator. With the application running on both, change the text on the iOS Simulator instance and save the key. After a short delay the device based instance of the app will detect the change, display the alert and update the text field to the new value:
Figure 44-3
Learn SwiftUI and take your iOS Development to the Next Level |
| Previous | Table of Contents | Next |
| Using iCloud Storage in an iOS 9 Application | iOS 9 Database Implementation using SQLite |


