Difference between revisions of "An Android Studio Gradle Build Variants Example"
m (Text replacement - "<google>ADSDAQBOX_FLOW</google>" to "<htmlet>adsdaqbox_flow</htmlet>") |
m (Text replacement - "<table border="0" cellspacing="0">" to "<table border="0" cellspacing="0" width="100%">") |
||
| (5 intermediate revisions by the same user not shown) | |||
| Line 269: | Line 269: | ||
| + | |||
| + | <htmlet>ezoicbottom</htmlet> | ||
<hr> | <hr> | ||
<table border="0" cellspacing="0" width="100%"> | <table border="0" cellspacing="0" width="100%"> | ||
Latest revision as of 20:00, 27 October 2016
| Previous | Table of Contents | |
| An Overview of Gradle in Android Studio |
The goal of this chapter is to use the build variants feature of Android Studio to create a project which can be built in two flavors designed to target phone and tablet devices respectively. The build environment will be configured such that each flavor can be built using either a release or debug build type. The end result, therefore, will be four build variant options available for selection within Android Studio:
- phoneDebug
- phoneRelease
- tabletDebug
- tabletRelease
This raises the question as to the difference between a build type and a build flavor. In general, a build type defines how a module is built (for example whether or not ProGuard is run, how the resulting application package is signed and whether debug symbols are to be included).
The build flavor, on the other hand, typically defines what is built (such as which resource and source code files are to be included in the build) for each variant of the module. Initially the two flavors will be configured such that they differ only visually in terms of the resources that are used for each target such as layouts and string values. The project will then be further extended to provide an example of how each flavor might make use of different source code bases in order to provide differing application behavior.
Creating the Build Variant Example Project
Create a new project in Android Studio, entering BuildExample into the Application name field and ebookfrenzy.com as the Company Domain setting before clicking on the Next button.
On the form factors screen, enable the Phone and Tablet option and set the minimum SDK setting to API 19: Android 4.4 (KitKat). Continue to proceed through the screens, requesting the creation of a blank activity named BuildExampleActivity with the remaining fields set to the default values.
Adding the Build Flavors to the Module Build File
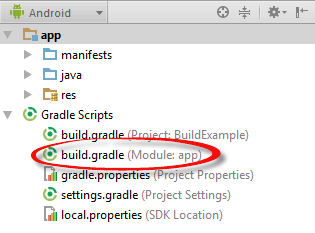
With the initial project created, the next step is to configure the module level build.gradle file to add the two build flavor configurations. Within the Android Studio Project tool window, navigate to the build.gradle file listed as app -> Gradle Scripts -> build.gradle (Module: app) (Figure 58-1) and double click on it to load it into the editor:

Figure 57-1
Once loaded into the editor, the build file should resemble the following listing:
apply plugin: 'com.android.application'

android {
    compileSdkVersion 21
    buildToolsVersion "21.1.2"

    defaultConfig {
        applicationId "com.ebookfrenzy.buildexample"
        minSdkVersion 19
        targetSdkVersion 21
        versionCode 1
        versionName "1.0"
    }
    buildTypes {
        release {
            minifyEnabled false
            proguardFiles getDefaultProguardFile('proguard-android.txt'), 'proguard-rules.pro'
        }
    }
}

dependencies {
    compile fileTree(dir: 'libs', include: ['*.jar'])
    compile 'com.android.support:appcompat-v7:21.0.3'
}
As previously outlined, the project is going to consist of two build types (release and debug) together with two flavors (phone and tablet). As is evident from the build file, the release build type is already declared in the file so this does not need to be added. In practice, Gradle is also using sensible default settings for the debug build so this type also does not need to be added to the file. All this leaves is the requirement to declare the two build flavors as follows:
apply plugin: 'com.android.application'

android {
    compileSdkVersion 19
    buildToolsVersion "19.1.0"

    defaultConfig {
        applicationId "com.ebookfrenzy.buildexample"
        minSdkVersion 15
        targetSdkVersion 19
        versionCode 1
        versionName "1.0"
    }
    buildTypes {
        release {
            runProguard false
            proguardFiles getDefaultProguardFile('proguard-android.txt'), 'proguard-rules.pro'
        }
    }
    productFlavors {
        phone {
            applicationId
            "com.ebookfrenzy.buildexample.app.phone"
            versionName "1.0-phone"
        }
        tablet {
            applicationId
            "com.ebookfrenzy.buildexample.app.tablet"
            versionName "1.0-tablet"
        }
    }
}

dependencies {
    compile fileTree(dir: 'libs', include: ['*.jar'])
}
Once the changes have been made, a yellow warning bar will appear across the top of the editor indicating that the changes to the Gradle build file need to be synchronized with the rest of the project. Click on the Sync Now link located in the warning panel to perform the synchronization.
Before proceeding to the next step, open the Build Variants tool window either using the quick access menu located in the status bar in the bottom left hand corner of the Android Studio main window or using the Build Variant tool window bar. Once loaded, clicking in the Build Variant cell for the app module should now list the four build variants:
Figure 57-2
Now that the build flavors have been added to the project the project structure needs to be extended to provide support for these two new flavors.
Adding the Flavors to the Project Structure
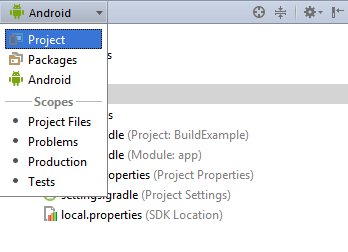
So far in this book we have been using the Android Studio Project tool window in Android mode. This mode presents a less cluttered view of the directory structure of a project. When working with build variants, however, it will be necessary to switch the window into Project mode so that we can gain access to all of the directory levels in the project. To switch mode, click on the Android menu at the top of the Project tool window and select Project from the list of options as outlined in Figure 58-3:
Figure 58-3
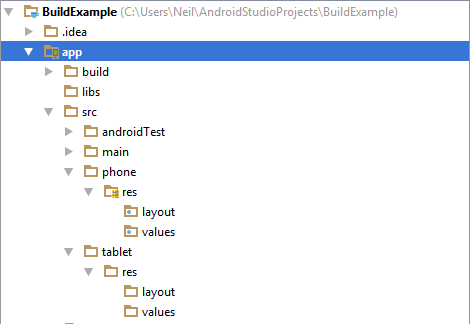
Within the Project tool window, right-click on the BuildExample -> app -> src directory and select the New -> Directory menu option and create a new directory named phone/res/layout. Right-click once again on the src directory, this time adding a new directory named phone/res/values.
Repeat these steps, this time naming the new directories tablet/res/layout and tablet/res/values. Once complete, the module section of the project structure should resemble that of Figure 57-4:
Figure 57-4
Adding Resource Files to the Flavors
Each flavor is going to need to contain a copy of the activity’s activity_build_example.xml and strings.xml resource files. Each copy will then be modified to meet the requirements of the respective flavor.
Within the Project tool window, navigate to the app -> src -> main -> res -> layout -> activity_build_example.xml file and double click on it to load it into the Designer tool. With the tool in Design mode, double click on the background of the screen layout and specify layout as the id of the relative layout view.
Using the same technique, add a copy of the src -> main -> res -> values –> strings.xml file to the src -> phone -> res -> values folder.
Once the resource files have been added, edit the strings.xml file in the phone flavor to change the hello_world string resource as follows:
<?xml version="1.0" encoding="utf-8"?>
<resources>

    <string name="app_name">BuildExample</string>
    <string name="hello_world">This is the phone flavor</string>
    <string name="action_settings">Settings</string>

</resources>
Change the Build Variant setting to tabletDebug and copy and paste the phone activity_build_example.xml and strings.xml files to the corresponding locations in the tablet res -> layout and res -> values folders respectively.
Edit the tablet flavor strings.xml file so that the hello_world string resource reads “This is the tablet flavor” and modify the layout in the activity_build_example.xml layout file so that the TextView is positioned in the center of the display.
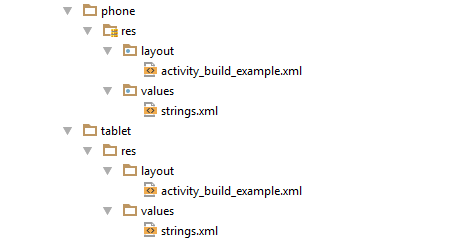
With the changes made, the flavor section of the project structure should now match that of Figure 57-5:
Figure 57-5
Testing the Build Flavors
At this point two flavors have been configured, each with different string and layout resources. Before moving on to the next step, it is important to check that the two build variants work as expected.
Within the Build Variants tool window, change the Build Variant setting for the app module to phoneDebug before running the application on a device or emulator. Once running, the phone flavor of the user interface should be displayed with the “This is the phone flavor” message displayed on the TextView object.
Change the build variant to tabletDebug and re-run the application once again, noting that this time the tablet flavor has been built with the “This is the tablet flavor” message positioned in the center of the display.
Build Variants and Class Files
As the project currently stands, the two flavors of the application share the main BuildExample activity class and all of the flavor changes have been made through resource files. Whilst much can be achieved through resource file modifications, it is inevitable that in many instances changes in the source code will be necessary from one flavor to the next. In the remainder of this chapter the main Activity class will be moved into the flavor variants so that different code bases can be used for each flavor.
Adding Packages to the Build Flavors
From this point on, each of the build flavors will have its own activity class file which can be customized to meet the requirements of the two different build targets.
Within the Build Variants tool window, begin by selecting the phoneDebug variant. Move to the Project tool window, right-click on the phone entry and select the New -> Directory menu option. Name the new directory java before clicking on the OK button.
Right-click on the new java directory, this time selecting the New -> Package menu option and naming the new package com.ebookfrenzy.buildexample. Finally, find the BuildExampleActivity class which is located in the src -> main -> java -> com.ebookfrenzy.buildexample folder, right-click on it and select the Copy menu option. Right-click on the new package added to the phone variant and select the Paste menu option to copy the Activity source file into the package. In the resulting Copy Class dialog click on the OK button to accept the default settings. The phone variant now has its own version of the activity class. Using the Build Variants tool window, change the build variant to tabletDebug and repeat the above steps to add instances of the package and Activity class file to the tablet flavor of the build.
At this point, Android Studio will most likely have started to complain about duplicate instances of the BuildExampleActivity class. This is because in addition to having the class declared within the flavor variants, the original instance still exists within the main build folder. Locate, therefore, and delete the BuildExampleActivity entry listed under src -> main -> java -> com.ebookfrenzy.buildexample.
Customizing the Activity Classes
With phoneDebug selected in the Build Variants tool window, load the phone -> java -> com.ebookfrenzy.buildexample -> BuildExampleActivity class file into the editing window and modify the onCreate method to change the background color of the RelativeLayout to red:
package com.ebookfrenzy.buildexample;

import android.support.v7.app.ActionBarActivity;
import android.graphics.Color;
import android.os.Bundle;
import android.view.Menu;
import android.view.MenuItem;
import android.widget.RelativeLayout;

public class BuildExampleActivity extends Activity {

    @Override
    protected void onCreate(Bundle savedInstanceState) {
        super.onCreate(savedInstanceState);
        setContentView(R.layout.activity_build_example);
        RelativeLayout myLayout =
              (RelativeLayout) findViewById(R.id.layout);
        myLayout.setBackgroundColor(Color.RED);
    }
.
.
.
}
Change the build variant to tabletDebug and modify the tablet -> java -> com.ebookfrenzy.buildexample -> BuildExampleActivity class file to change the background color of the layout to green:
package com.ebookfrenzy.buildexample;

import android.support.v7.app.ActionBarActivity;
import android.graphics.Color;
import android.os.Bundle;
import android.view.Menu;
import android.view.MenuItem;
import android.widget.RelativeLayout;

public class BuildExampleActivity extends Activity {

    @Override
    protected void onCreate(Bundle savedInstanceState) {
        super.onCreate(savedInstanceState);
        setContentView(R.layout.activity_build_example);
        RelativeLayout myLayout =
              (RelativeLayout) findViewById(R.id.layout);
        myLayout.setBackgroundColor(Color.GREEN);
    }
.
.
.
}
Compile and run the application using each variant and note that the background color changes to indicate that each flavor is using its own activity class file in addition to different resource files.
Summary
The Android market now comprises a diverse range of devices all of which have different hardware capabilities and screen sizes. While there is much that can be achieved with careful use of layout managers such as the RelativeLayout and defensive coding, there will inevitably be situations where some target devices will need a separate application package to be built. In recognition of this fact, Android Studio introduces the concept of build variants and flavors designed specifically to make the task of building multiple variations of an application project easier to manage.
| Previous | Table of Contents | |
| An Overview of Gradle in Android Studio |


