Difference between revisions of "An Example SQLite based iOS 9 Application using Swift and FMDB"
m (Text replacement - "<hr> <table border=" to "<htmlet>ezoicbottom</htmlet> <hr> <table border=") |
m (Text replacement - "<table border="0" cellspacing="0">" to "<table border="0" cellspacing="0" width="100%">") |
||
| Line 1: | Line 1: | ||
| − | <table border="0" cellspacing="0"> | + | <table border="0" cellspacing="0" width="100%"> |
<tr> | <tr> | ||
<td width="20%">[[iOS 9 Database Implementation using SQLite|Previous]]<td align="center">[[iOS 9 App Development Essentials|Table of Contents]]<td width="20%" align="right">[[Working with iOS 9 Databases using Core Data|Next]]</td> | <td width="20%">[[iOS 9 Database Implementation using SQLite|Previous]]<td align="center">[[iOS 9 App Development Essentials|Table of Contents]]<td width="20%" align="right">[[Working with iOS 9 Databases using Core Data|Next]]</td> | ||
| Line 241: | Line 241: | ||
<htmlet>ezoicbottom</htmlet> | <htmlet>ezoicbottom</htmlet> | ||
<hr> | <hr> | ||
| − | <table border="0" cellspacing="0"> | + | <table border="0" cellspacing="0" width="100%"> |
<tr> | <tr> | ||
<td width="20%">[[iOS 9 Database Implementation using SQLite|Previous]]<td align="center">[[iOS 9 App Development Essentials|Table of Contents]]<td width="20%" align="right">[[Working with iOS 9 Databases using Core Data|Next]]</td> | <td width="20%">[[iOS 9 Database Implementation using SQLite|Previous]]<td align="center">[[iOS 9 App Development Essentials|Table of Contents]]<td width="20%" align="right">[[Working with iOS 9 Databases using Core Data|Next]]</td> | ||
Latest revision as of 19:57, 27 October 2016
| Previous | Table of Contents | Next |
| iOS 9 Database Implementation using SQLite | Working with iOS 9 Databases using Core Data |
Learn SwiftUI and take your iOS Development to the Next Level |
In the chapter entitled iOS 9 Database Implementation using SQLite the basic concepts of integrating a SQLite based database into iOS 9 applications were discussed. In this chapter we will put this knowledge to use by creating a simple example application that demonstrates SQLite-based database implementation and management on iOS 9 using Swift and the FMDB wrapper.
About the Example SQLite Application
The focus of this chapter is the creation of a somewhat rudimentary iOS application that is designed to store contact information (names, addresses and telephone numbers) in a SQLite database. In addition to data storage, a feature will also be implemented to allow the user to search the database for the address and phone number of a specified contact name. Some knowledge of SQL and SQLite is assumed throughout the course of this tutorial. Those readers unfamiliar with these technologies in the context of iOS application development are encouraged to first read the previous chapter before proceeding.
Creating and Preparing the SQLite Application Project
Begin by launching the Xcode environment and creating a new iOS Single View Application project named Database configured for Swift and with the Devices menu set to Universal.
Once the project has been created, the next step is to configure the project to include the SQLite dynamic library (libsqlite3.tbd) during the link phase of the build process. Failure to include this library will result in build errors.
To add this library, select the target entry in the Xcode project navigator (the top entry with the product name) to display the General information panel. Select the Build Phases tab to display the build information. The Link Binary with Libraries section lists the libraries and frameworks already included in the project. To add another library or framework click on the ‘+’ button to display the full list. From this list search for, and then select libsqlite3.tbd and click Add.
Checking Out the FMDB Source Code
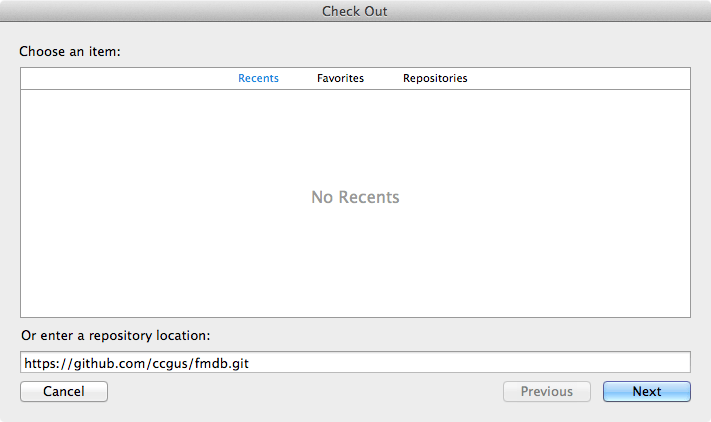
In order to use FMDB, the source files for the wrapper will need to be added to the project. The source code for FMDB is stored on the GitHub source code repository and can be downloaded directly onto your development system from within Xcode (a process referred to as checking out). Begin by selecting the Xcode Source Control -> Check Out… menu option to display the Check Out dialog:
Figure 46-1
In the dialog, enter the following GitHub URL into the repository location field and click on Next:
https://github.com/ccgus/fmdb.git
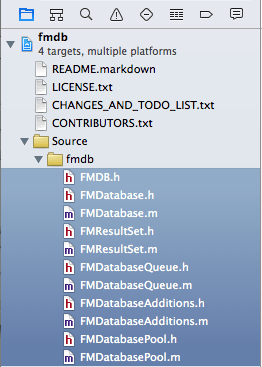
When the list of branches appears in the dialog, select master and click on Next once again. Choose a location on your local file system into which the files are to be checked out before clicking on the Check Out button. Xcode will check out the files and save them at the designated location. A new Xcode project window will also open containing the FMDB source files. Within the project navigator panel, unfold the fmdb -> Source -> fmdb folder to list the source code files (highlighted in Figure 46-2) for the FMDB wrapper.
Figure 46-2
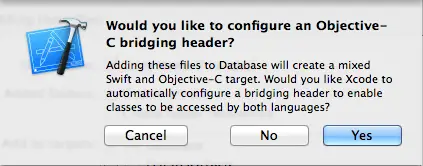
Shift-click on the first and last of the files in the fmdb folder to select all of the .h and .m files in the navigator panel and drag and drop them onto the Database project folder in the Xcode window containing the Database project. On the options panel click on the Finish button. Since these files are written in Objective-C rather than Swift, Xcode will offer to configure and add an Objective-C bridging header file as shown in Figure 46-3:
Figure 46-3
Click on the Yes button to add the bridging file. Once added, it will appear in the Supporting Files folder of the project with the name Database-Bridging-Header.h. Select this file and edit it to add a single line to import the FMDB.h file:
#import "FMDB.h"
With the project fully configured to support SQLite from within Swift application projects, the remainder of the project may now be completed.
Designing the User Interface
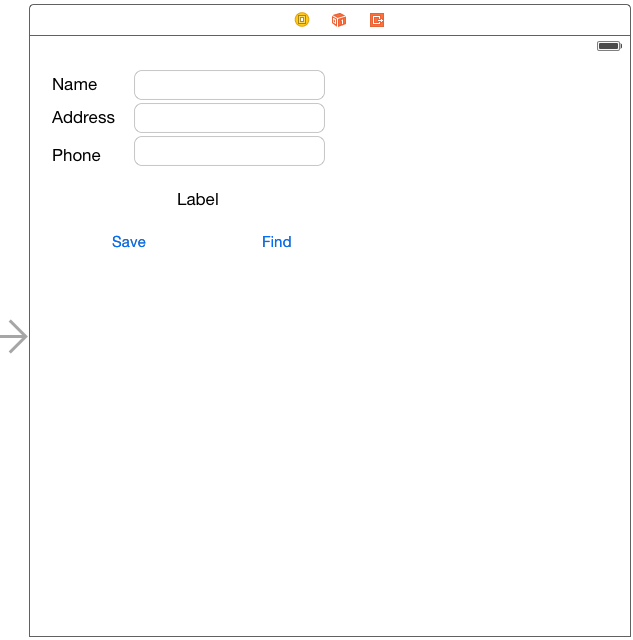
The next step in developing our example SQLite iOS application involves the design of the user interface. Begin by selecting the Main.storyboard file to edit the user interface and drag and drop components from the Object Library (View -> Utilities -> Show Object Library) onto the view canvas and edit properties so that the layout appears as illustrated in Figure 46-4:
Figure 46-4
Before proceeding, stretch the status label (located above the two buttons) so that it is the same width as the combined labels and text field views and change the text alignment in the Attributes Inspector so that it is centered. Finally, edit the label and remove the word “Label” so that it is blank.
Select the top most text field object in the view canvas, display the Assistant Editor panel and verify that the editor is displaying the contents of the ViewController.swift file. Ctrl-click on the text field object again and drag to a position just below the class declaration line in the Assistant Editor. Release the line and in the resulting connection dialog establish an outlet connection named name. Repeat the above steps to establish outlet connections for the remaining text fields and the label object to properties named address, phone and status respectively.
Ctrl-click on the Save button object and drag the line to the area immediately beneath the existing viewDidLoad method in the Assistant Editor panel. Release the line and, within the resulting connection dialog, establish an Action method on the Touch Up Inside event configured to call a method named saveData. Repeat this step to create an action connection from the Find button to a method named findContact.
Close the Assistant Editor panel, select the ViewController.swift file and add a variable to store a reference to the database path:
class ViewController: UIViewController {

    @IBOutlet weak var name: UITextField!
    @IBOutlet weak var address: UITextField!
    @IBOutlet weak var phone: UITextField!
    @IBOutlet weak var status: UILabel!

    var databasePath = NSString()

    override func viewDidLoad() {
        super.viewDidLoad()

    }

    @IBAction func saveData(sender: AnyObject) {
    }

    @IBAction func findContact(sender: AnyObject) {
    }
.
.
}
Creating the Database and Table
When the application is launched it will need to check whether the database file already exists and, if not, create both the database file and a table within the database in which to store the contact information entered by the user. The code to perform this task can be placed in the viewDidLoad method of our view controller class. Select the ViewController.swift file, scroll down to the viewDidLoad method and modify it as follows:
override func viewDidLoad() {
    super.viewDidLoad()

    let filemgr = NSFileManager.defaultManager()
    let dirPaths = filemgr.URLsForDirectory(.DocumentDirectory, inDomains: .UserDomainMask)

    databasePath = dirPaths[0].URLByAppendingPathComponent("contacts.db").path!


    if !filemgr.fileExistsAtPath(databasePath as String) {

        let contactDB = FMDatabase(path: databasePath as String)

        if contactDB == nil {
            print("Error: \(contactDB.lastErrorMessage())")
        }

        if contactDB.open() {
            let sql_stmt = "CREATE TABLE IF NOT EXISTS CONTACTS (ID INTEGER PRIMARY KEY AUTOINCREMENT, NAME TEXT, ADDRESS TEXT, PHONE TEXT)"
            if !contactDB.executeStatements(sql_stmt) {
                print("Error: \(contactDB.lastErrorMessage())")
            }
            contactDB.close()
        } else {
            print("Error: \(contactDB.lastErrorMessage())")
        }
    }
}
The code in the above method performs the following tasks:
- Identifies the application’s Documents directory and constructs a path to the contacts.db database file.
- Checks if the database file already exists.
- If the file does not yet exist the code creates the database by creating an FMDatabase instance initialized with the database file path. If the database creation is successful it is then opened via a call to the open method of the new database instance.
- Prepares a SQL statement to create the contacts table in the database and executes it via a call to the FMDB executeStatements method of the database instance.
- Closes the database
Implementing the Code to Save Data to the SQLite Database
The saving of contact data to the database is the responsibility of the saveData action method. This method will need to open the database file, extract the text from the three text fields and construct and execute a SQL INSERT statement to add this data as a record to the database. Having done this, the method will then need to close the database.
In addition, the code will need to clear the text fields ready for the next contact to be entered, and update the status label to reflect the success or failure of the operation.
In order to implement this behavior, therefore, we need to modify the template method created previously as follows:
@IBAction func saveData(sender: AnyObject) {
    let contactDB = FMDatabase(path: databasePath as String)

    if contactDB.open() {

        let insertSQL = "INSERT INTO CONTACTS (name, address, phone) VALUES ('\(name.text!)', '\(address.text!)', '\(phone.text!)')"

        let result = contactDB.executeUpdate(insertSQL,
            withArgumentsInArray: nil)

        if !result {
            status.text = "Failed to add contact"
            print("Error: \(contactDB.lastErrorMessage())")
        } else {
            status.text = "Contact Added"
            name.text = ""
            address.text = ""
            phone.text = ""
        }
    } else {
        print("Error: \(contactDB.lastErrorMessage())")
    }
}
The next step in our application development process is to implement the action for the find button.
Implementing Code to Extract Data from the SQLite Database
As previously indicated, the user will be able to extract the address and phone number for a contact by entering the name and touching the find button. To this end, the Touch Up Inside event of the find button has been connected to the findContact method, the code for which is outlined below:
@IBAction func findContact(sender: AnyObject) {
    let contactDB = FMDatabase(path: databasePath as String)

    if contactDB.open() {
        let querySQL = "SELECT address, phone FROM CONTACTS WHERE name = '\(name.text!)'"

        let results:FMResultSet? = contactDB.executeQuery(querySQL,
         withArgumentsInArray: nil)

        if results?.next() == true {
            address.text = results?.stringForColumn("address")
            phone.text = results?.stringForColumn("phone")
            status.text = "Record Found"
        } else {
            status.text = "Record not found"
            address.text = ""
            phone.text = ""
        }
        contactDB.close()
    } else {
        print("Error: \(contactDB.lastErrorMessage())")
    }
}
This code opens the database and constructs a SQL SELECT statement to extract any records in the database that match the name entered by the user into the name text field. The SQL statement is then executed via a call to the executeQuery method of the FMDatabase instance. The search results are returned in the form of an FMResultSet object.
The next method of the FMResultSet object is called to find out if at least one match was found. In the event that a match was found, the values corresponding to the address and phone columns are extracted and assigned to the text fields in the user interface.
Building and Running the Application
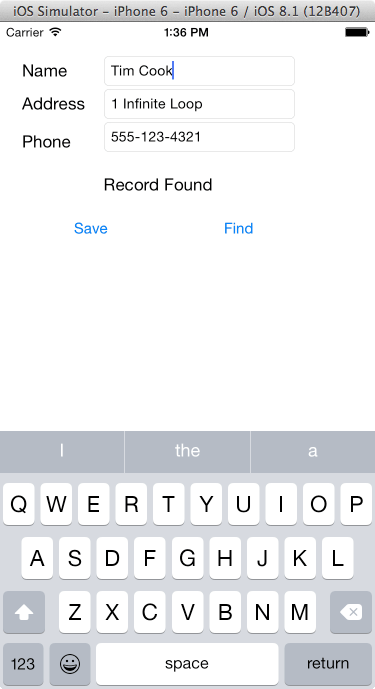
The final step is to build and run the application. Click on the run button located in the toolbar of the main Xcode project window. Once running, enter details for a few contacts, pressing the Save button after each entry. Be sure to check the status label to ensure the data is being saved successfully. Finally, enter the name of one of your contacts and click on the Find button. Assuming the name matches a previously entered record, the address and phone number for that contact should be displayed and the status label updated with the message “Record Found”:
Figure 46-5
Summary
In this chapter we have looked at the basics of storing data on iOS using the SQLite database environment using the FMDB wrapper approach to using SQLite from within Swift code. For developers unfamiliar with SQL and reluctant to learn it, an alternative method for storing data in a database involves the use of the Core Data framework. This topic will be covered in detail in the next chapter entitled Working with iOS 9 Databases using Core Data.
Learn SwiftUI and take your iOS Development to the Next Level |
| Previous | Table of Contents | Next |
| iOS 9 Database Implementation using SQLite | Working with iOS 9 Databases using Core Data |


