Difference between revisions of "Installing and Configuring Fedora KVM Virtualization"
m (Text replacement - "<hr> <table border=" to "<htmlet>ezoicbottom</htmlet> <hr> <table border=") |
m (Text replacement - "<table border="0" cellspacing="0">" to "<table border="0" cellspacing="0" width="100%">") |
||
| Line 1: | Line 1: | ||
| − | <table border="0" cellspacing="0"> | + | <table border="0" cellspacing="0" width="100%"> |
<tr> | <tr> | ||
<td width="20%">[[Managing Xen using the xm Command-line Tool|Previous]]<td align="center">[[Fedora Linux Essentials|Table of Contents]]<td width="20%" align="right">[[Installing a KVM Guest OS from the Command-line (virt-install)|Next]]</td> | <td width="20%">[[Managing Xen using the xm Command-line Tool|Previous]]<td align="center">[[Fedora Linux Essentials|Table of Contents]]<td width="20%" align="right">[[Installing a KVM Guest OS from the Command-line (virt-install)|Next]]</td> | ||
| Line 111: | Line 111: | ||
<htmlet>ezoicbottom</htmlet> | <htmlet>ezoicbottom</htmlet> | ||
<hr> | <hr> | ||
| − | <table border="0" cellspacing="0"> | + | <table border="0" cellspacing="0" width="100%"> |
<tr> | <tr> | ||
<td width="20%">[[Managing Xen using the xm Command-line Tool|Previous]]<td align="center">[[Fedora Linux Essentials|Table of Contents]]<td width="20%" align="right">[[Installing a KVM Guest OS from the Command-line (virt-install)|Next]]</td> | <td width="20%">[[Managing Xen using the xm Command-line Tool|Previous]]<td align="center">[[Fedora Linux Essentials|Table of Contents]]<td width="20%" align="right">[[Installing a KVM Guest OS from the Command-line (virt-install)|Next]]</td> | ||
Latest revision as of 19:54, 27 October 2016
| Previous | Table of Contents | Next |
| Managing Xen using the xm Command-line Tool | Installing a KVM Guest OS from the Command-line (virt-install) |
Take your Fedora Linux Skills to the Next Level |
As discussed in previous chapters of this book, virtualization is the ability to run multiple operating systems simultaneously on a single computer system. There are a number of ways to implement virtualization on Fedora. Options include (but are not limited to) VMWare, Xen, VirtualBox and KVM. In the preceding chapters we looked in detail at configuring and maintaining Xen based virtualization. In this and subsequent chapters we will look at KVM based virtualization hosted on a Fedora system.
Preparing Fedora for KVM Virtualization
KVM support is pre-built into the Fedora Linux kernel for Fedora release 7 and later. As a result KVM support is already available in the standard kernel negating the need to install and boot from a special kernel.
The tools required to setup and maintain virtualized system are not, however, installed by default. To fully utilize the KVM support built into the kernel the following packages are required:
- qemu-kvm
- virt-manager
- virt-viewer
- python-virtinst
Check to find out if these packages are already installed on your system by running the following commands:
rpm -q qemu-kvm virt-manager virt-viewer python-virtinst
If any of these packages are reported as not installed they may be installed using the yum package manager:
su -
yum install qemu-kvm virt-manager virt-viewer python-virtinst
The packages required to implement virtualization can change from one Fedora release to the next. To avoid the necessity to know the exact package names to install, the required packages can also be installed as a group as follows:
yum groupinstall 'Virtualization'
This command will install all the required packages.
Building a Fedora KVM Virtual System
Virtual systems can easily be configured using either the virt-install command-line tool, or the virt-manager GUI tool. For the purposes of this chapter we will use the virt-manager tool.
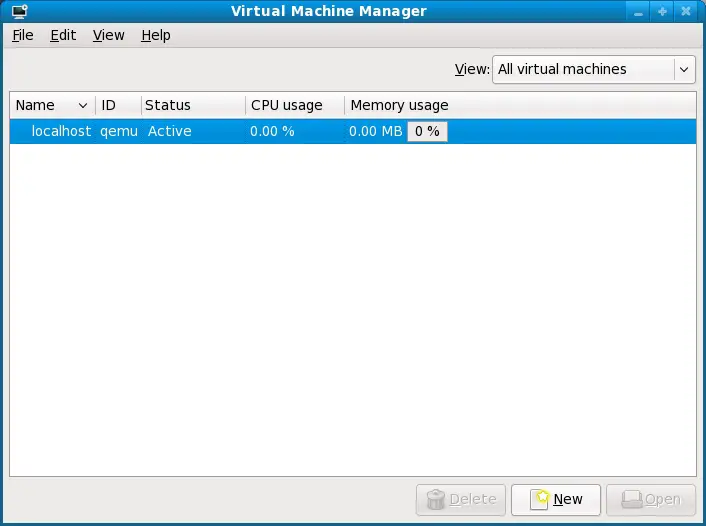
Begin by launching virt-manager either by selecting the Applications->System Tools->Virtual Machine Manager or from the command-line in a terminal window by running virt-manager. Once loaded, the virtual manager will prompt for the root password prior to displaying the following screen:
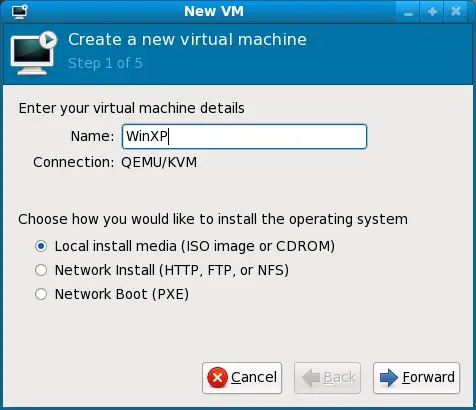
To create a new virtual system, click on the New button to display the first configuration screen. Click the Forward button to proceed to the Naming screen and enter a name for the virtual system which can be any name you choose. On this screen, also select the location of the media from which the guest operating system will be installed. This can either be a CD or DVD drive, an ISO image file accessible to the local host or a network install using HTTP, FTP, NFS or PXE:
Clicking Forward once more will display a screen seeking additional information about the installation process. The screen displayed and information required will depend on selection made in the preceding screen. For example, if a CD, DVD or ISO was selected, this screen will ask for the specific location of the ISO file or physical device.
Configuring the KVM Virtual System
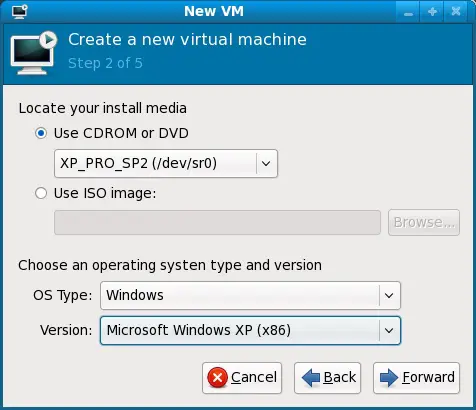
Clicking Forward once more will display a screen seeking additional information about the installation process. The screen displayed and information required will depend on selection made in the preceding screen. For example, if a CD, DVD or ISO was selected, this screen will ask for the specific location of the ISO file or physical device. This screen also asks that you specify the type and version of the guest operating system to be installed (for example Windows Vista or Ubuntu Linux):
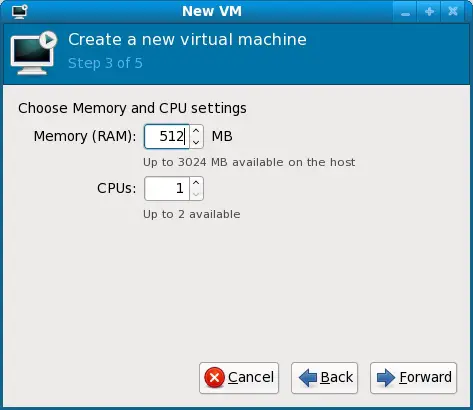
Once these settings are complete, click Forward to configure CPU and memory settings. The optimal settings will depend on the number of CPUs and amount of physical memory present in the host and the requirements of other applications and virtual machines that will run in parallel with the new virtual machine:
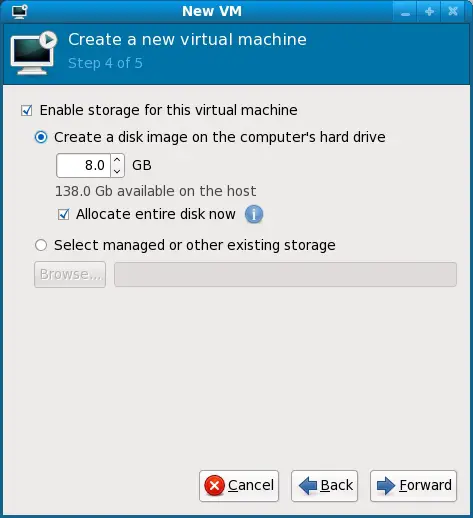
The last item to configure before creating the virtual machine is the storage space for the guest operating system and corresponding user data. This takes the form of a virtual disk drive. A virtual disk drive is essentially an image file hosted on the file system of the host computer which is seen by the virtual machine as a physical disk drive.
Options are available to create an image disk of a specified size, select a pre-existing volume or to create a storage volume of a specified format (raw, vmdk, iso etc). Unless you have a specific need to use a particular format (for example you might need to use vmdk to migrate to a VMware based virtualization environment at a later date) or need to use a dedicated disk or partition, it is generally safe to simply specify a size on this screen. The option is also available to pre-allocate the space now. If you choose not to pre-allocate the space, space will be allocated up to the specified maximum only as it is needed by the guest operating system. This has the advantage that space on the host file system is not used until it is needed. Downsides are that performance may degrade as space is allocated in real-time and allocation will fail if another process uses up the free space on the host file system before it can be assigned to the virtual machine:
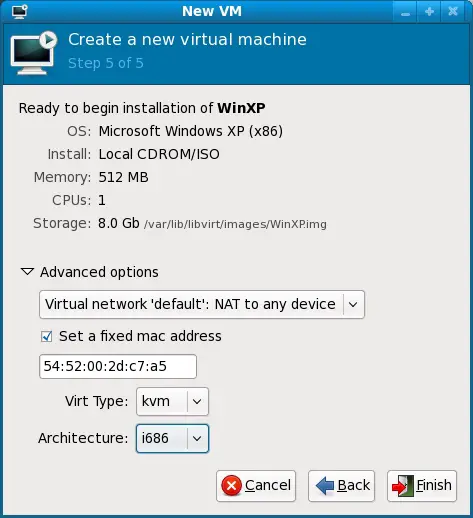
Once these settings are configured, click the Forward key once more. The final screen displays a summary of the configuration. Review the information displayed. Advanced options are also available to configure bridged networking (where the virtual machine has direct access to a host network adapter) and to configure a specific MAC address if required:
Starting the KVM Virtual System
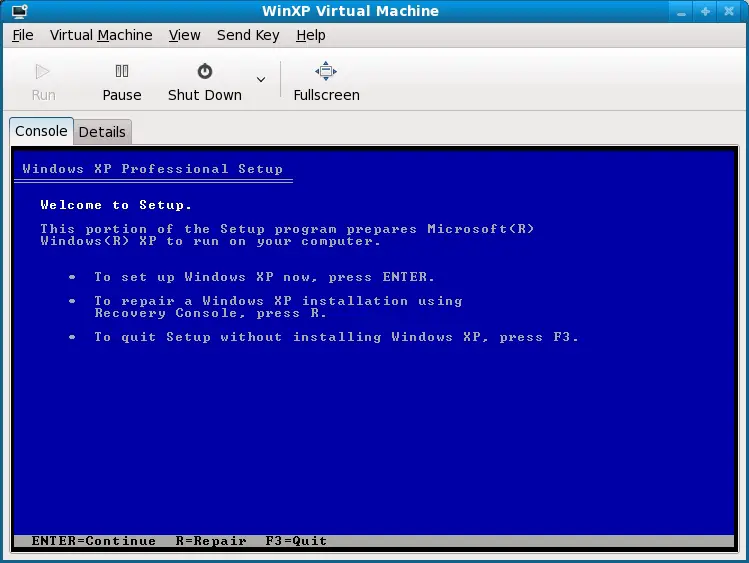
Click on the Finish button to begin the creation process. The virtualization manager will create the disk and configure KVM before starting the system. Once started, the guest OS installation will begin:
From this point on, simply follow the operating installation instructions to install the guest OS.
For information on administering a virtual system read Managing and Monitoring Fedora based KVM Guest Systems.
Take your Fedora Linux Skills to the Next Level |
| Previous | Table of Contents | Next |
| Managing Xen using the xm Command-line Tool | Installing a KVM Guest OS from the Command-line (virt-install) |


