Difference between revisions of "A WatchKit Notification Tutorial"
m (Text replacement - "<htmlet>ezoicbottom</htmlet>" to "") |
m (Text replacement - "<hr> <table border=" to "<htmlet>ezoicbottom</htmlet> <hr> <table border=") |
||
| Line 422: | Line 422: | ||
| + | <htmlet>ezoicbottom</htmlet> | ||
<hr> | <hr> | ||
<table border="0" cellspacing="0"> | <table border="0" cellspacing="0"> | ||
Revision as of 18:12, 11 May 2016
| Previous | Table of Contents | Next |
| An Overview of Notifications in WatchKit | A WatchKit Custom Notification Tutorial |
| Purchase the fully updated watchOS 2/Swift 2 edition of this book in eBook ($12.99) or Print ($27.99) format watchOS 2 App Development Essentials Print and eBook (ePub/PDF/Kindle) editions contain 35 chapters. |
This chapter will create an iOS project containing a WatchKit app that demonstrates the use of the iOS notification system. The example will make use of the standard WatchKit short-look and long-look notification interfaces and include the implementation of notification action buttons within the long-look interface.
About the Example Project
The purpose of the project is to allow the user to specify a time delay before which a notification alert will be triggered. At the point that the notification appears, the user will be given the opportunity through notification action buttons on both the iPhone or Apple Watch device to either repeat the notification or modify the time delay in preparation for the next notification request.
Creating the Xcode Project
Start Xcode and create a new iOS project. On the template screen choose the Application option located under iOS in the left hand panel and select Single View Application. Click Next, set the product name to NotifyDemoApp, enter your organization identifier and make sure that the Devices menu is set to Universal. Before clicking Next, change the Language menu to Swift. On the final screen, choose a location in which to store the project files and click on Create to proceed to the main Xcode project window.
Designing the iOS App User Interface
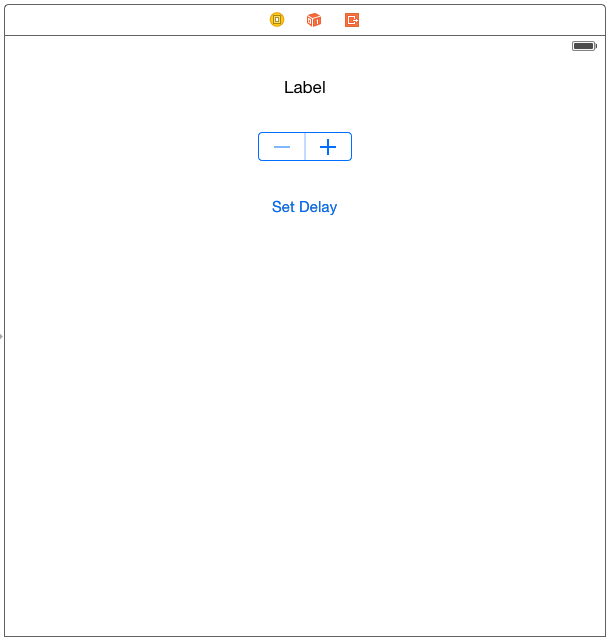
The user interface for the parent iOS app will consist of Label, Stepper and Button objects. Select the Main.storyboard file and add and configure these objects so that the layout matches that illustrated in Figure 28-1, making sure to position the objects in the horizontal center of the layout:
Figure 28-1
Display the Resolve Auto Layout Issues menu (Figure 28-2) and select the Reset to Suggested Constraints menu option listed under All Views in View Controller to establish sensible layout constraints on the view objects:
Figure 28-2
Select the Label object, display the Attributes Inspector panel and change the Alignment property so that the text is centered.
Establishing Outlets and Actions
With the Main.storyboard file still loaded into Interface Builder, display the Assistant Editor and establish an outlet connection from the Label object named timeLabel within the ViewController.swift file. Repeat this step to add an outlet connection from the Stepper object named timeStepper.
Next, establish action connections from the Stepper and Button objects to methods named valueChanged and buttonPress respectively. Review the code in the ViewController.swift file and verify that the actions and outlets match those included in the following code listing:
import UIKit

class ViewController: UIViewController {

    @IBOutlet weak var timeLabel: UILabel!
    @IBOutlet weak var timeStepper: UIStepper!

    override func viewDidLoad() {
        super.viewDidLoad()
    }

    @IBAction func valueChanged(sender: AnyObject) {
    }

    @IBAction func buttonPress(sender: AnyObject) {
    }
.
.
}
Creating and Joining an App Group
Both the parent iOS app and the WatchKit app extension will need access to the current time delay setting. This shared access will be implemented using an app group and a shared user default setting key-value pair as covered in the chapter entitled Sharing Data Between a WatchKit App and the Containing iOS App.
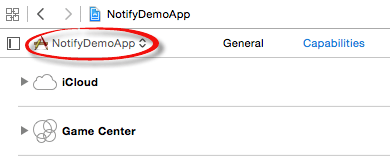
Begin by selecting the NotifyDemoApp target located at the top of the Project Navigator panel and clicking on the Capabilities tab in the main panel. Within the Capabilities panel, locate the App Groups section and move the switch to the On position. When prompted, select an Apple Developer account to be associated with the app group.
When app groups have been enabled in the Capabilities screen, any existing app groups associated with your Apple developer account will be listed.
To add a new app group to your account, simply click on the + button and enter the new app group name, for example:
group.com.example.NotifyDemoApp
Add the current app to the newly added app group by enabling the checkbox next to the group name.
Initializing the iOS App
Each time the iOS app is launched it will need to check if the time delay value has been stored in the app group and, in the event that it has not, save a default value. Both the Label and Stepper objects will then need to be updated with the prevailing time delay value. Locate and select the ViewController.swift file and modify it to access the shared defaults and to modify the viewDidLoad method to add the initialization code, noting that the app group identifier will need to be changed to match the one you created in the previous section:
import UIKit

class ViewController: UIViewController {

    @IBOutlet weak var timeLabel: UILabel!
    @IBOutlet weak var timeStepper: UIStepper!

    let sharedDefaults =
	     NSUserDefaults(suiteName: "<YOUR_APP_GROUP_ID_HERE>")

    override func viewDidLoad() {
        super.viewDidLoad()

        if let timeValue = sharedDefaults?.doubleForKey("timeDelay") {
            timeStepper.value = timeValue
        } else {
            sharedDefaults?.setDouble(10.0, forKey: "timeDelay")
            timeStepper.value = 10.0
        }

        timeLabel.text =
		sharedDefaults?.doubleForKey("timeDelay").description
    }
.
.
}
Updating the Time Delay
The Stepper object is the method by which the user adjusts the amount of time to delay before triggering the notification alert. This object was previously connected to an action method named valueChanged. When called, this method needs to obtain the current value of the Stepper object, display it on the Label object and store the value in shared defaults using a key set to “timeDelay”. With these requirements in mind, locate and modify the valueChanged method in the ViewController.swift file so that it reads as follows:
@IBAction func valueChanged(sender: AnyObject) {
    timeLabel.text = timeStepper.value.description
    sharedDefaults?.setDouble(timeStepper.value, forKey: "timeDelay")
}
Setting the Notification
A method will now be added to the ViewController.swift file to configure the notification using the time delay value stored in the shared defaults with an alert title of “Reminder” and an alert body which reads “Wake Up!”. In addition to these settings, the notification will be configured to play the default alert sound and assign a category identifier of “REMINDER_CATEGORY” (this category will need to be referenced again later in the chapter when action buttons are added to the notification). Remaining in the ViewController.swift file, implement this method as outlined in the following listing:
func setNotification() {

    if let timeValue = sharedDefaults?.doubleForKey("timeDelay") {
        var localNotification:UILocalNotification =
					UILocalNotification()

        localNotification.alertTitle = "Reminder"

        localNotification.alertBody = "Wake Up!"

        localNotification.fireDate = NSDate(timeIntervalSinceNow:
						timeValue)
        localNotification.soundName =
				UILocalNotificationDefaultSoundName
        localNotification.category = "REMINDER_CATEGORY"


        UIApplication.sharedApplication().scheduleLocalNotification(
				localNotification)
    }
}
The setNotification method will need to be called each time that the user taps the Set Delay button which is configured to call the buttonPressed method. Add the call to the setNotification method to the buttonPressed method:
@IBAction func buttonPress(sender: AnyObject) {
    setNotification()
}
Adding the Notification Actions
When the notification is triggered, the user is to be given the option of repeating the notification using the same delay, or adjusting the prevailing delay duration. This will involve the addition of some notification actions to the notification using the “REMINDER_CATEGORY” identifier referenced each time the notification is set. The code to configure the actions will be placed within the Application Delegate class within the didFinishLaunchingWithOptions method.
Begin by locating and selecting the AppDelegate.swift file and modifying the didFinishLaunchingWithOptions method to create the first notification action as follows:
func application(application: UIApplication, didFinishLaunchingWithOptions launchOptions:
[NSObject: AnyObject]?) -> Bool {

    var repeatAction: UIMutableUserNotificationAction =
		UIMutableUserNotificationAction()
    repeatAction.identifier = "REPEAT_IDENTIFIER"
    repeatAction.title = "Repeat"
    repeatAction.destructive = false
    repeatAction.authenticationRequired = false
    repeatAction.activationMode =
		UIUserNotificationActivationMode.Background

    return true
}
The above code creates a new notification action instance and configures it with an identifier string (this will be used to identify which action has been selected by the user later in the project). The action is also configured to display text which reads “Repeat” on the action button and to indicate that it is a non-destructive action (in other words it does not cause the loss of any data or information). In the event that the device is locked when the notification is triggered, the action is configured such that it is not necessary for the user to unlock the device for the action to be performed.
Finally, since the notification can be repeated without the need to display the iOS app, the activation mode is set to Background mode.
Add the following code to the didFinishLaunchingWithOptions method beneath the code for the first action to create and configure the second action:
var modifyAction :UIMutableUserNotificationAction =
	UIMutableUserNotificationAction()
modifyAction.identifier = "MODIFY_IDENTIFIER"
modifyAction.title = "Modify"
modifyAction.destructive = false
modifyAction.authenticationRequired = false
modifyAction.activationMode =
	UIUserNotificationActivationMode.Foreground
This time the action is configured with an identifier of “MODIFY_IDENTIFIER” and to display “Modify” on the action button. Since the iOS app will need to be displayed in order for the user to modify the time delay value, the action is configured using Foreground mode.
The next task is to create the notification category containing the two actions and register it with the notification system:
func application(application: UIApplication, didFinishLaunchingWithOptions launchOptions: [NSObject: AnyObject]?) -> Bool {

    var repeatAction: UIMutableUserNotificationAction =
	UIMutableUserNotificationAction()
    repeatAction.identifier = "REPEAT_IDENTIFIER"
    repeatAction.title = "Repeat"
    repeatAction.destructive = false
    repeatAction.authenticationRequired = false
    repeatAction.activationMode =
	UIUserNotificationActivationMode.Background


    var modifyAction :UIMutableUserNotificationAction =
	UIMutableUserNotificationAction()
    modifyAction.identifier = "MODIFY_IDENTIFIER"
    modifyAction.title = "Modify"
    modifyAction.destructive = false
    modifyAction.authenticationRequired = false
    modifyAction.activationMode =
	UIUserNotificationActivationMode.Foreground

    var notificationCategory:UIMutableUserNotificationCategory =
	UIMutableUserNotificationCategory()

    notificationCategory.identifier = "REMINDER_CATEGORY"

    notificationCategory.setActions([repeatAction, modifyAction],
         forContext: UIUserNotificationActionContext.Default)

    application.registerUserNotificationSettings(
        UIUserNotificationSettings(forTypes:
        UIUserNotificationType.Sound
            | UIUserNotificationType.Alert
            | UIUserNotificationType.Badge,
        categories: NSSet(array:[notificationCategory])
            as Set<NSObject>))

    return true
}
Compile and run the app and allow notification access when prompted by the operating system. Select a delay time and press the Set Delay button. Once the delay has been set, place the app into the background by pressing the Home button on the device (or selecting the Hardware -> Home menu option within the simulator). When the notification appears, swipe downward on the alert panel to display the action buttons as shown in Figure 28-3:
Figure 28-3
Tap the “Modify” button and verify that the iOS app launches. Assuming that the app behaves as expected, the next step is to handle the “Repeat” action.
| Purchase the fully updated watchOS 2/Swift 2 edition of this book in eBook ($12.99) or Print ($27.99) format watchOS 2 App Development Essentials Print and eBook (ePub/PDF/Kindle) editions contain 35 chapters. |
Implementing the handleActionWithIdentifier Method
When a notification action button configured for background mode is tapped by the user, the handleActionWithIdentifier method of the app delegate class is called. Among the items passed to the method are a notification object from which both the action and category identifiers of the action that triggered the call can be obtained together with a completion handler to be called once the action has been handled. This method now needs to be added to the AppDelegate.swift file along with a variable in which to store a reference to the view controller instance as follows:
@UIApplicationMain
class AppDelegate: UIResponder, UIApplicationDelegate {

    var window: UIWindow?
    var viewController: ViewController?

    func application(application: UIApplication, handleActionWithIdentifier identifier: String?, forLocalNotification notification: UILocalNotification, completionHandler: () -> Void) {

        if identifier == "REPEAT_IDENTIFIER" && notification.category == "REMINDER_CATEGORY" {
            viewController = ViewController()
            viewController?.setNotification()
        }
        completionHandler()
    }
.
.
.
}
The method begins by verifying that the category and action id match the repeat action. If this is a repeat action request, an instance of the ViewController class is created and the setNotification method of the instance called to repeat the notification. The completion handler block is then called to indicate that the action has been handled.
Re-run the app, set up a notification and place the app in the background. Display the action buttons in the notification panel when it appears and tap on the “Repeat” button. After the designated time has elapsed the notification should trigger a second time as requested.
Adding the WatchKit App to the Project
Now that work on the iOS app is complete, the next task is to add the WatchKit app to the project.
Within Xcode, select the File -> New -> Target… menu option. In the target template dialog, select the Apple Watch option listed beneath the iOS heading. In the main panel, select the WatchKit App icon and click on Next.
On the subsequent screen switch the Include Notification Scene and Include Glance Scene options off before clicking on the Finish button (the Notification Scene option is only required when working with custom notifications, a topic covered in the next chapter).
As soon as the extension target has been created, a new panel will appear requesting permission to activate the new scheme for the extension target. Activate this scheme now by clicking on the Activate button in the request panel.
Adding Notification Icons to the WatchKit App
The WatchKit app requires that six app icons be added to fully support notifications for the Notification Center, Short-Look and Long-Look views. For each icon category, images must be provided for both 38mm and 42mm Apple Watch models. The icons used in the example can be found in the app_icons folder of the sample code download available from the following URL:
http://www.ebookfrenzy.com/watchkit/app_icons.zip
Select the Images.xcassets entry located under NotifyDemoApp WatchKit App in the Project Navigator panel and select the AppIcon image set as outlined in Figure 28-4:
Figure 28-4
Open a Finder window and navigate to the app_icons folder. Once located, drag and drop the following icon image files to the corresponding locations in the image asset catalog:
- [email protected] -> Apple Watch Home Screen (All) Long Look (38mm)
- Notification_Center_38mm.png -> Apple Watch Notification Center 38mm
- Notification_Center_42mm.png -> Apple Watch Notification Center 42mm
- Long_Look_42mm.png -> Apple Watch Long Look
- Short_Look_38mm.png – Apple Watch Short Look 38mm
- Short_Look_42mm.png – Apple Watch Short Look 42mm
Testing the Notification on the Apple Watch
Make sure that the NotifyDemoApp target is still selected in the Xcode toolbar and run the iOS app on a physical iPhone device with which an Apple Watch is paired. This will launch the iOS app and install the WatchKit app on the Apple Watch device.
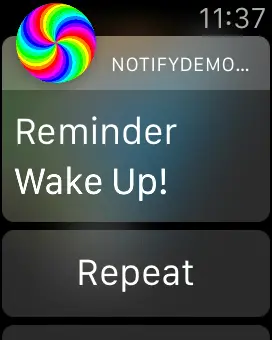
Configure a delay, tap the Set Delay button and lock the iPhone device. Pick up the Apple Watch device so that the screen is active. When the time delay has elapsed, the short look notification should appear on the screen using the designated icon. After a few seconds, the scrollable long look notification should appear including the alert title, alert body, the two action buttons and a Dismiss button:
Figure 28-5
Since the repeat action is already configured to launch the iOS app in the background and re-initiate the notification, tapping the Repeat button on the notification scene of the Apple Watch will cause the notification to repeat.
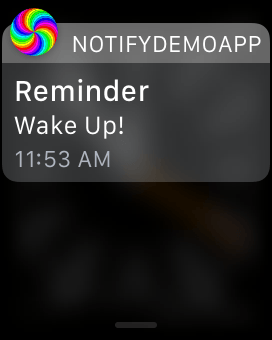
Make a swiping motion from the top of the watch display to view the Notification Center panel which should also include the notification as illustrated in Figure 28-6:
Figure 28-6
Tapping the Modify button will launch the WatchKit app, where some work now needs to be performed to complete the project.
Adding the WatchKit App to the App Group
With the iOS app added to the app group, the WatchKit extension must also be added as a member of the same group in order to gain access to the shared container. To access the capability settings for the WatchKit extension, use the menu located in the top left-hand corner of the Capabilities panel as indicated in Figure 28-7:
Figure 28-7
When clicked, this menu will present a list of targets contained within the current project, one of which will be the NotifyDemoApp WatchKit Extension. Select this option and repeat the steps followed for the iOS app to enable membership in the same app group.
Designing the WatchKit App User Interface
The user interface for the WatchKit app main scene is going to consist of a Label, a Slider and a Button. Within the Project Navigator panel, locate and select the Interface.storyboard file to load it into the Interface Builder tool and design a layout that matches that of Figure 28 8 where both the Alignment and Horizontal position properties have been set to Center on the Label object:
Figure 28-8
Select the Slider object and set the Minimum attribute to 0 and the Maximum and Steps values to 100 in the Attributes Inspector panel.
Display the Assistant Editor panel and establish outlet connections from the Label and Slider objects named timeLabel and timeSlider. Also establish action connections from the Slider and Button objects to methods named sliderChange and setDelay respectively.
Select the InterfaceController.swift file and modify it to declare a slider value variable, access the shared app group and to implement the code in the two action methods as follows:
import WatchKit
import Foundation


class InterfaceController: WKInterfaceController {

    @IBOutlet weak var timeLabel: WKInterfaceLabel!
    @IBOutlet weak var timeSlider: WKInterfaceSlider!
    var sliderValue: Double?

    let sharedDefaults =
	NSUserDefaults(suiteName: "<YOUR_APP_GROUP_ID_HERE>")

    override func awakeWithContext(context: AnyObject?) {
        super.awakeWithContext(context)

        // Configure interface objects here.
    }

    @IBAction func setDelay() {
        sharedDefaults?.setDouble(sliderValue!, forKey: "timeDelay")
    }

    @IBAction func sliderChange(value: Float) {
        sliderValue = Double(value)
        timeLabel.setText((value.description))
    }
.
.
}
The setDelay method simply saves the current slider value to the app group shared defaults where it will be picked up by the containing iOS app next time it runs. The sliderChange method saves the current value to the sliderValue variable and displays it on the Label object.
Testing the App
Launch the iOS app on a physical iPhone device, configure a notification and then lock the device. Pick up the paired Apple Watch so that the screen activates and wait for the notification to appear. Tap the Modify button in the long look notification scene and wait for the WatchKit app to appear. Change the delay value using the slider and tap the Set Delay button. Stop and restart the iOS app and verify that the new delay value is displayed.
Summary
This chapter has worked through the design and implementation of an example application intended to demonstrate the handling of notifications from within both a containing iOS app and the corresponding WatchKit app with a particular emphasis on the use of notification actions.
| Purchase the fully updated watchOS 2/Swift 2 edition of this book in eBook ($12.99) or Print ($27.99) format watchOS 2 App Development Essentials Print and eBook (ePub/PDF/Kindle) editions contain 35 chapters. |
| Previous | Table of Contents | Next |
| An Overview of Notifications in WatchKit | A WatchKit Custom Notification Tutorial |
