Difference between revisions of "An Introduction to Swift Playgrounds"
(→A Basic Swift Playground Example) |
m (Text replacement - "<google>ADSDAQBOX_FLOW</google>" to "<htmlet>adsdaqbox_flow</htmlet>") |
||
| Line 53: | Line 53: | ||
Note that after entering the line of code, the results panel to the right of the editing panel is now showing the output from the println call as highlighted in Figure 6-2: | Note that after entering the line of code, the results panel to the right of the editing panel is now showing the output from the println call as highlighted in Figure 6-2: | ||
| − | < | + | <htmlet>adsdaqbox_flow</htmlet> |
[[Image:xcode_6_playground_println_result.png|Output in the results panel of the Swift Playground environment]] | [[Image:xcode_6_playground_println_result.png|Output in the results panel of the Swift Playground environment]] | ||
Revision as of 18:05, 1 February 2016
| Previous | Table of Contents | Next |
| Testing Apps on iOS 8 Devices with Xcode 6 | Swift Operators and Expressions |
<google>BUY_IOS8</google>
Along with iOS 8 and Xcode 6, Apple has introduced the new Swift programming language. Intended as a replacement for Objective-C as the basis for developing iOS apps, the significance of this new language is such that nine chapters of this book are dedicated solely to introducing the basics of Swift. In addition, all of the code examples in this book have been developed entirely using this new programming language.
Before introducing the Swift programming language in the chapters that follow, however, it is first worth learning about a feature known as Swift playgrounds. Playgrounds are another new feature introduced in Xcode 6 that make learning Swift and experimenting with the iOS 8 SDK much easier. The concepts covered in this chapter can be put to use when experimenting with many of the introductory Swift code examples contained in the chapters that follow.
What is a Swift Playground?
A playground is an interactive environment where Swift code can be entered and executed with the results appearing in real-time. This makes an ideal environment in which to learn the syntax of Swift without the need to work continuously through the edit/compile/run/debug cycle that would ordinarily accompany a standard Xcode iOS project.
Creating a New Swift Playground
To create a new Playground, start Xcode and select the Get started with a playground option from the welcome screen or select the File -> New -> Playground menu option. On the resulting options screen, name the playground LearnSwift and set the Platform menu to iOS. Click Next and choose a suitable file system location into which the playground should be saved.
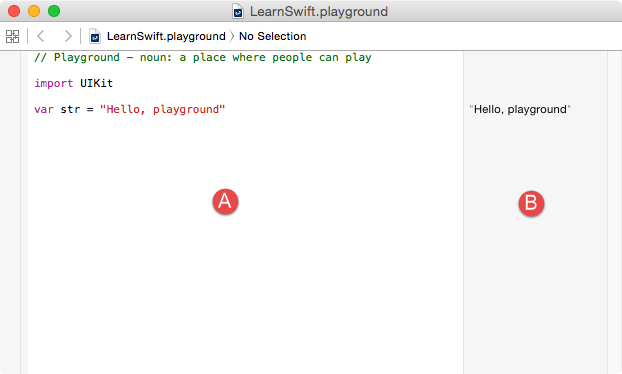
Once the playground has been created, the following screen will appear ready for Swift code to be entered:
Figure 6-1
The panel on the left hand side of the window (marked A in Figure 6 1) is the playground editor where the lines of Swift code are entered. The right hand panel (marked B) is referred to as the results panel and is where the results of each Swift expression entered into the playground editor panel are displayed.
By far the quickest way to gain familiarity with the playground environment is to work through some simple examples.
A Basic Swift Playground Example
Perhaps the simplest of examples in any programming language (that at least does something tangible) is to write some code to output a single line of text. Swift is no exception to this rule so, within the playground window, begin by deleting the current Swift expression from the editor panel:
var str = “Hello, playground”
Next, enter a line of Swift code that reads as follows:
println("Welcome to Swift")
All that the code does is make a call to the built-in Swift println function which takes as a parameter a string of characters to be displayed on the console. Those familiar with other programming languages will note the absence of a semi-colon at the end of the line of code. In Swift, semi-colons are optional and generally only used as a separator when multiple statements occupy the same line of code.
Note that after entering the line of code, the results panel to the right of the editing panel is now showing the output from the println call as highlighted in Figure 6-2:
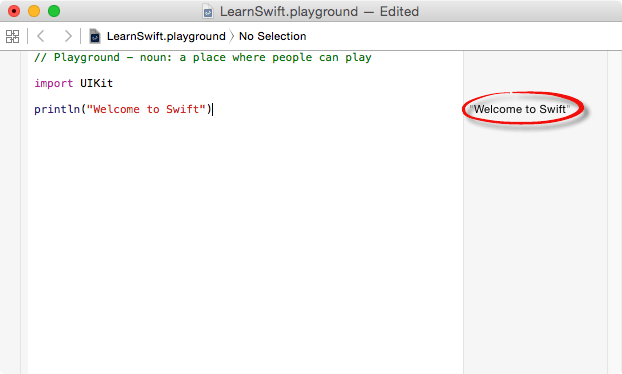
Figure 6-2
<google>BUY_IOS8</google>
Playground Timelines
Playgrounds are particularly useful when working and experimenting with Swift algorithms. This can be of particular use when combined with the Playground Timeline Assistant. Remaining within the playground editor, enter the following lines of code beneath the existing println statement:
var x = 10

for index in 1...20 {
        let y = index * x--
}
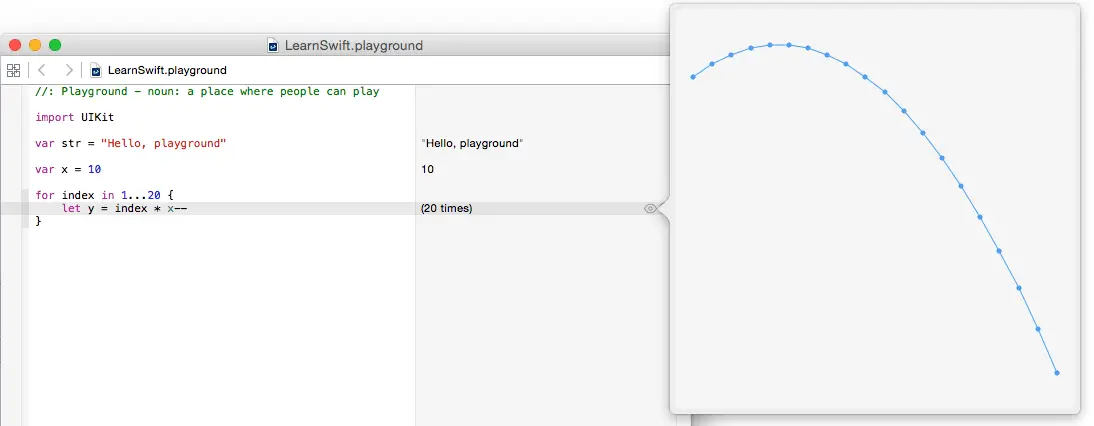
This expression repeats a loop 20 times, performing an arithmetic expression on each iteration of the loop. Once the code has been entered into the editor, the playground will execute the loop and display in the results panel the number of times the loop was performed. More interesting information, however, may be obtained by hovering the mouse pointer over the results line so that two additional buttons appear as shown in Figure 6-3:
Figure 6-3
The left most of the two buttons is the quick look button which, when selected, will show a popup panel displaying the results as shown in Figure 6-4:
Figure 6-4
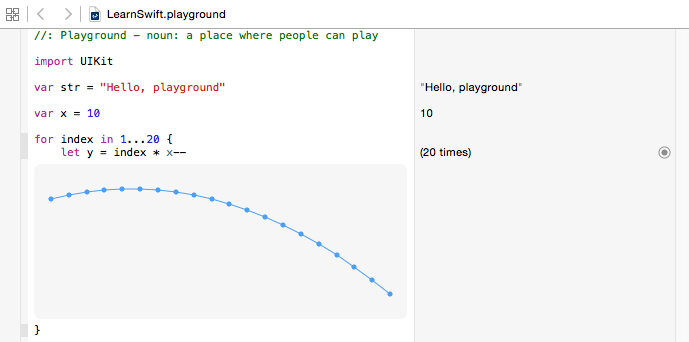
The right-most button is the value history button which, when selected, displays the results inline with the code:
Figure 6-5
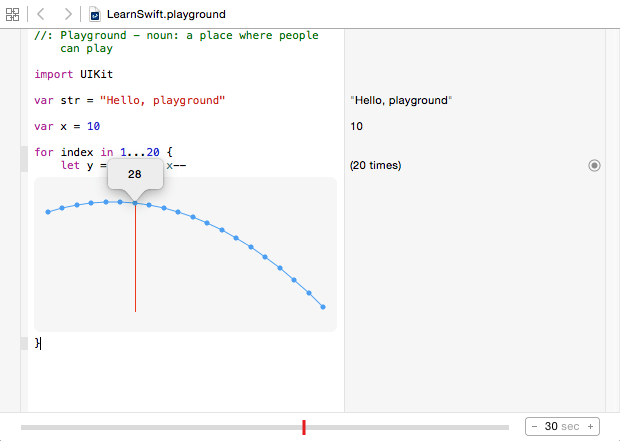
The slider along the bottom edge of the playground panel can be moved to view the prevailing results at different points in the value history timeline. Sliding it to the left, for example, will highlight and display the different values in the graph:
Figure 6-6
Working with UIKit in Playgrounds
The playground environment is not restricted to simple Swift code statements. Much of the power of the iOS 8 SDK is also available for experimentation within a playground.
When the playground used in this chapter was created, it included a line to import the iOS UIKit Framework. The UIKit Framework contains most of the classes necessary to implement user interfaces for iOS applications and is an area which will be covered in significant detail throughout the book. An extremely powerful feature of playgrounds is that it is also possible to work with UIKit along with many of the other Frameworks that comprise the iOS 8 SDK.
The following code, for example, creates a UILabel instance and sets color, text and font properties on it:
let myLabel = UILabel(frame: CGRectMake(0, 0, 200, 50))
myLabel.backgroundColor = UIColor.redColor()
myLabel.text = "Hello Swift"
myLabel.textAlignment = .Center
myLabel.font = UIFont(name: "Georgia", size: 24)
myLabel
Enter this code into the playground editor and note that this is a good example of how the quick look feature can be useful. Each line of the example Swift code configures a different aspect of the appearance of the UILabel instance. Clicking on the quick look button for the first line of code will display an empty view (since the label exists but has yet to be given any visual attributes). Clicking on the quick look button in the line of code which sets the background color, on the other hand, will show the red label:
Figure 6-7
Similarly, the quick look for the line where the text property is set will show the red label with the “Hello Swift” text left aligned:
Figure 6-8
The font setting quick look on the other hand displays the UILabel with centered text and the larger Georgia font:
Figure 6-9
When to Use Swift Playgrounds
Clearly Swift Playgrounds provide an ideal environment for learning to program using the Swift programming language and the use of playgrounds in the Swift introductory chapters that follow is recommended.
It is also important to keep in mind that playgrounds will remain useful long after the basics of Swift have been learned and will become increasingly useful when moving on to more advanced areas of iOS development.
The iOS 8 SDK is a vast collection of Frameworks and classes and it is not unusual for even experienced developers to need to experiment with unfamiliar aspects of iOS development before adding code to a project. Historically this has involved creating a temporary iOS Xcode project and then repeatedly looping through the somewhat cumbersome edit, compile, run cycle to arrive at a programming solution. Rather than fall into this habit, consider having a playground on standby to carry out experiments during your project development work.
Summary
This chapter has introduced the concept of Swift playgrounds. Playgrounds provide an environment in which Swift code can be entered and the results of that code viewed dynamically. This provides an excellent environment both for learning the Swift programming language and for experimenting with many of the classes and APIs included in the iOS 8 SDK without the need to create Xcode projects and repeatedly edit, compile and run code.
<google>BUY_IOS8</google>
| Previous | Table of Contents | Next |
| Testing Apps on iOS 8 Devices with Xcode 6 | Swift Operators and Expressions |
