
The previous chapter designed an app that used iCloud Storage to store a text file remotely. While the presence of the stored file could be confirmed by accessing the iCloud Storage section of the iOS Settings app, the file and its content were only accessible to the iCloudStore example app. This chapter will create a simple app that uses iCloud Drive to store a sample text file and show how the file can be accessed in various ways from outside the app.
Preparing an App to use iCloud Drive Storage
As with other forms of iCloud storage, several steps must be taken to add support for iCloud Drive to an Xcode app project. The first step is to enable the iCloud Documents capability as outlined in the chapter entitled Preparing an iOS 17 App to use iCloud Storage.
When an app stores files on iCloud Drive, it places them within the Documents folder of an iCloud ubiquitous container. Any files stored at this location will appear within iCloud Drive within a Folder with the name assigned to the container (by default, this is simply the app name).
The ubiquitous container is configured for the project via an NSUbiquitousContainers key entry which needs to be added to the project’s Info.plist file, which takes the following form:
<key>NSUbiquitousContainers</key>
<dict>
    <key>iCloud.$(PRODUCT_BUNDLE_IDENTIFIER)</key>
    <dict>
        <key>NSUbiquitousContainerIsDocumentScopePublic</key>
        <true/>
        <key>NSUbiquitousContainerName</key>
        <string>MyAppName</string>
        <key>NSUbiquitousContainerSupportedFolderLevels</key>
        <string>None</string>
    </dict>
</dict>Code language: HTML, XML (xml)
The first entry in the dictionary consists of the app’s bundle identifier pre-fixed with “iCloud.” (for example, iCloud.com.ebookfrenzy.MyApp). This entry must match the app’s bundle identifier. Otherwise, the stored files will not appear in iCloud Drive. Since Xcode has already declared the bundle ID in the Info.plist file via the PRODUCT_BUNDLE_IDENTIFIER key, the safest option is to reference this key as follows:
 |
You are reading a sample chapter from Building iOS 17 Apps using Xcode Storyboards.
Buy the full book now in eBook or Print format. The full book contains 96 chapters and 760 pages of in-depth information. |
<key>iCloud.$(PRODUCT_BUNDLE_IDENTIFIER)</key>Code language: plaintext (plaintext)Next, the access scope of the container is declared. If set to false, the contents of the container will be accessible to the app but will not otherwise be visible within iCloud Drive (in other words, it will not show up in the iOS Files app or macOS Finder).
The container name entry defines the container’s name and represents the folder name under which the files will be listed in iCloud Drive.
Finally, the number of directory levels within the container to which the user will have access via iCloud Drive is declared. If this is set to None, iCloud Drive only has access to the container’s Documents directory, and sub-directories cannot be created using apps such as Files or Finder. A setting of One allows iCloud Drive to access and create sub-folders up to one level beyond the Documents folder. Finally, a setting of Any allows subdirectories of any level to be accessed and created via iCloud Drive.
Once these preparations have been made, working with iCloud Drive from within an iOS app is simply a matter of obtaining the URL of the ubiquitous container and using it to perform the necessary file operations.
Making Changes to the NSUbiquitousContainers Key
When making modifications to the iCloud Drive container settings in the Info.plist file, it is important to be aware that once the app has been run once, subsequent changes to these settings may not be registered with iCloud unless the CFBundleVersion number value in the Info.plist file is incremented, for example:
|
You are reading a sample chapter from Building iOS 17 Apps using Xcode Storyboards.
Buy the full book now in eBook or Print format. The full book contains 96 chapters and 760 pages of in-depth information. |
.
.
    <key>CFBundleVersion</key>
	    <string>2</string>
.
.Code language: HTML, XML (xml)
Creating the iCloud Drive Example Project
Begin by launching Xcode and creating a new project using the iOS App template with the Swift and Storyboard options selected, entering TestDrive as the product name. Next, follow the steps outlined in the Preparing an iOS 17 App to use iCloud Storage chapter to add the iCloud capability, enable the iCloud Documents Service, and create and enable a container for the app.
Modifying the Info.plist File
Locate the Info.plist file in the project navigator panel, right-click on it and select the Open As -> Source Code menu option. With the file open in the editor, add the NSUbiquitousContainers entry as follows:
<?xml version="1.0" encoding="UTF-8"?>
<!DOCTYPE plist PUBLIC "-//Apple//DTD PLIST 1.0//EN" "http://www.apple.com/DTDs/PropertyList-1.0.dtd">
<plist version="1.0">
<dict>
	<key>UIApplicationSceneManifest</key>
	<dict>
.
.
					<string>Main</string>
				</dict>
			</array>
		</dict>
	</dict>
    <key>NSUbiquitousContainers</key>
    <dict>
        <key>iCloud.$(PRODUCT_BUNDLE_IDENTIFIER)</key>
        <dict>
            <key>NSUbiquitousContainerIsDocumentScopePublic</key>
            <true/>
            <key>NSUbiquitousContainerName</key>
            <string>TestDrive</string>
            <key>NSUbiquitousContainerSupportedFolderLevels</key>
            <string>None</string>
        </dict>
    </dict>
</dict>
</plist>Code language: HTML, XML (xml)
Designing the User Interface
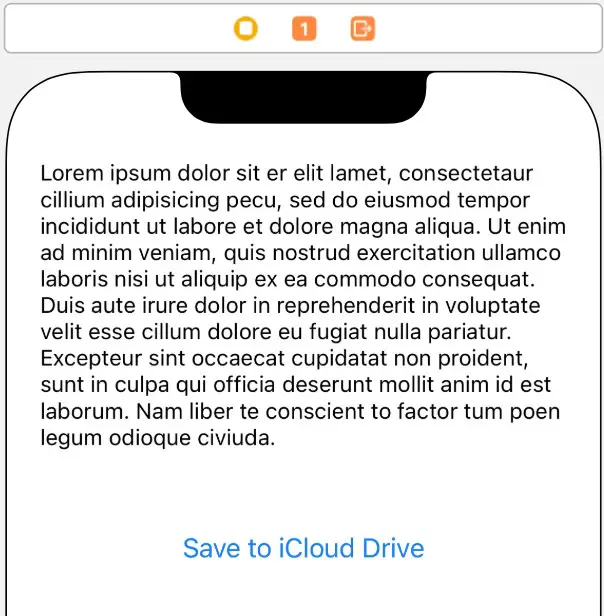
The user interface will, once again, consist of a UITextView and a UIButton. The user will enter text into the text view and save that text to a file on iCloud Drive by clicking on the button.
Select the Main.storyboard file and display the Interface Builder Library panel. Drag and drop the Text View and Button objects into the view canvas, resizing the text view so that it occupies only the upper area of the view. Double-click on the button object and change the title text to “Save to iCloud Drive”:
Display the Resolve Auto Layout Issues menu and select the Reset to Suggested Constraints option.
|
You are reading a sample chapter from Building iOS 17 Apps using Xcode Storyboards.
Buy the full book now in eBook or Print format. The full book contains 96 chapters and 760 pages of in-depth information. |
Remove the example Latin text from the text view object by selecting it in the view canvas and deleting the value from the Text property in the Attributes Inspector panel.
Select the Text View object in the view canvas, display the Assistant Editor panel and verify that the editor is displaying the contents of the ViewController.swift file. Right-click on the Text View object and drag it to a position just below the “class ViewController” declaration line in the Assistant Editor. Release the line, and in the resulting connection dialog, establish an outlet connection named textView.
Finally, Ctrl-click on the button object and drag the line to the area immediately beneath the viewDidLoad method declaration in the Assistant Editor panel. Release the line and, within the resulting connection dialog, establish an Action method on the Touch Up Inside event configured to call a method named saveToDrive.
Accessing the Ubiquitous Container
Each time the TestDrive app launches, it will need to obtain the URL of the container, check whether the text file already exists, and, if so, read the file content and display it within the Text View object. Edit the ViewController. swift file and modify it to read as follows:
import UIKit

class ViewController: UIViewController {

    @IBOutlet weak var textView: UITextView!

    let containerURL =
        FileManager.default.url(forUbiquityContainerIdentifier: nil)
    var documentURL: URL?

    override func viewDidLoad() {
        super.viewDidLoad()

        documentURL = containerURL?.appendingPathComponent(
                                     "Documents/MyTextFile.txt")

        if let documentPath = documentURL?.path {
            if (FileManager.default.fileExists(atPath: documentPath,
                                          isDirectory: nil)) {

                if let databuffer = FileManager.default.contents(
                                          atPath: documentPath) {
                    let datastring = NSString(data: databuffer,
                           encoding: String.Encoding.utf8.rawValue)
                    textView.text = datastring as String?
                }
            }
        }
    }
.
.Code language: Swift (swift)
The code changes begin by declaring a constant named containerURL and assigning to it the URL of the default ubiquity container and a variable into which the full URL of the text file will be stored:
|
You are reading a sample chapter from Building iOS 17 Apps using Xcode Storyboards.
Buy the full book now in eBook or Print format. The full book contains 96 chapters and 760 pages of in-depth information. |
let containerURL =
        FileManager.default.url(forUbiquityContainerIdentifier: nil)
var documentURL: URL?Code language: Swift (swift)
The text file will be named MyTextFile.txt and must be stored in the container’s Documents folder. This URL is Using iCloud Drive Storage in an iOS 17 App constructed by appending it to the end of the containerURL as follows:
documentURL = containerURL?.appendingPathComponent(
                                     "Documents/MyTextFile.txt"Code language: Swift (swift)
Finally, the FileManager class is used to check if the text file already exists. If it exists, the contents are read and displayed to the user:
if (FileManager.default.fileExists(atPath: documentPath, isDirectory: nil)) {
    if let databuffer = FileManager.default.contents(atPath: documentPath) {
        let datastring = NSString(data: databuffer,
                                  encoding: String.Encoding.utf8.rawValue)
        textView.text = datastring as String?
    }
}Code language: Swift (swift)
Saving the File to iCloud Drive
The final task before testing the app is implementing the code in the saveToDrive() method to write the file to iCloud Drive. First, within the ViewController.swift file, locate the stub method and implement the code as follows:
@IBAction func saveToDrive(_ sender: Any) {

    if let url = documentURL {
        do {
            try textView.text.write(to: url, atomically:true,
		encoding:String.Encoding.utf8)
        } catch let error {
            print(error.localizedDescription)
        }
    }
}Code language: Swift (swift)
Using the previously initialized documentURL constant, the method writes the Text View’s contents to the text file stored on iCloud Drive, reporting an error if the write operation fails.
Testing the App
Build and run the app on a device or emulator on which the user’s iCloud credentials have been configured, enter some text, and click the button to save the file to iCloud Drive. Then, stop the app, relaunch it, and make sure that the text entered previously is restored.
|
You are reading a sample chapter from Building iOS 17 Apps using Xcode Storyboards.
Buy the full book now in eBook or Print format. The full book contains 96 chapters and 760 pages of in-depth information. |
Place the app into the background, launch the iOS Files app, and select the Browse tab located at the bottom of the screen. From the Browse screen, select the iCloud Drive option from the Locations section. Among the folders already stored on iCloud Drive will be a folder named TestDrive, within which will reside the MyTextFile. txt file:
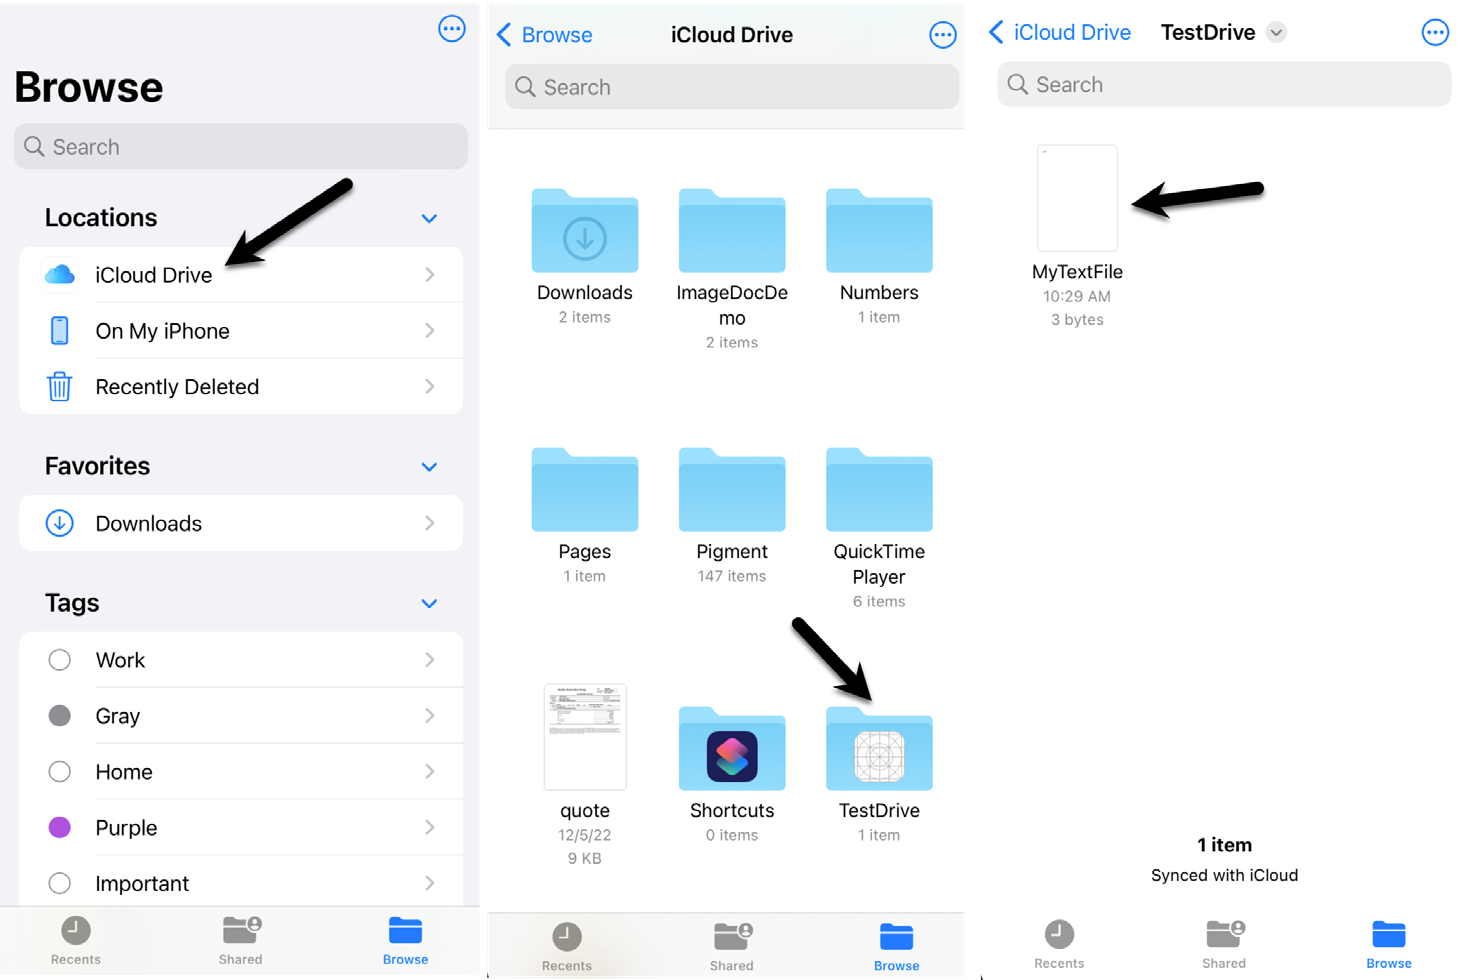
When selected, the file should open and display the text entered within the TestDrive app.
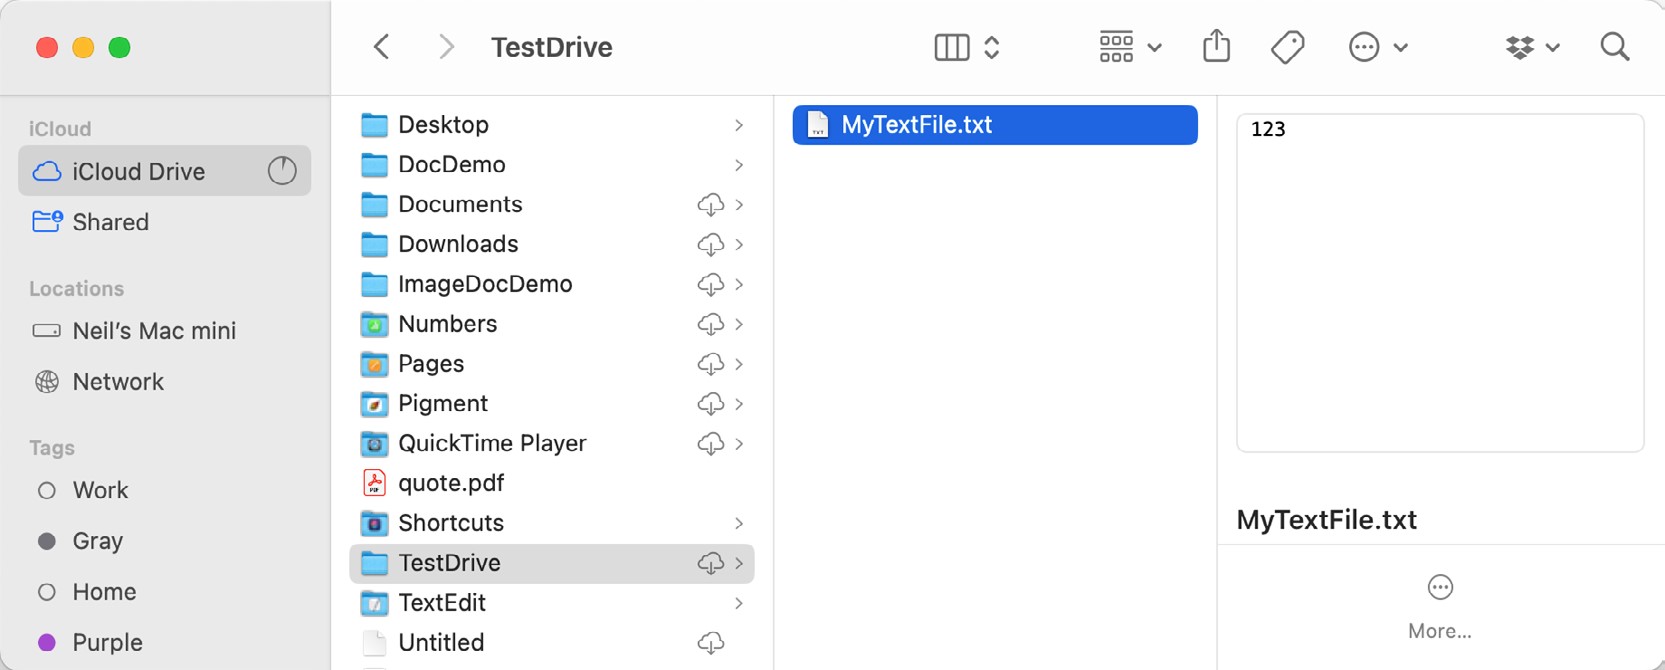
On a macOS system configured with the same iCloud user account, open the Finder window and navigate to iCloud Drive -> TestDrive -> MyTextFile.txt, where the preview panel should display the text saved to the file from within the TestDrive app:
Summary
The iCloud Drive support built into the iOS SDK allows apps to store and retrieve iCloud Drive-based files. This requires the project’s appropriate iCloud capabilities to be enabled within Xcode and the addition of ubiquitous container settings within the Info.plist file. Once these steps have been taken, a reference to the URL of the container is obtained and used to read, write, delete, and copy files on iCloud Drive. This chapter outlined these steps before creating an example app that uses iCloud Drive to store and access a simple text file.