
An area of user interface design yet to be covered in this book relates to the concept of menus within an Android application. Menus provide a mechanism for offering additional choices to the user beyond the view components in the interface layout. While there are a number of different menu systems available to the Android application developer, this chapter will focus on the more commonly used Overflow menu. The chapter will cover the creation of menus both manually via XML and visually using the Android Studio Layout Editor tool.
The Overflow Menu
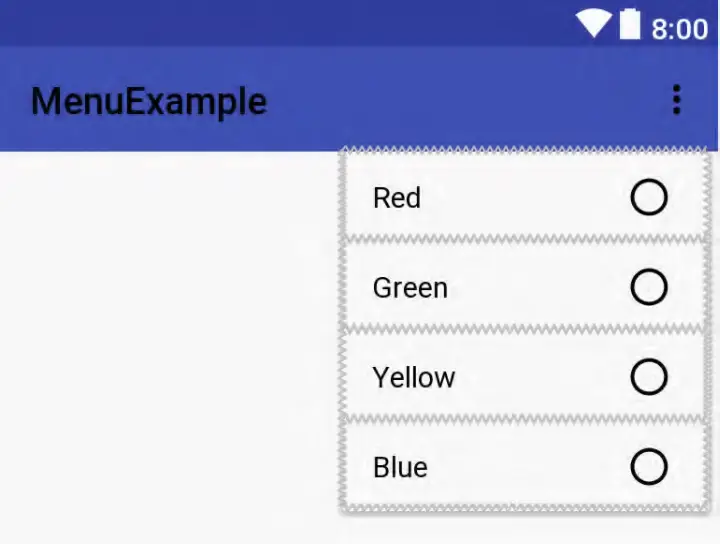
The overflow menu (also referred to as the options menu) is a menu that is accessible to the user from the device display and allows the developer to include other application options beyond those included in the user interface of the application. The location of the overflow menu is dependent upon the version of Android that is running on the device. With the Android 4.0 release and later, the overflow menu button is located in the top right-hand corner (Figure 84-1) in the action toolbar represented by the stack of three squares:

Creating an Overflow Menu
The items in a menu can be declared within an XML file, which is then inflated and displayed to the user on demand. This involves using the <menu> element, containing an <item> sub-element for each menu item. The following XML, for example, defines a menu consisting of two menu items relating to color choices:
<menu xmlns:android="http://schemas.android.com/apk/res/android"
xmlns:app="http://schemas.android.com/apk/res-auto"
xmlns:tools="http://schemas.android.com/tools"
tools:context=".MainActivity" >
<item
android:id="@+id/menu_red"
android:orderInCategory="1"
app:showAsAction="never"
android:title="@string/red_string"/>
<item
android:id="@+id/menu_green"
android:orderInCategory="2"
app:showAsAction="never"
android:title="@string/green_string"/>
</menu>Code language: HTML, XML (xml)In the above XML, the android:orderInCategory property dictates the order in which the menu items will appear within the menu when it is displayed. The app:showAsAction property, on the other hand, controls the conditions under which the corresponding item appears as an item within the action bar itself. If set to if Room, for example, the item will appear in the action bar if there is enough room. Figure 84-2 shows the effect of setting this property to ifRoom for both menu items:

This property should be used sparingly to avoid overcluttering the action bar.
 |
You are reading a sample chapter from Android Studio Hedgehog Essentials – Java Edition.
Buy the full book now in eBook (PDF) or Print format. The full book contains 87 chapters and over 806 pages of in-depth information. |
By default, a menu XML file is created by Android Studio when a new Android application project is created. This file is located in the app -> res -> menu project folder and contains a single menu item entitled “Settings”:
<menu xmlns:android="http://schemas.android.com/apk/res/android"
    xmlns:app="http://schemas.android.com/apk/res-auto"
    xmlns:tools="http://schemas.android.com/tools"
    tools:context=".MainActivity">
       <item android:id="@+id/action_settings"
            android:title="@string/action_settings"
            android:orderInCategory="100"
            app:showAsAction="never" />
</menu>Code language: HTML, XML (xml)
This menu is already configured to be displayed when the user selects the overflow menu on the user interface when the app is running, so simply modify this one to meet your needs.
Displaying an Overflow Menu
An overflow menu is created by overriding the onCreateOptionsMenu() method of the corresponding activity and then inflating the menu’s XML file. For example, the following code creates the menu contained within a menu XML file named menu_main:
@Override
public boolean onCreateOptionsMenu(Menu menu) {
       getMenuInflater().inflate(R.menu.menu_main, menu);
       return true;
}Code language: Java (java)
As with the menu XML file, Android Studio will already have overridden this method in the main activity of a newly created Android application project. In the event that an overflow menu is not required in your activity, either remove or comment out this method.
Responding to Menu Item Selections
Once a menu has been implemented, the question arises as to how the application receives notification when the user makes menu item selections. To receive menu selection notifications, an activity needs to override the onOptionsItemSelected() method. Passed as an argument to this method is a reference to the selected menu item. The getItemId() method may then be called on the item to obtain the ID which may, in turn, be used to identify which item was selected. For example:
|
You are reading a sample chapter from Android Studio Hedgehog Essentials – Java Edition.
Buy the full book now in eBook (PDF) or Print format. The full book contains 87 chapters and over 806 pages of in-depth information. |
@Override
public boolean onOptionsItemSelected(MenuItem item) {

    if (id == R.id.menu_red) {
        // Red item was selected
    } else if (id == R.id.menu_green) {
        // Green item was selected
    } else {
        return super.onOptionsItemSelected(item);
    }
    return(true);
}Code language: Java (java)
Creating Checkable Item Groups
In addition to configuring independent menu items, it is also possible to create groups of menu items. This is of particular use when creating checkable menu items whereby only one out of a number of choices can be selected at any one time. Menu items can be assigned to a group by wrapping them in the <group> tag. The group is declared as checkable using the android:checkableBehavior property, setting the value to either single, all or none. The following XML declares that two menu items make up a group wherein only one item may be selected at any given time:
<menu xmlns:android="http://schemas.android.com/apk/res/android"
    xmlns:app="http://schemas.android.com/apk/res-auto">
    <group android:checkableBehavior="single">
        <item
            android:id="@+id/menu_red"
            android:title="@string/red_string"/>
        <item
            android:id="@+id/menu_green"
            android:title="@string/green_string"/>
    </group>
</menu>Code language: HTML, XML (xml)
When a menu group is configured to be checkable, a small circle appears next to the item in the menu as illustrated in Figure 84-3. It is important to be aware that the setting and unsetting of this indicator does not take place automatically. It is, therefore, the responsibility of the application to check and uncheck the menu item.

Continuing the color example used previously in this chapter, this would be implemented as follows:
@Override
public boolean onOptionsItemSelected(MenuItem item) {

    if (id == R.id.menu_red) {
        item.setChecked(!item.isChecked())
        mainLayout.setBackgroundColor(android.graphics.Color.RED);
    } else if (id == R.id.menu_green) {
        item.setChecked(!item.isChecked());
        mainLayout.setBackgroundColor(android.graphics.Color.GREEN);
    } else {
        return super.onOptionsItemSelected(item);
    }
    return(true);
}Code language: Java (java)
Menus and the Android Studio Menu Editor
Android Studio allows menus to be designed visually simply by loading the menu resource file into the Menu Editor tool, dragging and dropping menu elements from a palette and setting properties. This considerably eases the menu design process, though it is important to be aware that it is still necessary to write the code in the onOptionsItemSelected() method to implement the menu behavior.
To visually design a menu, locate the menu resource file and double-click on it to load it into the Menu Editor tool. Figure 84-4, for example, shows the default menu resource file for a basic activity loaded into the Menu Editor in Design mode:
|
You are reading a sample chapter from Android Studio Hedgehog Essentials – Java Edition.
Buy the full book now in eBook (PDF) or Print format. The full book contains 87 chapters and over 806 pages of in-depth information. |
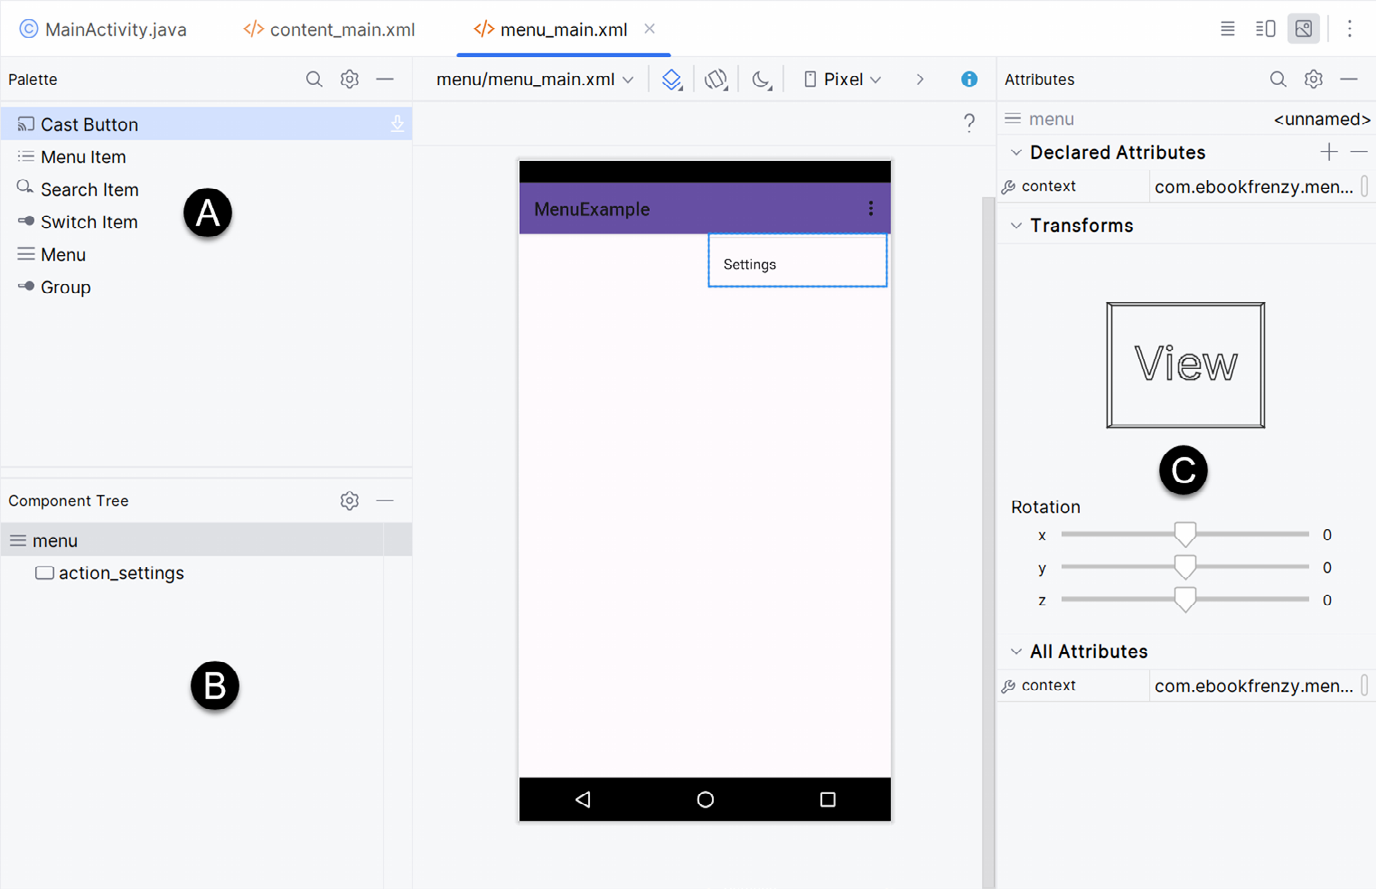
The palette (A) contains items that can be added to the menu contained in the design area (C). The Component Tree (B) is a useful tool for identifying the hierarchical structure of the menu. The Attributes panel (D) contains a subset of common attributes for the currently selected item.
New elements may be added to the menu by dragging and dropping objects either onto the layout canvas or the Component Tree. When working with menus in the Layout Editor tool, it will sometimes be easier to drop the items onto the Component Tree since this provides greater control over where the item is placed within the tree. For example, this is of particular use when adding items to a group.
Although the Menu Editor provides a visual approach to constructing menus, the underlying menu is still stored in XML format which may be viewed and edited manually by switching from Design to Code mode using the tab marked F in the above figure.
Creating the Example Project
To see the overflow menu in action, click the New Project button on the welcome screen and, within the resulting new project dialog, choose the Basic Views Activity template before clicking on the Next button.
Enter MenuExample into the Name field and specify com.ebookfrenzy.menuexample as the package name. Before clicking on the Finish button, change the Minimum API level setting to API 26: Android 8.0 (Oreo) and the Language menu to Java.
|
You are reading a sample chapter from Android Studio Hedgehog Essentials – Java Edition.
Buy the full book now in eBook (PDF) or Print format. The full book contains 87 chapters and over 806 pages of in-depth information. |
When the project has been created, navigate to the app -> res -> layout folder in the Project tool window and double-click on the content_main.xml file to load it into the Android Studio Menu Editor tool. Switch the tool to Design mode, select the ConstraintLayout from the Component Tree panel and enter layoutView into the ID field of the Attributes panel.
Designing the Menu
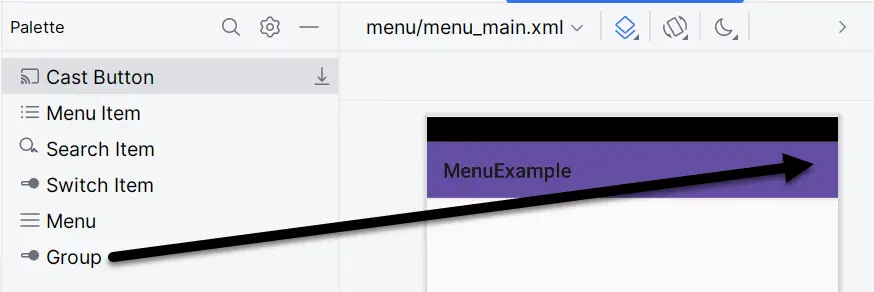
Within the Project tool window, locate the project’s app -> res -> menu -> menu_main.xml file and double-click on it to load it into the Layout Editor tool. Switch to Design mode if necessary and select and delete the default Settings menu item added by Android Studio so that the menu currently has no items.
From the palette, click and drag a menu group object onto the title bar of the layout canvas as highlighted in Figure 84-5:
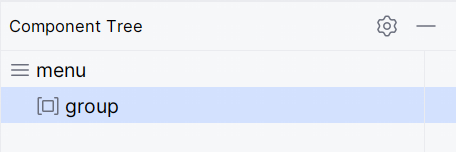
Although the group item has been added, it will be invisible within the layout. To verify the presence of the element, refer to the Component Tree panel where the group will be listed as a child of the menu:
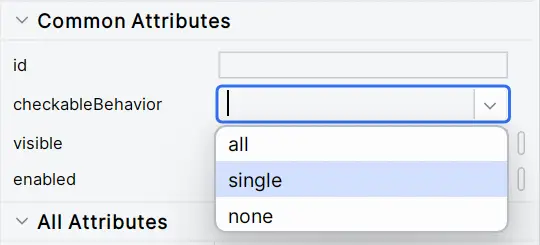
Select the group entry in the Component Tree and, referring to the Attributes panel, set the checkableBehavior property to single so that only one group menu item can be selected at any one time:
|
You are reading a sample chapter from Android Studio Hedgehog Essentials – Java Edition.
Buy the full book now in eBook (PDF) or Print format. The full book contains 87 chapters and over 806 pages of in-depth information. |
Next, drag four Menu Item elements from the palette and drop them onto the group element in the Component Tree. Select the first item and use the Attributes panel to change the title to “Red” and the ID to menu_red:
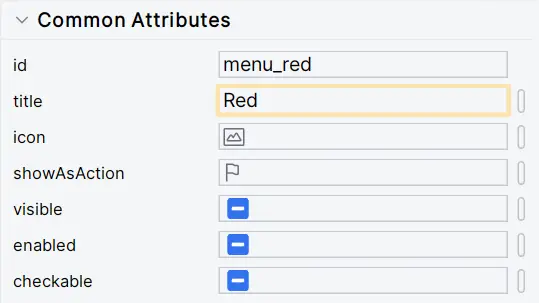
Repeat these steps for the remaining three menu items, setting the titles to “Green”, “Yellow,” and “Blue” with matching IDs of menu_green, menu_yellow and menu_blue. Use the warning buttons to the right of the menu items in the Component Tree panel to extract the strings to resources:
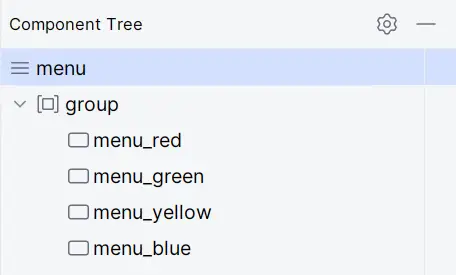
On completion of these steps, the menu layout should match that shown in Figure 84-10 below:
Switch the Layout Editor tool to Code mode and review the XML representation of the menu which should match the following listing:
<menu xmlns:android="http://schemas.android.com/apk/res/android"
    xmlns:app="http://schemas.android.com/apk/res-auto"
    xmlns:tools="http://schemas.android.com/tools"
    tools:context="com.ebookfrenzy.menuexample.MainActivity">

    <group android:checkableBehavior="single">
        <item android:title="@string/red_string"
            android:id="@+id/menu_red" />
        <item android:title="@string/green_string"
            android:id="@+id/menu_green" />
        <item android:title="@string/yellow_string"
            android:id="@+id/menu_yellow" />
        <item android:title="@string/blue_string"
            android:id="@+id/menu_blue" />
    </group>
</menu>Code language: HTML, XML (xml)
Modifying the onOptionsItemSelected() Method
When items are selected from the menu, the overridden onOptionsItemsSelected() method of the application’s activity will be called. The role of this method will be to identify which item was selected and change the background color of the layout view to the corresponding color. Locate and double-click on the app -> java -> com.ebookfrenzy.menuexample -> MainActivity file and modify the method as follows:
|
You are reading a sample chapter from Android Studio Hedgehog Essentials – Java Edition.
Buy the full book now in eBook (PDF) or Print format. The full book contains 87 chapters and over 806 pages of in-depth information. |
package com.ebookfrenzy.menuexample;
.
.
import androidx.constraintlayout.widget.ConstraintLayout;

public class MainActivity extends AppCompatActivity {
.
.
    public boolean onOptionsItemSelected(MenuItem item) {

        int id = item.getItemId();
        ConstraintLayout mainLayout =
                findViewById(R.id.layoutView);

        if (id == R.id.menu_red) {
            item.setChecked(!item.isChecked());
            mainLayout.setBackgroundColor(android.graphics.Color.RED);
        } else if (id == R.id.menu_green) {
            item.setChecked(!item.isChecked());
            mainLayout.setBackgroundColor(android.graphics.Color.GREEN);
        } else if (id == R.id.menu_yellow) {
            item.setChecked(!item.isChecked());
            mainLayout.setBackgroundColor(android.graphics.Color.YELLOW);
        } else if (id == R.id.menu_blue) {
            item.setChecked(!item.isChecked());
            mainLayout.setBackgroundColor(android.graphics.Color.BLUE);
        } else {
            return super.onOptionsItemSelected(item);
        }
        return(true);
    }
.
.Code language: Java (java)
Testing the Application
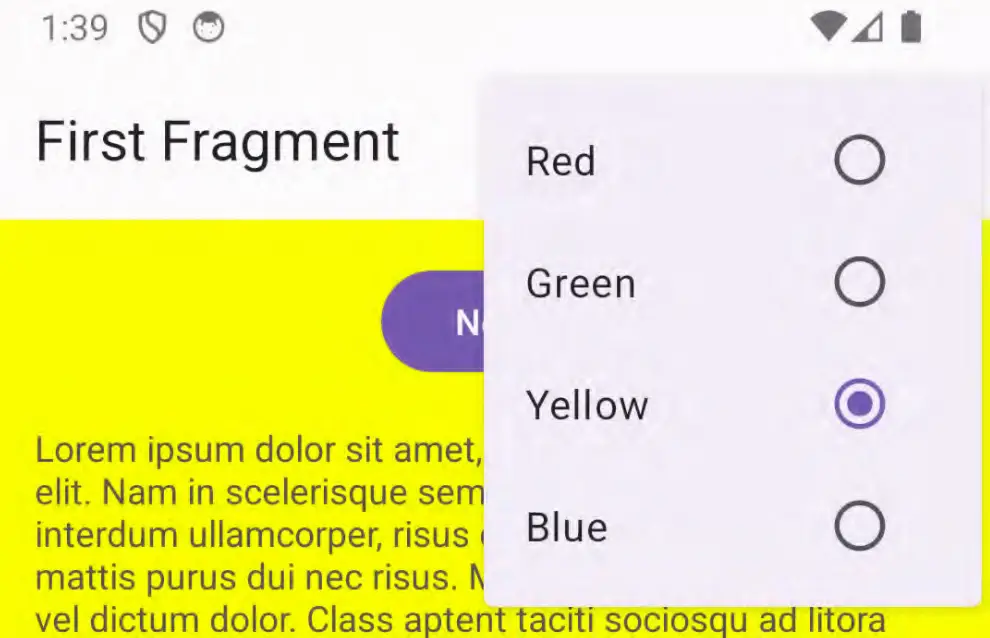
Build and run the application on either an emulator or a physical Android device. Using the overflow menu, select menu items and verify that the layout background color changes appropriately. Note that the currently selected color is displayed as the checked item in the menu:
Summary
The Android overflow menu is accessed from the far right of the actions toolbar at the top of the display of the running app. This menu provides a location for applications to provide additional options to the user.
The structure of the menu is most easily defined within an XML file and the application activity receives notifications of menu item selections by overriding and implementing the onOptionsItemSelected() method.