
Although the Android Studio Preview panel allows us to see the layout we are designing, compiling and running an entire app will be necessary to thoroughly test that it works. An Android application may be tested by installing and running it on a physical device or in an Android Virtual Device (AVD) emulator environment. Before an AVD can be used, it must first be created and configured to match the specifications of a particular device model. In this chapter, we will work through creating such a virtual device using the Pixel 4 phone as a reference example.
About Android Virtual Devices
AVDs are emulators that allow Android applications to be tested without needing to install the application on a physical Android-based device. An AVD may be configured to emulate various hardware features, including screen size, memory capacity, and the presence or otherwise of features such as a camera, GPS navigation support, or an accelerometer. Several emulator templates are installed as part of the standard Android Studio installation, allowing AVDs to be configured for various devices. Custom configurations may be created to match any physical Android device by specifying properties such as processor type, memory capacity, and the size and pixel density of the screen.
An AVD session can appear as a separate window or embedded within the Android Studio window.
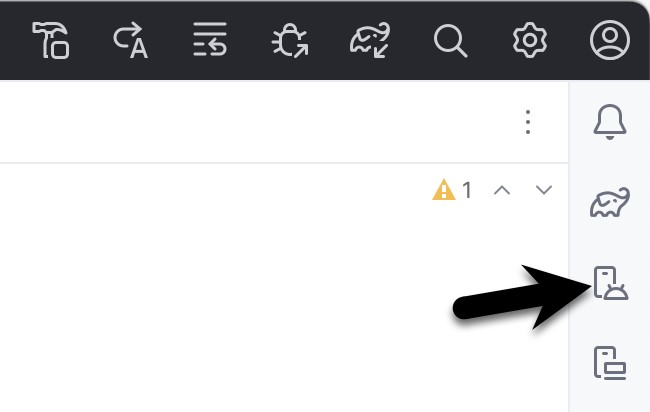
New AVDs are created and managed using the Android Virtual Device Manager, which may be used in command-line mode or with a more user-friendly graphical user interface. To create a new AVD, the first step is to launch the AVD Manager. This can be achieved from within the Android Studio environment by clicking the Device Manager button in the right-hand tool window bar, as indicated in Figure 4-1:
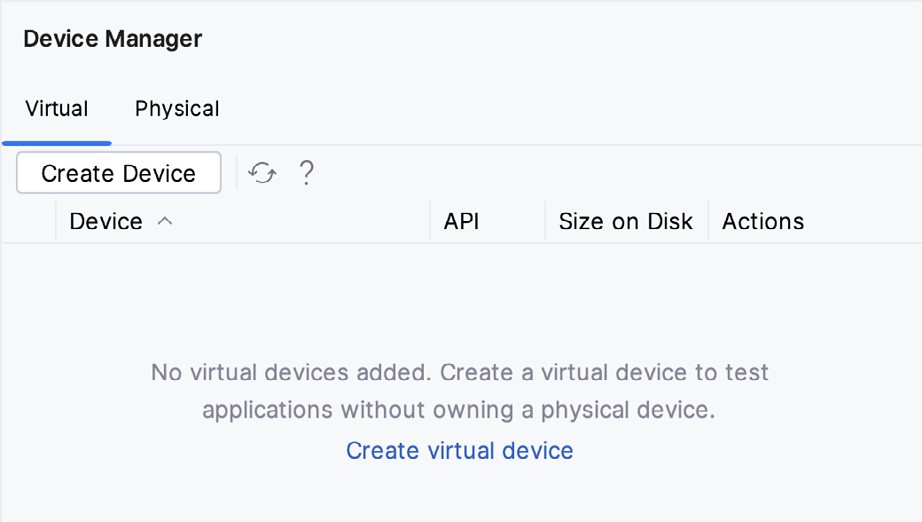
Once opened, the manager will appear as a tool window, as shown in Figure 4-2:
 |
You are reading a sample chapter from Android Studio Giraffe Essentials – Kotlin Edition.
Buy the full book now in eBook (PDF) or Print format. The full book contains 94 chapters and over 830 pages of in-depth information. |
If you installed Android Studio for the first time on a computer (as opposed to upgrading an existing Android Studio installation), the installer might have created an initial AVD instance ready for use, as shown in Figure 4-3:
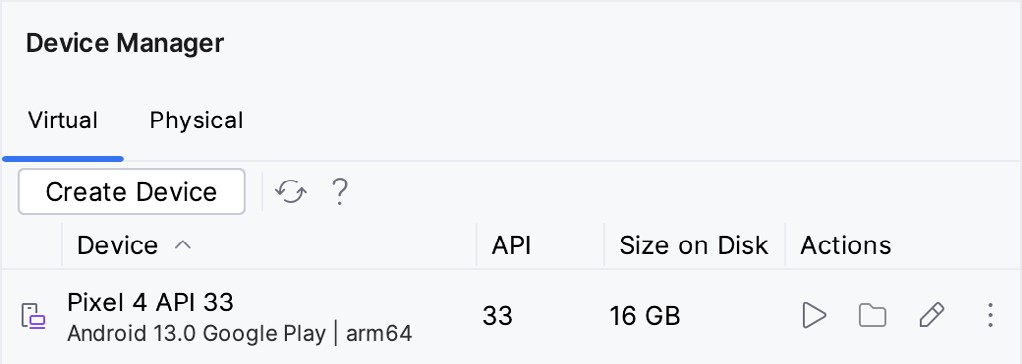
If this AVD is present on your system, you can use it to test apps. If no AVD was created, or you would like to create AVDs for different device types, follow the steps in the rest of this chapter.
To add a new AVD, begin by making sure that the Virtual tab is selected before clicking on the Create device button to open the Virtual Device Configuration dialog:
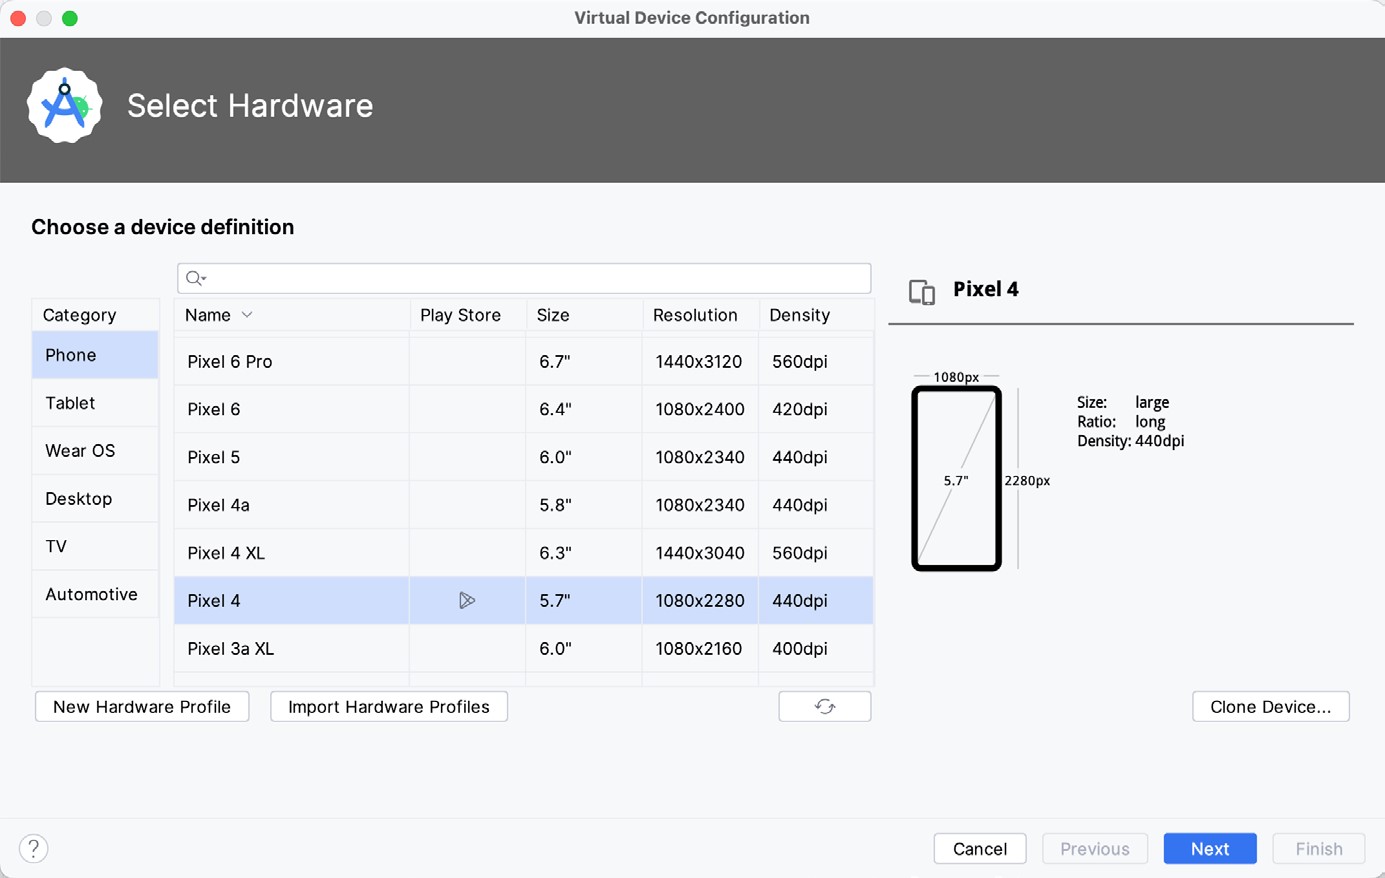
Within the dialog, perform the following steps to create a Pixel 4-compatible emulator:
- Select the Phone option From the Category panel to display the available Android phone AVD templates.
- Select the Pixel 4 device option and click Next.
- On the System Image screen, select the latest version of Android. If the system image has not yet been installed, a Download link will be provided next to the Release Name. Click this link to download and install the system image before selecting it. If the image you need is not listed, click on the x86 Images (or ARM images if you are running a Mac with Apple Silicon) and Other images tabs to view alternative lists.
- Click Next to proceed and enter a descriptive name (for example, Pixel 4 API 33) into the name field or accept the default name.
- Click Finish to create the AVD.
- If future modifications to the AVD are necessary, re-open the Device Manager, select the AVD from the list, and click on the pencil icon in the Actions column to edit the settings.
Starting the Emulator
To test the newly created AVD emulator, select the emulator from the Device Manager and click the launch button (the triangle in the Actions column). The emulator will appear embedded into the main Android Studio window and begin the startup process. The amount of time it takes for the emulator to start will depend on the configuration of both the AVD and the system on which it is running:
|
You are reading a sample chapter from Android Studio Giraffe Essentials – Kotlin Edition.
Buy the full book now in eBook (PDF) or Print format. The full book contains 94 chapters and over 830 pages of in-depth information. |
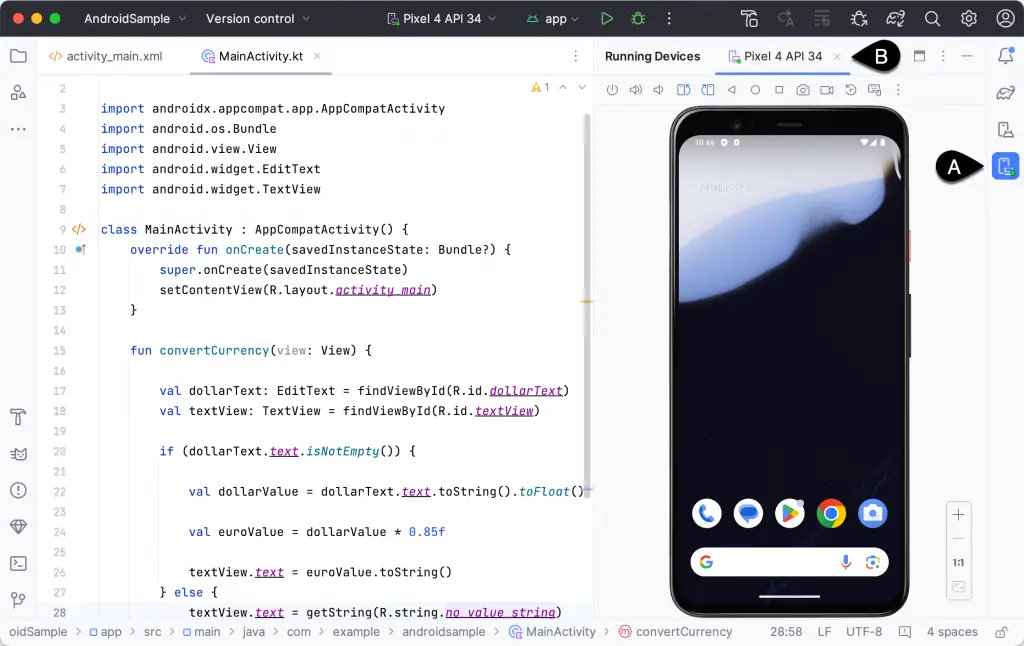
To hide and show the emulator tool window, click the Running Devices tool window button (marked A above). Click the “x” close button next to the tab (B) to exit the emulator. The emulator tool window can accommodate multiple emulator sessions, with each session represented by a tab. Figure 4-6, for example, shows a tool window with two emulator sessions:

To switch between sessions, click on the corresponding tab.
Although the emulator probably defaulted to appearing in portrait orientation, this and other default options can be changed. Within the Device Manager, select the new Pixel 4 entry and click on the pencil icon in the Actions column of the device row. In the configuration screen, locate the Startup orientation section and change the orientation setting. Exit and restart the emulator session to see this change take effect. More details on the emulator are covered in the next chapter, Using and Configuring the Android Studio AVD Emulator). To save time in the next section of this chapter, leave the emulator running before proceeding.
Running the Application in the AVD
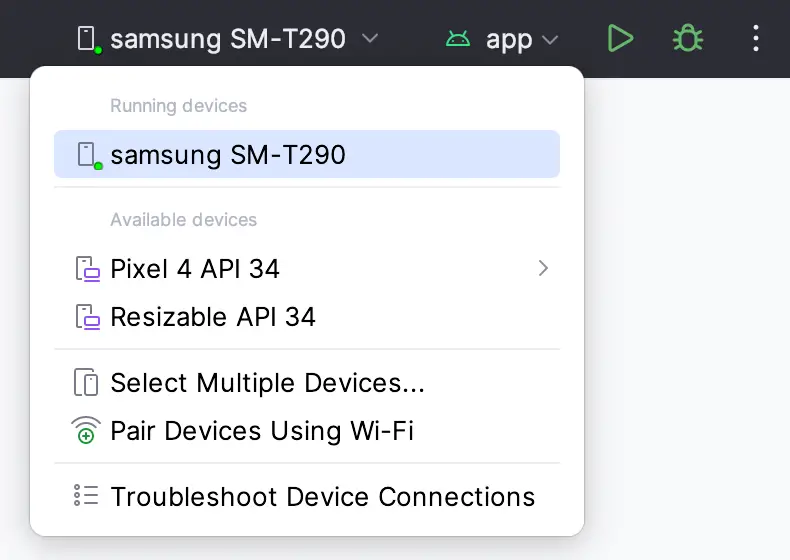
With an AVD emulator configured, the example AndroidSample application created in the earlier chapter can now be compiled and run. With the AndroidSample project loaded into Android Studio, make sure that the newly created Pixel 4 AVD is displayed in the device menu (marked A in Figure 4-7 below), then either click the run button represented by a triangle (B), select the Run -> Run ‘app’ menu option, or use the Ctrl-R keyboard shortcut:

The device menu (A) may be used to select a different AVD instance or physical device as the run target and also to run the app on multiple devices. The menu also provides access to the Device Manager as well as device connection configuration and troubleshooting options:
|
You are reading a sample chapter from Android Studio Giraffe Essentials – Kotlin Edition.
Buy the full book now in eBook (PDF) or Print format. The full book contains 94 chapters and over 830 pages of in-depth information. |
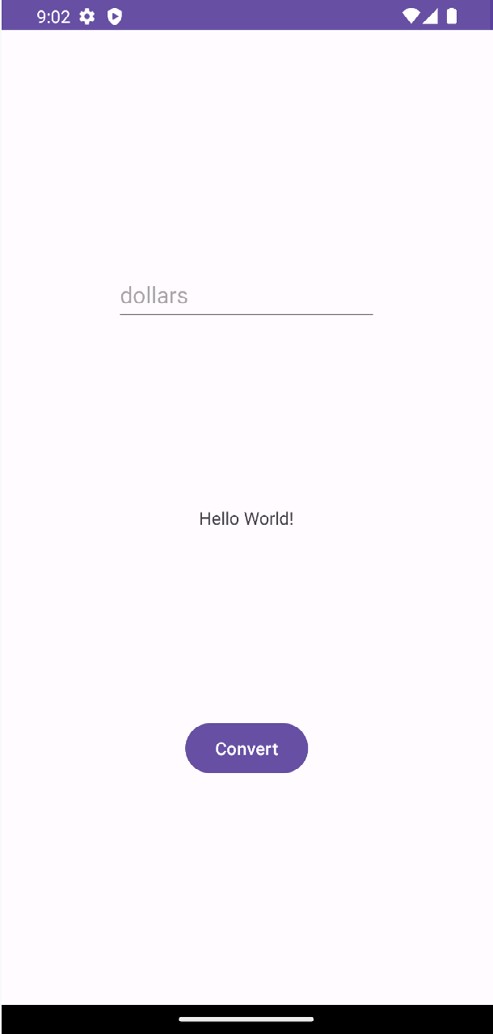
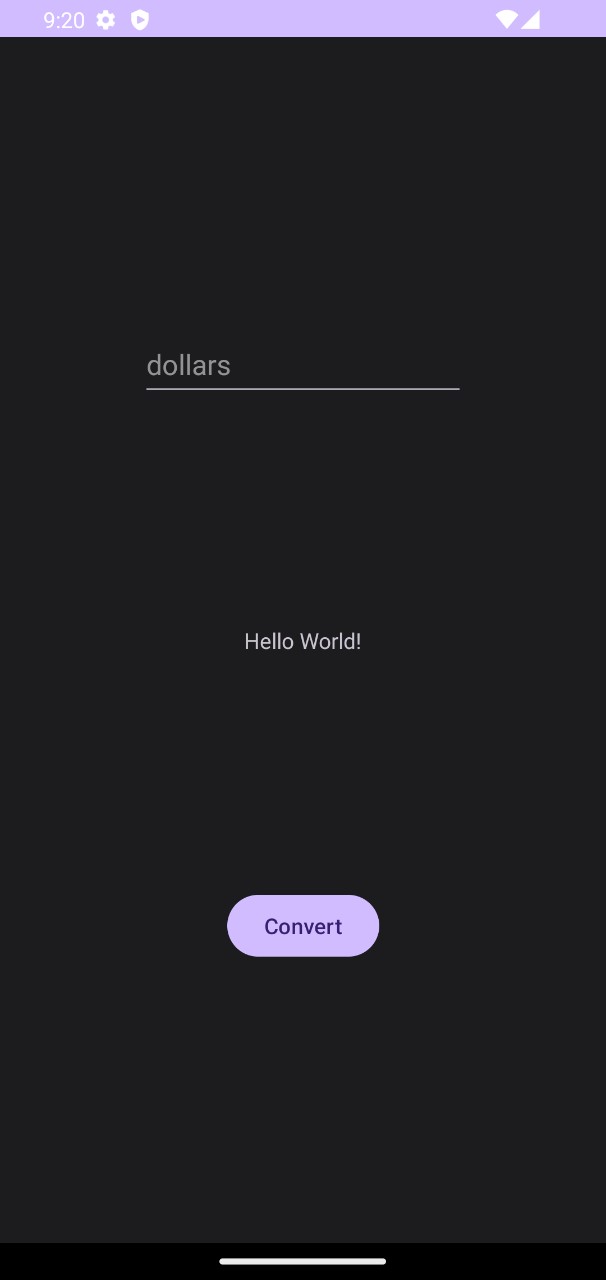
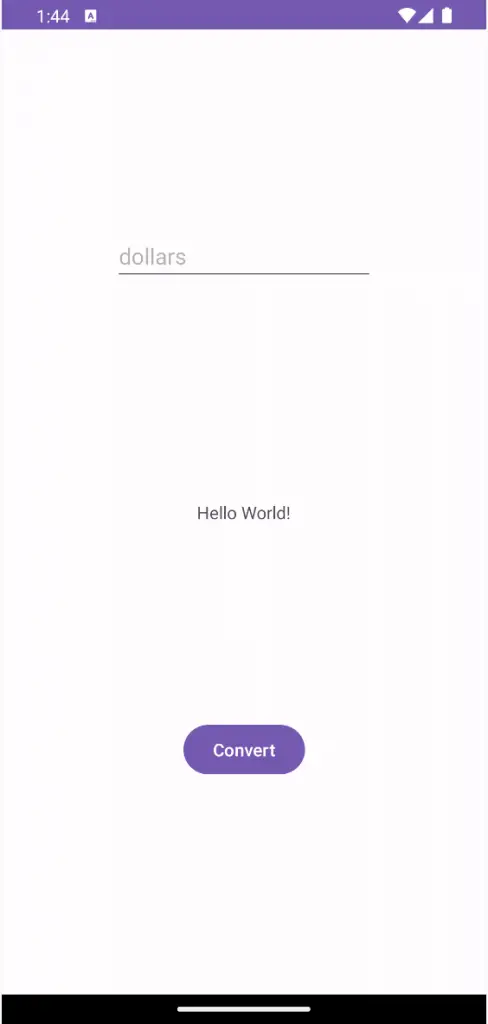
Once the application is installed and running, the user interface for the first fragment will appear within the emulator (a fragment is a reusable section of an Android project typically consisting of a user interface layout and some code, a topic which will be covered later in the chapter entitled A Guide to Android Fragments):
Once the run process begins, the Run tool window will appear. The Run tool window will display diagnostic information as the application package is installed and launched. Figure 4-10 shows the Run tool window output from a typical successful application launch:
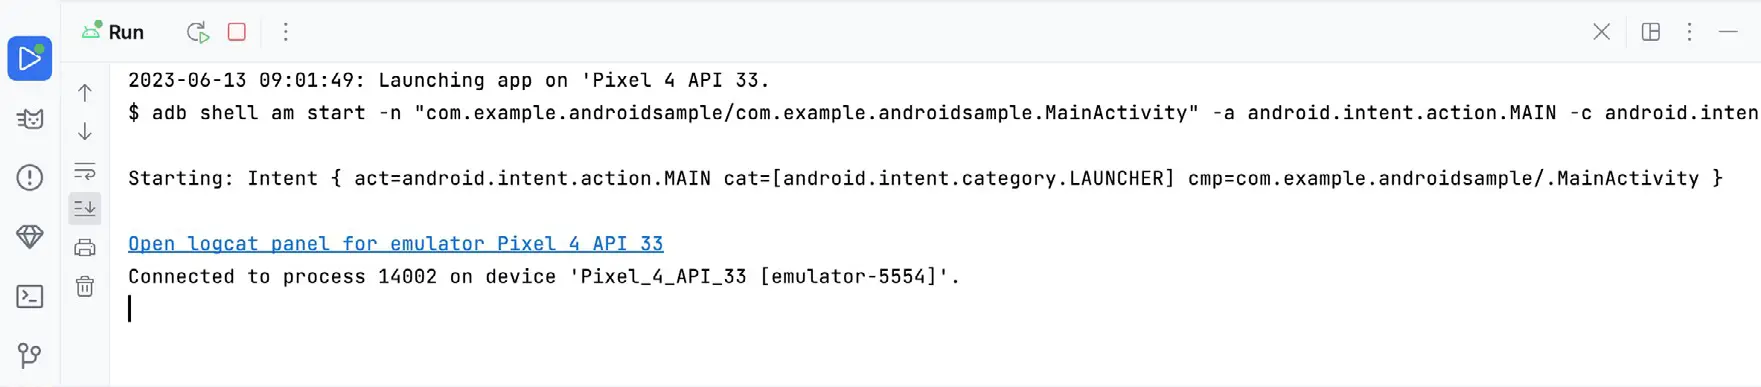
If problems are encountered during the launch process, the Run tool window will provide information to help isolate the problem’s cause.
Assuming the application loads into the emulator and runs as expected, we have safely verified that the Android development environment is correctly installed and configured. With the app running, try performing a currency conversion to verify that the app works as intended.
Running on Multiple Devices
The run target menu shown in Figure 4-8 above includes an option to run the app on multiple emulators and devices in parallel. When selected, this option displays the dialog in Figure 4-11, providing a list of the AVDs configured on the system and any attached physical devices. Enable the checkboxes next to the emulators or devices to be targeted before clicking on the Run button:
|
You are reading a sample chapter from Android Studio Giraffe Essentials – Kotlin Edition.
Buy the full book now in eBook (PDF) or Print format. The full book contains 94 chapters and over 830 pages of in-depth information. |
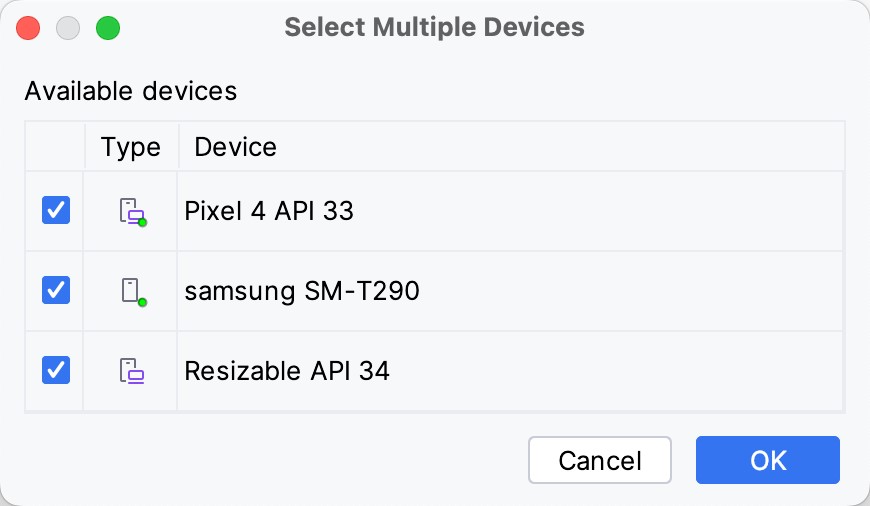
After clicking the Run button, Android Studio will launch the app on the selected emulators and devices.
Stopping a Running Application
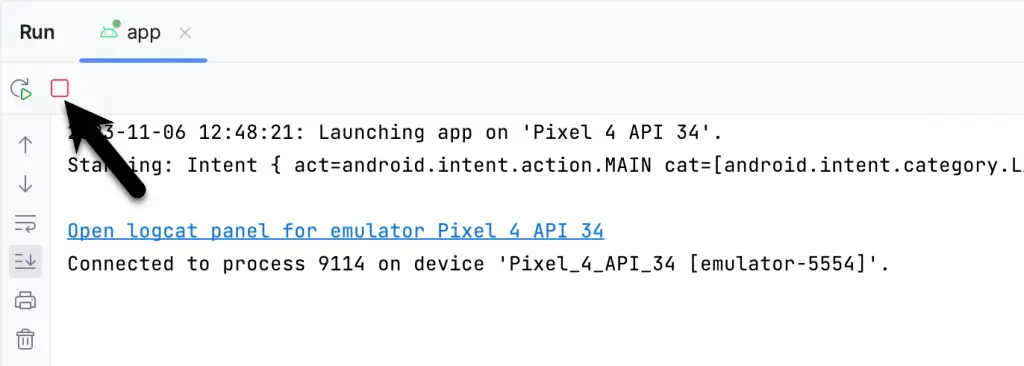
To stop a running application, click the stop button located in the main toolbar, as shown in Figure 4-12:

An app may also be terminated using the Run tool window. Begin by displaying the Run tool window using the window bar button that becomes available when the app is running. Once the Run tool window appears, click the stop button highlighted in Figure 4-13 below:
Supporting Dark Theme
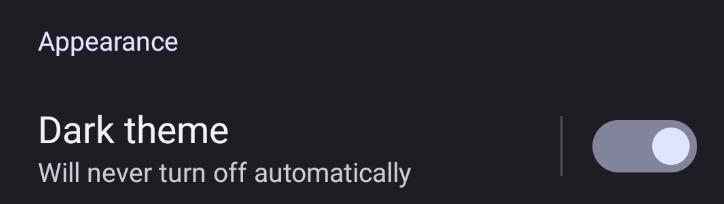
To test how an app behaves when dark theme is enabled, open the Settings app within the running Android instance in the emulator, choose the Display category, and enable the Dark theme option as shown in Figure 4-14:
With dark theme enabled, run the AndroidSample app and note that it appears using a dark theme, including a black background and a purple background color on the button, as shown in Figure 4-15:
|
You are reading a sample chapter from Android Studio Giraffe Essentials – Kotlin Edition.
Buy the full book now in eBook (PDF) or Print format. The full book contains 94 chapters and over 830 pages of in-depth information. |
Return to the Settings app and turn off Dark theme mode before continuing.
Running the Emulator in a Separate Window
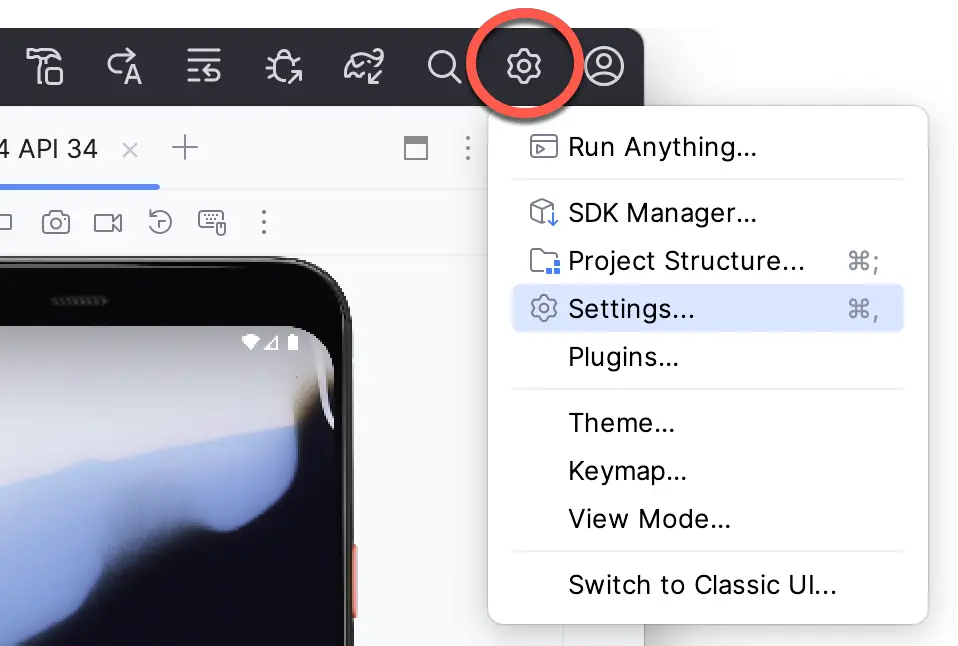
So far in this chapter, we have only used the emulator as a tool window embedded within the main Android Studio window. The emulator can be configured to appear in a separate window within the Settings dialog, which can be displayed by clicking on the IDE and Project Settings button located in the Android Studio toolbar, as highlighted in Figure 4-16:
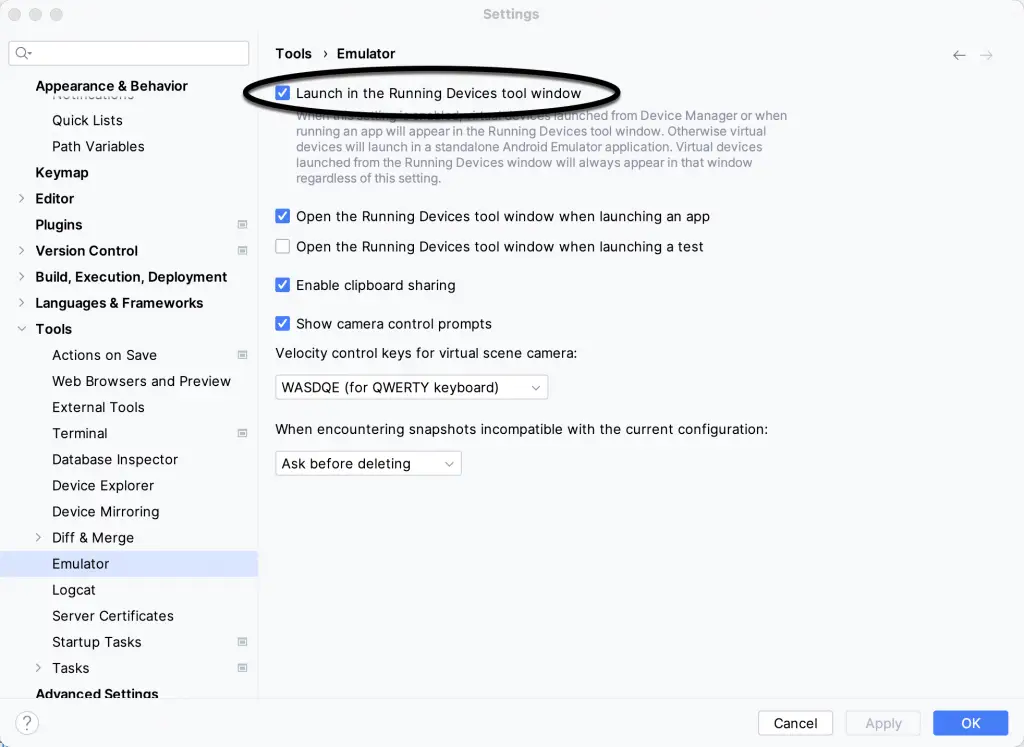
Within the Settings dialog, navigate to Tools -> Emulator in the side panel, and disable the Launch in the Running Devices tool window option:
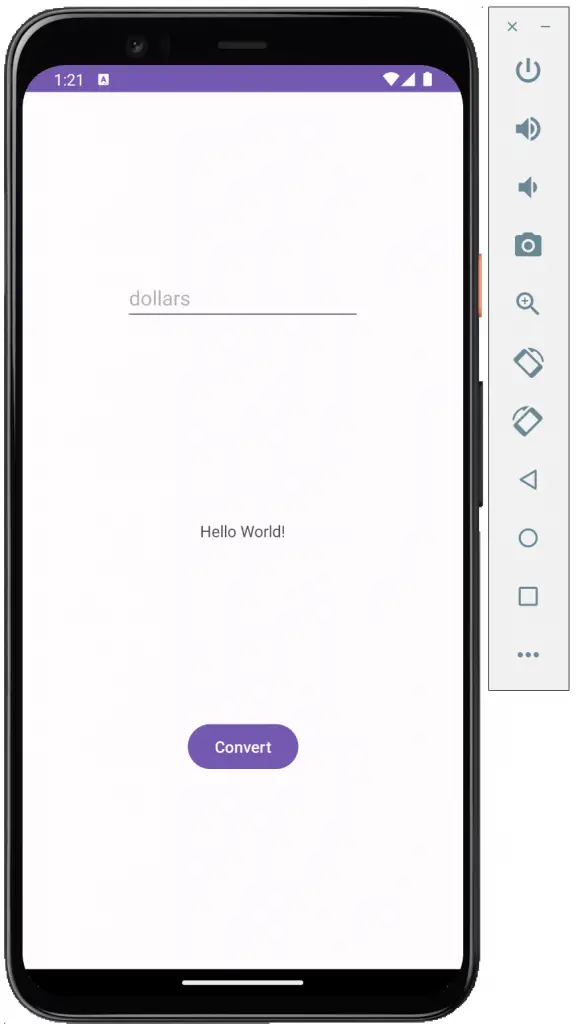
With the option disabled, click the Apply button followed by OK to commit the change, then exit the current emulator session by clicking on the close button on the tab marked B in Figure 4-5 above.
Run the sample app once again, at which point the emulator will appear as a separate window, as shown below:
|
You are reading a sample chapter from Android Studio Giraffe Essentials – Kotlin Edition.
Buy the full book now in eBook (PDF) or Print format. The full book contains 94 chapters and over 830 pages of in-depth information. |
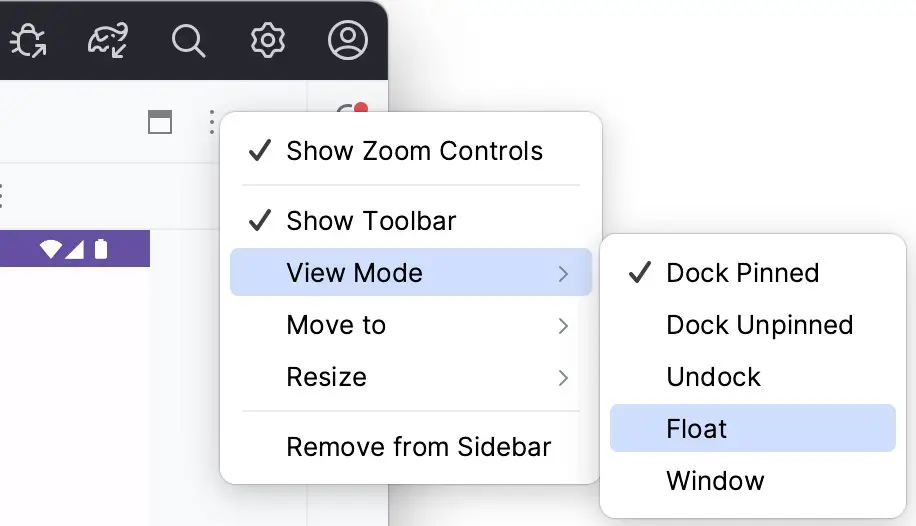
The choice of standalone or tool window mode is a matter of personal preference. If you prefer the emulator running in a tool window, return to the settings screen and re-enable the Launch in the Running Devices tool window option. Before committing to standalone mode, however, keep in mind that the Running Devices tool window may also be detached from the main Android Studio window from within the tool window Options menu, which is accessed by clicking the button indicated in Figure 4-19:
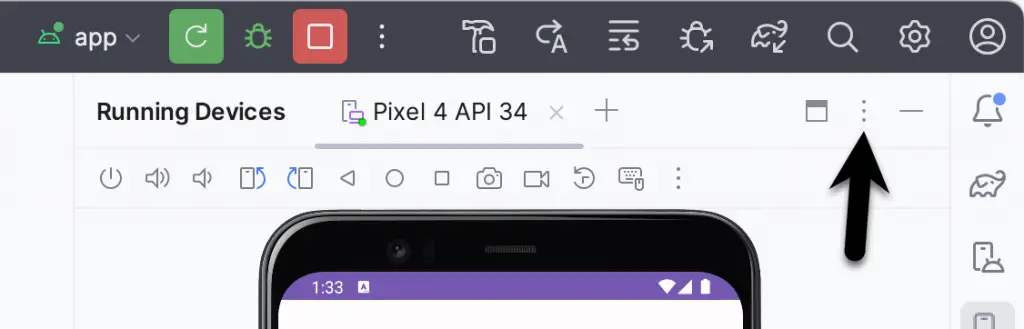
From within the Options menu, select View Mode -> Float to detach the tool window from the Android Studio main window:
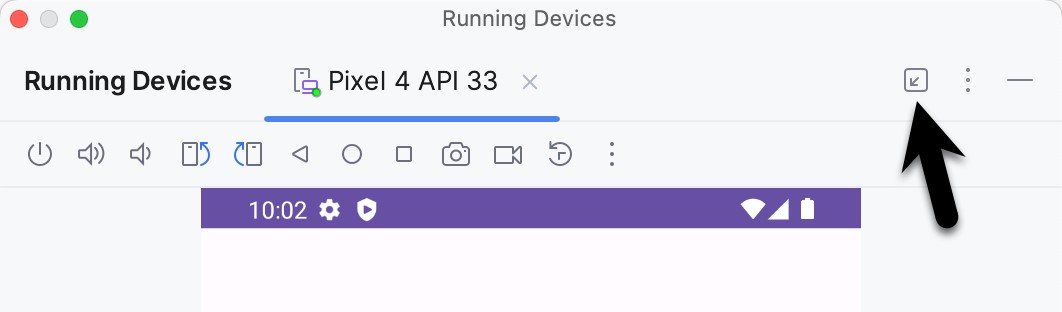
To re-dock the Running Devices tool window, click on the Dock button shown in Figure 4-21:
Removing the Device Frame
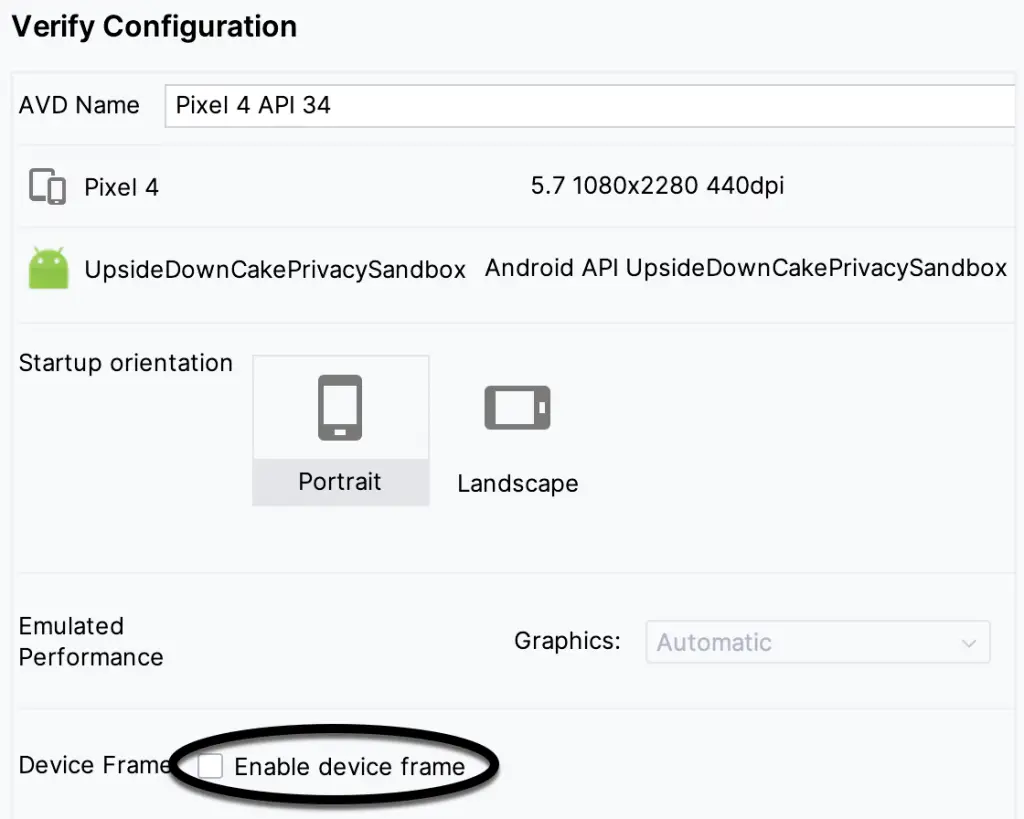
The emulator can be configured to appear with or without the device frame. To change the setting, exit the emulator, open the Device Manager, select the AVD from the list, and click on the menu button indicated by the arrow in Figure 4-22:

Select the Edit option and, in the settings screen, locate and switch off the Enable device frame option before clicking the Finish button:
|
You are reading a sample chapter from Android Studio Giraffe Essentials – Kotlin Edition.
Buy the full book now in eBook (PDF) or Print format. The full book contains 94 chapters and over 830 pages of in-depth information. |
Once the device frame has been disabled, the emulator will appear as shown in Figure 4-23 the next time it is launched:
Summary
A typical application development process follows a coding, compiling, and running cycle in a test environment. Android applications may be tested on a physical Android device or an Android Virtual Device (AVD) emulator. AVDs are created and managed using the Android Studio Device Manager tool, which may be used as a command-line tool or via a graphical user interface. When creating an AVD to simulate a specific Android device model, the virtual device should be configured with a hardware specification matching that of the physical device.
The AVD emulator session may be displayed as a standalone window or embedded into the main Android Studio user interface.