
Suppose you have ever had an idea for a game but didn’t create it because you lacked the skills or time to write complex game code and logic; look no further than Sprite Kit. Introduced as part of the iOS 7 SDK, Sprite Kit allows 2D games to be easily developed.
Sprite Kit provides almost everything needed to create 2D games for iOS, watchOS, tvOS, and macOS with minimum coding. Sprite Kit’s features include animation, physics simulation, collision detection, and special effects. These features can be harnessed within a game with just a few method calls.
In this and the next three chapters, the topic of games development with Sprite Kit will be covered to bring the reader up to a level of competence to begin creating games while also providing a knowledge base on which to develop further Sprite Kit development skills.
What is Sprite Kit?
Sprite Kit is a programming framework that makes it easy for developers to implement 2D-based games that run on iOS, macOS, tvOS, and watchOS. It provides a range of classes that support the rendering and animation of graphical objects (otherwise known as sprites) that can be configured to behave in specific programmer-defined ways within a game. Through actions, various activities can be run on sprites, such as animating a character so that it appears to be walking, making a sprite follow a specific path within a game scene, or changing the color and texture of a sprite in real-time.
Sprite Kit also includes a physics engine allowing physics-related behavior to be imposed on sprites. For example, a sprite can, amongst other things, be made to move by subjecting it to a pushing force, configured to behave as though affected by gravity, or to bounce back from another sprite as the result of a collision.
 |
You are reading a sample chapter from Building iOS 17 Apps using Xcode Storyboards.
Buy the full book now in eBook or Print format. The full book contains 96 chapters and 760 pages of in-depth information. |
In addition, the Sprite Kit particle emitter class provides a useful mechanism for creating special effects within a game, such as smoke, rain, fire, and explosions. A range of templates for existing special effects is provided with Sprite Kit and an editor built into Xcode for creating custom particle emitter-based special effects.
The Key Components of a Sprite Kit Game
A Sprite Kit game will typically consist of several different elements.
Sprite Kit View
Every Sprite Kit game will have at least one SKView class. An SKView instance sits at the top of the component hierarchy of a game and is responsible for displaying the game content to the user. It is a subclass of the UIView class and, as such, has many of the traits of that class, including an associated view controller.
Scenes
A game will also contain one or more scenes. One scene might, for example, display a menu when the game starts, while additional scenes may represent multiple levels within the game. Scenes are represented in a game by the SKScene class, a subclass of the SKNode class.
Nodes
Each scene within a Sprite Kit game will have several Sprite Kit node children. These nodes fall into several different categories, each of which has a dedicated Sprite Kit node class associated with it. These node classes are all subclasses of the SKNode class and can be summarized as follows:
|
You are reading a sample chapter from Building iOS 17 Apps using Xcode Storyboards.
Buy the full book now in eBook or Print format. The full book contains 96 chapters and 760 pages of in-depth information. |
- SKSpriteNode – Draws a sprite with a texture. These textures will typically be used to create image-based characters or objects in a game, such as a spaceship, animal, or monster.
- SKLabelNode – Used to display text within a game, such as menu options, the prevailing score, or a “game over” message.
- SKShapeNode – Allows nodes to be created containing shapes defined using Core Graphics paths. If a sprite is required to display a circle, for example, the SKShapeNode class could be used to draw the circle as an alternative to texturing an SKSpriteNode with an image of a circle.
- SKEmitterNode – The node responsible for managing and displaying particle emitter-based special effects.
- SKVideoNode – Allows video playback to be performed within a game node.
- SKEffectNode – Allows Core Image filter effects to be applied to child nodes. A sepia filter effect, for example, could be applied to all child nodes of an SKEffectNode.
- SKCropNode – Allows the pixels in a node to be cropped subject to a specified mask.
- SKLightNode – The lighting node is provided to add light sources to a SpriteKit scene, including casting shadows when the light falls on other nodes in the same scene.
- SK3DNode – The SK3DNode allows 3D assets created using the Scene Kit Framework to be embedded into 2D Sprite Kit games.
- SKFieldNode – Applies physics effects to other nodes within a specified area of a scene.
- SKAudioNode – Allows an audio source using 3D spacial audio effects to be included in a Sprite Kit scene.
- SKCameraNode – Provides the ability to control the position from which the scene is viewed. The camera node may also be adjusted dynamically to create panning, rotation, and scaling effects.
Physics Bodies
Each node within a scene can have associated with it a physics body. Physics bodies are represented by the SKPhysicsBody class. Assignment of a physics body to a node brings a wide range of possibilities in terms of the behavior associated with a node. When a node is assigned a physics body, it will, by default, behave as though subject to the prevailing forces of gravity within the scene. In addition, the node can be configured to behave as though having a physical boundary. This boundary can be defined as a circle, a rectangle, or a polygon of any shape.
Once a node has a boundary, collisions between other nodes can be detected, and the physics engine is used to apply real-world physics to the node, such as causing it to bounce when hitting other nodes. The use of contact bit masks can be employed to specify the types of nodes for which contact notification is required.
The physics body also allows forces to be applied to nodes, such as propelling a node in a particular direction across a scene using either a constant or one-time impulse force. Physical bodies can also be combined using various join types (sliding, fixed, hinged, and spring-based attachments).
The properties of a physics body (and, therefore, the associated node) may also be changed. Mass, density, velocity, and friction are just a few of the properties of a physics body available for modification by the game developer.
Physics World
Each scene in a game has its own physics world object in the form of an instance of the SKPhysicsWorld class. A reference to this object, which is created automatically when the scene is initialized, may be obtained by accessing the physicsWorld property of the scene. The physics world object is responsible for managing and imposing the rules of physics on any nodes in the scene with which a physics body has been associated. Properties are available on the physics world instance to change the default gravity settings for the scene and also to adjust the speed at which the physics simulation runs.
|
You are reading a sample chapter from Building iOS 17 Apps using Xcode Storyboards.
Buy the full book now in eBook or Print format. The full book contains 96 chapters and 760 pages of in-depth information. |
Actions
An action is an activity performed by a node in a scene. Actions are the responsibility of SKAction class instances which are created and configured with the action to be performed. That action is then run on one or more nodes. An action might, for example, be configured to perform a rotation of 90 degrees. That action would then be run on a node to make it rotate within the scene. The SKAction class includes various action types, including fade in, fade out, rotation, movement, and scaling. Perhaps the most interesting action involves animating a sprite node through a series of texture frames.
Actions can be categorized as sequence, group, or repeating actions. An action sequence specifies a series of actions to be performed consecutively, while group actions specify a set of actions to be performed in parallel. Repeating actions are configured to restart after completion. An action may be configured to repeat several times or indefinitely.
Transitions
Transitions occur when a game changes from one scene to another. While it is possible to switch immediately from one scene to another, a more visually pleasing result might be achieved by animating the transition in some way. This can be implemented using the SKTransition class, which provides several different pre-defined transition animations, such as sliding the new scene down over the top of the old scene or presenting the effect of doors opening to reveal the new scene.
Texture Atlas
A large part of developing games involves handling images. Many of these images serve as textures for sprites. Although adding images to a project individually is possible, Sprite Kit also allows images to be grouped into a texture atlas. Not only does this make it easier to manage the images, but it also brings efficiencies in terms of image storage and handling. For example, the texture images for a particular sprite animation sequence would typically be stored in a single texture atlas. In contrast, another atlas might store the images for the background of a particular scene.
Constraints
Constraints allow restrictions to be imposed on nodes within a scene in terms of distance and orientation in relation to a point or another node. A constraint can, for example, be applied to a node such that its movement is restricted to within a certain distance of another node. Similarly, a node can be configured so that it is oriented to point toward either another node or a specified point within the scene. Constraints are represented by instances of the SKConstraint class and are grouped into an array and assigned to the constraints property of the node to which they are to be applied.
|
You are reading a sample chapter from Building iOS 17 Apps using Xcode Storyboards.
Buy the full book now in eBook or Print format. The full book contains 96 chapters and 760 pages of in-depth information. |
An Example Sprite Kit Game Hierarchy
To aid in visualizing how the various Sprite Kit components fit together, Figure 92-1 outlines the hierarchy for a simple game:
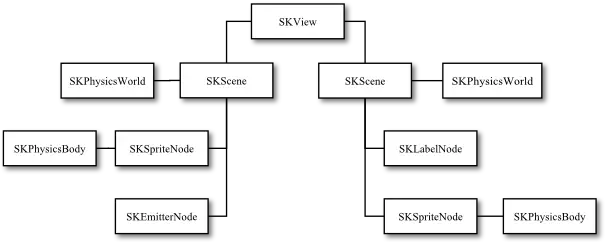
In this hypothetical game, a single SKView instance has two SKScene children, each with its own SKPhysicsWorld object. Each scene, in turn, has two node children. In the case of both scenes, the SKSpriteNode instances have been assigned SKPhysicsBody instances.
The Sprite Kit Game Rendering Loop
When working with Sprite Kit, it helps to understand how the animation and physics simulation process works. This process can best be described by looking at the Sprite Kit frame rendering loop.
Sprite Kit performs the work of rendering a game using a game rendering loop. Within this loop, Sprite Kit performs various tasks to render the visual and behavioral elements of the currently active scene, with an iteration of the loop performed for each successive frame displayed to the user.
Figure 92-2 provides a visual representation of the frame rendering sequence performed in the loop:
|
You are reading a sample chapter from Building iOS 17 Apps using Xcode Storyboards.
Buy the full book now in eBook or Print format. The full book contains 96 chapters and 760 pages of in-depth information. |
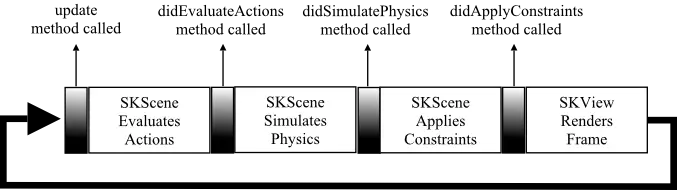
When a scene is displayed within a game, Sprite Kit enters the rendering loop and repeatedly performs the same sequence of steps as shown above. At several points in this sequence, the loop will make calls to your game, allowing the game logic to respond when necessary.
Before performing any other tasks, the loop begins by calling the update method of the corresponding SKScene instance. Within this method, the game should perform any tasks before the frame is updated, such as adding additional sprites or updating the current score.
The loop then evaluates and implements any pending actions on the scene, after which the game can perform more tasks via a call to the didEvaluateActions method.
Next, physics simulations are performed on the scene, followed by a call to the scene’s didSimulatePhysics method, where the game logic may react where necessary to any changes resulting from the physics simulation.
The scene then applies any constraints configured on the nodes in the scene. Once this task has been completed, a call is made to the scene’s didApplyConstraints method if it has been implemented. Finally, the SKView instance renders the new scene frame before the loop sequence repeats.
|
You are reading a sample chapter from Building iOS 17 Apps using Xcode Storyboards.
Buy the full book now in eBook or Print format. The full book contains 96 chapters and 760 pages of in-depth information. |
The Sprite Kit Level Editor
Integrated into Xcode, the Sprite Kit Level Editor allows scenes to be designed by dragging and dropping nodes onto a scene canvas and setting properties on those nodes using the SKNode Inspector. Though code writing is still required for anything but the most basic scene requirements, the Level Editor provides a useful alternative to writing code for some of the less complex aspects of SpriteKit game development. The editor environment also includes both live and action editors, allowing for designing and testing animation and action sequences within a Sprite Kit game.
Summary
Sprite Kit provides a platform for creating 2D games on iOS, tvOS, watchOS, and macOS. Games comprise an SKView instance with an SKScene object for each game scene. Scenes contain nodes representing the game’s characters, objects, and items. Various node types are available, all of which are subclassed from the SKNode class. In addition, each node can have associated with it a physics body in the form of an SKPhysicsBody instance. A node with a physics body will be subject to physical forces such as gravity, and when given a physical boundary, collisions with other nodes may also be detected. Finally, actions are configured using the SKAction class, instances of which are then run by the nodes on which the action is to be performed.
The orientation and movement of a node can be restricted by implementing constraints using the SKConstraint class.
The rendering of a Sprite Kit game takes place within the game loop, with one loop performed for each game frame. At various points in this loop, the app can perform tasks to implement and manage the underlying game logic.
Having provided a high-level overview in this chapter, the next three chapters will take a more practical approach to exploring the capabilities of Sprite Kit by creating a simple game.
|
You are reading a sample chapter from Building iOS 17 Apps using Xcode Storyboards.
Buy the full book now in eBook or Print format. The full book contains 96 chapters and 760 pages of in-depth information. |