
The previous chapter introduced the fundamental concepts of Android Jetpack and outlined the basics of modern Android app architecture. Jetpack defines a set of recommendations describing how an Android app project should be structured while providing a set of libraries and components that make it easier to conform to these guidelines to develop reliable apps with less coding and fewer errors.
To help reinforce and clarify the information provided in the previous chapter, this chapter will step through creating an example app project that uses the ViewModel component. The next chapter will further enhance this example by including LiveData and data binding support.
About the Project
In the chapter entitled A Java Android Studio Example App, a project named AndroidSample was created in which all of the code for the app was bundled into the main Activity class file. In the following chapter, an AVD emulator was created and used to run the app. While the app was running, we experienced first-hand the problems that occur when developing apps in this way when the data displayed on a TextView widget was lost during a device rotation.
This chapter will implement the same currency converter app, using the ViewModel component and following the Google app architecture guidelines to avoid Activity lifecycle complications.
Creating the ViewModel Example Project
When the AndroidSample project was created, the Empty Views Activity template was chosen as the basis for the project. However, the Basic Views Template template will be used for this project.
 |
Get the Updated BookYou are reading a sample chapter from an old edition of the Android Studio Essentials – Java Edition book. Purchase the fully updated Android Studio Iguana – Java Edition of this book in eBook or Print format. The full book contains 92 chapters and over 840 pages of in-depth information. |
Select the New Project option from the welcome screen and, within the resulting new project dialog, choose the Basic Views Activity template before clicking on the Next button.
Enter ViewModelDemo into the Name field and specify com.ebookfrenzy.viewmodeldemo as the package name. Before clicking on the Finish button, change the Minimum API level setting to API 26: Android 8.0 (Oreo) and the Language menu to Java.
Removing Unwanted Project Elements
As outlined in the A Guide to the Android Studio Layout Editor Tool, the Basic Views Activity template includes features not required by all projects. Before adding the ViewModel to the project, we first need to remove the navigation features, the second content fragment, and the floating action button as follows:
- Double-click on the activity_main.xml layout file in the Project tool window, select the floating action button, and tap the keyboard delete key to remove the object from the layout.
- Edit the MainActivity.java file and remove the floating action button code from the onCreate method as follows:
@Override
protected void onCreate(Bundle savedInstanceState) {
.
.
// binding.fab.setOnClickListener(new View.OnClickListener() {
// @Override
// public void onClick(View view) {
// Snackbar.make(view, "Replace with your own action", Snackbar.LENGTH_LONG)
// .setAnchorView(R.id.fab)
// .setAction("Action", null).show();
// }
// });
}Code language: JavaScript (javascript)- Within the Project tool window, navigate to and double-click on the app -> res -> navigation -> nav_graph.xml file to load it into the navigation editor.
- Within the editor, select the SecondFragment entry in the graph panel and tap the keyboard delete key to remove it from the graph.
- Locate and delete the SecondFragment.java and fragment_second.xml files.
- The final task is to remove some code from the FirstFragment class so that the Button view no longer navigates to the now non-existent second fragment when clicked. Edit the FirstFragment.java file and remove the code from the onViewCreated() method so that it reads as follows:
public void onViewCreated(@NonNull View view, Bundle savedInstanceState) {
    super.onViewCreated(view, savedInstanceState);

}Code language: Java (java)
Designing the Fragment Layout
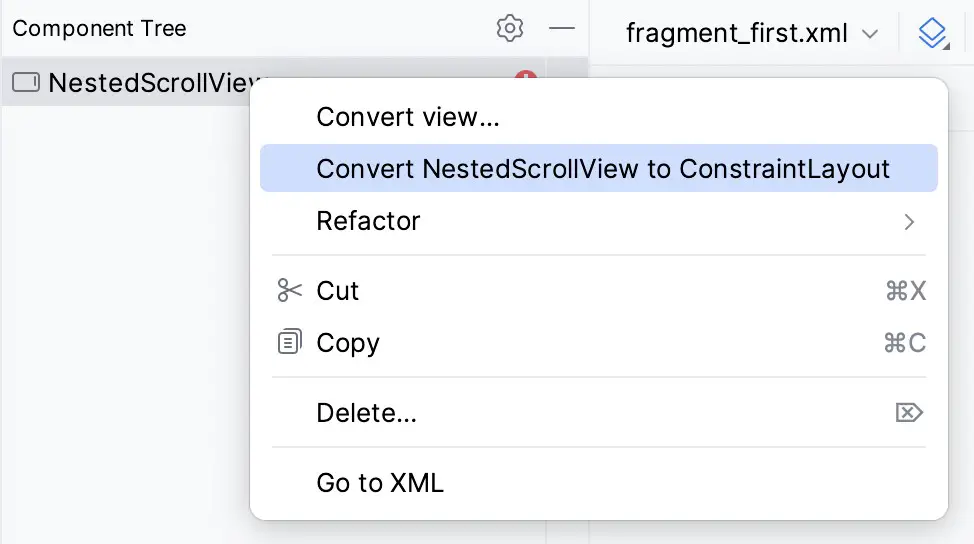
The next step is to design the layout of the fragment. First, locate the fragment_first.xml file in the Project tool window and double-click on it to load it into the layout editor. Once the layout has loaded, select and delete the existing Button, TextView, and ConstraintLayout components. Next, right-click on the NestedScrollView instance in the Component Tree panel and select the Convert NestedScrollView to ConstraintLayout menu option as shown in Figure 33-1, and accept the default settings in the resulting dialog:
Select the converted ConstraintLayout component and use the Attributes tool window to change the id to constraintLayout.
|
Get the Updated BookYou are reading a sample chapter from an old edition of the Android Studio Essentials – Java Edition book. Purchase the fully updated Android Studio Iguana – Java Edition of this book in eBook or Print format. The full book contains 92 chapters and over 840 pages of in-depth information. |
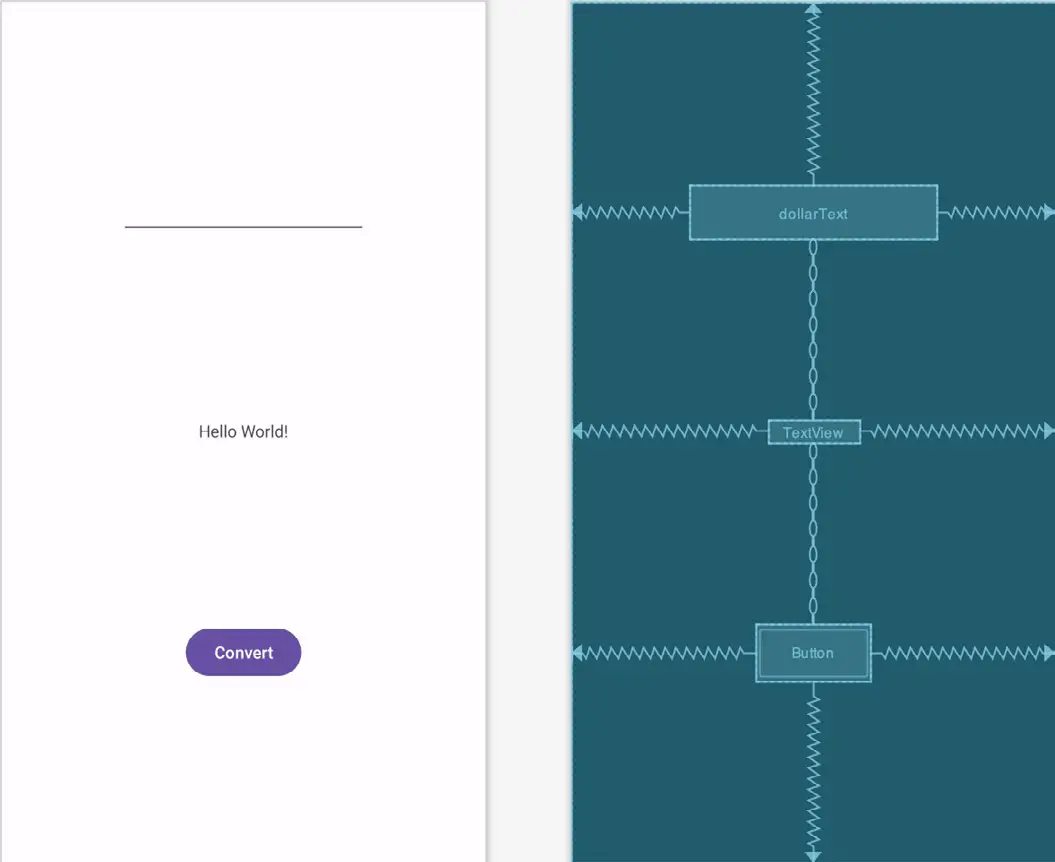
Add a new TextView, position it in the center of the layout, and change the id to resultText. Next, drag a Number (Decimal) view from the palette and position it above the existing TextView. With the view selected in the layout, refer to the Attributes tool window and change the id to dollarText.
Drag a Button widget onto the layout to position it below the TextView, and change the text attribute to read “Convert”. With the button still selected, change the id property to convertButton. At this point, the layout should resemble that illustrated in Figure 33-2 (note that the three views have been constrained using a vertical chain):
Finally, click on the warning icon in the top right-hand corner of the layout editor and convert the hard-coded strings to resources.
Implementing the View Model
With the user interface layout completed, the data model for the app needs to be created within the view model. Begin by locating the com.ebookfrenzy.viewmodeldemo entry in the Project tool window, right-clicking on it, and selecting the New -> Java Class menu option. Name the new class MainViewModel and press the keyboard enter key. Edit the new class file so that it reads as follows:
package com.ebookfrenzy.viewmodeldemo.ui.main;

import androidx.lifecycle.ViewModel;

public class  MainViewModel extends ViewModel {

    private static final Float rate = 0.74F;
    private String dollarText = "";
    private Float result = 0F;

    public void setAmount(String value) {
        this.dollarText = value;
        result = Float.parseFloat(dollarText)*rate;
    }

    public Float getResult()
    {
        return result;
    }
}Code language: Java (java)
The class declares variables to store the current dollar string value and the converted amount together with getter and setter methods to provide access to those data values. When called, the setAmount() method takes the current dollar amount as an argument and stores it in the local dollarText variable. The dollar string value is converted to a floating point number, multiplied by a fictitious exchange rate, and the resulting euro value is stored in the result variable. The getResult() method, on the other hand, returns the current value assigned to the result variable.
|
Get the Updated BookYou are reading a sample chapter from an old edition of the Android Studio Essentials – Java Edition book. Purchase the fully updated Android Studio Iguana – Java Edition of this book in eBook or Print format. The full book contains 92 chapters and over 840 pages of in-depth information. |
Associating the Fragment with the View Model
There needs to be some way for the fragment to obtain a reference to the ViewModel to access the model and observe data changes. A Fragment or Activity maintains references to the ViewModels on which it relies for data using an instance of the ViewModelProvider class.
A ViewModelProvider instance is created using the ViewModelProvider class from within the Fragment. When called, the class initializer is passed a reference to the current Fragment or Activity and returns a ViewModelProvider instance as follows:
ViewModelProvider viewModelProvider = new ViewModelProvider(this);Code language: Java (java)Once the ViewModelProvider instance has been created, an index value can be used to request a specific ViewModel class. The provider will then either create a new instance of that ViewModel class or return an existing instance, for example:
ViewModel viewModel = viewModelProvider.get(MainViewModel.class);Code language: Java (java)Edit the FirstFragment.java file and override the onCreate() method to set up the ViewModelProvider:
.
.
import androidx.lifecycle.ViewModelProvider;
import androidx.annotation.Nullable;
.
.
public class FirstFragment extends Fragment {

    private MainViewModel viewModel;
.
.
  @Override
    public void onCreate(@Nullable Bundle savedInstanceState) {
        super.onCreate(savedInstanceState);
        viewModel = new ViewModelProvider(this).get(MainViewModel.class);
    }
.
.Code language: Java (java)
With access to the model view, code can now be added to the Fragment to begin working with the data model.
|
Get the Updated BookYou are reading a sample chapter from an old edition of the Android Studio Essentials – Java Edition book. Purchase the fully updated Android Studio Iguana – Java Edition of this book in eBook or Print format. The full book contains 92 chapters and over 840 pages of in-depth information. |
Modifying the Fragment
The fragment class needs to be updated to react to button clicks and interact with the data values stored in the ViewModel. The class will also need references to the three views in the user interface layout to react to button clicks, extract the current dollar value, and display the converted currency amount.
In the chapter entitled “Creating an Example Android App in Android Studio”, the onClick property of the Button widget was used to designate the method to be called when the user clicks the button. Unfortunately, this property can only call methods on an Activity and cannot be used to call a method in a Fragment. To overcome this limitation, we must add some code to the Fragment class to set up an onClick listener on the button. This can be achieved in the onViewCreated() lifecycle method in the FirstFragment.java file as outlined below:
.
.
public class MainFragment extends Fragment {

    private MainViewModel viewModel;
.
.
    @Override
    public void onViewCreated(@NonNull View view, @Nullable Bundle savedInstanceState) {
        super.onViewCreated(view, savedInstanceState);

        binding.convertButton.setOnClickListener(v -> {

        });
    }
.
.
}Code language: PHP (php)
With the listener added, any code placed within the onClick() method will be called whenever the user clicks the button.
Accessing the ViewModel Data
When the button is clicked, the onClick() method needs to read the current value from the EditText view, confirm that the field is not empty, and then call the setAmount() method of the ViewModel instance. The method will then need to call the ViewModel’s getResult() method and display the converted value on the TextView widget.
Since LiveData has yet to be used in the project, it will also be necessary to get the latest result value from the ViewModel each time the Fragment is created.
|
Get the Updated BookYou are reading a sample chapter from an old edition of the Android Studio Essentials – Java Edition book. Purchase the fully updated Android Studio Iguana – Java Edition of this book in eBook or Print format. The full book contains 92 chapters and over 840 pages of in-depth information. |
Remaining in the FirstFragment.java file, implement these requirements as follows in the onViewCreated() method:
.
.
import java.util.Locale;
.
.
@Override
public void onViewCreated(@NonNull View view, @Nullable Bundle savedInstanceState) {
    super.onViewCreated(view, savedInstanceState);

    binding.resultText.setText(String.format(Locale.ENGLISH,"%.2f",
            viewModel.getResult()));

        binding.convertButton.setOnClickListener(v -> {
            if (!binding.dollarText.getText().toString().equals("")) {
                viewModel.setAmount(String.format(Locale.ENGLISH,"%s",
                        binding.dollarText.getText()));
                binding.resultText.setText(String.format(Locale.ENGLISH,"%.2f",
                        viewModel.getResult()));
            } else {
                binding.resultText.setText("No Value");
            }
        });
}Code language: Java (java)
Testing the Project
With this project development phase completed, build and run the app on the simulator or a physical device, enter a dollar value, and click the Convert button. The converted amount should appear on the TextView, indicating that the UI controller and ViewModel re-structuring is working as expected.
When the original AndroidSample app was run, rotating the device caused the value displayed on the resultText TextView widget to be lost. Repeat this test now with the ViewModelDemo app and note that the current euro value is retained after the rotation. This is because the ViewModel remained in memory as the Fragment was destroyed and recreated, and code was added to the onViewCreated() method to update the TextView with the result data value from the ViewModel each time the Fragment re-started.
While this is an improvement on the original AndroidSample app, much more can be done to simplify the project by using LiveData and data binding, both of which are the topics of the next chapters.
Summary
In this chapter, we revisited the AndroidSample project created earlier in the book and created a new version of the project structured to comply with the Android Jetpack architectural guidelines. The example project also demonstrated the use of ViewModels to separate data handling from user interface-related code. Finally, the chapter showed how the ViewModel approach avoids problems handling Fragment and Activity lifecycles.
|
Get the Updated BookYou are reading a sample chapter from an old edition of the Android Studio Essentials – Java Edition book. Purchase the fully updated Android Studio Iguana – Java Edition of this book in eBook or Print format. The full book contains 92 chapters and over 840 pages of in-depth information. |