Using MKDirections to get iOS 7 Map Directions and Routes
| Previous | Table of Contents | Next |
| Working with MapKit Local Search in iOS 7 | Using iOS 7 Event Kit to Create Date and Location Based Reminders |
Learn SwiftUI and take your iOS Development to the Next Level |
In this, the final chapter covering the MapKit framework, the use of the MKDirections class to obtain directions and route information from within an iOS 7 application will be explored. Having covered the basics, the MapSample tutorial application will be extended to make use of these features to draw routes on a map view and display turn-by-turn driving directions.
An Overview of MKDirections
The MKDirections class was introduced into iOS as part of the iOS 7 SDK and is used to generate directions from one geographical location to another. The start and destination points for the journey are passed to an instance of the MKDirections class in the form of MKMapItem objects contained within an MKDirectionsRequest instance. In addition to storing the start and end points, the MKDirectionsRequest class also provides a number of properties that may be used to configure the request, such as indicating whether alternate route suggestions are required and specifying whether the directions should be for driving or walking.
Once directions have been requested, the MKDirections class contacts Apple’s servers and awaits a response. Upon receiving a response, a completion handler is called and passed the response in the form of an MKDirectionsResponse object. Depending on whether or not alternate routes were requested (and assuming directions were found for the route), this object will contain one or more MKRoute objects. Each MKRoute object contains the distance, expected travel time, advisory notes and an MKPolyline that can be used to draw the route on a map view. In addition, each MKRoute object contains an array of MKRouteStep objects, each of which contains information such as the text description of a turn-by-turn step in the route and the coordinates at which the step is to be performed. In addition, each MKRouteStep object contains a polyline object for that step and the estimated distance and travel time.
The following code fragment demonstrates an example implementation of a directions request between the user’s current location and a destination location represented by an MKMapItem object named destination:
MKDirectionsRequest *request = [[MKDirectionsRequest alloc] init];

request.source = [MKMapItem mapItemForCurrentLocation];

request.destination = _destination;
request.requestsAlternateRoutes = YES;
MKDirections *directions =
     [[MKDirections alloc] initWithRequest:request];

[directions calculateDirectionsWithCompletionHandler:
       ^(MKDirectionsResponse *response, NSError *error) {
      if (error) {
	     // Handle Error
       } else {
            [self showRoute:response];
       }
}];
The resulting response can subsequently be used to draw the routes on a map view using the following code:
-(void)showRoute:(MKDirectionsResponse *)response
{
    for (MKRoute *route in response.routes)
    {
        [_routeMap
            addOverlay:route.polyline level:MKOverlayLevelAboveRoads];
    }
}
The above code simply iterates through the MKRoute objects in the response and adds the polyline for each route alternate as a layer on a map view. In this instance, the overlay is configured to appear above the road names on the map.
Although the layer is added to the map view in the above code, nothing will be drawn until the rendererForOverlay delegate method is implemented. This method creates an instance of the MKPolylineRenderer class and then sets properties such as the line color and width:
- (MKOverlayRenderer *)mapView:(MKMapView *)mapView rendererForOverlay:(id < MKOverlay >)overlay
{
      MKPolylineRenderer *renderer =
            [[MKPolylineRenderer alloc] initWithOverlay:overlay];
      renderer.strokeColor = [UIColor blueColor];
      renderer.lineWidth = 5.0;
      return renderer;
}
Note that this method will only be called if the class in which it resides is declared as the delegate for the map view object. For example:
_routeMap.delegate = self;
Finally, the turn-by-turn directions for each step in the route can be accessed as follows:
for (MKRouteStep *step in route.steps)
{
      NSLog(@"%@", step.instructions);
}
The above code simply outputs the text instructions for each step of the route. As previously discussed, additional information may also be extracted from the MKRouteStep objects as required by the application.
Having covered the basics of directions and routes in iOS 7, the MapSample application can be extended to put some of this theory into practice.
Adding Directions and Routes to the MapSample Application
The MapSample application will now be modified to include a Details button in the toolbar of the first scene. When selected, this button will display a table view listing the names and phone numbers of all locations matching the most recent local search operation. Selecting a location from the list will display another scene containing a map displaying the route from the user’s current location to the selected destination.
Adding the New Classes to the Project
Load the MapSample application project into Xcode and add a new class to represent the view controller for the table view. To achieve this, select the File -> New -> File… menu option and create a new iOS Cocoa Touch Objective-C class named ResultsTableViewController subclassed from UITableViewController with the With XIB for user interface option disabled. If the project was originally configured for the iPad select the Targeted for iPad option, otherwise leave this unselected.
Since the table view will also need a class to represent the table cells, add another new class to the project named ResultsTableCell, this time subclassing from the UITableViewCell class.
Repeat the above steps to add a third class named RouteViewController subclassed from UIViewController, also with the With XIB for user interface option disabled and the Targeted for iPad option set to match the original configuration of the project.
Configuring the Results Table View
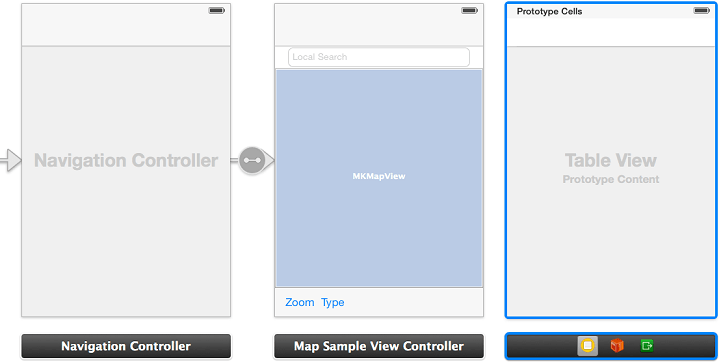
Select the Main.storyboard file and drag and drop a Table View Controller object from the Object Library so that it is positioned to the right of the existing MapSampleViewController scene in the storyboard canvas (Figure 72-1):
Figure 72-1
With the new controller selected, display the Identity Inspector and change the class from UITableViewController to ResultsTableViewController.
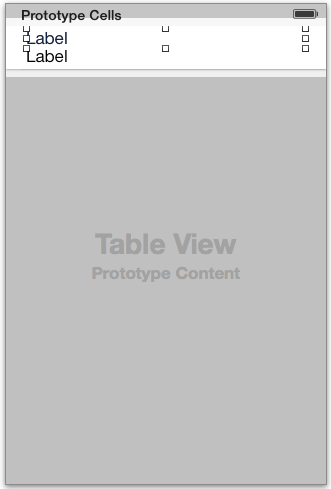
Drag and drop two Label objects onto the prototype cell and position them as outlined in Figure 72-2, making sure to stretch them so that they extend to the far right margin of the cell.
Figure 72-2
Display the Assistant Editor, make sure that it is displaying the ResultsTableCell.h file and then establish outlets from the two labels named nameLabel and phoneLabel respectively. On completion of these steps, the file should read as follows:
#import <UIKit/UIKit.h>

@interface ResultsTableCell : UITableViewCell
@property (strong, nonatomic) IBOutlet UILabel *nameLabel;
@property (strong, nonatomic) IBOutlet UILabel *phoneLabel;
@end
Next, edit the ResultsTableViewController.h file and modify it to import the ResultsTableView.h and MapKit files and to declare an array into which will be placed the MKMapItem objects representing the local search results:
#import <UIKit/UIKit.h>
#import <MapKit/MapKit.h>
#import "ResultsTableCell.h"

@interface ResultsTableViewController : UITableViewController
@property (strong, nonatomic) NSArray *mapItems;
@end
Next, edit the ResultsTableViewController.m file and modify the data source and delegate methods so that the table is populated with the location information when displayed (removing the #warning lines during the editing process):
#pragma mark - Table view data source

- (NSInteger)numberOfSectionsInTableView:(UITableView *)tableView
{
    // Return the number of sections.
    return 1;
}

- (NSInteger)tableView:(UITableView *)tableView numberOfRowsInSection:(NSInteger)section
{
    // Return the number of rows in the section.
    return _mapItems.count;
}

- (UITableViewCell *)tableView:(UITableView *)tableView cellForRowAtIndexPath:(NSIndexPath *)indexPath
{
    static NSString *CellIdentifier = @"resultCell";
    ResultsTableCell *cell =
        [tableView dequeueReusableCellWithIdentifier:CellIdentifier
            forIndexPath:indexPath];

    long row = [indexPath row];

    MKMapItem *item = _mapItems[row];

    cell.nameLabel.text = item.name;
    cell.phoneLabel.text = item.phoneNumber;

    return cell;
}
With the results table view configured, the next step is to add a segue from the first scene to this scene.
Implementing the Result Table View Segue
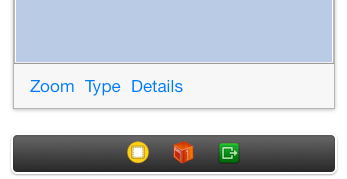
Select the Main.storyboard file and drag and drop an additional Bar Button item from the Object Library to the toolbar in the Map Sample View Controller scene. Double click on this new button and change the text to Details:
Figure 72-3
Click on the Details button to select it (it may be necessary to click twice since the first click will select the Toolbar). Establish a segue by Ctrl-clicking on the Details button and dragging to the Results Table View Controller and select push from the Action Segue menu.
Edit the MapSampleViewController.h file and import the ResultsTableViewController.h file as follows:
#import <UIKit/UIKit.h>
#import <MapKit/MapKit.h>
#import "ResultsTableViewController.h"

@interface MapSampleViewController : UIViewController
    <MKMapViewDelegate>

@property (strong, nonatomic) NSMutableArray *matchingItems;
@property (strong, nonatomic) IBOutlet UITextField *searchText;
@property (strong, nonatomic) IBOutlet MKMapView *mapView;
- (IBAction)zoomIn:(id)sender;
- (IBAction)changeMapType:(id)sender;
- (IBAction)textFieldReturn:(id)sender;
@end
When the segue is triggered, the mapItems property of the ResultsTableViewController instance needs to be updated with the array of locations created by the local search. This can be performed in the prepareForSegue method which needs to be implemented in the MapSampleViewController.m file as follows:
-(void)prepareForSegue:(UIStoryboardSegue *)segue sender:(id)sender
{
    ResultsTableViewController *destination =
               [segue destinationViewController];

    destination.mapItems = _matchingItems;
}
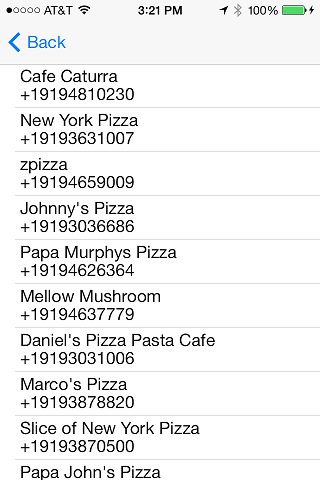
With the Results scene complete, compile and run the application on an iOS device. Perform a search for a business type that returns valid results before selecting the Details toolbar button. The results table should subsequently appear (Figure 72-4) listing the names and phone numbers for the matching locations:
Figure 72-4
Learn SwiftUI and take your iOS Development to the Next Level |
Adding the Route Scene
The last task is to display a second map view and draw on it the route from the user’s current location to the location selected from the results table. The class for this scene (RouteViewController) was added earlier in the chapter so the next step is to add a scene to the storyboard and associate it with this class.
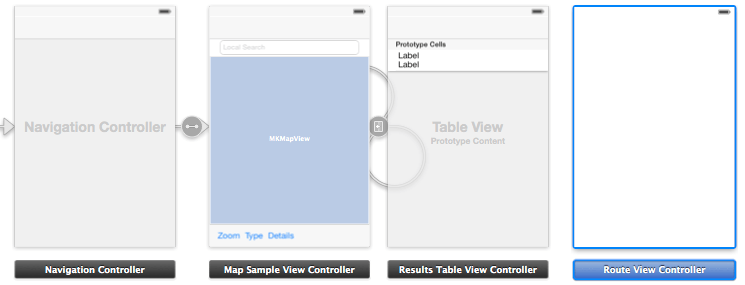
Begin by selecting the Main.storyboard file and dragging and dropping a View Controller item from the Object Library panel so that it is positioned to the right of the Results Table View Controller scene (Figure 72-5). With the new view controller scene selected (so that it appears with a blue border) display the Identity Inspector and change the class from UIViewController to RouteViewController.
Figure 72-5
Drag and drop a Map View object into the new view controller scene and position it so that it occupies the entire view. Display the Assistant Editor, make sure it is displaying the content of the RouteViewController.h file and then establish an outlet from the map view instance named routeMap. Remaining in the RouteViewController.h file, add an import directive to the MapKit headers, a property into which will be stored a reference to the destination map item and a declaration that this class implements the <MKMapViewDelegate> protocol. With these changes implemented, the file should read as follows:
#import <UIKit/UIKit.h>
#import <MapKit/MapKit.h>

@interface RouteViewController : UIViewController
   <MKMapViewDelegate>
@property (strong, nonatomic) IBOutlet MKMapView *routeMap;
@property (strong, nonatomic) MKMapItem *destination;
@end
Now that the route scene has been added, it is now time to add some code to it to generate and then draw the route on the map.
Getting the Route and Directions
Select the RouteViewController.m file and modify the viewDidLoad method to display the user’s current location, zoom in on the map region and set this class as the delegate for the map view:
- (void)viewDidLoad
{
   [super viewDidLoad];
   _routeMap.showsUserLocation = YES;
   MKUserLocation *userLocation = _routeMap.userLocation;
   MKCoordinateRegion region =
   MKCoordinateRegionMakeWithDistance(userLocation.location.coordinate,
          20000, 20000);
   [_routeMap setRegion:region animated:NO];
   _routeMap.delegate = self;
   [self getDirections];
}
Clearly, the last task performed by the viewDidLoad method is to call another method named getDirections which now also needs to be implemented:
- (void)getDirections
{
        MKDirectionsRequest *request =
           [[MKDirectionsRequest alloc] init];

    request.source = [MKMapItem mapItemForCurrentLocation];

        request.destination = _destination;
        request.requestsAlternateRoutes = NO;
        MKDirections *directions =
           [[MKDirections alloc] initWithRequest:request];

        [directions calculateDirectionsWithCompletionHandler:
     ^(MKDirectionsResponse *response, NSError *error) {
         if (error) {
             // Handle error
         } else {
             [self showRoute:response];
         }
     }];
}
This code largely matches that outlined at the start of the chapter, as is the case with the implementation of the showRoute method which also now needs to be implemented in the RouteViewController.m file along with the corresponding rendererForOverlay method:
-(void)showRoute:(MKDirectionsResponse *)response
{
    for (MKRoute *route in response.routes)
    {
        [_routeMap
           addOverlay:route.polyline level:MKOverlayLevelAboveRoads];

        for (MKRouteStep *step in route.steps)
        {
            NSLog(@"%@", step.instructions);
        }
    }
}

- (MKOverlayRenderer *)mapView:(MKMapView *)mapView rendererForOverlay:(id < MKOverlay >)overlay
{
    MKPolylineRenderer *renderer =
        [[MKPolylineRenderer alloc] initWithOverlay:overlay];
    renderer.strokeColor = [UIColor blueColor];
    renderer.lineWidth = 5.0;
    return renderer;
}
The showRoute method simply adds the polygon for the route as an overlay to the map view and then outputs the turn-by-turn steps to the console.
Establishing the Route Segue
All that remains to complete the application is to establish the segue between the results table cell and the route view. This will also require the implementation of the prepareForSegue method to pass the map item for the destination to the route scene.
Select the Main.storyboard file followed by the table cell in the Result Table View Controller scene (making sure the actual cell and not the view or one of the labels is selected). Ctrl-click on the prototype cell and drag the line to the Route View Controller scene. Release the line and select push from the resulting menu. Next, edit the ResultsTableViewController.h file and modify it to import the RouteViewController.h interface file:
#import <UIKit/UIKit.h>
#import <MapKit/MapKit.h>
#import "ResultsTableCell.h"
#import "RouteViewController.h"

@interface ResultsTableViewController : UITableViewController
@property (strong, nonatomic) NSArray *mapItems;
@end
Finally, edit the ResultsTableViewController.m file and implement the prepareForSegue method so that the destination property matches the location associated with the selected table row:
-(void)prepareForSegue:(UIStoryboardSegue *)segue sender:(id)sender
{
    RouteViewController *routeController =
        [segue destinationViewController];

    NSIndexPath *indexPath = [self.tableView indexPathForSelectedRow];

    long row = [indexPath row];

    routeController.destination = _mapItems[row];
}
Testing the Application
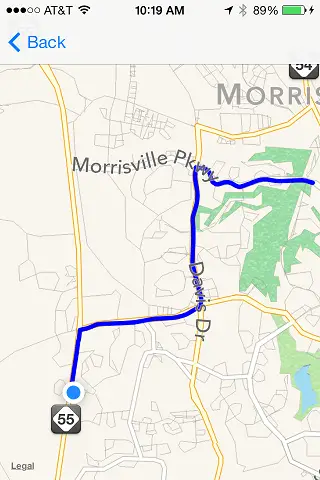
Build and run the application on a suitable iOS device and perform a local search. Once search results have been returned, select the Details button to display the list of locations. Selecting a location from the list should now cause a second map view to appear containing the user’s current location and the route from there to the selected location drawn in blue as demonstrated in Figure 72-6:
Figure 72-6
A review of the Xcode console should also reveal that the turn-by-turn directions have also been output, for example:
2013-08-07 10:19:27.737 MapSample[184:60b] Proceed to Parkview Dr
2013-08-07 10:19:27.739 MapSample[184:60b] At the end of the road, turn left onto Parkgreen Ln
2013-08-07 10:19:27.740 MapSample[184:60b] Turn right onto NC Highway 58
2013-08-07 10:19:27.742 MapSample[184:60b] Turn right onto High Meadow Rd
2013-08-07 10:19:27.743 MapSample[184:60b] Turn left onto Wilson Dr
2013-08-07 10:19:27.745 MapSample[184:60b] Turn right onto Morris Pkwy
2013-08-07 10:19:27.789 MapSample[184:60b] Arrive at the destination
Summary
The MKDirections class was added to the MapKit framework for iOS 7 and allows directions from one location to another to be requested from Apple’s mapping servers. Information returned from a request includes the text for turn-by-turn directions, the coordinates at which each step of the journey is to take place and the polygon data needed to draw the route as a map view overlay.
Learn SwiftUI and take your iOS Development to the Next Level |
| Previous | Table of Contents | Next |
| Working with MapKit Local Search in iOS 7 | Using iOS 7 Event Kit to Create Date and Location Based Reminders |


