Receiving Data from an iOS 9 Action Extension
| Previous | Table of Contents | Next |
| Creating an iOS 9 Action Extension | Accessing the iOS 9 Camera and Photo Library |
Learn SwiftUI and take your iOS Development to the Next Level |
The previous chapter covered the steps involved in creating an Action extension in iOS 9 that was designed to modify and display text content from a host app. In developing the extension, steps were taken to ensure that the modified content was returned to the host app when the user exited the extension. This chapter will work through the creation of an example host application that demonstrates how to receive data from an Action extension.
Creating the Example Project
Start Xcode and create a new Single View Application project named ActionHostApp with Swift selected as the programming language and the Devices menu set to Universal.
The finished application is going to consist of a Text View object and a toolbar containing a Share button that will provide access to the Change it Up Action extension created in the previous chapter. When the Action extension returns, the host app will receive the modified content from the extension and display it to the user.
Designing the User Interface
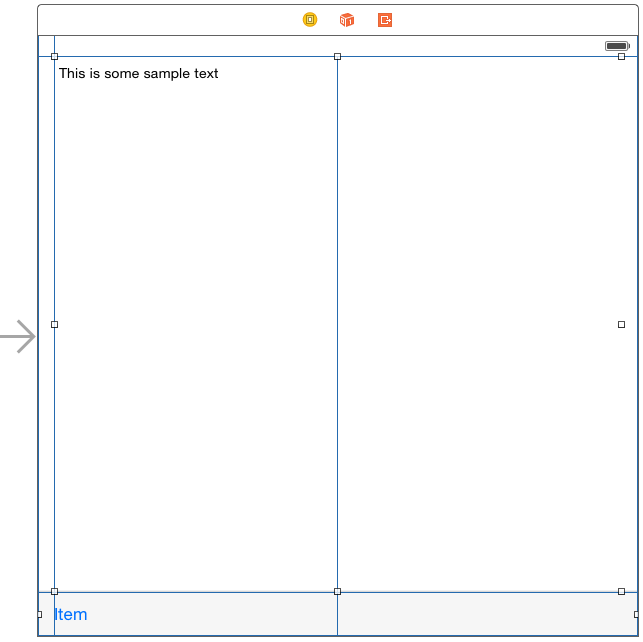
Locate and load the Main.storyboard file into the Interface Builder tool and drag and drop a Toolbar instance so that it is positioned along the bottom edge of the layout canvas. Next, drag and drop a Text View object onto the canvas and resize and position it so that it occupies the remaining space above the toolbar, stretching the view out horizontally until the blue margin guidelines appear. With the TextView object selected, display the Attributes Inspector and change the displayed text to “This is some sample text”.
Finally, hold down the keyboard Shift key and click on both the Text View and Toolbar views in the layout. Once both are selected, display the Resolve Auto Layout Issues menu and select the Reset to Suggested Constraints option. At this point the layout should resemble Figure 88-1:
Figure 88-1
Before proceeding, display the Assistant Editor panel and establish an outlet for the Text View object named myTextView.
Importing the Mobile Core Services Framework
The code added to this project will make use of a definition which is declared within the Mobile Core Services framework. To avoid compilation errors, this framework must be imported into the ViewController.swift file as follows:
import UIKit
import MobileCoreServices

class ViewController: UIViewController {
.
.
.
}
Learn SwiftUI and take your iOS Development to the Next Level |
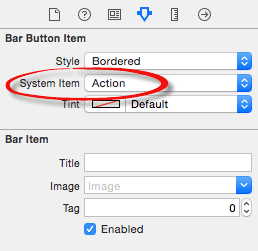
In order to be able to access the “Change it Up” Action extension from within this host application it will be necessary to implement a Share button. As the user interface currently stands, the toolbar contains a single button item displaying text which reads “Item”. To change this to a Share button, select it in the storyboard layout (keeping in mind that it may be necessary to click on it twice since the first click typically selects the parent toolbar rather than the button item).
With the button selected, display the Attributes Inspector and change the System Item menu from Custom to Action:
Figure 88-2
Once the change has been made, the button item should now have the standard appearance of an iOS Share button as shown in Figure 88-3:
Figure 88-3
Now that the button looks like a Share button, some code now needs to be added to display the activity view controller when it is tapped by the user. With the Assistant Editor displayed, Ctrl-click on the button and drag the resulting line to a suitable location within the ViewController.swift file. Release the line and create an Action outlet named showActionView. Once created, implement the code in this method so that it reads as follows:
@IBAction func showActionView(sender: AnyObject) {

    let activityViewController =
    	UIActivityViewController(activityItems:
           [myTextView.text], applicationActivities: nil)

    self.presentViewController(activityViewController,
           animated:true, completion: nil)

    activityViewController.completionWithItemsHandler = myHandler
}
The code within the method creates a new UIActivityViewController instance initialized with the content of the Text View in the user interface. The activity view controller is then displayed to the user. Finally, a method is assigned to act as the completion handler to be called when the Action extension returns control to the application. For now this can be implemented as a stub method as follows:
func myHandler(activityType:String?, completed: Bool,
    returnedItems: [AnyObject]?, error: NSError?) {
}
Learn SwiftUI and take your iOS Development to the Next Level |
Receiving Data from an Extension
When the user exits from an Action extension, the completion handler assigned to the UIActivityViewController instance will be called and passed a variety of parameters. One of those parameters will be an array of NSExtensionItem objects containing NSItemProvider objects that can be used to load any data that has been returned by the extension.
Using the same techniques described in the previous chapter (Creating an iOS 9 Action Extension) this data can be extracted by making the following changes to the myHandler method:
func myHandler(activityType:String?, completed: Bool,
      returnedItems: [AnyObject]?, error: NSError?) {

    if returnedItems!.count > 0 {

        let textItem: NSExtensionItem =
            returnedItems![0] as! NSExtensionItem


        let textItemProvider =
            textItem.attachments![0] as! NSItemProvider

        if textItemProvider.hasItemConformingToTypeIdentifier(
              kUTTypeText as String) {

              textItemProvider.loadItemForTypeIdentifier(
                    kUTTypeText as String,
                         options: nil,
                         completionHandler: {(string:
                         NSSecureCoding?, error: NSError!) ->
                          Void in
                            let newtext = string as! String
                            self.myTextView.text = newtext
                    })
            }
        }
    }
.
.
.
}
The method obtains a reference to the item provider and verifies that at least one item has been returned from the extension. A test is then performed to make sure that it is a text item. If the item is text based, the item is loaded from the extension and a completion handler used to assign the new text to the Text View object.
Testing the Application
Compile and run the application, select the Share button and launch the “Change it Up” extension. On returning to the host application the original text should now have been updated to be displayed in uppercase as modified within the extension.
Summary
In addition to providing an alternative view of the content in a host app, Action extensions can also be used to transform that content in some way. Not only can this transformation be performed and viewed within the extension, but a mechanism is also provided to return that modified content to the host app. By default, most host apps will not make use of the returned content. In reality adding this support is a relatively simple task which involves implementing a completion handler method to handle the content returned from the extension into the host app and assigning that handler method to be called when the activity view controller is displayed to the user.
Learn SwiftUI and take your iOS Development to the Next Level |
| Previous | Table of Contents | Next |
| Creating an iOS 9 Action Extension | Accessing the iOS 9 Camera and Photo Library |


