Google Sign-In Authentication using FirebaseUI Auth
| Previous | Table of Contents | Next |
| Testing and Customizing FirebaseUI Auth Authentication | Facebook Login Authentication using FirebaseUI Auth |
The next area of Firebase authentication to cover involves the use of the Google Sign-in provider. As with the email and password provider, Google Sign-in uses an email address and a password to authenticate a user. In this case, however, the user’s existing Google account credentials are used to create the user’s account.
In this chapter, the FirebaseAuth project will be extended to include Google Sign-in authentication.
Preparing the Project
Most of the steps required to configure the project to work with Google Sign-in as an authentication provider have already been performed in the chapter entitled Email/Password Authentication using FirebaseUI Auth. These steps include connecting the project to Firebase from within Android Studio and adding the build dependencies to the Gradle build files.
Two additional steps are, however, required in preparation for adding Google Sign-in support to the project. These consist of adding the SHA-1 fingerprint for the app to the Firebase project and enabling Google Sign-in as a supported sign-in method.
Obtaining the SHA-1 Fingerprint
As an Android developer you have two unique certificates used to sign the apps you develop using Android Studio. The debug certificate is used to sign apps that are being developed and tested. The release certificate on the other hand, is used to sign the apps when they are ready to be uploaded to the Google Play store.
These certificates take the form of SHA-1 fingerprints. By default the debug key is stored in a file named debug.keystore and located in the .android folder of your home directory. The release keystore file is created when you first generate the release APK file for your app and will be placed in a location of your choosing.
Ultimately, both the release and debug fingerprints will need to be added to the Firebase project with which the Android app is associated in order to use the Google Sign-in provider. At this stage, however, only the debug fingerprint needs to be added.
There are a number of options for obtaining the SHA-1 fingerprint, the most common of which is to use the keytool command-line tool included with the Android SDK. On Windows, open a command prompt window and execute the following command to obtain the debug key:
keytool -exportcert -list -v -alias androiddebugkey -keystore
		%USERPROFILE%\.android\debug.keystore
The command will prompt for the password which, by default, set to android.
Similarly, the following command can be executed within a terminal window on macOS or Linux to obtain the debug key:
keytool -exportcert -list –v -alias androiddebugkey -keystore
		~/.android/debug.keystore
The keytool utility may also be used to extract the release key as follows where <key name> and <path to keystore> are replaced by the name given to the key location of the release keystore file specified when the key was created:
keytool -exportcert -list -v
		-alias <key name> -keystore <path to keystore>
Before the key information is displayed, the utility will prompt for the password assigned to the keystore file. When prompted, enter the password specified when the keystore was generated.
The keytool command will output a number of values including the certificate fingerprints in a variety of encodings, one of which will be labeled SHA1, for example:
SHA1: 17:22:55:79:67:65:D6:3F:56:66:BF:A9:41:68:62:7A:CC:77:EE:A4
Copy the key so that it is ready to be pasted into the Firebase console.
Adding the SHA-1 Key to the Firebase Project
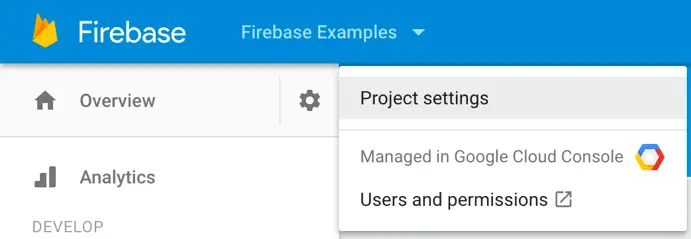
Having obtained at least the debug SHA-1 fingerprint, it must now be added to the project within the Firebase console. Open the console within a browser window and select the Firebase Examples project. Click on the settings gear icon to the right of the Overview title in the left-hand panel and select Project settings from the resulting menu:
Figure 6-1
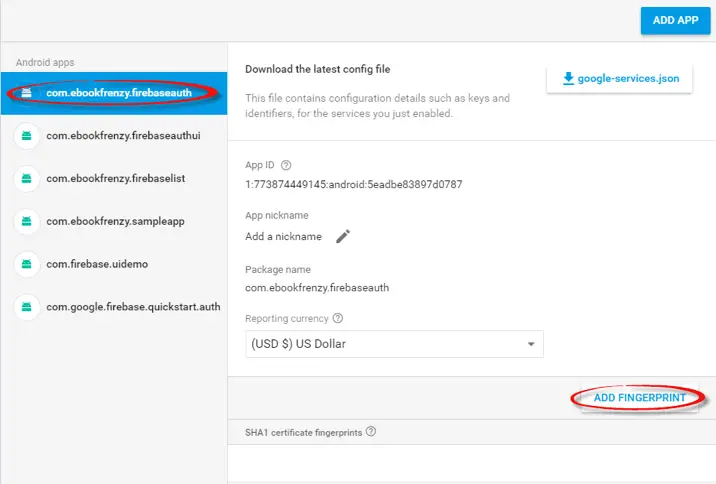
Within the settings screen, select the FirebaseAuth app from the list of apps, then locate and click on the Add Fingerprint button:
Figure 6-2
When the Add Fingerprint button is clicked, a dialog (Figure 6-3) will appear into which the SHA-1 fingerprint provided by the keytool utility must now be pasted. Once the key has been entered, click on the Save button and verify that the certificate is now listed in the settings screen.
Figure 6-3
Enabling the Google Sign-In Method
The next step to be performed within the Firebase console is to enable the Google Sign-In method within the project authentication settings. With the Firebase Examples project still selected within the console, select the Authentication option from the left-hand navigation panel followed by the Sign-In Method tab in the authentication panel.
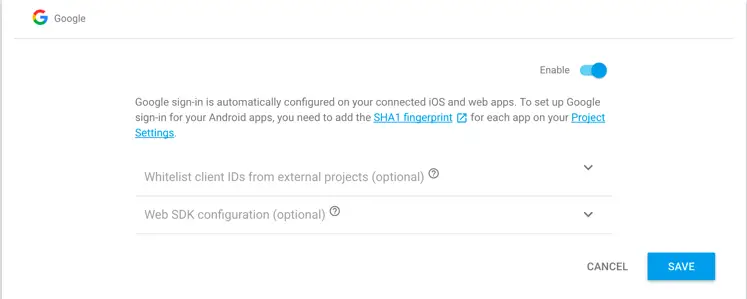
Within the list of providers select the Google entry and, in the resulting panel, turn on the Enable switch as illustrated in Figure 6-4 before clicking on the Save button:
Figure 6-4
If you have other Google based projects (such as other Android apps or even web or Chrome-based apps) that you would like to use the same authentication settings, add the client IDs here. To find the ID for a Google Cloud Platform project, open the Google Cloud console (https://console.cloud.google.com), select the project name and navigate to API Manager -> Credentials. A list of projects and respective client IDs will appear listed under OAuth 2.0 client IDs as illustrated in Figure 6-5:
Figure 6-5
Adding the Google Sign-In Provider within the App
The final step before testing the Google Sign-in provider is to add some code within the app. Load the FirebaseAuthActivity.java file into the Android Studio code editor, locate the getProvider() list method and modify it to add the Google provider:
private List<AuthUI.IdpConfig> getProviderList() {

    List<AuthUI.IdpConfig> providers = new ArrayList<>();

    providers.add(new
	AuthUI.IdpConfig.Builder(AuthUI.EMAIL_PROVIDER).build());
    providers.add(new
	AuthUI.IdpConfig.Builder(AuthUI.GOOGLE_PROVIDER).build());

    return providers;
}
For initial testing purposes, edit the authenticateUser() method to disable Smart Lock:
private void authenticateUser() {
    startActivityForResult(
            AuthUI.getInstance().createSignInIntentBuilder()
                    .setTheme(R.style.CustomTheme)
                    .setLogo(R.drawable.firelogo)
                    .setAvailableProviders(getProviderList())
                    .setIsSmartLockEnabled(false)
                    .build(),
            REQUEST_CODE);
}
Testing Google Sign-In
With the code changes completed, compile and run the Firebase app on a device or emulator. This time when the app launches the app will behave differently. Now that there are two possible sign-in providers, the app no longer immediately displays the initial email and password sign-in screen. Instead, the user is presented with two buttons allowing the sign-in to be performed using either email or Google. Note also, that the logo added in the previous chapter is displayed above the buttons:
Figure 6-6
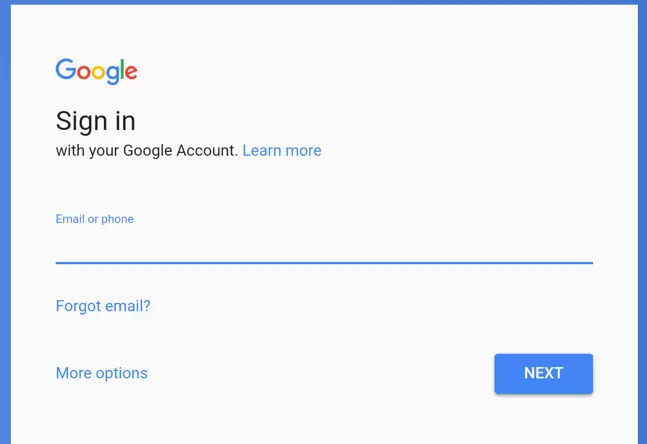
Begin the sign-in process by clicking on the Sign in with Google button. At this point the Firebase authentication process will check on the device to identify if any Google accounts have been configured. If no Google accounts have been set up on the device or emulator, the process of entering the credentials for an existing Google account, or creating a new one will begin, starting with the screen shown in Figure 6-7:
Figure 6-7
Once a valid Google account has been entered, or a new Google account created, those account details will be stored in the Firebase user database and the user signed into the app. The account will also be stored locally on the device or emulator and will be presented as a sign-in option next time the user needs to log into the app. On selecting a previously stored Google account, the user will be signed into the app without the need to enter the corresponding password.
If, on the other hand, one or more Google accounts have already been stored on the device, the authentication activity will present a list of those accounts.
Figure 6-8
When the user selects an account from the list, it is added to the Firebase user database and the user signed into the app. If the required account is not listed, the user can select the Add account option and proceed through the steps of either entering the credentials for a different Google account or creating a new Google account as illustrated in Figure 6-7 above.
If you are testing the app on a device or emulator on which no pre-existing Google accounts have been configured, one or more may also be added by launching the Settings app, selecting the Accounts category and clicking on the Add account button.
Having created a new account for the FirebaseAuth app using a Google Sign-in, select the Firebase Examples project in the Firebase console and review the list of users on the Authentication page. Any Google accounts added to the project will appear in the list with a Google “G” in the Provider column indicating that these users used the Google Sign-in provider to create the account:
Figure 6-9
Displaying the User’s Profile Photo
Unlike the email and password sign-in method, Google accounts are likely to have a profile photo, even if it is only the default photo comprised of a colored square containing the first letter of the user’s name. The FirebaseAuth app can now be enhanced to extract the profile photo from the account and display it within the SignedInActivity screen.
When a profile picture is available, a URL will be included within the current user’s FirebaseUser object along with the other information such as email address and display name. The photo URL can be extracted via a call to the getPhotoUrl() method of the FirebaseUser object.
Edit the SignedInActivity.java file, locate the onCreate() method and add code to check for the presence of a photo URL:
@Override
protected void onCreate(Bundle savedInstanceState) {
    super.onCreate(savedInstanceState);
    setContentView(R.layout.activity_signed_in);

    FirebaseUser currentUser = FirebaseAuth.getInstance().getCurrentUser();

    if (currentUser == null) {
        startActivity(new Intent(this, FirebaseAuthActivity.class));
        finish();
        return;
    }

    TextView email = (TextView) findViewById(R.id.email);
    TextView displayname = (TextView) findViewById(R.id.displayname);

    email.setText(currentUser.getEmail());
    displayname.setText(currentUser.getDisplayName());

    if (currentUser.getPhotoUrl() != null) {
        displayImage(currentUser.getPhotoUrl());
    }
}
If the method identifies the presence of a photo URL, that URL is passed to a method named displayImage(). It will be the responsibility of this method to download the image using the provided URL and display it on the ImageView object within the SignedInActivity layout. Remaining within the SignedInActivity.java file, add the code to download and display the photo image so that it reads as follows:
package com.ebookfrenzy.firebaseauth;

import android.content.Intent;
import android.support.annotation.NonNull;
import android.support.v7.app.AppCompatActivity;
import android.os.Bundle;
import android.view.View;
import android.widget.TextView;
import android.graphics.Bitmap;
import android.graphics.BitmapFactory;
import android.net.Uri;
import android.os.AsyncTask;
import android.widget.ImageView;

import java.io.InputStream;

import com.firebase.ui.auth.AuthUI;
import com.google.android.gms.tasks.OnCompleteListener;
import com.google.android.gms.tasks.Task;
import com.google.firebase.auth.FirebaseAuth;
import com.google.firebase.auth.FirebaseUser;

public class SignedInActivity extends AppCompatActivity {
.
.
    void displayImage(Uri imageUrl) {

        // show The Image in a ImageView
        new DownloadImageTask((ImageView) findViewById(R.id.imageView))
                .execute(imageUrl.toString());
    }

    private class DownloadImageTask extends AsyncTask<String, Void, Bitmap> {
        ImageView bmImage;

        public DownloadImageTask(ImageView bmImage) {
            this.bmImage = bmImage;
        }

        protected Bitmap doInBackground(String... urls) {
            String urldisplay = urls[0];
            Bitmap bitmap = null;
            try {
                InputStream in = new java.net.URL(urldisplay).openStream();
                bitmap = BitmapFactory.decodeStream(in);
            } catch (Exception e) {
                e.printStackTrace();
            }
            return bitmap;
        }

        protected void onPostExecute(Bitmap result) {
            bmImage.setImageBitmap(result);
        }
    }
.
.
}
The added code runs an asynchronous task in the background to download the image data from the photo URL. Once the download completes, the downloaded image data is converted to a bitmap and displayed on the ImageView object.
Compile and run the app and once again sign in using a Google account. When the SignedInActivity screen appears the profile picture associated with the account should be displayed on the ImageView object:
Figure 6-10
Finally, edit the onCreate() method within the FirebaseAuthActivity.java file to re-enable Smart Lock:
private void authenticateUser() {
    startActivityForResult(
            AuthUI.getInstance().createSignInIntentBuilder()
                    .setTheme(R.style.CustomTheme)
                    .setLogo(R.drawable.firelogo)
                    .setProviders(getProviderList())
                    .setIsSmartLockEnabled(true)
                    .build(),
            REQUEST_CODE);
}
The next time the app is run, the Smart Lock dialog will appear providing the option to sign in using account credentials saved for both Google Sign-in and email/password based accounts.
Summary
Firebase authentication provides a number of different ways in which a user’s identity can be established. While the previous chapter explored the use of email and password authentication, this chapter has covered the use of Google account credentials to authenticate users.
The first step in implementing Google Sign-in as an authentication option is to add your developer debug certificate SHA-1 key to the Firebase project containing the app and enable the Google Sign-in method via the Firebase console. Once these steps are completed, all that remains is to add Google as a supported provider while performing the initialization of FirebaseUI Auth within the app code.
When Google Sign-in is fully implemented and enabled, users will be able to create new accounts for the app based on existing Google accounts. Users without a Google account are also given the option to create a new one as part of the signup process for the app.
| Previous | Table of Contents | Next |
| Testing and Customizing FirebaseUI Auth Authentication | Facebook Login Authentication using FirebaseUI Auth |


